Implementing Authentication


In this book, you use ASDM to implement authentication on the ASA/PIX Security Appliance. The following list of authentication tasks are performed:

  • Secure Telnet security appliance access

  • Secure SSH security appliance access

  • Secure ASDM/HTTPS security appliance access

  • Secure inbound and outbound web users (optional)

  • Authorize security appliance users

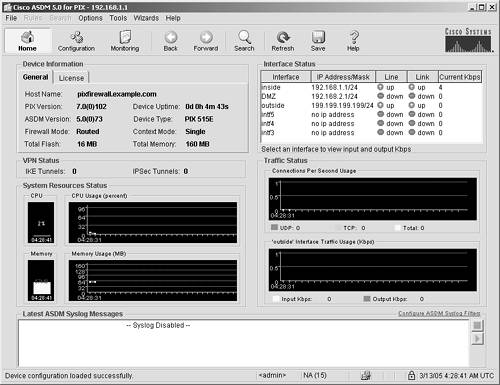
Securing Access to the Security Appliance

Now that you have a basic understanding of both authentication and its importance, you can start ASDM and follow these procedures to deploy authentication.

This step-by-step procedure leverages off of the configuration work that you have already done on your ASA/PIX Security Appliance in Chapter 5, "Deploying Secure Internet Connectivity," and Chapter 6, "Deploying Web and Mail Services."

Start ASDM

To connect to the ASA/PIX Security Appliance using ASDM and then to authenticate access to your security appliance, follow these steps:

Step 1.

Use the same PC that you configured and connected in Chapter 5 and launch ASDM by entering https://192.168.1.1./admin.

Step 2.

Enter the appropriate responses to certificate authentications and usernames and passwords. After you do so, the ASDM home page displays. (See Figure 7-1.)

Figure 7-1. ASDM Home


Step 3.

Because you are using the LOCAL security appliance database, you must set that parameter before you configure users or services. Access the following Authentication panel, as follows:

Configuration > Features > Device Administration > Administration > AAA Access > Authentication

Step 4.

On the Administration screen, click Enable.

Step 5.

Select LOCAL from the Server Group.

Step 6.

Click Apply to save the changes.

Securing Telnet Access

Do not use Telnet to administer your security appliance. As stated several times in this book, Telnet is a clear text protocol. Therefore, it sends usernames and passwords on the network in clear text. The same occurs if you use Telnet for Line mode configuration of your security appliance, in that the configuration of the security appliance would be passed on the network in clear text. In such a case, hackers can easily intercept the information and thereby gain unlimited access to your security appliance.

CAUTION

From a security best practices perspective, do not use Telnet to administer your security appliance. You cannot secure the Telnet protocol unless it is used in conjunction with virtual private networks (VPNs), which is beyond the scope of this book. The "SAFE Blueprint" white paper at http://www.cisco.com/go/safe has some recommendations for using VPN as a means to protect clear text management protocols.


Securing SSH Access

Secure Shell (SSH) is a utility that you can safely use to manage your security appliance. It is a Line mode tool; therefore, it is important to be familiar with the native ASA/PIX version 7 command set if you elect to use SSH. If you aren't familiar with the command set, ASDM is the option you would want to use.

To set up SSH, just in case you have this requirement in your network deployment, follow these steps:

Step 1.

Before you can authenticate an SSH user, you must generate an RSA key pair on the ASA/PIX. Navigate to Configuration > Features > Device Administration > Certificate > Key Pair.

Step 2.

Click Add to generate a key. In the Add Key panel, click Generate Now.

Step 3.

You now need to create a user to log in to the ASA/PIX. Navigate to Configure > Features > Device Administration > Administration > User Accounts.

Step 4.

Click Add and create a username and password. Remember to use security best practices and create a difficult-to-guess username and password. Include uppercase, lowercase, numeric, and special characters. Make sure that both the username and password are at least eight characters in length. If you are configuring a user for security appliance management access (ASDM), you need to select a privilege level of 15.

Step 5.

Navigate to the Configuration > Device Administration > Administration > Secure Shell panel.

The default parameters on this page are SSH version 1 and a timeout of 5 minutes. Most implementations would keep this as default. However, if you know that you are using a certain version of SSH, you can set the version value appropriately. You can always change the timeout to a value that suits you. Don't set the timeout value too low, however. If you leave your SSH session for a long period of time, you don't want the session to stay active for long because someone could sit down at your station and have access to your ASA/PIX.

Step 6.

Click Add to configure the IP address of a PC that can use SSH to connect to your ASA/PIX.

For this example, the added device has the address 192.168.1.2 on the inside interface of the ASA/PIX. (See Figure 7-2.)

Figure 7-2. SSH Add Panel


Step 7.

Click OK. When you return to the main panel, click Apply to enable the changes.

You should now be able to access the ASA/PIX Security Appliance, using SSH, from 192.168.1.2 with the username and password you created.

Securing ASDM/HTTPS Access

The preferred method of access for the ASA/PIX Security Appliance running version 7 is ASDM. It is both secure and easy to use. In this section, you configure the security appliance to add ASDM users. You have already configured the security appliance to use ASDM, but the steps are repeated here again briefly for emphasis:

Step 1.

You need to create a user to log in to the ASA/PIX. Navigate to Configure > Features > Device Administration > Administration > User Account. Click Add and create a username and password. Again, use a difficult-to-guess username and password that includes uppercase, lowercase, numeric, and special characters. Make sure that both the username and password are at least eight characters in length. Also, because this user is an ASDM user, you must select privilege level 15.

Step 2.

Now, you need to add IP addresses of the PCs you are allowing to access your ASA/PIX using ASDM. Navigate to Configuration > Device Administration > Administration > ASDM > HTTPS.

Step 3.

Click Add and enter the interface, IP address, and mask of the device you are allowing to use ASDM. Click OK, and then click Apply to save the changes.

Step 4.

To verify that the changes worked, go to the device you just configured to use ASDM. Access ASDM through the browser as normal. This time, however, when you are prompted for the username and password, enter the username and password you created in the preceding steps. Respond appropriately to the certificate warnings. If done correctly, you should have access to the ASA/PIX through ASDM from this device.

Monitoring Security Appliance Access

Monitoring system access is a critical task for any network administrator. The ASA/PIX Security Appliance offers several options for keeping track of who is logged on to your system.

If you navigate to Monitoring > Features > Administration, you will see a list of all the ASA/PIX access methods, including the following:

  • ASDM/HTTPS

  • Telnet

  • Secure Shell

  • Authenticated users

  • AAA servers

By just clicking any of these categories, you can immediately see who is connected to your system and the method by which they established their connection.

Syslog can also be an excellent tool to see who has connected to your system. However, you would need to write a script or utility to search the syslog file for keywords that indicate that someone has connected or disconnected from your system.

AAA Authentication Access

By using the AAA features of the ASA/PIX Security Appliance, you can limit the hours that users can log on to your ASA/PIX. AAA also has utilities that enable an administrator to see what time a user logged on or off and, in some cases, what the user did while on the system. Adding an AAA server is an additional expense, but considering the additional features and reporting, many customers have little problem justifying the purchase. You can find out more about AAA on the Cisco website at http://www.cisco.com/go/acs.

Authentication for Inbound and Outbound Services

Another compelling feature of the ASA/PIX Security Appliance is the ability to authenticate users before you allow them to access certain inbound and outbound services. For example, if you have a website on your demilitarized zone (DMZ) that is to be accessed only by a few choice users, the ASA/PIX Security Appliance can prompt anyone trying to access that site for a username and password before allowing access.

The following are the services that can be authenticated:

  • HTTP Web traffic

  • HTTPS Encrypted web traffic

  • Telnet Text-based terminal traffic

  • FTP File Transfer Protocol

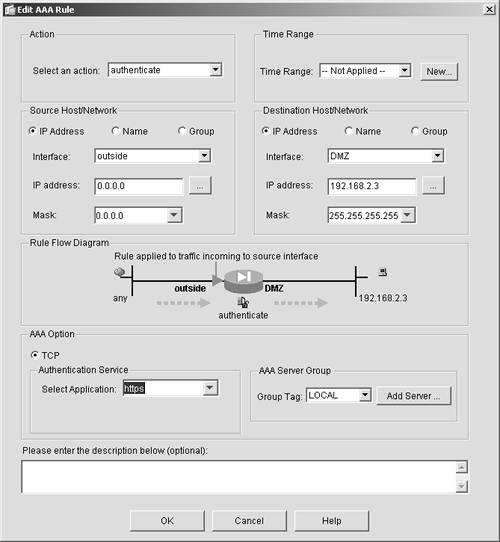
To deploy this authentication, you must complete the following steps. In this example, HTTPS is used and users are authenticated before they can access your web server at 199.199.199.202:

Step 1.

Navigate to Configure > Features > Device Administration > Administration > User Accounts to create a username and password.

Step 2.

Click Add and create a username and password. Remember to use security best practices and create a difficult-to-guess username and password. Include uppercase, lowercase, numeric, and special characters. Make sure that both the username and password are at least eight characters in length.

Step 3.

To enable authentication, navigate to Configure > Features > Security Policy and click the AAA Rules button. Click Add to add a rule. The panel shown in Figure 7-3 displays.

Figure 7-3. AAA Access Panel


Step 4.

Choose Outside as the source network.

Step 5.

Choose DMZ as the destination network.

Step 6.

Click the pop-up next to the Address text box and choose 192.168.2.3, which is your web server.

Step 7.

Click the Application pull-down and choose HTTPS.

Step 8.

Choose LOCAL from the Group pull-down.

Step 9.

Click OK, and then click Apply to save the changes.

Step 10.

To test this feature, go to a machine on the outside of your network. Enter the address https://199.199.199.203 in your browser. You should be prompted with a standard username and password prompt. Enter the user credentials from your local database, and you should be authenticated.

You can authenticate outbound users in the same manner, except, when you create the AAA rule, choose Inside as the source and Outside as the destination.

Outbound URL Filtering for Public Services

As discussed in Chapter 4, "Exploring the Adaptive Security Device Manager," in the ASDM overview, outbound URL authentication can be a powerful security and network bandwidth-management tool. You can block access to certain websites or classes of websites and thereby limit access to certain sites such as porn, free download, and file-sharing sites, which in turn will help reduce the following threats to your hosts:

  • The spread of spyware

  • Pop-up advertisements

  • Trojan downloads

  • Web viruses

  • Downloading of dangerous software

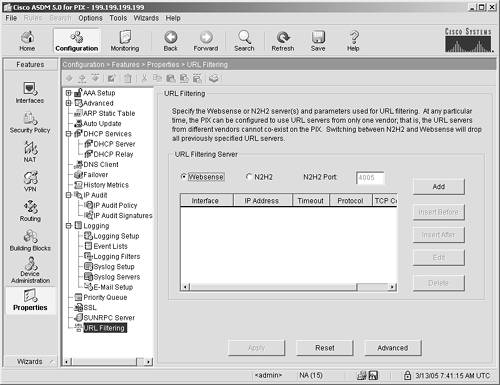
The ASA/PIX version 7 operating system supports URL filtering from several different vendors. This feature enables you to stop access to several different classes of websites that might be responsible for the spread of spyware, Trojans, web viruses, and data-mining cookies. Examples of classes of websites that might be blocked by this software include the following:

  • Hacker sites

  • Music download sites

  • Pornography sites

  • Sports sites

NOTE

The classes of sites listed here are not considered bad sites, per se. But they represent some of the classes of sites that could be blocked using URL filtering. Unfortunately, many web servers that fit in these classes have chosen to do things such as download spyware, data miners, and Trojans. The result of this activity has led to client computers experiencing excessive pop-up ads, significantly slower CPUs, and usage of unnecessary network bandwidth.


URL blocking servers enable you to block classes of URLs that you deem dangerous or inappropriate. If you elect to block a class called "hacker sites," the software automatically blocks several hundred URLs that are known hacker sites. You can also use URL blocking to improve bandwidth usages in some businesses (especially if users previously had been downloading large files such as MP3s, WAVs, MPEGs, or streaming audio). You can deploy URL blocking to reduce these traffic classes.

CAUTION

A few states in the United States consider URL blocking illegal. Check with a legal representative before deploying this feature.


Step 1.

You can deploy URL blocking by navigating to the Configuration > Features > Properties > URL Filtering panel. You can select the vendor on that panel and then click Add. On the Add subpanel, you can choose the IP address of the server running the URL-filtering software and the protocol supported by that server. (See Figure 7-4.)

Figure 7-4. URL Filtering Panel


Step 2.

Click OK and Apply to save your changes to the ASA/PIX Security Appliance.

Step 3.

After defining the URL server, you need to define a filter to tell the security appliance which traffic to block and what to do if the URL server goes down. Navigate to Policy > Filter Rules.

Step 4.

Set the Select Action to HTTP.

Step 5.

Set the Host/Source Network to Inside.

Step 6.

Set the Host/Destination Network to Outside.

Step 7.

If you want to allow traffic flow if the URL server is down, check the box Allow Outbound Traffic If the URL Server Is Not Available. (See Figure 7-5.)

Figure 7-5. Add Filter Rule


VPN Authentication

VPN authentication is discussed in Chapter 11, "Deploying VPNs."


Securing Your Business with Cisco ASA and PIX Firewalls
ISBN: 1587052148
EAN: 2147483647
Year: 2006
Pages: 120
Authors: Greg Abelar

flylib.com © 2008-2017.
If you may any questions please contact us: flylib@qtcs.net