Section 12.3. Hosting Target Boards
12.3. Hosting Target BoardsReferring back to Figure 12-1, you will notice an Ethernet connection from the target-embedded board to the host-development system. This is not strictly necessary, and, indeed, some smaller embedded devices do not have an Ethernet interface. However, this is the exception rather than the rule. Having an Ethernet connection available on your target board is worth its cost in silicon! While developing the kernel, you will compile and download kernels to your embedded board many times. Many embedded development systems and bootloaders have support for TFTP and assume that the developer will use it. TFTP is a lightweight protocol for moving files between a TFTP server and TFTP client, similar to FTP. Using TFTP from your bootloader to load the kernel will save you countless hours waiting for serial downloads even at higher serial baud rates. And loading your ramdisk can take much longer because ramdisk images can grow to many tens of megabytes and more, depending on your requirements. The investment in your time to configure and use TFTP will surely pay off and is highly recommended. There are very few designs that can't afford the real estate to include an Ethernet port during development, even if it is depopulated for production. 12.3.1. TFTP ServerConfiguring TFTP on your Linux development host is not difficult. Of course, the details might vary, depending on which Linux distribution you choose for your development workstation. The guidelines presented here are based on Red Hat and Fedora Core Linux distributions. TFTP is a TCP/IP service that must be enabled on your workstation. To enable TFTP service, you must instruct your server to respond to incoming TFTP packets and spawn your TFTP server. On many Linux distributions, this is done by editing a configuration file used by the xinetd Internet superserver. For example, on the Red Hat and Fedora desktop Linux distributions, this file is /etc/xinetd.d/tftp. Listing 12-4 contains a TFTP configuration from a Fedora Core 2 development workstation to enable the TFTP service. It has been slightly rearranged to fit the page. Listing 12-4. TFTP Configuration
In this typical setup, the TFTP service has been enabled (disable = no) and configured to serve files located in this workstation's /tftpboot directory. When the xinetd Internet superserver receives an incoming TFTP request, it consults this configuration and spawns the server specified (/usr/sbin/in.tftpd). The command line arguments specified by server_args are passed to the in.tftpd process. In this case, the -s switch tells in.tftpd to switch to the specified directory (/tftpboot), and the -c flag allows the creation of new files. This is useful to write files to the server from the target. Consult the documentation that came with your desktop distribution for details specific to your environment. 12.3.2. BOOTP/DHCP ServerHaving a DHCP server on your development host simplifies the configuration management for your embedded target. We have already established the reasons why an Ethernet interface on your target hardware is a good idea. When Linux boots on your target board, it needs to configure the Ethernet interface before the interface will be useful. Moreover, if you are using an NFS root mount configuration on your target board, Linux needs to configure your target's Ethernet interface before the boot process can complete. We covered NFS in detail in Chapter 9, "File Systems." In general, Linux can use two methods to initialize its Ethernet/IP interface during boot:
For obvious reasons, the latter choice is the most flexible. DHCP or BOOTP is the protocol your target and server use to accomplish the automatic detection of network settings. For details of the DHCP or BOOTP protocols, see Section 12.4.1 at the end of this chapter. A DHCP server controls the IP address assignments for IP subnets for which it has been configured, and for DHCP or BOOTP clients that have been configured to participate. A DHCP server listens for requests from a DHCP client (such as your target board), and assigns addresses and other pertinent information to the client as part of the boot process. A typical DHCP exchange (see Listing 12-5) can be examined by starting your DHCP server with the -d debug switch and observing the output when a target machine requests configuration. Listing 12-5. Typical DHCP Exchange
The sequence starts with the client (target) transmitting a broadcast frame attempting to discover a DHCP server. This is shown by the DHCPDISCOVER message shown. The server responds (if it has been so configured and enabled) by offering an IP address for the client. This is evidenced by the DHCPOFFER message. The client then responds by testing this IP address locally. The testing includes sending the DHCPREQUEST packet to the DHCP server, as shown. Finally, the server responds by acknowledging the IP address assignment to the client, thus completing the automatic target configuration. It is interesting to note that a properly configured client will remember the last address it was assigned by a DHCP server. The next time it boots, it will skip the DHCPDISCOVER stage and proceed directly to the DHCPREQUEST stage, assuming that it can reuse the same IP address that the server previously assigned. A booting Linux kernel does not have this capability and emits the same sequence every time it boots. Configuration of your host's DHCP server is not difficult. As usual, our advice is to consult the documentation that came with your desktop Linux distribution. On a Red Hat or Fedora Core distribution, the configuration entry for a single target might look like Listing 12-6. Listing 12-6. Example DHCP Server Configuration
This is a simple example, meant only to show the kind of information you can pass to your target system. There is a one-to-one mapping of the target MAC address to its assigned IP address. In addition to its fixed IP address, you can pass other information to your target. In this example, the default router and DNS server addresses are passed to your target, along with the filename of a file of your choice, and a root path for your kernel to mount an NFS root mount from. The filename might be used by your bootloader to load a kernel image from your TFTP server. You can also configure your DHCP server to hand out IP addresses from a predefined range, but it is very convenient to use a fixed address such as that shown in Listing 12-6. You must enable the DHCP server on your Linux development workstation. This is typically done through your main menu or via the command line. Consult the documentation for your own Linux distribution for details suitable for your environment. For example, to enable the DHCP server on a Fedora Core 2 Linux distribution, simply type the following command from a root command prompt: $ /etc/init.d/dhcpd start (or restart)You must do this each time you start your development workstation, unless you configure it to start automatically. Many nuances are involved with installing a DHCP server, so unless your server is on a private network, it is advisable to check with your system administrator before going live with your own. If you coexist with a corporate LAN, it is very possible that you will interfere with its own DHCP service. 12.3.3. NFS ServerUsing an NFS root mount for your target board is a very powerful development tool. Some of the advantages of this configuration for development are:
Setting up an NFS server varies depending on the desktop Linux distribution you are using. As with the other services described in this chapter, you must consult the documentation for your own Linux distribution for the details appropriate to your configuration. The NFS service must be started from either your startup scripts, a graphical menu, or the command line. For example, the command to start NFS services from a root command prompt for a Fedora Core 2 Linux desktop is as follows: $ /etc/init.d/nfs start (or restart)You must do this each time you start your desktop Linux workstation. (This and other services can be started automatically on bootingconsult the documentation for your desktop Linux distribution.) In addition to enabling the service, your kernel must be compiled with support for NFS. Although DHCP and TFTP are both user space utilities, NFS requires kernel support. This is true on both your development workstation and your target board. Figure 12-2 illustrates the configuration options for NFS in the kernel. Notice that there are configuration options for both NFS server and client support. Note also the option for root file system on NFS. Your target kernel must have this option configured for NFS root mount operation. Figure 12-2. NFS kernel configuration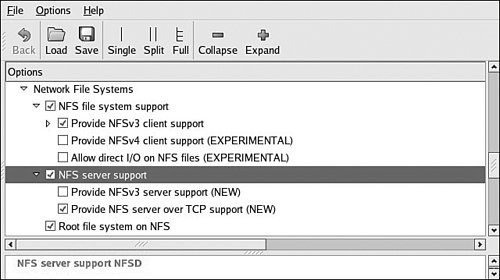 The NFS server gets its instructions from an exports file located on your server. It is commonly found in /etc/exports. Listing 12-7 is an example of a simple exports entry. Listing 12-7. Simple NFS exports File
These entries on my workstation allow a client to remotely mount any of the three directories shown. The attributes following the directory specification instruct the NFS server to allow connections from any IP address (*) and to mount the respective directories with the given attributes (read/write with no_root_squash). The latter attribute enables a client with root privileges to exercise those privileges on the given directory. It is usually required when working with embedded systems because they often have only root accounts. You can test your NFS configuration right from your workstation. Assuming that you have NFS services enabled (requires both NFS server and client components enabled), you can mount a local NFS export as you would mount any other file system: # mount -t nfs localhost:/home/chris/workspace /mnt/remoteIf this command succeeds and the files in .../workspace are available on /mnt/remote, your NFS server configuration is working. 12.3.4. Target NFS Root MountMounting your target via NFS root mount is not difficult, and, as mentioned elsewhere, it is a very useful development configuration. However, a set of details must be correct before it will work. The steps required are as follows:
We presented the kernel configuration in Figure 12-2 when we explained the NFS server configuration. You must make sure that your target kernel configuration has NFS client services enabled, and, in particular, you must enable the option for Root file system on NFS. Specifically, make sure that your kernel has CONFIG_NFS_FS=y and CONFIG_ROOT_NFS=y. Obviously, you cannot configure NFS as loadable modules if you intend to boot NFS root mount. Kernel-level autoconfiguration is a TCP/IP configuration option found under the Networking tab in the kernel configuration utility. Enable CONFIG_IP_PNP on your target kernel. When selected, you are presented with several options for automatic configuration. Select either BOOTP or DHCP, as described earlier. Figure 12-3 illustrates the kernel configuration for kernel-level autoconfiguration. Figure 12-3. Kernel-level autoconfiguration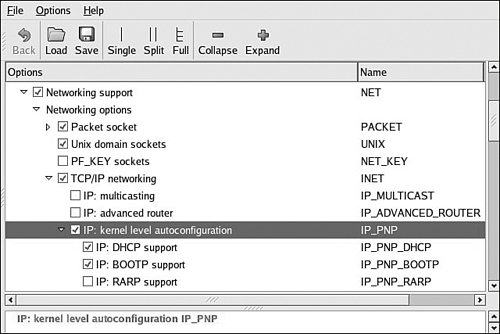 When your server and target kernel are configured, you need to provide your target Ethernet configuration via one of the methods described earlier. If your bootloader supports a kernel command line, that is the easiest method. Here is what a kernel command line might look like to support NFS root mount: console=ttyS0,115200 root=/dev/nfs rw ip=dhcp \ nfsroot=192.168.1.9:/home/chris/sandbox/pdna-target 12.3.5. U-Boot NFS Root Mount ExampleU-Boot is a good example of a bootloader that supports a configurable kernel command line. Using U-Boot's nonvolatile environment feature, we can store our kernel command line in a parameter specially named for this purpose. To enable the NFS command line in U-Boot, we do the following (all on one line in our serial terminal): setenv bootargs console=ttyS0,115200 root=/dev/nfs rw \ ip=dhcp nfsroot=192.168.1.9:/home/chris/sandbox/pdna-target Then we load a kernel via our TFTP server. Listing 12-8 shows what this might look like on a PowerPC embedded target. Listing 12-8. Loading Kernel via TFTP Server
When we boot the kernel, we see specific evidence of our NFS root mount configuration. Listing 12-9 reproduces selected output from the kernel boot messages to demonstrate this. This output has been formatted (many lines omitted and whitespace added) for readability. Listing 12-9. Booting with NFS Root Mount
From Listing 12-9, first we see the kernel banner followed by the kernel command line. We specified four items in this kernel command line:
Shortly thereafter, we see the kernel attempting kernel-level autoconfiguration via DHCP. When the server responds and the DHCP exchange completes, the kernel displays the detected configuration in the following lines. You can see from this listing that the DHCP server has assigned the target the IP address 192.168.1.68. Compare the detected settings with those specified in Listing 12-6. That was similar to the DHCP server configuration that resulted in this configuration. When the kernel has completed the IP autoconfiguration, it is capable of mounting the root file system using the supplied parameters. You can see this from the three lines ending with the VFS (virtual file subsystem) message announcing that it has mounted the root NFS file system. After the NFS root file system has been mounted, initialization completes as described in Chapter 5, "Kernel Initialization." It is also possible to pass target IP settings to the kernel in a static fashion instead of having the kernel obtain IP settings from a DHCP or BOOTP server. IP settings can be passed via the kernel command line directly. In this case, the kernel command line might look similar to this:
|
EAN: 2147483647
Pages: 167