| This section describes the main collection classes provided by Java in the java.util package. It lists the classes in increasing order of complexity: ArrayList Vector LinkedList Stack HashSet TreeSet HashMap TreeMap
Figure 11.15 displays the collection class/interface hierarchy. Figure 11.15. Collection class hierarchy. 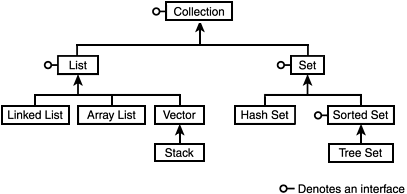 Figure 11.15 shows four interfaces: Collection: All collection classes must directly or indirectly implement the Collection interface. List: Derives from Collection and provides common functionality for the "list" data structures: LinkedList, ArrayList, Vector, and Stack. Set: Derives from Collection and provides common functionality for the "set" data structures: HashSet and TreeSet. SortedSet: Derives from Set and provides the common functionality for "sorted sets," which currently consists of only TreeSet.
Figure 11.16 shows the Map class hierarchy. Figure 11.16. Map class hierarchy. 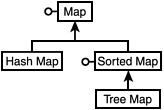 Because maps map a key to a value, they do not fit nicely into the collection paradigm as a single unit. They do, however, present a collection of keys that map to a collection of values, so you can think of maps as a composite of two collection implementations. Figure 11.16 shows two interfaces: ArrayList The java.util.ArrayList class implements a growable array that has elements that are accessible via a 0-based index. An ArrayList can be initialized to hold a specific number of elements or be empty, but is free to grow to hold additional load. Furthermore, it can be initialized with the values contained in another java.util.Collection derivative. The primary methods needed to use the ArrayList class are add( Object o ): Adds an object to the end of the list. add( int index, Object o ): Inserts an element at a specific index. clear(): Removes all elements from the list. contains( Object o ): Returns true if the specified object exists in the list, false otherwise. get( int index ): Returns the element at the specified index. remove( int index ): Removes the element at the specified index. set( int index, Object o ): Sets the element at the specified index. size(): Returns the number of elements in the list.
Listing 11.1 shows how to use the most common functionality of an ArrayList. Listing 11.1 ArrayListExample.java import java.util.ArrayList; import java.util.Iterator; public class ArrayListExample { public static void main( String[] args ) { // Create a new ArrayList ArrayList al = new ArrayList(); // Add Items to the array list al.add( new Integer( 1 ) ); al.add( new Integer( 2 ) ); al.add( new Integer( 3 ) ); al.add( new Integer( 4 ) ); al.add( new Integer( 5 ) ); al.add( new Integer( 6 ) ); al.add( new Integer( 7 ) ); al.add( new Integer( 8 ) ); al.add( new Integer( 9 ) ); al.add( new Integer( 10 ) ); // Use ArrayList specific methods to display the values for( int i=0; i<al.size(); i++ ) { System.out.println( i + " = " + al.get( i ) ); } // Remove the element at index 5 (value=6) al.remove( 5 ); // Set the value at index 5, this overwrites the value 7 al.set( 5, new Integer( 66 ) ); // Use iterator to display the values for( Iterator i=al.iterator(); i.hasNext(); ) { Integer integer = ( Integer )i.next(); System.out.println( integer ); } } } Listing 11.1 starts by creating an empty ArrayList and adding values to it using its add() method. Next, it displays the list values using the ArrayList proprietary methods: Next, it removes the element at index 5, which is the Integer 6 using the remove() method. Then, it sets the value of the element at the new position 5 to 66. Finally, it displays the new list using the Iterator construct. The output should look something like the following: 0 = 1 1 = 2 2 = 3 3 = 4 4 = 5 5 = 6 6 = 7 7 = 8 8 = 9 9 = 10 1 2 3 4 5 66 8 9 10 Vector Like the java.util.ArrayList, the java.util.Vector class implements a growable array that has elements, which are accessible via a 0-based index. A Vector can be initialized to hold a specific number of elements, and an optional growth rate can be specified or can be initialized empty, but it is free to grow to hold additional load. Furthermore, it can be initialized with the values contained in another java.util.Collection derivative. The primary methods needed to use the Vector class are add( Object o ): Adds an object to the end of the vector. add( int index, Object o ): Inserts an element at a specific index. clear(): Removes all elements from the list. contains( Object o ): Returns true if the specified object exists in the list, false otherwise. elementAt( int index ): Returns the element at the specified index. get( int index ): Returns the element at the specified index. indexOf( Object o ): Returns the numeric index of the specified object in the vector. insertElementAt( Object o, int index ): Inserts an element at a specific index. isEmpty(): Returns true if the vector is empty remove( int index ): Removes the element at the specified index. set( int index, Object o ): Sets the element at the specified index. setElementAt( Object o, int index ): Sets the element at the specified index. size(): Returns the number of elements in the list.
Listing 11.2 shows how to use the most common functionality of a Vector. Listing 11.2 VectorExample.java import java.util.Vector; import java.util.Iterator; public class VectorExample { public static void main( String[] args ) { // Create a new Vector Vector vector = new Vector(); // Add Items to the Vector vector.add( new Integer( 1 ) ); vector.add( new Integer( 2 ) ); vector.add( new Integer( 3 ) ); vector.add( new Integer( 4 ) ); vector.add( new Integer( 5 ) ); vector.add( new Integer( 6 ) ); vector.add( new Integer( 7 ) ); vector.add( new Integer( 8 ) ); vector.add( new Integer( 9 ) ); vector.add( new Integer( 10 ) ); // Use Vector specific methods to display the vvectores for( int i=0; i<vector.size(); i++ ) { Integer integer = ( Integer )vector.elementAt( i ); System.out.println( i + " = " + integer ); } // Remove the element at index 5 (vvectore=6) vector.remove( 5 ); // Set the vvectore at index 5, this overwrites the vvectore 7 vector.setElementAt( new Integer( 66 ), 5 ); // Use iterator to display the vvectores for( Iterator i=vector.iterator(); i.hasNext(); ) { Integer integer = ( Integer )i.next(); System.out.println( integer ); } } } Listing 11.2 starts by creating an empty Vector and adding values to it using its add() method. Next, it displays the list values using the Vector proprietary methods: Next, it removes the element at index 5, which is the Integer 6 using the remove() method. Then, it sets the value of the element at the new position 5 to 66 using the setElementAt() method. Finally, it displays the new list using the Iterator construct. The output should look something like the following (the same as the ArrayList): 0 = 1 1 = 2 2 = 3 3 = 4 4 = 5 5 = 6 6 = 7 7 = 8 8 = 9 9 = 10 1 2 3 4 5 66 8 9 10 LinkedList The java.util.LinkedList class implements a linked list a la the previous linked list discussion in this chapter. A LinkedList can be initialized either empty or from an existing collection. The primary methods needed to use the LinkedList class are add( Object o ): Adds an object to the end of the list. add( int index, Object o ): Inserts an element at a specific index. addFirst( Object o ): Adds an object to the beginning of the list. addLast( Object o ): Adds an object to the end of the list. clear(): Removes all elements from the list. contains( Object o ): Returns true if the specified object exists in the list, false otherwise. elementAt( int index ): Returns the element at the specified index. get( int index ): Returns the element at the specified index. getFirst(): Returns the first element in the list. getLast(): Returns the last element in the list. indexOf( Object o ): Returns the numeric index of the specified object in the vector. insertElementAt( Object o, int index ): Inserts an element at a specific index. isEmpty(): Returns true if the vector is empty. remove( int index ): Removes the element at the specified index. removeFirst(): Removes and returns the first element in the list. removeLast(): Removes and returns the last element in the list. set( int index, Object o ): Sets the element at the specified index. size(): Returns the number of elements in the list.
Note that although the java.util.List functionality is provided that offers random access to the elements in the list, the underlying implementation still must traverse the list to locate the randomly accessed object; thus the performance is still impacted. Listing 11.3 shows how to use the most common functionality of a List. Listing 11.3 LinkedListExample.java import java.util.LinkedList; import java.util.Iterator; public class LinkedListExample { public static void main( String[] args ) { // Create a new LinkedList LinkedList list = new LinkedList(); // Add Items to the array list list.add( new Integer( 1 ) ); list.add( new Integer( 2 ) ); list.add( new Integer( 3 ) ); list.add( new Integer( 4 ) ); list.add( new Integer( 5 ) ); list.add( new Integer( 6 ) ); list.add( new Integer( 7 ) ); list.add( new Integer( 8 ) ); list.add( new Integer( 9 ) ); list.add( new Integer( 10 ) ); // Use iterator to display the values for( Iterator i=list.iterator(); i.hasNext(); ) { Integer integer = ( Integer )i.next(); System.out.println( integer ); } // Remove the element at index 5 (value=6) list.remove( 5 ); // Set the value at index 5, this overwrites the value 7 list.set( 5, new Integer( 66 ) ); // Use the linked list as a queue: // add an object to the end of the list (queue) // remove an item from the head of the list (queue) list.add( new Integer( 11 ) ); Integer head = ( Integer )list.removeFirst(); System.out.println( "Head: " + head ); // Use iterator to display the values for( Iterator i=list.iterator(); i.hasNext(); ) { Integer integer = ( Integer )i.next(); System.out.println( integer ); } } } Listing 11.3 starts by creating an empty LinkedList and adding values to it using its add() method. Next, it displays the list values using the Iterator construct. Next, it removes the element at index 5, which is the Integer 6 using the remove() method. Then, it sets the value of the element at the new position 5 to 66 using the set() method. Next, it starts using the list as a queue by adding an element to the end of the list (enqueueing) using the addLast() method, and then removing the first element of the list (dequeueing) using the removeFirst() method. Finally, it displays the contents of the list using the Iterator construct. The Stack Class The Stack class implements the previously discussed stack data structure. It can only be created empty and cannot be initialized from an existing collection as the other collections discussed so far could. The primary methods needed to use the Stack class are empty(): Returns true if the stack is empty. peek(): Returns the object on the top of the stack without removing it from the stack. pop(): Removes and returns the object on the top of the stack. push( Object o ): Adds an object to the top of the stack.
Listing 11.4 shows how to use the most common functionality of a Stack. Listing 11.4 StackExample.java import java.util.Stack; public class StackExample { public static void main( String[] args ) { // Create a new LinkedList Stack stack = new Stack(); // Add Items to the array list stack.push( new Integer( 1 ) ); stack.push( new Integer( 2 ) ); stack.push( new Integer( 3 ) ); stack.push( new Integer( 4 ) ); stack.push( new Integer( 5 ) ); stack.push( new Integer( 6 ) ); stack.push( new Integer( 7 ) ); stack.push( new Integer( 8 ) ); stack.push( new Integer( 9 ) ); stack.push( new Integer( 10 ) ); // Pop everything out of the stack and display the values while( !stack.empty() ) { Integer element = ( Integer )stack.pop(); System.out.println( "Element: " + element ); } } } Listing 11.4 creates an empty stack, and then pushes 10 Integers on to the stack. Next, it iterates through all the elements in the stack until the stack is empty and removes them using the pop() method. HashSet The java.util.HashSet class implements the mathematical concept of a Set that contains unique elements. A HashSet can be initialized by an existing collection, it can be initialized to a specific size with an optional load factor (how much to grow when needed), or it can be initialized empty. The primary methods needed to use the HashSet class are add( Object o ): Adds an element to the set. clear(): Removes all the elements from the set. contains( Object o ): Returns true if the specified object exists in the set. isEmpty(): Returns true if the set is empty. iterator(): Returns an iterator that will iterate over the values in the set. remove( Object o ): Removes the specified element from the set. size(): Returns the number of elements in the set.
Listing 11.5 shows how to use the most common functionality of a HashSet. Listing 11.5 HashSetExample.java import java.util.Set; import java.util.HashSet; import java.util.Iterator; public class HashSetExample { public static void main( String[] args ) { // Create a new HashSet Set set = new HashSet(); // Add Items to the HashSet set.add( new Integer( 1 ) ); set.add( new Integer( 2 ) ); set.add( new Integer( 3 ) ); set.add( new Integer( 4 ) ); set.add( new Integer( 5 ) ); set.add( new Integer( 6 ) ); set.add( new Integer( 7 ) ); set.add( new Integer( 8 ) ); set.add( new Integer( 9 ) ); set.add( new Integer( 10 ) ); // Use iterator to display the vsetes System.out.println( "HashSet Before: " ); for( Iterator i=set.iterator(); i.hasNext(); ) { Integer integer = ( Integer )i.next(); System.out.println( integer ); } // Remove the integer 6 System.out.println( "\nRemove integer 6" ); set.remove( new Integer( 6 ) ); // Use iterator to display the vsetes System.out.println( "\nHashSet After: " ); for( Iterator i=set.iterator(); i.hasNext(); ) { Integer integer = ( Integer )i.next(); System.out.println( integer ); } } } Listing 11.5 starts by creating an instance of the HashSet class. Note that the variable it is assigned to is not a HashSet, but rather is a Set; this was done purposely so that if the requirements regarding the data change later, the implementation of the set can change while the code that uses the set remains unchanged. Next, the set is loaded with 10 Integers using the add() method. The program then displays the contents of the set using an Iterator. Next, the Integer 6 is removed from the set using the remove() method, and, finally, the contents are again displayed using an Iterator. The output of this program should look as follows: HashSet Before: 10 9 8 7 6 5 4 3 2 1 Remove integer 6 HashSet After: 10 9 8 7 5 4 3 2 1 Recall that there is no order implied in a hash table, so the iteration over the elements just happened to return the values in descending order. TreeSet The java.util.TreeSet class implements the mathematical concept of a Set that contains unique elements. A TreeSet can be initialized by an existing collection, it can be initialized to contain the values of another SortedSet (a derivation of a set that sorts its values), it can be initialized using a Comparator (a class implementing this interface defines how to compare two objects during sorting), or it can be initialized empty. The primary methods needed to use the TreeSet class are add( Object o ): Adds an element to the set. clear(): Removes all the elements from the set. contains( Object o ): Returns true if the specified object exists in the set. first(): Returns the element with the lowest value in the set. isEmpty(): Returns true if the set is empty. iterator(): Returns an iterator that will iterate over the values in the set. last(): Returns the element with the highest value in the set. remove( Object o ): Removes the specified element from the set. size(): Returns the number of elements in the set.
Listing 11.6 shows how to use the most common functionality of a TreeSet. Listing 11.6 TreeSetExample.java import java.util.Set; import java.util.TreeSet; import java.util.Iterator; public class TreeSetExample { public static void main( String[] args ) { // Create a new TreeSet Set set = new TreeSet(); // Add Items to the TreeSet set.add( new Integer( 1 ) ); set.add( new Integer( 2 ) ); set.add( new Integer( 3 ) ); set.add( new Integer( 4 ) ); set.add( new Integer( 5 ) ); set.add( new Integer( 6 ) ); set.add( new Integer( 7 ) ); set.add( new Integer( 8 ) ); set.add( new Integer( 9 ) ); set.add( new Integer( 10 ) ); // Use iterator to display the vsetes System.out.println( "TreeSet Before: " ); for( Iterator i=set.iterator(); i.hasNext(); ) { Integer integer = ( Integer )i.next(); System.out.println( integer ); } // Remove the integer 6 System.out.println( "\nRemove Integer 6" ); set.remove( new Integer( 6 ) ); // Use iterator to display the vsetes System.out.println( "\nTreeSet After: " ); for( Iterator i=set.iterator(); i.hasNext(); ) { Integer integer = ( Integer )i.next(); System.out.println( integer ); } } } Listing 11.6 starts by creating an instance of the TreeSet class. Similar to the HashSet example, the TreeSet example defines a TreeSet, but assigns it to a Set variable. The set is next loaded with 10 Integers using the add() method. The program then displays the contents of the set using an Iterator. Next, the Integer 6 is removed from the set using the remove() method, and, finally, the contents are again displayed using an Iterator. The output of this program should look as follows: TreeSet Before: 1 2 3 4 5 6 7 8 9 10 Remove Integer 6 TreeSet After: 1 2 3 4 5 7 8 9 10 Recall that trees have an inherent order implied and, thus, iterating over the values in a TreeSet returns the values in ascending order. HashMap The java.util.HashMap class implements a mapping of keys to values. A HashMap can be initialized to an existing Map, it can be initialized to a specific size with an optional load factor (how much to grow when needed), or it can be initialized empty. The primary methods needed to use the HashMap class are clear(): Removes all the elements from the map. containsKey( Object key ): Returns true if the map contains the specified key. containsValue( Object value ): Returns true if the map contains the specified value. get( Object key ): Returns the value associated with the specified key. isEmpty(): Returns true if the map is empty. keySet(): Returns the keys in the map as a Set. put( Object key, Object value ): Adds the key-value pair to the map. remove( Object key ): Removes the key-value pair fromthe map for the specified key. size(): Returns the number of key-value pairs in the map.
Listing 11.7 shows how to use the most common functionality of a HashMap. Listing 11.7 HashMapExample.java import java.util.Set; import java.util.Map; import java.util.HashMap; import java.util.Iterator; public class HashMapExample { public static void main( String[] args ) { // Create a new HashMap Map map = new HashMap(); // Add Items to the HashMap map.put( new Integer( 1 ), "One" ); map.put( new Integer( 2 ), "Two" ); map.put( new Integer( 3 ), "Three" ); map.put( new Integer( 4 ), "Four" ); map.put( new Integer( 5 ), "Five" ); map.put( new Integer( 6 ), "Six" ); map.put( new Integer( 7 ), "Seven" ); map.put( new Integer( 8 ), "Eight" ); map.put( new Integer( 9 ), "Nine" ); map.put( new Integer( 10 ), "Ten" ); // Use iterator to display the keys and associated values System.out.println( "Map Values Before: " ); Set keys = map.keySet(); for( Iterator i=keys.iterator(); i.hasNext(); ) { Integer key = ( Integer )i.next(); String value = ( String )map.get( key ); System.out.println( key + " = " + value ); } // Remove the entry with key 6 System.out.println( "\nRemove element with key 6" ); map.remove( new Integer( 6 ) ); // Use iterator to display the keys and associated values System.out.println( "\nMap Values After: " ); keys = map.keySet(); for( Iterator i=keys.iterator(); i.hasNext(); ) { Integer key = ( Integer )i.next(); String value = ( String )map.get( key ); System.out.println( key + " = " + value ); } } } Listing 11.7 starts by creating an instance of the HashMap class. Similar to the Set examples, the variable assigned to HashMap is not a HashMap, but rather is a Map. Ten key-value pairs are added to the map through the put() method. Next, it displays the contents of the map by iterating over a Set of the keys in the map (obtained through a call to keySet()), and then calling the map's get() method to retrieve the key's associated value. Next, the value with the key Integer 6 is removed from the map using the remove() method. Finally, the contents are again displayed using the aforementioned construct. The output of this program should look as follows: Map Values Before: 10 = Ten 9 = Nine 8 = Eight 7 = Seven 6 = Six 5 = Five 4 = Four 3 = Three 2 = Two 1 = One Remove element with key 6 Map Values After: 10 = Ten 9 = Nine 8 = Eight 7 = Seven 5 = Five 4 = Four 3 = Three 2 = Two 1 = One Recall that there is no order implied in a hash table, so iterating over the key set elements just happened to return the values in descending order. TreeMap The java.util.TreeMap class implements a mapping of keys to values. A TreeMap can be initialized to an existing map, it can be initialized to contain the values of another SortedMap (a derivation of a map that sorts its keys), it can be initialized using a Comparator (a class implementing this interface defines how to compare two keys during sorting), or it can be initialized empty. The primary methods needed to use the TreeMap class are clear(): Removes all the elements from the map. containsKey( Object key ): Returns true if the map contains the specified key. containsValue( Object value ): Returns true if the map contains the specified value. get( Object key ): Returns the value associated with the specified key. isEmpty(): Returns true if the map is empty. keySet(): Returns the keys in the map as a Set. put( Object key, Object value ): Adds the key-value pair to the map. remove( Object key ): Removes the key-value pair from the map for the specified key. size(): Returns the number of key-value pairs in the map.
Listing 11.8 shows how to use the most common functionality of a TreeMap. Listing 11.8 TreeMapExample.java import java.util.Set; import java.util.Map; import java.util.TreeMap; import java.util.Iterator; public class TreeMapExample { public static void main( String[] args ) { // Create a new TreeMap Map map = new TreeMap(); // Add Items to the TreeMap map.put( new Integer( 1 ), "One" ); map.put( new Integer( 2 ), "Two" ); map.put( new Integer( 3 ), "Three" ); map.put( new Integer( 4 ), "Four" ); map.put( new Integer( 5 ), "Five" ); map.put( new Integer( 6 ), "Six" ); map.put( new Integer( 7 ), "Seven" ); map.put( new Integer( 8 ), "Eight" ); map.put( new Integer( 9 ), "Nine" ); map.put( new Integer( 10 ), "Ten" ); // Use iterator to display the keys and associated values System.out.println( "Map Values Before: " ); Set keys = map.keySet(); for( Iterator i=keys.iterator(); i.hasNext(); ) { Integer key = ( Integer )i.next(); String value = ( String )map.get( key ); System.out.println( key + " = " + value ); } // Remove the entry with key 6 System.out.println( "\nRemove element with key 6" ); map.remove( new Integer( 6 ) ); // Use iterator to display the keys and associated values System.out.println( "\nMap Values After: " ); keys = map.keySet(); for( Iterator i=keys.iterator(); i.hasNext(); ) { Integer key = ( Integer )i.next(); String value = ( String )map.get( key ); System.out.println( key + " = " + value ); } } } Listing 11.8 starts by creating an instance of the TreeMap class. Similar to the HashMap example, the variable assigned to the TreeMap is not a TreeMap, but rather is a Map. Ten key-value pairs are added to the map through the put() method. Next, it displays the contents of the map by iterating over a Set of the keys in the map (obtained through a call to keySet()), and then calling the map's get() method to retrieve the key's associated value. Next, the value with the key Integer 6 is removed from the map using the remove() method. Finally, the contents are again displayed using the aforementioned construct. The output of this program should look as follows: Map Values Before: 1 = One 2 = Two 3 = Three 4 = Four 5 = Five 6 = Six 7 = Seven 8 = Eight 9 = Nine 10 = Ten Remove element with key 6 Map Values After: 1 = One 2 = Two 3 = Three 4 = Four 5 = Five 7 = Seven 8 = Eight 9 = Nine 10 = Ten Trees have an inherent order implied and, thus, iterating over the key set values in a TreeMap returns the values in ascending order. | 