| You can enhance your text by using the Font dialog box or by using various tools on the Formatting toolbar. Use the Font dialog box if you want to add several enhancements to your text at one time. Use the Formatting toolbar to add one font enhancement at a time.  | Fonts, Styles, and Effects In PowerPoint, a font is a family of text that has the same design or typeface (for example, Arial or Courier). A style is a standard enhancement, such as bold or italic. An effect is a special enhancement, such as shadow or underline. |
Using the Font Dialog Box The font dialog box offers you control over all the attributes you can apply to text. Attributes such as strikethrough , superscript, subscript, and shadow are available as check boxes in this dialog box. You can change the font of existing text or of text you are about to type by performing the following steps: -
To change the font of existing text, select text by clicking and dragging the I-beam pointer over the text in a particular text box. If you want to change font attributes for all the text in a text box, select the text box (do not place the insertion point within the text box). -
Choose the Format menu and then choose Font . The Font dialog box appears, as shown in Figure 7.2. Figure 7.2. The Font dialog box enables you to change all the text attributes for selected text. 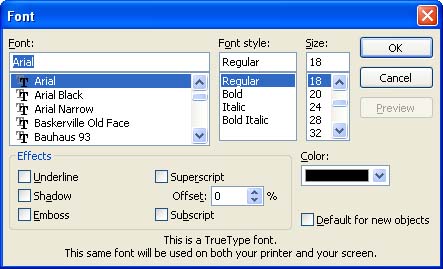  | Right-Click Shortcut You can right-click the text and select Font from the shortcut menu to open the Font dialog box. |
-
From the Font list, select the font you want to use. -
From the Font Style list, select any style you want to apply to the text, such as Bold or Italic . (To remove styles from text, select Regular .) -
From the Size list, select any size in the list, or type a size directly into the box. (With TrueType fontsthe fonts marked with the TT logoyou can type any point size, even sizes that do not appear on the list.) -
In the Effects box, select any special effects you want to add to the text, such as Underline, Shadow , or Emboss . You can also choose Superscript or Subscript , although these are less common. -
To change the color of your text, click the arrow button to the right of the Color list and click the desired color . (For more colors, click the More Colors option at the bottom of the Color drop-down list; to select a color, use the dialog box that appears.) -
Click OK to apply the new look to your selected text. | | Title and Object Area Text If you change a font on an individual slide, the font change applies only to that slide. To change the font for all the slides in the presentation, you need to change the font on the Slide Master. Select View , point at Master , and then select Slide Master . Select a text area and perform the preceding steps to change the look of the text on all slides. Be careful, however, because these changes override any font styles that are supplied by the design template assigned to the presentation. |
Formatting Text with the Formatting Toolbar The Formatting toolbar provides several buttons that enable you to change font attributes for the text on your slides. It makes it easy for you to quickly bold selected text or to change the color of text in a text box. To use the different Formatting toolbar font tools, follow these steps: -
To change the look of existing text, select the text, or select a particular text box to change the look of all the text within that box. -
To change fonts, open the Font drop-down list and click the desired font. -
To change font size, open the Font Size drop-down list, click the desired size or type a size directly into the box, and then press Enter .
-
To add a style or effect to the text (bold, italic, underline, and/or shadow), click the appropriate button(s): | Bold |  | | Italic |  | | Underline |  | | Shadow |  | As you have already seen, you can change the font color through the Font dialog box. You can also change it with the Font Color button on the Formatting toolbar. Just do the following: -
Select the text for which you want to change the color. -
 Click the down-pointing arrow next to the Font Color button on the Formatting toolbar. A color palette appears (see Figure 7.3). Click the down-pointing arrow next to the Font Color button on the Formatting toolbar. A color palette appears (see Figure 7.3). Figure 7.3. When you click the arrow next to the Font Colors button, a color palette appears. 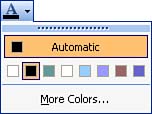 -
Do one of the following: -
Click a color on the palette to change the color of the selected text or the text box (the colors available are based on the design template and color scheme you have selected for the presentation). -
Click the More Font Colors option to display a Colors dialog box. Click a color on the Standard tab or use the Custom tab to create your own color. Then click OK . The color is applied to the text.  |