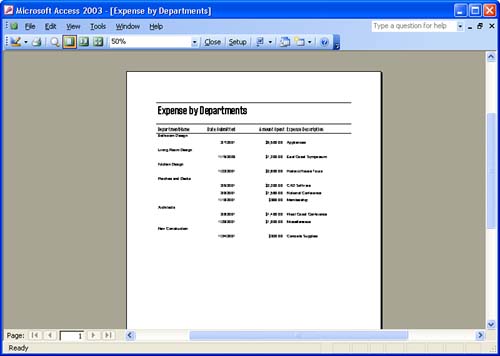
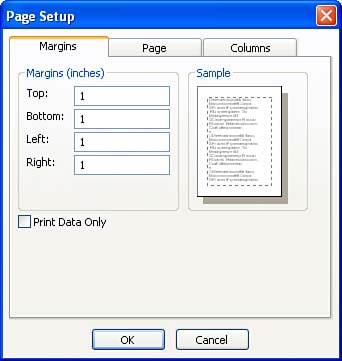
Printing Reports As you learned earlier in this section of the book, the Access report is the ideal format for presenting database information on the printed page. Using reports, you can add page numbering controls and other header or footer information that repeat on each page of the report. Whether you create a report using AutoReport or the Report Wizard, the completed report appears in the Print Preview mode, as shown in Figure 20.1. Figure 20.1. Reports created using AutoReport or the Report Wizard open in the Print Preview mode.   You can immediately send the report to the default printer by clicking the Print button on the Print Preview toolbar. If you find that you would like to change the margins on the report or change how the report is oriented on the page, click the Setup button on the Print Preview toolbar. The Page Setup dialog box appears (see Figure 20.2). You can immediately send the report to the default printer by clicking the Print button on the Print Preview toolbar. If you find that you would like to change the margins on the report or change how the report is oriented on the page, click the Setup button on the Print Preview toolbar. The Page Setup dialog box appears (see Figure 20.2). Figure 20.2. The Page Setup dialog box page orientation of the printed report.  Three tabs are on the Page Setup dialog box: -
Margins This tab enables you to set the top, bottom, left, and right margins. To change one of the default settings (1 inch), type the new setting in the appropriate margin box. -
Page This tab enables you to change the orientation of the report on the printed page. Portrait, which is the default setting, orients the report text from top to bottom on a regular 8 1/2-inch by 11-inch page. Landscape turns the page 180 degrees, making it an 11-inch by 8 1/2-inch page. Landscape orientation works well for reports that contain a large number of fields placed from left to right on the report. This tab also enables you to select the type of paper that you are going to use for the printout (such as letter, legal, and so on). -
Columns This tab enables you to change the number of columns in the report and the distance between the columns. Because the columns for the report are determined when you create the report using AutoReport or the Report Wizard, you probably won't want to tamper with the column settings. It's easier to change the distance between field controls in the Report Design view.  | Use the Report Design View to Make Design Changes If you find that the report needs some major structural changes, click the View button to go to the Design view. |
After you have finished making your choices in the Page Setup dialog box, click OK to close the dialog box. You can now print the report.  |

