| After you've created a form, you might find that it doesn't quite look as good as you like. Controls might need realignment , or you might want to resize the label for a particular control or controls. You also might want to expand the form grid areas so that you can rearrange the form controls or add additional controls to the form. You can accomplish all these actions in the Form Design view. Using this view, you can edit the structure of any form that you create, regardless of whether you created the form using AutoForm, the Form Wizard, or the Design view. Moving Field Controls The most common change to a form is to reposition a control. For example, you might want to move several controls down so you can insert a new control, or you might want to rearrange how the controls appear on the grid. If you placed controls on the form to begin with (rather than using AutoForm or the Form Wizard), you have probably noticed that the control consists of two parts : a text label and the actual control. You can manipulate various aspects of the label and the control independently (such as their sizes or the distance between them). You work with label and control sizing later in this lesson.  | More Space If you want to create extra space at the bottom of the controls so that you have more room to move them around, drag the bottom of the form down so that more of the Detail area is visible. You can also drag the right side of the grid to make the form wider. If you need more space at the top of the form, highlight all the controls and move them down as a group . |
To move a control, follow these steps: -
 From the database window, select a form in the Form list, and then click the Design button on the database window toolbar. The form is opened in Design view. From the database window, select a form in the Form list, and then click the Design button on the database window toolbar. The form is opened in Design view. -
Click a control's label to select it. Selection handles appear around the label (a displacement handle, which looks like a hand with a pointing figure, also appears on the control, but don't touch it because it will move the label and control apart; we discuss it later in the lesson). You can select several controls by holding down Shift as you click each control's label. -
Position the mouse pointer on the edge of the control's label so that the pointer becomes a hand (see Figure 11.1). If you're moving more than one selected control, you can position the mouse pointer on any selected control's label. Figure 11.1. To move a control, first select it. Then, drag it by its label using the hand pointer. 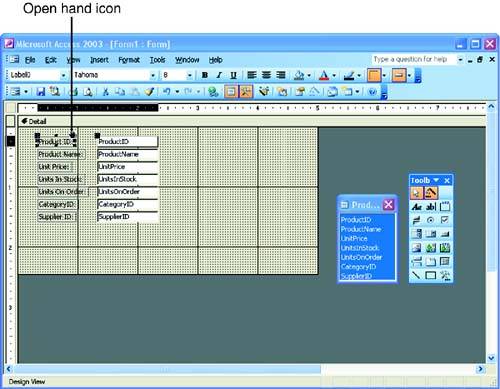 -
Drag the control's label and the control to a new location. -
Release the mouse button when the control is at the desired new location.  | The Label Moved Without the Control Attached! When you position the mouse pointer over the control to be moved, be sure the pointer changes to an open hand, as shown in Figure 11.1. If you see a pointing finger, you are on the control's displacement box. The pointing finger is used to move controls and labels independently, as you'll learn in the next section. |
Moving Controls and Field Labels Independently Depending on how you are laying out the controls in your form, you might want to separate the control label from the control. For example, you might want to arrange the form in a tabular format where the control names are positioned over the controls. Separating controls and labels also allows you to move the control so that the field label isn't cut off. Then you can resize the label. | | Field Controls: The Most Commonly Used Controls Controls related to fields in a table and their attached labels are discussed in this lesson, but the same methods can be used with other controls that have attached labels, such as combo boxes and list boxes (which are discussed in Lesson 12, "Adding Special Controls to Forms"). |
To move a control or its attached label by itself, follow these steps: -
Click the control that you want to separate from its label. -
Position the mouse pointer over the displacement handle at the top left of the label or the control (the large box handle on the top left of the label or the control). The mouse pointer becomes a pointing finger (see Figure 11.2). Figure 11.2. Drag the displacement handle to move the control or label independently. 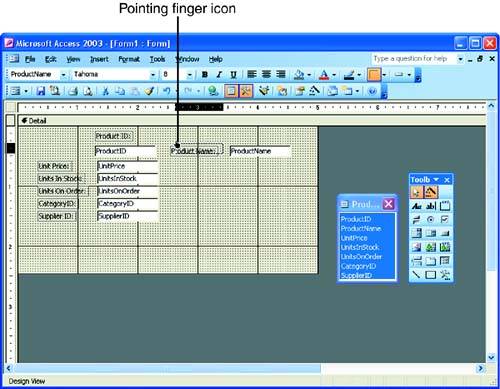 -
Drag the label or the control to a new position. | | Deleting Labels If a certain control is self-explanatory (such as a picture), you might want to delete its attached label. To do so, select the label and press Delete. |
Separating the label from a control allows you to arrange your controls in all kinds of tabular and columnar arrangements on the form grid. Just make sure that you keep the correct label in close proximity to the appropriate control. Changing Label and Control Sizes You can also change the width or height of a label or control. Separating a label from its control, as discussed in the previous section, provides you with the room to resize the label or the control independently. To change a label's or control's width (length): -
Click the label or the control to select it. If you are going to resize the control itself, be sure you click the control. Selection handles (small boxes) appear around it. -
Position the mouse pointer on either the right or left of the label or control until the mouse pointer becomes a sizing tool (a horizontal double-headed arrow, as shown in Figure 11.3). Figure 11.3. You can change the size of a label or control by dragging a sizing box. 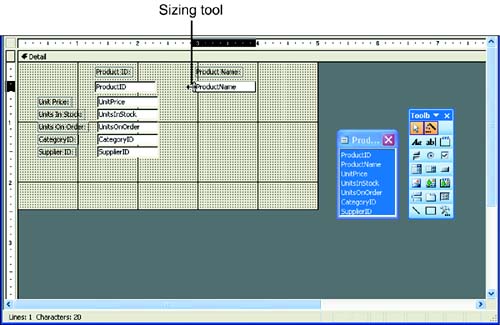 -
Drag the label's or control's sizing handle to increase or decrease the length as needed. Then release the mouse button. |