| You can move or copy worksheets within a workbook or from one workbook to another. Copying a worksheet enables you to copy the formatting of the sheet and other items, such as the column labels and the row labels. Follow these steps: -
Select the worksheet or worksheets you want to move or copy. If you want to move or copy worksheets from one workbook to another, be sure the target workbook is open . -
Select the Edit menu and choose Move or Copy Sheet . The Move or Copy dialog box appears, as shown in Figure 13.2. Figure 13.2. The Move or Copy dialog box asks where you want to copy or move a worksheet. 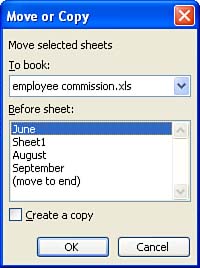 -
To move the worksheets to a different workbook, be sure that workbook is open, and then select that workbook's name from the To Book drop-down list. If you want to move or copy the worksheets to a new workbook, select (New Book) in the To Book drop-down list. Excel creates a new workbook and then copies or moves the worksheets to it. -
In the Before Sheet list box, choose the worksheet you want to follow the selected worksheets. -
To move the selected worksheet, skip to step 6. To copy the selected worksheets instead of moving them, select the Create a Copy option. -
Select OK . The selected worksheets are copied or moved as specified. Moving a Worksheet Within a Workbook with Drag and Drop A fast way to copy or move worksheets within a workbook is to use drag and drop. First, select the tab of the worksheet(s) you want to copy or move. Move the mouse pointer over one of the selected tabs, click and hold the mouse button, and drag the tab where you want it moved. To copy the worksheet, hold down the Ctrl key while dragging. When you release the mouse button, the worksheet is copied or moved. Moving or Copying a Worksheet Between Workbooks with Drag and Drop You can also use the drag-and-drop feature to quickly copy or move worksheets between workbooks. -
Open the workbooks you want to use for the copy or move. -
Select Window and select Arrange . The Arrange dialog box opens. -
You can arrange the different workbook windows horizontally, vertically, tiled, or cascaded in the Excel application window. For more than two open workbooks, your best selection is probably the Tiled option. -
After making your selection, click OK to arrange the workbook windows within the Excel application window. Figure 13.3 shows three open workbooks that have been tiled. Figure 13.3. You can arrange multiple workbooks in the Excel window and then move or copy worksheets. 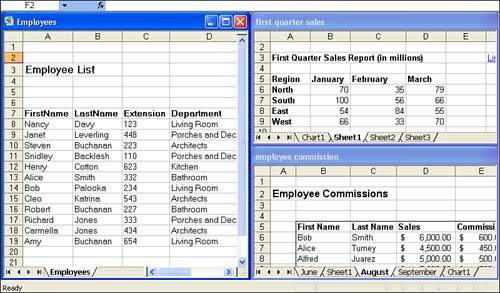 -
Select the tab of the worksheet(s) you want to copy or move. -
Move the mouse pointer over one of the selected tabs, click and hold the mouse button, and drag the tab where you want it moved. To copy the worksheet, hold down the Ctrl key while dragging. -
When you release the mouse button, the worksheet is copied or moved.  | Compare Workbooks Side-by-Side You can display two workbooks side-by-side for a quick comparison of the data. With the workbooks open in Excel, select Window and then Compare Side by Side . If only one other workbook is open, the workbook name will appear as part of the Compare Side by Side command on the menu. When you're working with multiple open workbooks, a Compare Side by Side dialog box will open listing the other open workbooks. Select the workbook for comparison and then click OK . |
 |