| Word offers you several approaches for actually placing the table into the document. You can insert the table into the document or draw the table using the Draw Table command. Let's take a look at inserting a table, which allows you to quickly specify the number of rows and columns to be used. We can then look at drawing a table into a document. Inserting a Table One option for placing a table into your document is inserting the table. Inserting a table enables you to select the number of rows and columns in the table. The height and the width of the rows and columns are set to the default (one line space [based on the current font height] for the row height and 1.23 inches for the column width). Using the Insert command for a new table is the simplest way to select the number of rows and columns for the table. Also, to place the table, you need only place the insertion point at the position where the new table is to be inserted. The insertion point marks the top-left starting point of the table. Inserted tables are static; you can move them to a new location in a document only by selecting the entire table and then using cut and paste. If you want to have better control over the placement of the table, you might want to draw a table (as described in the next section). This type of table can be dragged to any location in the document because it is created inside a portable frame. To insert a table into your document, follow these steps: -
Place the insertion point in the document where you want to place the table; select Table , and then point to Insert . Select Table from the cascading menu. The Insert Table dialog box appears (see Figure 16.1). Figure 16.1. The Insert Table dialog box enables you to specify the number of columns and rows for your new table. 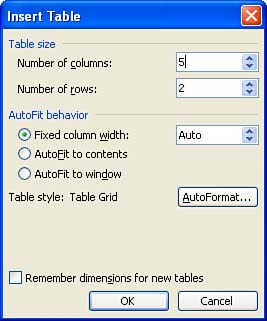 -
Use the spin arrows in the Number of Columns text box to set the number of columns. Use the click arrows in the Number of Rows text box to set the number of rows. -
If you want to set the number of columns and rows as the default for subsequent tables, click the Remember Dimensions for New Tables check box. -
To set the table so that it automatically adjusts the column widths to accommodate the text that you type in the column, select the AutoFit to Contents option button. If you are going to save the Word document containing the table as a Web document (and use it on a Web site), select the AutoFit to Window option button. This allows the table to automatically adjust within a Web browser window so that it can be viewed when the browser window is sized . -
When you have completed your settings for the table, click OK . The table is inserted into your document.  | Use the Toolbar to Insert a Table  Click the Insert Table button on the Standard toolbar, and then drag down and to the right to select the number of rows and columns (a column and row counter shows you the number selected). Release the mouse to insert the table (or click Cancel if you change your mind). Click the Insert Table button on the Standard toolbar, and then drag down and to the right to select the number of rows and columns (a column and row counter shows you the number selected). Release the mouse to insert the table (or click Cancel if you change your mind). |
Drawing a Table An alternative to inserting a table into your document is to draw the table. This method creates a table that resides inside a table frame. The frame can then be dragged to any position in the document. You actually draw the table with a drawing tool and use the tool to add rows and columns to the table. When you draw the table, you will find that it is created without any rows or columns. You then must manually insert the rows and columns using the Table Drawing tool. Although you can build a highly customized table using this method, it is not as fast as inserting a table with a prescribed number of rows and columns, as described in the previous section. To draw a table in your document, follow these steps: -
Select Table , Draw Table . The mouse pointer becomes a "pencil" drawing tool. The Tables and Borders toolbar also appears in the document window. -
Click and drag to create the table's outside borders (its box shape). Release the mouse when you have the outside perimeter of the table completed. -
To add rows and columns to the table, use the pencil to draw the row and column lines (hold down the left mouse button and drag the mouse; see Figure 16.2). Figure 16.2. With the table drawing tool, you can draw a table in your document, and then draw in the row and column lines. The borders all snap to right-angled lines on an unseen grid so that your table will always have straight lines.  -
When you have completed your table, click the Draw Table button on the Tables and Borders toolbar to deactivate the Draw Table feature (this button is a toggle and can also turn the drawing tool back on when clicked). | | Right-Click Any Toolbar to Show the Tables and Borders Toolbar Right-click on any toolbar in the Word application window, and then select Tables and Borders to open the Tables and Borders toolbar. |
The Tables and Borders toolbar provides you with buttons that enable you to edit the attributes of the table. Several of the buttons on the Tables and Borders toolbar are useful for customizing your table: -
Distribute Rows Evenly  This button makes the row heights in the table all the same. This button makes the row heights in the table all the same. -
Distribute Columns Evenly  This button makes all the column widths consistent. This button makes all the column widths consistent. -
Eraser  This button enables you to turn on the eraser; drag it across any row or column line in the table to erase it. This button enables you to turn on the eraser; drag it across any row or column line in the table to erase it. -
Line Style This drop-down box enables you to change the weight and style of the row or column lines you create. You can also move the table anywhere on the document page (it's not anchored in one place like tables that are placed on the page using the Insert Table command). Place the mouse on the upper-left edge of the table and a Move icon (a four-headed arrow) appears. Drag the icon to a new location on the page. When you release the mouse, the table is placed in the new location.  | When I Insert or Draw a Table, My Screen View Changes For you to be able to see the table formatting as it occurs, Word automatically sets your document view to Print Layout. If you previously were in the Normal view, your screen will look different because it is now showing all layout instructions. To switch back, select your desired page view from the View menu. |
 |