Understanding AutoText

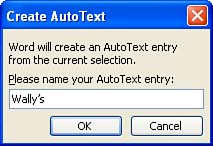
AutoText provides you with a way to build a library of words and text phrases that you use often in your documents. AutoText makes it easy for you to quickly insert items from your AutoText list into any document. Creating AutoText entries is also very straightforward. An AutoText entry can consist of a company name, your name , or an entire paragraph that you commonly place in your documents.

Creating AutoText Entries

You can create an AutoText entry using text from an existing document, or you can type the text that you want to add to the AutoText list in a blank document. Then it's just a matter of copying the text to your AutoText list.

To create an AutoText entry, follow these steps:

  1. Type the text you want to use for the AutoText entry or open the document containing the text that will serve as the AutoText entry.

  2. Select the text.

  3. Select the Insert menu, point at AutoText , and then select New from the cascading menu. The Create AutoText dialog box appears as shown in Figure 12.1.

    Figure 12.1. Creating the Wally's AutoText saves you from typing Wally's Friendly Fish Market.

    graphics/48fig01.jpg

    graphics/tip_icon.gif

    AutoText Isn't on My Insert Menu Remember that Word uses a personalized menu system that places your most recently used commands on the various menus . If you click a menu and don't see a particular command, rest your pointer in the menu for a moment; the menu will expand and provide a list of all the commands available on that particular menu.


  4. Type the name that you want to use to retrieve this AutoText entry in the text box provided (for one-word text entries, the selected text can also serve as the entry name).

  5. After providing the name for the AutoText entry, click OK .

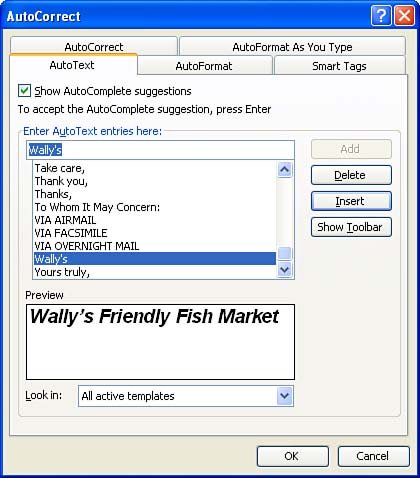
Your selected text is added to the AutoText list. You can repeat this procedure and add as many text items to the AutoText list as you want.

Inserting AutoText Entries

After you add an AutoText entry or entries to the list, you can insert them into any Word document. One method of inserting an AutoText entry into the current document is to pull the entry directly from the AutoText list.

To insert an AutoText entry into a document, follow these steps:

  1. Place the insertion point in the document where you want to insert the AutoText entry.

  2. Select the Insert menu, point at AutoText , and then select AutoText . The AutoCorrect dialog box appears as shown in Figure 12.2 (with the AutoText tab selected).

    Figure 12.2. Insert your AutoText entries from the AutoCorrect dialog box.

    graphics/48fig02.jpg

  3. The AutoText tab of the AutoCorrect dialog box displays an alphabetical list (as well as various default entries that Word provides) of the AutoText entries that you have added to the AutoText list. Select the entry you want to insert and click Insert . Or double-click any entry on the list to insert it into the document.

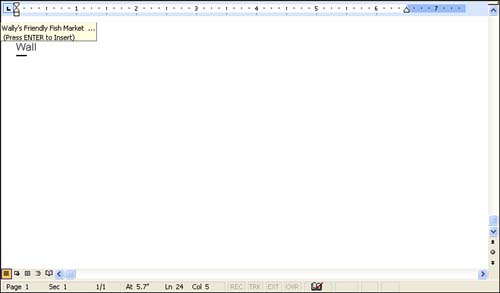
An alternative to manually inserting AutoText into the document is using the AutoComplete feature to automatically insert an entry into your document. For example, if you have an entry in your AutoText list that reads "I am pleased to announce," you can automatically insert this entry into your document by beginning to type the entry. As you type the first few letters in the AutoText entry, an AutoComplete box appears, containing the complete AutoText entry, as shown in Figure 12.3.

Figure 12.3. AutoComplete automatically places entries from your AutoText list into your documents.

graphics/48fig03.jpg

To insert the entry into the document, press the Enter key. AutoComplete also helps you enter items that are not included on your AutoText list into your document. These items include the current date, days of the week, and names of months. For example, as you begin to type the name of a month, the AutoComplete box message appears, telling you to press Enter to insert the complete word.

graphics/tip_icon.gif

Use the AutoText Toolbar to Quickly Insert AutoText Entries Right-click any toolbar, and then select AutoText from the menu. To add an entry into the current document, click the All Entries button on the AutoText toolbar and select your AutoText from the list.


Deleting AutoText Entries

You can easily delete items on the AutoText list when you no longer need them. This is done on the AutoText tab of the AutoCorrect dialog box.

To delete an AutoText entry, follow these steps:

  1. Select the Insert menu, point at AutoText , and then select AutoText from the cascading menu. The AutoCorrect dialog box appears.

  2. Select any of the entries in the AutoText list.

  3. Click Delete to remove the entry from the list.

After you have completed your deletion of AutoText entries, click OK to close the AutoText dialog box.


Microsoft Office 2003 All-in-One
ISBN: B005HKSHB2
EAN: N/A
Year: 2002
Pages: 660
Authors: Joe Habraken

flylib.com © 2008-2017.
If you may any questions please contact us: flylib@qtcs.net