| Outlook provides options that enable you to mark any message with certain options that emphasize a certain aspect of the message's importance. You can use Priority status so that the recipient knows you need a quick response. Using a sensitivity rating makes it so that not just anyone can change your message after it is sent. With other options you can enable the recipients of your message to vote on an issue by including voting buttons in your message and having the replies sent to a specific location. You also can set delivery options. For example, you can schedule the delivery of a message for a specified delivery time or date if you don't want to send it right now.  | Recognizing Priority Levels Not all e-mail packages recognize the priority levels that you assign to messages you send (as discussed in the next section). These priority levels work ideally in a network situation, where Outlook is the e-mail client for all users. Microsoft's Outlook Express e-mail client also has the capability to recognize priority levels that you use on sent messages. |
To set message options, open a new e-mail and click the Options button on the toolbar (or select View , Options ). As you can see in Figure 9.1, the Message Options dialog box is separated into four areas. The next four sections discuss each group of options in detail. Figure 9.1. Use the Message Options dialog box to govern how your message is sent. 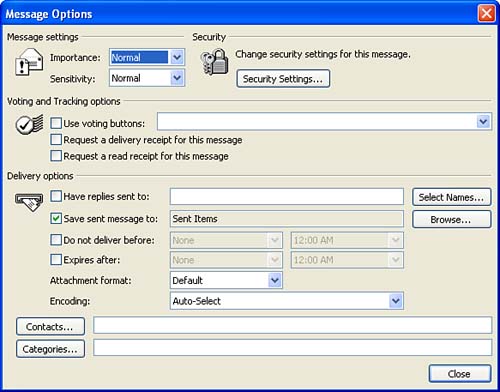 | | I Don't See Options on the View Menu If you are using Word 2003 as your e-mail editor (the default setting for Outlook if Word is also installed on the computer), the Options command does not appear on the View menu. You must select Options on the message toolbar to open the Options dialog box. |
Message Settings In the Message Settings area, set any of the following options for your message: -
Click the Importance drop-down arrow and choose a priority level of Low, Normal , or High from the list. Low priority is denoted on a message by a down-pointing arrow, whereas a high priority is denoted by a red exclamation point. When importance isn't specified, the message is given Normal importance. -
Click the Sensitivity drop-down arrow and choose one of the following options: -
Normal Use this option to indicate that the message contents are standard or customary. -
Personal Use this option to suggest that the message contents are of a personal nature. A banner is placed at the top of the message that reads "Please treat this as Personal." -
Private Use this option to prevent the message from being edited (text changes, copy, paste, and so on) after you send it. A banner is placed at the top of the message that reads "Please treat this as Private." -
Confidential Use this option to indicate that the message contents are restricted or private. Confidential messages can be edited by the recipient. Marking the message Confidential is only to suggest how the recipient should handle the contents of the message. A banner is placed at the top of the message that reads "Please treat this as Confidential."  | Mark All Messages As Private You can mark all your new messages as private automatically. Choose Tools, Options . On the Preferences tab, click the E-mail Options button. In the E-mail Options dialog box, click the Advanced E-mail Options button. Use the Sensitivity drop-down box at the bottom of the Advanced E-mail Options dialog box to set the default sensitivity for all your new e-mail messages. |
Only message recipients who use Outlook as their e-mail client will be able to view the sensitivity banners placed on sent e- mails when you assign them a sensitivity level. Outlook Express users cannot view the banners such as "Please treat this as Confidential" that are placed on the messages. Security Settings Outlook also supplies you with options related to the security settings for a message. You can choose to encrypt the contents of your message or add a digital signature to the message. You can access the security options by clicking the Security Settings button in the Message Options dialog box (which you can open by clicking the Options button on the message toolbar).  | Digital Signature A digital ID that is electronically stamped on messages that you send. This allows recipients of the message to verify that the message is truly sent by you. |
To set the security option for the message, click the Security Settings button. This opens the Security Properties dialog box, as shown in Figure 9.2. Figure 9.2. You can set security options for a message, such as encryption and the use of a digital signature. 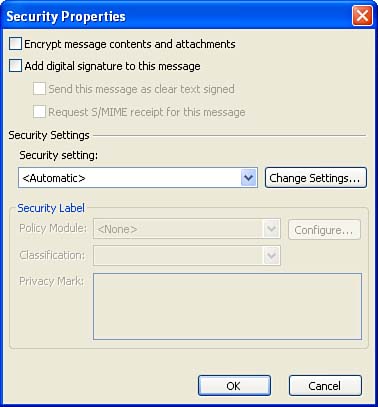 If you want to encrypt the message, click the Encrypt Message Contents and Attachments check box. If you want, you can also add a digital signature to the message that verifies you are the sender; click the Add Digital Signature to This Message check box. | | Encryption Messages are coded so that they remain secure until the recipient opens them. |
Before you can use either the encryption or the digital-signature features, you must obtain a digital ID, which is also often called a certificate. Digital IDs are issued by an independent certifying authority. Microsoft's certifying authority of choice is VeriSign Digital ID. For a fee, you can obtain, download, and install your digital ID from VeriSign by following the steps on their Web page at http://digitalid.verisign.com/. Most e-mail traffic doesn't really require encryption or the use of digital signatures. You will have to determine for yourself whether your e-mails require extra security precautions such as encryption and digital signatures. Voting and Tracking Options The Voting and Tracking Options enable you to control special features such as voting buttons (these allow recipients of the message to reply with a click of the mouse), which supply you with the means to track the receipt of your message. The delivery and read notification options allow you to receive notification that the recipient of the message has received the message or opened and read it, respectively. -
In the Message Options dialog box, select the Use Voting Buttons check box to add the default choices (Approve and Reject) to your message. You can also add Yes and No choices (meeting requests , for example) or Yes, No, and Maybe choices using the drop-down list to the right of the Use Voting Buttons check box. If you want to provide other choices, enter your own text into the text box (using semicolons to break up your choices). When you send a message with voting buttons to several people, you can view a summary of all the voting results by clicking the voting summary message on any of the e-mail responses. -
Select Request a Delivery Receipt for This Message to receive an e-mail notification that the intended recipient has received the message. -
Select Request a Read Receipt for This Message to receive e-mail confirmation that the recipient has opened the message. Delivery Options In addition to voting and tracking options, you can set certain delivery options, such as having replies sent to individuals you select. You can also choose a folder where a copy of the message is saved, or schedule the time of the delivery. In the Delivery Options area of the Message Options dialog box, choose any of the following check boxes: -
Normally, a reply to an e-mail message returns to the e-mail address of the sender. Sometimes, especially if you have multiple e-mail accounts, you might want replies to your message to go to a different e-mail address than the one you're sending from. Choose the Have Replies Sent To check box and specify in the text box the e-mail address to which you want the replies sent (see Figure 9.3). You can use the Select Names button to view your Contacts or Outlook Address Book and choose an e-mail address or addresses from the selected list. Figure 9.3. You can specify that responses to a message be sent to specific e-mail addresses (including or excluding your own). 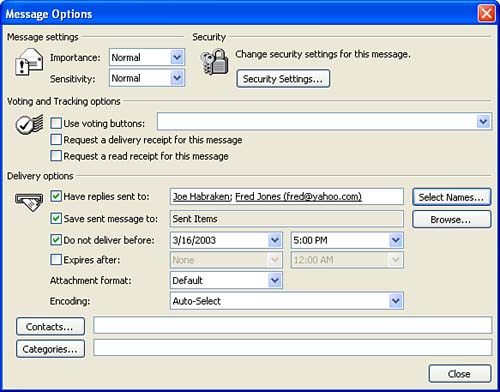 -
Select the Save Sent Message To check box to save your message to a folder other than the Sent Items folder. The Sent Items folder is specified by default, but you can choose to save the sent message to any folder in Outlook. Use the Browse button and the resulting Select Folder dialog box to specify a particular folder. -
Select the Do Not Deliver Before option to specify a delivery date. Click the down arrow in the text box beside the option to display a calendar on which you can select the day. This option enables you to send out e-mail even when you are not at your computer (or in the office). The message will be held in your Outbox folder until the specified time. If you are using Internet e-mail, your computer and Outlook must be up and running for the e-mail to be sent. In a corporate environment where Exchange Server is used, the e-mail is stored on the mail server and is sent automatically on the delivery date. -
Select the Expires After check box to include a day, date, and time of expiration. You can click the down arrow in the text box to display a calendar from which you can choose a date, or you can enter the date and time yourself. Messages marked to expire are made unavailable after the expiration date. This means the message is basically recalled from any computer where the message has not been read (this feature works only in networked environments using Microsoft Exchange Server). The delivery options are really great in cases where someone other than you needs to keep track of the responses related to an e-mail message that you sent or in cases where you don't want to immediately deliver a message using the Do Not Deliver Before option. Using the Expire option means that people who have been on vacation won't have to read old messages that you have sent; they will no longer be available because of the expiration date. Assigning Contacts to a Message The Message Options dialog box also enables you to link a contact or contacts to a message. Linking a contact (or contacts) to a message allows you to view the message on that contact's Activities tab (when you are viewing the contact's actual record in the Contacts folder). The use of the Activities tab on a contact's record is discussed in Lesson 11, "Creating a Contacts List." | | Do Contact Links and Categories Appear on Sent Messages? When you link contacts and categories to messages, you are actually just applying organizational tags to the e-mails. You can then view all the e-mail sent to a particular contact in the Contacts folder or sort sent e-mail by a particular category. The recipient of e-mail that you have tagged in this manner does not know that you created the link. |
To assign a contact link to the message, click the Contacts button in the Message Options dialog box. The Select Contacts dialog box opens, showing all your contacts. Double-click a contact to add it to the Contacts box on the Message Options dialog box. Now the sent message is linked to a particular contact or contacts and can be accessed for later consideration when you are working with that contact or contacts in the Contacts folder. Assigning Categories to a Message Another option that Outlook provides for organizing sent messages is the use of categories. You can assign your messages to different categories, such as Business, Goals, Hot Contacts, Phone Calls, and so on. You set the category for a message in the Categories dialog box. | | Categories Categories offer a way of organizing messages to make them easier to find, sort, print, and manage. To find all the items in one category, choose Tools, Find Items . Click the More Choices tab, choose Categories , and check the category for which you're searching. |
To assign a category, follow these steps: -
In the Message Options dialog box, click the Categories button. The Categories dialog box appears (see Figure 9.4). Figure 9.4. Organize your messages with categories. 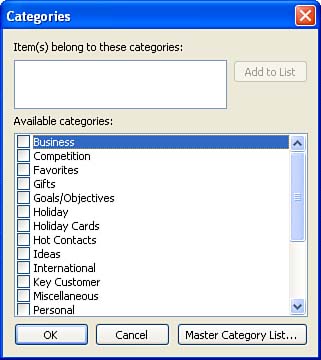 -
To assign an existing category, select the category or categories that best suit your message from the Available Categories list. To assign a new category, enter a new category into the Item(s) Belong to These Categories text box, and then click the Add to List button. -
Click OK to close the Categories dialog box and return to the Message Options dialog box. | | Create Your Own Categories If you want to create a new category to assign to your e-mail messages, click the Master Category List button on the Categories dialog box. The Master Category List dialog box appears. Type the name of the new category in the New category box, and then click Add (repeat as necessary). To return to the Categories dialog box, click OK . Your new categories appear in the Categories dialog box. |
When you have set all the options for the current message, click the Close button to close the Message Options box and return to the message window. The whole point of tagging sent messages with categories is so that you can view messages by category when you open the Sent Items folder. For example, you might want to quickly check the messages that have been tagged with the Competition category. -
Use the Mail Favorite Folders group or the All Mail Folders group on the Navigation pane to open the Sent Items folder. -
To view the messages by category (in the mail list), select View, point at Arrange By, and then select Categories. The messages will be arranged by category. -
Click any of the categories to expand the list to view the messages in a particular category. If you want to expand all the categories, click the View menu, point at Collapse/Expand Groups , and then select Expand All Groups . | | Categories Can Be Used to Find Messages You can search for messages or other Outlook items that have been assigned a particular category using Outlook's Advanced Search feature. Finding Outlook items is discussed in Lesson 18, "Saving and Finding Outlook Items." |
|