| If you want to automate some of the management of your e-mail messages (rather than relying on the Organize tool and moving the messages manually), you can create rules. Rules can be used to automatically move messages from a particular sender or automatically send certain messages to the Deleted Items folder. Rules can use different criteria to act upon a message such as the sender, subject, and message text.  | Rules Rules are a set of conditions (such as a particular e-mail address or message content) that you identify to move, delete, or otherwise manage incoming e-mail messages (including color -coding). |
 | Rules and Attachments The rules you create to organize your messages can look at such things as sender, receiver, message subject, and message text. Attachments to a message are not governed by the rules that you create, so the content of file attachments to a message does not govern how they are handled by the Organize tool or rules. |
You can create a rule by using the Organize pane or by clicking on the Rules and Alerts icon on the Outlook Advanced toolbar. Rules are created using the Rules Wizard. The Rules Wizard enables you to create pretty sophisticated rules using simple sentences. To open the Rules Wizard, follow these steps: -
Select the Rules and Alerts icon on the Outlook Advanced toolbar (or from the Organizer pane, when Using Folders is selected, click Rules and Alerts ). The Rules and Alerts dialog box appears (see Figure 8.6). Figure 8.6. The Rules and Alerts dialog box helps you create and manage rules for managing mail messages. 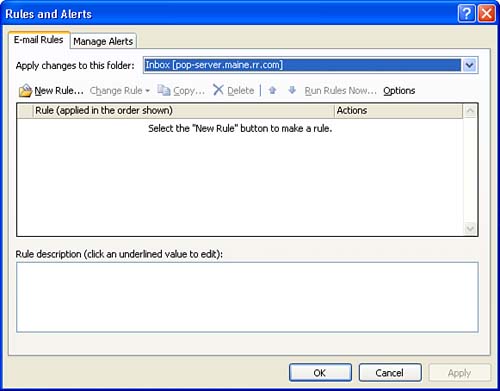 -
To create a new rule, click the New Rule button. The Rules Wizard walks you through the rule-creation process. The first screen asks you to choose either to create the rule from an existing template or create a new, blank rule. Templates provide you with the easiest way to quickly create a new rule. Step 3 describes creating a rule using a template (although the process of creating a blank rule follows a similar set of options provided by the wizard). -
Select one of the templates provided by the Rule wizard. For example, you might select the Move Messages with Specific Words in the Subject to a Folder Template (see Figure 8.7). After selecting a particular template, click Next . Figure 8.7. In the Rules Wizard, you select the type of rule you want to create and the template used to create the rule. 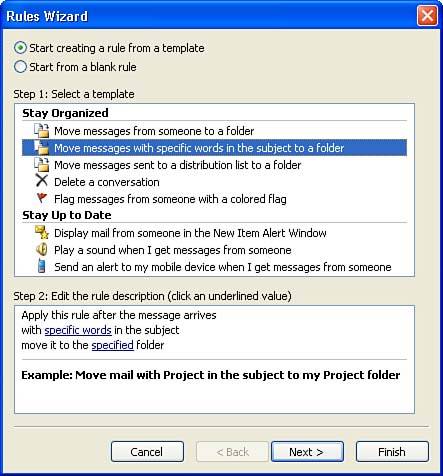 -
The next screen asks you to select all the conditions that the new rule is to use (see Figure 8.8). These conditions range from words found in the subject line to who the message is from to the importance level for the message. Any conditions that you select in the conditions list will require fine-tuning in the Edit the Rule Description box of the Rules Wizard. Select conditions using the check boxes provided in the Step 1 Select Conditions Box. Figure 8.8. You select the conditions that are to be used by the rule. 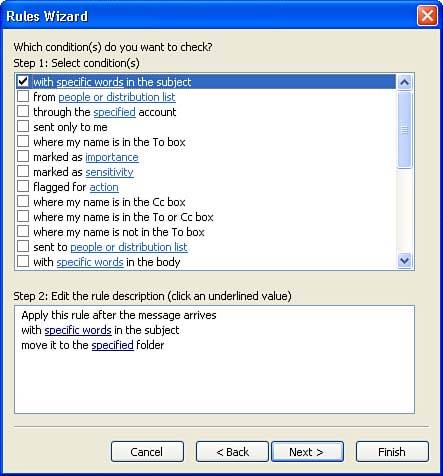 | | Conditions That Require Input from You Some conditions such as From People or Distribution List or Specific Words require that you provide a list of people for the condition to use or certain words. Conditions requiring additional information have an underlined selection for you to click in the Step 2 box. |
-
In the Step 2 : Edit the Rule Description box, select any underlined items associated with the conditions you select in the Step 1 box. You will have to provide the information required by each condition. For example, the Specific Words in the Subject condition (shown in Figure 8.8) requires that you click the Specific Words link and provide a list of words for the rule to use. This condition also requires that you specify the folder to which the e-mail messages meeting the condition are moved. After providing the required information, click Next . -
The next wizard screen provides you with a second chance to specify what should be done with a message that meets the condition of the rule. If you used a template that set specific actions when a message met the conditions of the rule, actions for the rule and the overall rule description should be completed at this point. Click Next to continue. -
The next wizard screen provides you with the ability to configure any exceptions that you may want to have for this rule. For example, if you create a rule that moves messages with certain words in the subject line directly to the Deleted Items folder, you could create an exception for messages that are received from certain senders. After setting any exceptions to the rule, click the Next button to continue. -
On the next wizard screen, provide a name for the new rule (see Figure 8.9). The rule is turned on by default. You can also check the Run This Rule Now on Messages Already in "Inbox" if you want to apply the rule to previously received messages. After setting these options, click Finish . Figure 8.9. Provide a name for the rule and determine if you want to apply the rule to previously received messages. 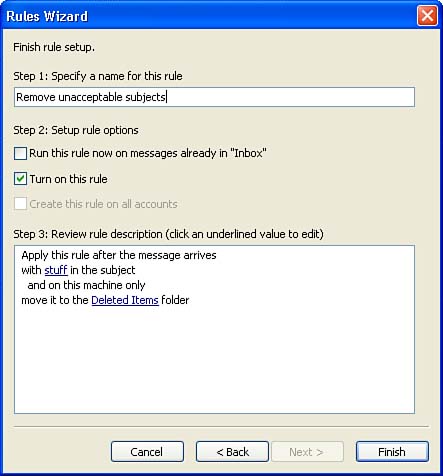 The new rule will appear in the Rules and Alerts dialog box. You can create additional rules at this point, or you can close the Rules and Alerts dialog box by clicking OK . After using a particular rule, you may find that you want to fine-tune and edit the rule. All you have to do is open the Rules and Alerts dialog box (click the Rules and Alerts icon on the Advanced toolbar) and then double-click on the rule. You can then edit the various settings as you did when you first created the rule. | | Delete "Bad" Rules If you find that a rule or rules that you have created are actually doing things to messages that you hadn't planned, you can delete the rules. Rules created with the Organize tool can also be deleted in this manner. Open the Rules and Alerts dialog box (click Tools , then Rules and Alerts ). In the dialog box, select rules that you want to delete and then select Delete . They will be removed from the rule list. |
When you use the Rules Wizard for the first time, you may want to create a simple rule or two that handle messages that you do not consider extremely important. A poorly designed rule could delete important messages that you receive. A good general rule is to use the Organize tool first and let it create simple rules, and if you need more advanced message-management help, use the Rules Wizard. |