Section 7.1. Drawing Using the Graphics Class
7.1. Drawing Using the Graphics ClassProfessional photographers have a problem in that it is easy for people to scan pictures and print many copies of them. How can they allow people to see proofs of pictures, but discourage people from using their pictures without paying for them? One way that professional photographers protect their images is to put some text on them. People can still scan the picture and make copies, but it is obvious that the picture is stolen. The text also hides some of the picture so people are more likely to pay for pictures without the text. How can you add text to a picture? We know that this is just a matter of setting pixel values to whatever we want, but setting individual pixel values to draw a line or a circle or some letters is hard. Here's an example that creates a grid of lines on a picture (Figure 7.1). It works by simply setting all the pixels in a line to black! The gap between the lines is 20 pixels. Figure 7.1. Adding a grid of lines to a picture (barbara.jpg).
Program 47. Draw Lines by Setting Pixels |
 /** * Method to draw a grid on a picture */ public void drawGrid() { Pixel pixel = null; // Draw the horizontal lines for (int y = 20; y < this.getHeight(); y+=20) { for (int x = 0; x < this.getWidth(); x++) { pixel = this.getPixel(x,y); pixel.setColor(Color.black); } } // draw the vertical lines for (int x = 20; x < this.getWidth(); x+=20) { for (int y = 0; y < this.getHeight(); y++) |
To test this method create a Picture object and then invoke the method on the Picture.
> String fileName = FileChooser.getMediaPath("barbara.jpg"); > Picture pictureObj = new Picture(fileName); > pictureObj.show(); > pictureObj.drawGrid(); > pictureObj.repaint();This method first draws the horizontal lines by setting y to a value of 20 and incrementing y by 20, while x starts at 0 and is incremented by 1. Next the method draws the vertical lines by setting x to 20 and incrementing x by 20 while y starts at 0 and is incremented by 1. To draw more lines, decrease the start and increment values, and to draw fewer lines, increase the start and increment values.
|

We can imagine drawing anything we want like this, by simply setting individual pixels to whatever colors we want. We could draw rectangles or circles, simply by figuring out what pixels need to be what color. We could even draw lettersby setting the appropriate pixels to the appropriate colors, we could make any letter we want. While we could do it, it would involve a lot of work to do all the math for all the different shapes and letters. That's work that lots of people want done, so instead, the basic drawing has been built into Java for you.
7.1.1. Drawing with Graphics Methods
Most modern programming languages with graphics libraries provide ways to draw a variety of shapes and text. In Java the Graphics class in the java.awt package has a number of methods that allow you to draw simple shapes and text. These graphics methods work similar to painting. First you pick a color to use to paint with, and then you can paint several shapes using that color. If one shape is drawn over another, it will cover the shape underneath.
|
setColor(Color color) sets the color to use for drawing.
drawLine(int x1, int y1, int x2, int y2) draws a line from position (x1, y1) to (x2, y2) using the current color.
drawRect(int x1, int y1, int w, int h) draws the outline of a rectangle with the upper-left corner at (x1, y1), a width of w, and a height of h using the current color.
fillRect(int x1, int y1, int w, int h) draws a filled (solid) rectangle with the upper-left corner at (x1, y1), a width of w, and a height of h using the current color.
drawOval(int x1, int y1, int w, int h) draws the outline of an oval with the upper-left corner of the enclosing rectangle at (x1, y1), the width of the enclosing rectangle is w and the height of the enclosing rectangle is h using the current color.
fillOval(int x1, int y1, int w, int h) draws a filled (solid) oval with the upper-left corner of an enclosing rectangle at (x1, y1), the width of the enclosing rectangle is w and the height of the enclosing rectangle is h using the current color.
drawArc(int x1, int y1, int w, int h, int startAngle, int arcAngle) draws an outline of an arc that is part of an oval that fits in the enclosing rectangle at (x1, y1), the width of the enclosing rectangle is w and the height of the enclosing rectangle is h. The arc starts at the given startAngle and extends arcAngle degrees (where 0 degrees is at the 3 o'clock position on a clock and 45 degrees goes through the upper-right corner of the enclosing rectangle). The ending angle is the startAngle plus arcAngle.
fillArc(int x1, int y1, int w, int h, int startAngle, int arcAngle) draws a filled arc that is part of an oval that fits in the enclosing rectangle at (x1, y1), the width of the enclosing rectangle is w and the height of the enclosing rectangle is h. The arc starts at the given startAngle and extends arcAngle degrees (where 0 degrees is at the 3 o'clock position on a clock and 45 degrees goes through the upper-right corner of the enclosing rectangle). The ending angle is the startAngle plus arcAngle.
drawPolygon(int[] xArray, int[] yArray, int numPoints) draws the outline of a closed polygon using the x values in xArray and the y values in yArray using the current color.
fillPolygon(int[] xArray, int[] yArray, int numPoints) draws a filled closed polygon using the x values in xArray and the y values in yArray using the current color.
|
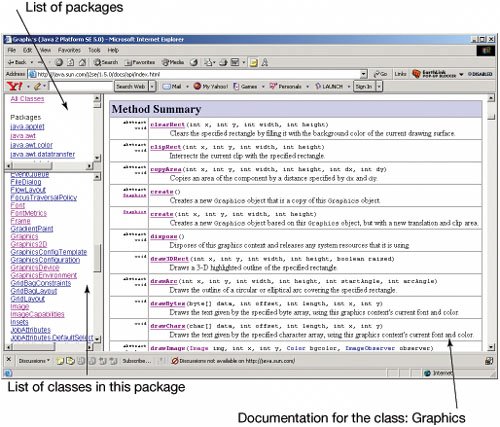
Figure 7.2. Viewing the Java API for java.awt.Graphics.
We can use these commands to add simple shapes to existing pictures. What would it look like if a mysterious red box washed up on the shore of a beach? We will need to get a Graphics object to use for the drawing. We can get one from a Picture object using the method getGraphics(). When you draw, you set the color using setColor(Color color) and then do any drawing commands. We can make a box appear on a picture of a beach with this method (Figure 7.3).
Figure 7.3. A box washed up on the shore of the beach.

Program 48. Adding a Box
/** * Method to add a solid red rectangle to the current picture */ public void addBox() { // get the graphics context from the picture Graphics g = this.getGraphics(); // set the color to red g.setColor(Color.red); // draw the box as a filled rectangle g.fillRect(150,200,50,50); } |
Execute this method using:
> String fileName = FileChooser.getMediaPath("beach-smaller.jpg"); > Picture p = new Picture(fileName); > p.addBox(); > p.show();This method isn't very reusable. The only way to change it to work for other rectangles is to modify the color and rectangle information and then recompile. If we want this to work on any rectangle, then we will want to pass parameters to make the method more general.
Program 49. General Draw Box
/** * Method to draw a filled box on the current picture * @param color the color to draw the box with * @param topLeftX the top left x coordinate of the box * @param topLeftY the top left y coordinate of the box * @param width the width of the box * @param height the height of the box */ public void drawBox(Color color, int topLeftX, int topLeftY, int width, int height) { // get the graphics context for drawing Graphics g = this.getGraphics(); // set the current color g.setColor(color); // draw the filled rectangle g.fillRect(topLeftX,topLeftY,width,height); } |
We could use this more general method to generate the same picture by:
> Picture p = new Picture(FileChooser.getMediaPath("beach-smaller.jpg")); > p.drawBox(java.awt.Color.red,150,200,50,50); > p.show();The advantage of the method drawBox over the method addBox is that it can be used to draw any rectangle of any color on any picture.
Below is another example of using the simple drawing commands (Figure 7.4).
Figure 7.4. An example drawn picture. (This item is displayed on page 220 in the print version)
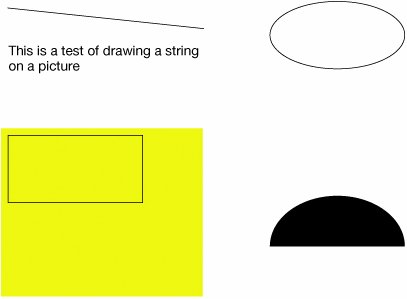
Program 50. An Example of Using Drawing Commands (This item is displayed on pages 218 - 219 in the print version)
/** * Method to show different drawing capabilities. It * will draw a string, a line, a filled rectangle, the * outline of a rectangle, the outline of an oval, * and a filled arc. */ public void drawExample() { // get the graphics object to use for drawing Graphics graphics = this.getGraphics(); // start with a black color graphics.setColor(Color.black); |
To try this out create a picture from the blank 640 by 480 file. Then invoke the method drawExample() on the picture.
> Picture p = new Picture(FileChooser.getMediaPath("640x480.jpg")); > p.drawExample(); > p.show();How would you draw a simple face (Figure 7.5)? You could draw an oval for the head. You could use filled ovals for the eyes. You could use arcs for the mouth and eyebrows.
Figure 7.5. A drawn face (left) and the face with enclosing rectangles (right). (This item is displayed on page 221 in the print version)
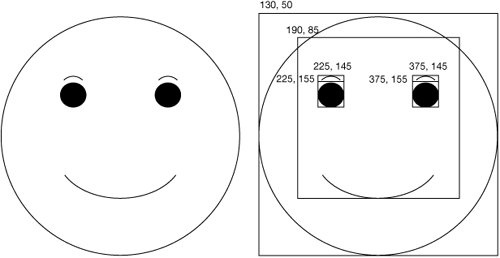
Program 51. An Example of Using Oval and Arc Drawing Commands
/** * Method to draw a face to demonstrate drawing * ovals and arcs */ public void drawFace() { // get the graphics object to use for drawing Graphics graphics = this.getGraphics(); // start with a black color graphics.setColor(Color.black); // draw the oval for the face graphics.drawOval(130,50,380,380); // draw the ovals for the eyes graphics.fillOval(225,155,40,40); graphics.fillOval(375,155,40,40); // draw the arcs for the eyebrows graphics.drawArc(225,145,40,40,45,90); graphics.drawArc(375,145,40,40,45,90); // draw the arc for the mouth graphics.drawArc(190,85,255,255,-45,-90); } |
To try this, create a picture from the blank 640 by 480 file. Then invoke the method drawFace() on the picture.
[Page 221] > Picture p = new Picture( FileChooser.getMediaPath("640x480.jpg")); > p.drawFace(); > p.show();
|
7.1.2. Vector and Bitmap Representations
Here's a thought: Which of these is smallerthe picture (Figure 7.4) or Program 50 (page 218)? The picture, on my disk, is about 31 kilobytes (a kilobyte is a thousand bytes). The program is less than 2 kilobytes. What if you just saved the program and not the pixels? That's what a vector representation for graphics is about.
Vector-based graphical representations are basically executable programs that generate the picture when desired. Vector-based representations are used in Postscript, Flash, and AutoCAD. When you make a change to an image in Flash or AutoCAD, you are actually making a change to the underlying representationessentially, you're changing the program, like the one in Program 50 (page 218). The program is then executed again to make the image appear. But thanks to Moore's Law, that execution-and-new-display occurs so fast that it feels like you're changing the picture.
Font definitions languages like Postscript and TrueType actually define miniature programs (or equations) for each and every letter or symbol. When you want the letter or symbol at a particular size, the program is run to figure out which pixels should be set to what values. (Some actually specify more than one color to create the effect of smoother curves.) Because the programs are written to handle the desired font size as an input, the letters and symbols can be generated at any size.
Bitmap graphical representations, on the other hand, store every individual pixel, or some compressed representation of the pixels. Formats like BMP, GIF, and JPEG are essentially bitmap representations. GIF and JPEG are compressed representationsthey don't represent each and every pixel with 24 bits. Instead, they use some techniques to represent the same information but with fewer bits.
What does compression mean? It means that various techniques have been used to make the file smaller. Some compression techniques are lossy compressionsome detail is lost, but hopefully the least significant (perhaps even invisible to the human eye, or ear) detail. Other techniques like lossless compression lose no detail, but still scrunch the file. One of the lossless techniques is run length encoding (RLE).
Imagine that you've got a long line of yellow pixels in a picture, surrounded by some blue pixels. Something like this:
B B Y Y Y Y Y Y Y Y Y B B
What if you encoded this, not as a long line of pixels, but as something like:
B B 9 Y B B
In words, you encode "blue, blue, then 9 yellows, then blue and blue." Since each of those yellow pixels takes 24 bits (3 bytes for red, green and blue), but recording "9" takes just a single byte, there's a huge savings. We say that we're encoding the length of the run of yellowsthus, run length encoding. That's just one of the compression methods used to make pictures smaller.
There are several benefits to vector-based representations over bitmap representations. If you can represent the picture you want to send (say, over the Internet) using a vector-based representation, it's much smaller than sending all the pixelsin a sense, vector notation is already compressed. Essentially, you're sending the instructions for how to make the picture, rather than sending the picture itself. For very complex images, however, the instructions can be as long as the image itself (imagine sending all the directions on how to paint the Mona Lisa!), so there is no benefit. But when the images are simple enough, representations like those used in Flash make for faster upload and download times than sending the same information as JPEG images.
The real benefit of vector-based notations comes when you want to change the image. Let's say that you're working on an architectural drawing, and you extend a line in your drawing tool. If your drawing tool is only working with bitmapped images (sometimes called a painting tool) then all you have are more pixels on the screen that are adjacent to the other pixels on the screen representing the line. There's nothing in the computer that says that all those pixels represent a line of any kindthey're just pixels. But if your drawing tool is working with vector-based representations (sometimes called a drawing tool), then extending a line means that you're changing an underlying representation of a line.
Why is that important? The underlying representation is actually a specification of the drawing, and it can be used anywhere that a specification is needed. Imagine taking the drawing of a part, then actually running the cutting and stamping machines based on that drawing. This happens regularly in many shops, and it's possible because the drawing isn't just pixelsit's a specification of the lines and their relationships, which can then be scaled and used to determine the behavior of machines.
You might be wondering, "But how could we change the program? Can we write a program that would essentially re-type the program or parts of the program?" Yes, we can, and we'll do that in the chapter on text (Chapter 12).
7.1.3. Drawing Text (Strings)
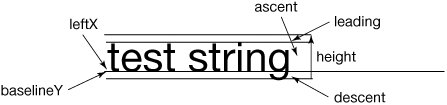
In order to add text to an image we can use the java.awt.Graphics method drawString(String str, int x, int y). This will draw the passed string at the passed x and y position. However, the x and y values are not the top left corner as is usual with the drawing methods. The x and y values give the baseline of the string which is the line on which you would write the string if you were using lined paper (Figure 7.6).
Figure 7.6. Shows font information including the baseline.
When you use the drawString method, the string will be drawn in the current color and font. The font specifies what the characters in the string will look like, what style will be used (bold, italic, plain), and how big the characters will be. You have seen that you can set the color using setColor(Color colorObj). You can also set the font using setFont(Font fontObj).
To create a Font object you specify the font name, style, and size: new Font(String name, int style, int size). You can always use any of Dialog, DialogInput, Monospaced, Serif, or SansSerif for font names. You can get an array of all of the available font names using:
> import java.awt.*; > GraphicsEnvironment env = GraphicsEnvironment.getLocalGraphicsEnvironment(); > String[] nameArray = env.getAvailableFontFamilyNames(); > for (int i=0; i < nameArray.length; i++) System.out.println(nameArray[i]);
The method to draw a passed string on the current picture at the passed x and y is:
Program 52. Draw a String on a Picture
/** * Method to draw a string on the current picture * @param text the string to draw * @x the x location to start at * @y the y location of the baseline */ public void drawString(String text, int x, int y) { // get the graphics object Graphics g = this.getGraphics(); // set the color g.setColor(Color.black); // set the font g.setFont(new Font("Arial",Font.BOLD,24)); // draw the string g.drawString(text,x,y); } |
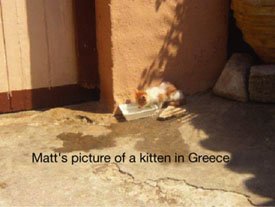
To use this program, you can use the picture explorer to determine where you want the baseline of the string to be and then use the drawString method to draw the string on the picture. Our son, Matthew, took a picture of a kitten on a trip to Greece. Let's add a string that explains the picture near the bottom of the picture (Figure 7.7).
[Page 225] > Picture p = new Picture(FileChooser.getMediaPath("kitten.jpg")); > p.explore(); > p.drawString("Matt's picture of a kitten in Greece",67,283); > p.explore();Figure 7.7. Drawing a string on a picture. (This item is displayed on page 224 in the print version)
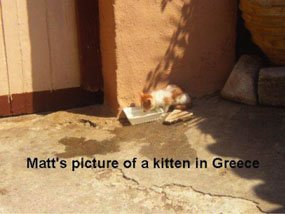
The string isn't quite in the center of the picture. What if we want it to be in the center as it is in Figure 7.8? How could we calculate the starting x position for the string such that the resulting string is centered? We know that the center of the picture horizontally is at half the width of the picture (int) (picture.getWidth() * 0.5). If we subtract half the length of the string in pixels from the center of the picture that would center the string. How do we calculate the length of the string in pixels? The length of the string depends on the number of characters in the string but also on the font used to draw the string.
Figure 7.8. Drawing a string centered on a picture.
To get information about the length of the string in the number of pixels drawn we can use the FontMetrics class which is in package java.awt. To get a FontMetrics object use g.getFontMetrics() where g is a Graphics object. The FontMetrics class contains methods for getting information about the display of a font. For example, we can get the length in pixels of a string using the method stringWidth(String str). We could get the height in pixels of a string drawn in the current font using the method getHeight(). We could get the length of the descent (part of a character like 'p' below the baseline) using getdescent().
Program 53. Drawing a String Centered Horizontally on a Picture
/** * Method to draw a horizontally centered string * on the current picture * @param text the string to draw * @y the y location of the baseline */ public void drawHorizontalCenteredString(String text, int y) { // get the graphics object Graphics g = this.getGraphics(); // create the font object Font font = new Font("Arial",Font.BOLD,24); // set the color g.setColor(Color.black); // set the font g.setFont(font); // get the font metrics FontMetrics fontMetrics = g.getFontMetrics(); // get the width of the string int strWidth = fontMetrics.stringWidth(text); // calculate the center of the picture int center = (int) (this.getWidth() * 0.5); // draw the string centered in x g.drawString(text, center - (int) (strWidth * 0.5), y); } |
EAN: N/A
Pages: 191