Section 4.2. Manipulating Pictures
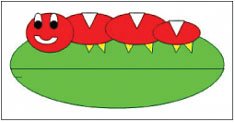
4.2. Manipulating PicturesWe manipulate a picture in DrJava by making a picture object out of a JPEG file, then changing the pixels in that picture. We change the pixels by changing the color associated with the pixelby manipulating the red, green, and blue components. We make a picture using new Picture(fileName). We make the picture appear with the method show(). We can also explore a picture with the method explore(). These are both object methods so they must be called on an object of the class that understands the method. This means that show() and explore() must be called on a Picture object (object of the Picture class) using dot notation as in pictureObject.show(). > String fileName = FileChooser.pickAFile(); > System.out.println(fileName); c:\intro-prog-java\mediasources\caterpillar.jpg > Picture pictureObject = new Picture(fileName); > pictureObject.show(); > System.out.println(pictureObject); Picture, filename c:\intro-prog-java\mediasources\caterpillar.jpg height 150 width 329 What new Picture(fileName) does is to scoop up all the bytes in the input filename, bring them in to memory, reformat them slightly, and place a sign on them "This is a picture object!" When you execute Picture pictureObject = new Picture(fileName), you are saying "The name pictureObject is referring to a Picture object created from the contents of the file." Picture objects know their width and their height. You can query them with the methods getWidth() and getHeight(). > System.out.println(pictureObject.getWidth()); 329 > System.out.println(pictureObject.getHeight()); 150 We can get any particular pixel from a picture using getPixel(x,y) where x and y are the coordinates of the pixel desired. This returns an object of the class Pixel which knows the picture it is from and the x and y position of the pixel in that picture. The x coordinate starts at 0 at the top left of the picture and increases horizontally. The y coordinate starts at 0 at the top left of the picture and increases vertically. We can also get a one-dimensional array containing all the pixels in the picture using the method getPixels(). This just grabs all the pixels in the first row from left to right followed by all of the pixels in the second row from left to right and so on till it has all of the pixels. > Pixel pixelObject = pictureObject.getPixel(0,0); > System.out.println(pixelObject); Pixel red=252 green=254 blue=251 > Pixel[] pixelArray=pictureObject.getPixels(); > System.out.println(pixelArray[0]); Pixel red=252 green=254 blue=251 Pixels know where they came from. You can ask them their x and y coordinates with getX() and getY(). > System.out.println(pixelObject.getX()); 0 > System.out.println(pixelObject.getY()); 0 Each pixel object knows how to get the red value getRed() and set the red value setRed(redValue). (Green and blue work similarly.) > System.out.println(pixelObject.getRed()); 252 > pixelObject.setRed(0); > System.out.println(pixelObject.getRed()); 0 You can ask a pixel object for its color with getColor(), and you can ask the pixel object to set the color with setColor(color). Color objects (objects of the class Color in package java.awt) know their red, green, and blue components. You can also create new Color objects with new Color(redValue,greenValue,blueValue) (the color values must be between 0 and 255). The Color class also has several colors predefined that you can use. If you need a color object that represents the color black you can use Color.black or Color.BLACK, for yellow use Color.yellow or Color.YELLOW. Other colors that are predefined are: Color.blue, Color.green, Color.red, Color.gray, Color.orange, Color.pink, Color.cyan, Color.magenta, and Color.white (or use all capitals for the color names). Notice that this is accessing fields on the Color class, not invoking class methods (no parentheses). Public class variables (fields) can be accessed using ClassName.fieldName.
> import java.awt.Color; > Color colorObj=pixelObject.getColor(); > System.out.println(colorObj); java.awt.Color[r=0,g=254,b=251] > Color newColorObj=new Color(0,100,0); > System.out.println(newColorObj); java.awt.Color[r=0,g=100,b=0] > pixelObject.setColor(newColorObj); > System.out.println(pixelObject.getColor()); java.awt.Color[r=0,g=100,b=0] If you change the color of a pixel, the picture that the pixel is from does get changed. However, you won't see the change until the picture repaints. > System.out.println(pictureObject.getPixel(0,0)); Pixel red=0 green=100 blue=0
You can automatically get a darker or lighter color from a Color object with colorObj.darker() or colorObj.brighter(). (Remember that this was easy in HSV, but not so easy in RGB. These methods do it for you.) > Color testColorObj = new Color(168,131,105); > System.out.println(testColorObj); java.awt.Color[r=168,g=131,b=105] > testColorObj = testColorObj.darker(); > System.out.println(testColorObj); java.awt.Color[r=117,g=91,b=73] > testColorObj = testColorObj.brighter(); > System.out.println(testColorObj); java.awt.Color[r=167,g=130,b=104] Notice that even though we darken the color and then brighten it the final color doesn't exactly match the original color. This is due to rounding errors. A rounding error is when calculations are done in floating point but the answer is stored in an integer. The floating point result can't fit in the type of the result (integer) and so some of the detail is lost. You can also get a color using ColorChooser.pickAColor(), which gives you a variety of ways of picking a color. ColorChooser is a class that we have created to make it easy for you to pick colors using the Java class javax.swing.JColorChooser. > import java.awt.Color; > Color pickedColorObj = ColorChooser.pickAColor(); > System.out.println(pickedColorObj); java.awt.Color[r=51,g=255,b=102] When you have finished manipulating a picture, you can write it out to a file with write(fileName). > pictureObject.write("newPicture.jpg");
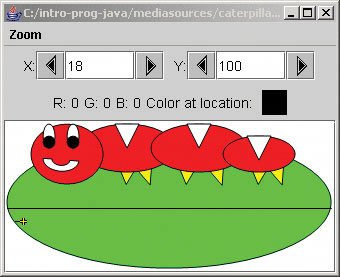
We don't have to write new methods to manipulate pictures. We can do it from the command area using the methods (functions) just described. Please reset the interactions pane by clicking the RESET button at the top of DrJava before you do the following. > import java.awt.Color; > String fName = "C:/intro-prog-java/mediasources/caterpillar.jpg"; > Picture picture = new Picture(fName); > picture.show(); > picture.getPixel(10,100).setColor(Color.black); > picture.getPixel(11,100).setColor(Color.black); > picture.getPixel(12,100).setColor(Color.black); > picture.getPixel(13,100).setColor(Color.black); > picture.getPixel(14,100).setColor(Color.black); > picture.getPixel(15,100).setColor(Color.black); > picture.getPixel(16,100).setColor(Color.black); > picture.getPixel(17,100).setColor(Color.black); > picture.getPixel(18,100).setColor(Color.black); > picture.getPixel(19,100).setColor(Color.black); > picture.repaint(); > picture.explore();
The result showing a small black line on the left side below the middle of the leaf appears in Figure 4.13. The black line is 100 pixels down, and the pixels 10 through 19 from the left edge have been turned black. Figure 4.13. Directly modifying the pixel colors via commands: Note the small black line on the left under the line across the leaf. |


EAN: N/A
Pages: 191