Chapter 20. Building Web Pages with Flash
| CONTENTS |
| |
|
- What Is Flash?
- Working with Flash in Dreamweaver
- Interview: Jennifer Bennett
- Working with Full-Screen Flash Pages
- Flash and JavaScript
- Flash Text and Flash Buttons
- Summary
In today's world of plugin media, Flash rules. You can integrate Flash into HTML pages in so many ways, and Dreamweaver offers so many tools for helping you do it, that this next chapter focuses solely on working with this one kind of plugin media content. The discussion covers the specifics of working with the Flash plugin, and special Dreamweaver features for coordinating Flash and HTML content.
What Is Flash?
Flash content is plugin-based media, following all the rules and restrictions of QuickTime, Shockwave, and the other media covered in the preceding chapter. The file format for online Flash movies is SWF (pronounced "swiff"). Most Flash media is created in the Macromedia Flash authoring program though, since Macromedia opened up the format to other developers, more and more content is being developed in other programs as well. Viewing SWF movies requires the Flash Player, which is available as a plugin and an ActiveX control. Macromedia estimates that 96 percent of the web-browsing public has some version of the Flash Player installed. Internet Explorer 6 for Windows comes with the ActiveX control preinstalled.
Advantages of Using Flash in Web Sites
Why is Flash so popular? Apart from being the right format in the right place at the right time (and well-promoted, as well), Flash content offers a variety of benefits perfectly suited to web developers interested in multimedia content.
Vector-Based Graphics
Probably the number one reason for the immense popularity of SWFs on the Internet is their small file sizes. Vector graphics create substantially smaller files than pixel-based graphics, such as GIFs and JPEGs, and the SWF format is currently the only way to put vector images on web pages and guarantee that most people will be able to see them. This opens the doors to full-screen, high-quality images and lengthy animations that won't choke low-bandwidth connections.
Pixels Versus Vectors There are two main ways that computers create, manipulate, and store graphics: as pixels, and as vectors. A pixel is a little square of color. Pixel-based graphics are built from a grid of pixels, like a tile floor where each tile is a different color. Pixels can be any size, but each pixel must be a solid color, and the pixels must exist in a grid. The computer stores the image information as a grid map, indicating how many pixels are in each row and column, and what color each one is. The more pixels there are, the larger the file will be. A vector is a mathematical formula that describes a shape (a line, a curve, a closed geometrical shape, for example). Vector-based graphics are built from shapes, each of which is essentially an open or closed vector curve that functions as an independent object in the picture. Each vector shape must be a solid color, but it can be any shape and any size; an image can contain any number of vectors. The computer stores the image information as a series of mathematical statements, each representing a vector. The more shapes there are, and the more complex they are, the larger the file will be. One of the many differences between pixel-based and vector-based graphics is that vectors take up much less storage space than pixels, so vector files are much, much smaller than their pixelated counterparts. Vector images can also be resized on the fly without losing image quality or increasing file size; pixel images cannot. Unfortunately, in our present state of computer technology, computers cannot display vector graphics; they can only display pixels. Any vector-based image must be translated into its pixel equivalent before it can appear onscreen some sort of graphics software is required to do this. Because computer displays are associated with pixels, the Internet and web browsers were developed with the ability to view pixel-based images, such as GIF and JPEG files. But because vector images are so much more efficient for downloading, they are more suited to web display. |
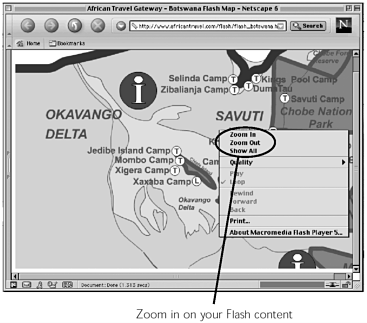
Unlike pixel graphics, vector graphics also are scalable, enabling designers to resize items on-the-fly in the HTML editor, create images that scale to match browser window size (without losing quality), and even enable web visitors to zoom in on images without losing detail, as in zoomable online street maps. The Flash Player takes advantage of this scalability, enabling users to zoom in on any Flash page content through a contextual menu. Figure 20.1 shows this happening.
Figure 20.1. Using the Flash Player's contextual menu to zoom in on an online map created in Flash.
Note
| | Finding and exploiting a widely supported vector graphics format has been something of a holy grail for web multimedia developers. At the moment, Flash is the clear leader in this race. Another developing format, the SVG (Scalable Vector Graphics) markup language, is poised to give Flash some competition in this area. See Chapter 32, "Technical Issues," for more on SVG. |
Client-Side Streaming
In addition to their naturally small file sizes, Flash movies partake of client-side streaming delivery. (See Chapter 19, "Plugins, ActiveX, and Java," for more on streaming.) This makes it possible, without any special server software, to create lengthy Flash animations that play as they download.
Animation
From its humble beginnings as FutureSplash Animator, Flash has developed into a powerhouse animation tool, used for everything from spinning corporate logos to full-length animated cartoons. The SWF format supports processor-efficient tweened animation, morphing, and other sophisticated effects. Several 3D animation programs (Swift3D, Amorphium Pro, and Strata3D) now offer the ability to export 3D Flash animations.
Interactivity
Each new version of Flash, and the Flash Player, supports more and more complex scripting and data-processing power through ActionScript, Flash's internal scripting language. ActionScript now looks and works much like JavaScript. Flash movies can send form data, using GET or POST, and can therefore be used in dynamic web sites with CGI and other server-side scripting.
Sound
Flash movies can contain sounds, optimized using MP3 compression for high-quality playback with minimal file size (see Chapter 19 for a discussion of sound formats and putting sound on web pages).
Disadvantages of Using Flash
Probably the single biggest complaint about Flash from web pundits is that it's used badly in web sites. But that's more a problem with Flash designers than with Flash itself. There's no inherent reason why Flash-based web sites cannot be as well-integrated, efficient, and effective as HTML sites. Flash does bring with it some technical problems, however.
The Plugin Problem
Anytime there's plugin media, there's a chance that some visitors might not have the plugin. There's also the problem of plugin versions. Although 96 percent of the browsers out there might have the Flash Player installed, not all of them have the most recent version (6). If you're in charge of creating the Flash content for your web site, you have to ask yourself whether you need to use the latest and greatest Flash technology available, or whether it's safer to scale yourself back and only create content that earlier versions of the plugin can access.
Ease of Updating
For web pages that change frequently, HTML is quicker to update than Flash, because you don't have to generate and upload an entirely new SWF file for every minor text change. Savvy Flash authors know how to make updating as easy as possible, and Dreamweaver's new Flash integration features help as well. But updating regular HTML pages is still more efficient.
Accessibility
Flash movies aren't accessible to users with text-based browsers, or browsers for the visually impaired. Flash movies aren't wide open to search engines. If there's internal navigation within a Flash movie, users can't bookmark specific sections of the movie or even use the browser's Back and Forward buttons to get around.
Note
| | Though Flash accessibility is still limited compared to HTML, Flash MX and the corresponding Flash Player 6 do offer improvements in this area over previous versions. |
Dynamic Data
Flash-based web pages can send and receive form data and interact with CGI and application servers. Through the Flash Generator application server, they're even capable of generating data-driven graphics at runtime, such as animated 3D bar charts that reflect current sales trends. However, you might not have access to technical staff that can accomplish this integration; knowledge of integrating server-based data and HTML is much more common.
Flash's Role in a Web Strategy
Flash content can be integrated into a web site in a variety of ways, just as it can be used for a variety of purposes. At the simplest level of involvement, small Flash animations can be used rather than animated GIFs to liven up pages. Many web sites open with a splash page containing a Flash animation that then segues to a standard HTML home page interface. Some sites present a full-screen Flash movie as the home page, moving on to standard HTML content on other site pages. Others put Flash content in page headers or footers, leaving the central content area in HTML. Although it's not done often, it's possible to create an entire site from full-screen Flash movies, so that the HTML serves only as a framework for holding the movies. (Figure 20.2 shows this strategy in action.)
Figure 20.2. The Tiffany's web site presents its entire interface in Flash, though an HTML-only version is also available.

Note
| | It's important to remember that even a full-screen Flash movie exists as an object embedded in a web page, surrounded by an HTML framework. Although it's possible to link directly to a SWF file, so that the Flash movie plays without an HTML framework, this limits the control you can have over the movie within the browser. You cannot assign parameters to it, or control it through scripting. Normally, even completely Flashified web sites are written as a series of Flash movies inside separate HTML documents. |
Working with Flash in Dreamweaver
Dreamweaver makes the process of putting Flash movies into web pages easy although the more you know about how Flash operates, the more you'll be able to take advantage of it.
Inserting Flash into a Document
To insert a SWF movie into an HTML document in Dreamweaver, use the Insert Flash object, found in the Media tab of the Insert bar (see Figure 20.3). Like the Shockwave object, this object inserts the Flash content using the <object> tag with an included <embed> tag. This combination targets the Flash ActiveX control where it's available and the Flash plugin where it's not. The code for the inserted object looks like this:
Figure 20.3. The Flash object as it appears in the Media tab of the Insert bar.

<object classid="clsid:D27CDB6E-AE6D-11cf-96B8-444553540000" codebase="http://download.macromedia.com/pub/shockwave/cabs/flash/swflas h.cab#version=5,0,0,0" width="365" height="250" title="myflashmovie" accesskey="a" tabindex="3"> <param name="movie" value="myflashmovie.swf"> <param name="quality" value="high"> <embed src="myflashmovie.swf" quality="high" pluginspage="http://www.macromedia.com/shockwave/download/index.cgi?P1_P rod_Version=ShockwaveFlash" type="application/x-shockwave-flash" width="365" height="250"> </embed> </object>
Tip
| | Don't confuse the regular Flash object with the Flash Text or Flash Button objects. Use the Flash object to insert Flash movies that already exist; use the others to create new, simple Flash movies for navigation or titling purposes. |
Examining this code, note that the codebase and pluginspage parameters are both used, to allow visitors without the Flash Player installed to download it. If you have enabled Flash accessibility options in the Accessibility Preferences, your code might also include title, accesskey, and tabindex attributes. (For more on Dreamweaver's new accessibility options, see Chapter 3, "Creating and Working with Documents.")
Using Flash Assets
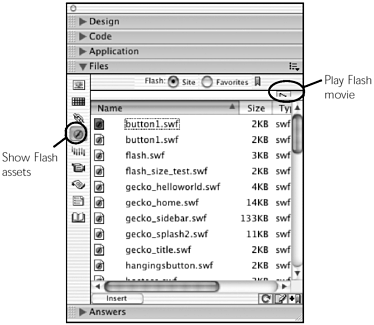
You can also add Flash movies to your documents from the Assets panel. In the panel, click the Flash icon to see a list of all SWF movies in your site. Flash movies can be added to Favorites and partake of all other asset-related benefits. When a Flash movie is selected in the Assets list, the panel display includes a Play button for previewing the animation (see Figure 20.4). For a complete discussion of using assets, see Chapter 22, "Local Site Management."
Figure 20.4. Viewing a Flash movie in the Assets panel.
Note
| | Flash assets won't be available to you if you haven't defined a site. |
Playing the Movie
Like other media elements, the Flash movie appears in your document as a gray box. To see the movie play, click the Play button in the Property inspector (see Figure 20.6). While the movie is playing, you can continue editing other content on the page, and even change some of its properties. To access other properties, or to resize the movie by dragging it in the Document window, copy it, or move it, you'll need to click the Stop button.
Figure 20.6. The Flash Property inspector.

Cloaking Flash Media for Site Synchronization
| | The new Dreamweaver cloaked media feature can be a big help in managing sites where a lot of Flash files are used. It used to be that if you kept your original Flash authoring files (FLAs) in your local root folder, you had to work around them when synchronizing local and remote folders. With Dreamweaver MX, you can specify that all files with the .fla extension be excluded from consideration when running the Select Newer Local, Select Newer Remote, and Synchronize commands. |
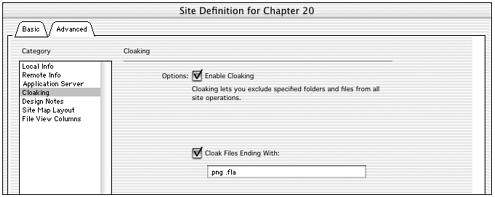
To cloak all FLAs in your site, access the Site Definition dialog box by choosing Site > Edit Sites, and in the dialog box that appears choosing a site and clicking the Edit button. In the Site Definition dialog box, choose the Cloaking category (see Figure 20.5). Enable cloaking, and enable cloaking by file type. Then make sure the.fla file extension is in the list of file types to be excluded. From now on, all FLAs within your local root folder will appear with a red line through them, and will be excluded from synchronization. (For more on cloaked media, see Chapter 22, "Local Site Management.")
Figure 20.5. Enabling cloaking in the Site Definition dialog box, so exclude FLAs from site synchronization.
Setting Flash Parameters
Figure 20.6 shows the Flash Property inspector, with typical and default settings in place. Flash movies accept a variety of parameters, some common to all media types and some unique to Flash. Most can be added using the Property Inspector; some are set automatically by Dreamweaver, and don't appear anywhere in the inspector. Some must be added using the generic Parameters dialog box. Table 20.1 lists parameters for the Flash plugin and ActiveX player, noting which parameters must be added manually.
| Parameter Name | Value | Description |
|---|---|---|
| name | Any one-word name | Required by the <embed> tag if the movie is to referred to by scripting. |
| ID | Any one-word name | Required by the <object> tag if the movie is to be referred to by scripting. |
| width | Integer or Percent value | The horizontal space the movie will be allotted on the page. If the width assigned is different from the movie's width, the movie will be resized (see "scale parameter"). |
| height | Integer or Percent value | The vertical space the movie will be allotted on the page. If the height assigned is different from the movie's height, the movie will be resized (see "scale parameter"). |
| align | Baseline, top, middle, bottom, texttop, absmiddle, absbottom, left, right | Determines how the browser will align the movie when text or other page elements are placed next to it (in the same table cell or paragraph, for instance). |
| bgcolor | Choose from the palette or enter a 6-digit hexadecimal number. | If the width and height values assigned are larger than the movie's dimensions, the color that will fill up the rest of the allotted space. |
| vspace | Integer (pixels) | Adds empty white space above and below the movie. Specify a number of pixels. |
| hspace | Integer (pixels) | Adds empty white space to the right and left of the movie. Specify a number of pixels. |
| autoplay | true or false | Whether the movie will start playing as soon as it loads. |
| loop | true or false | Whether the movie will repeat indefinitely, or play only once. This only has effect if the movie's own internal scripting doesn't have its own looping or stopping controls. |
| quality | low, medium, high, best, autolow, autohigh | Determines whether Flash Player will anti-alias the movie as it plays. (Quality doesn't change the file size, but can affect playback speed for processor-intensive animations.) See Table 20.2 for details. |
| scale | show all, noborder, exactfit | Determines how the movie's contents will be resized, if the width and height parameters are used to resize the movie object nonproportionally. Defaults to show all. See Table 20.3 for details. |
| [*] salign | left, center, right, top, middle, bottom | If the movie object has been scaled nonproportionally, this attribute determines how the movie's contents align within the object shape. See Table 20.4 for details. |
| [*] menu | true, false | Determines whether right-clicking (Windows) or Ctrl-clicking (Mac) on the Flash movie in the browser will cause a contextual menu to appear. Defaults to true. |
| [*] devicefont (Windows only) | true, false | Determines if an anti-aliased system font replaces text when specified fonts are not available. (Note: Normal, static text is automatically embedded in Flash movies; this setting refers to dynamic text and input fields only.) Defaults to false. |
| [*] wmode (IE/Windows only) | Opaque, window, transparent | Determines whether the background of the Flash movie is opaque or transparent, sitting in front or in back of other layered page elements. See Table 20.5 for details. |
| [**] pluginspage | http://www.macromedia.com/shockwave/download/index.cgi?P1_Prod_Version=ShockwaveFlash | Used by the <embed> tag. Allows users without the plugin to link directly to Macromedia's plugin download site. |
| [**] codebase (part of <object> tag, not a standard <param>) | http://download.macromedia.com/pub/shockwave/cabs/flash/swflash.cab#version=5,0,0,0 | Used by the <object> tag. Allows IE/Windows users without the ActiveX control to automatically retrieve the control from Macromedia. |
[*] Indicates parameters that must be set using the generic Parameters dialog box.
[**] Indicates parameters that Dreamweaver handles automatically.
Because Flash is not quite like any other plugin media, the meaning and potential uses of some of these items are not immediately obvious.
Width and Height
Flash movies can be resized numerically by entering values in the Width and Height fields of the Property inspector, or interactively by dragging the selection handles in the Document window.
Tip
| | Movies can only be drag-resized when they're not playing. To resize a movie while it's playing, enter new values in the Property inspector's Width and Height fields. |
Scalability is one of the most liberating aspects of designing with Flash. Unlike its handling of other plugin media, Dreamweaver is capable of determining the original dimensions of a Flash movie, and can reset its size if the current width and height don't represent its true dimensions. Also, unlike other plugin media, altering a Flash movie's width and height attributes will actually scale the movie, not simply adjust its cropping. Flash movies can even safely be set to percent-based dimensions, much like tables, so that they resize as the browser window resizes. To set a Flash movie to percent-based dimensions, type a number followed by the percent symbol into the Width or Height field (see Figure 20.7).
Figure 20.7. Setting a Flash movie's dimensions to percent-based numbers.

Note
| | Although any graphics created within Flash are vector-based and therefore scalable, Flash movies also can contain imported pixel images. Any pixel image inside a Flash movie has the same limitations as a pixel image outside Flash: Its presence will dramatically increase the movie's file size; and if the movie is scaled, it will lose image quality. |
Quality
Vector graphics such as those in Flash movies do not define pixels, but they must still be rendered by something that only understands pixels: the computer monitor. When the screen displays objects, it displays them with either aliased (jagged) or anti-aliased (smooth) edges. When the Flash Player plays a movie, each frame must be redrawn with either aliased or anti-aliased edges. How the player handles this is determined by the quality parameter. Table 20.2 lists possible values the parameter can take.
Movies playing at low quality will have jagged edges, but will play quickly. Movies set to high quality will have to be translated, frame-by-frame, into anti-aliased graphics, and so will have smooth edges but might not play at full speed on all computers. The other quality settings are all variations on this basic setup.
| Option | Description | Example |
|---|---|---|
| Low | No anti-aliasing (fastest playback). |
|
| [*] Medium | Some anti-aliasing on vector graphics; none on internal bitmaps. |
|
| High | Smooth anti-aliasing on vector graphics; internal bitmaps are anti-aliased, unless they're animated. |
|
| [*] Best | Anti-aliasing on vector and bitmap graphics, including animated bitmaps. | |
| Autolow | Starts in low quality mode, then switches to high quality if the user's computer is fast enough. | |
| Autohigh | Starts in high quality, then switches to low if the user's computer cannot keep up. |
[*] Not available in the pop-up menu must be typed into the input field.
The "auto" settings (Autolow and Autohigh) are the most flexible for dealing with a wide variety of computer speeds. Each tells the Flash Player to start out at a particular quality level and adjust the level as needed, depending on whether a particular user's computer can anti-alias and keep up with the frame rate. Of these two, Autolow will always play the first second or two of a Flash animation with jagged, aliased graphics, even on the fastest computer. Autohigh starts out with anti-aliasing turned on, so users with faster computers never have to see jagged graphics. If your Flash animation is at all complex, or if it includes a soundtrack, this is the best choice.
Note
| | The quality setting does not affect the Flash movie itself, and therefore has no effect on file size or download time. Its only purpose is to instruct the Flash Player how to display the movie. |
Scale
Because Flash graphics are scalable, and because you can set them to percent-based sizes that will change with browser window sizes, you need to determine what will happen when the movie's onscreen dimensions aren't the same proportions as the movie's true dimensions. Table 20.3 shows the details of this parameter, its possible values, and the effect of those values on the movie's appearance. If you examine the samples shown there, you'll see why Default (show all) is the default setting for this parameter it's definitely the most useful.
| Value | Description | Example |
|---|---|---|
| show all (default) | The movie contents are scaled proportionally, based on the smaller dimension (width or height) so that no contents are cropped away. Adding background color makes up extra space in the movie object along the larger dimension. |
|
| noborders | The movie contents are scaled proportionally, based on the larger dimension (width or height), causing contents to be cropped along the smaller dimension. |
|
| exactfit | The movie contents are scaled non-proportionally, to match the movie object's scaling. |
|
Note
| | Some designers, in trying to create truly full-screen Flash, mistakenly think that the noborders scale setting will eliminate any page borders around the movie. As you can see from the samples shown in Table 20.3, this isn't the case. To make a Flash movie hug the browser window edges when setting dimensions to 100%x100%, use Modify > Page Properties and set the page margins to 0. |
Scale Align (salign)
Don't confuse salign with the more standard align attribute. The purpose of salign is to work with the scale attribute, to determine how a proportionally scaled movie will fill a nonproportional box. Table 20.4 shows the settings for this attribute, and the effect of those values on movie appearance. Note that there are no values for centering horizontally or vertically; these are the default values, and needn't be specified at all.
| Value | Description | Example |
|---|---|---|
| L | When used with default scaling (show all), aligns the movie at the left (L) edge of any extra horizontal space. When used with scale=noborders, shows the left side of the movie if horizontal cropping must occur. |
|
| R | When used with default scaling (show all), aligns the movie at the right (R) edge of any extra space. When used with scale=noborders, shows the right side of the movie if horizontal cropping must occur. |
|
| T | When used with default scaling (show all), aligns the movie at the top (T) edge of any extra vertical space. When used with scale=noborders, shows the top part of the movie if vertical cropping must occur. |
|
| B | When used with default scaling (show all), aligns the movie at the bottom (B) edge of any extra vertical space. When used with scale=noborders, shows the bottom part of the movie if vertical cropping must occur. |
|
| (multiple values) | To assign both horizontal and vertical salign parameters, enter both relevant letters as the parameter's value (LB, LT, RB, or RT). The resulting code will look like: salign="LT", and so forth. |
The salign parameter does not appear anywhere in the Flash Property inspector. To set this parameter, click the Parameters button in the inspector to access the generic Parameters dialog box. (See Chapter 19, and refer to Figure 19.7, for a full discussion and example of working with generic Parameter settings.)
Window Mode (wmode)
Window mode is an attribute of the Flash ActiveX control only, so it only takes effect in IE/Windows. Within that environment, however, the wmode parameter allows you to control whether the Flash movie's background is transparent and how Flash movies interact with other page elements when DHTML layers are used. Table 20.5 details the various options for this attribute, and shows the effects of each.
| Value | Description | Example |
|---|---|---|
| opaque (default) | The background is opaque, using the Flash movie's internally specified background color; other layers can appear in front of the Flash movie. |
|
| window | The background is opaque; all other layers appear behind the Flash movie. |
|
| transparent | The background is transparent; other layers can appear in front of the Flash movie, or show through from behind it. |
|
If you are accessing your Flash content through the plugin, rather than the ActiveX control, Flash movies will always have opaque backgrounds, and any layer with Flash content will always show in front of all other layers.
Exercise 20.1 Inserting a Flash Banner
The exercises in this chapter give you a chance to practice working with Flash content in Dreamweaver; they also provide a chance to examine the various different ways Flash can be integrated into a site. In this first exercise, you start with a page that has an animated GIF banner and replace it with a SWF banner; and you examine the pros and cons of each choice. You can find all the required files for this and the other exercises in this chapter on the accompanying CD in the chapter_20 folder. Before proceeding with the exercise, copy that folder to your hard drive, and create a new site with that as your local root folder.
-
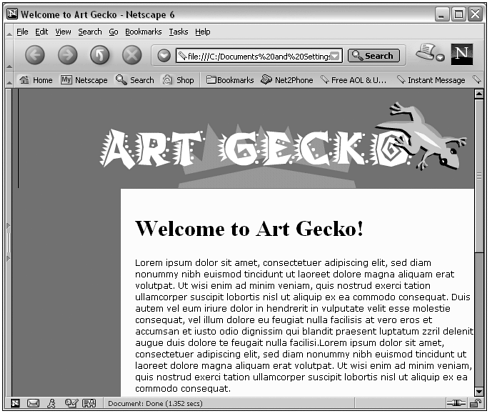
To start, from the exercise files on the CD find and open gecko_gifbanner.html. This sample home page includes an animated title banner, made from an animated GIF. Preview the page in your browser to see how the animation works. (Figure 20.8 shows the page.) The animation is set to play only once; if you blink, you miss it!
Figure 20.8. The gecko_gifbanner.html page as viewed in a browser.
-
Go to File > Save As, and save a copy of the file as gecko_swfbanner.html.(You will be comparing the animated GIF with a SWF banner, so you don't want to change the original page.) Select the GIF banner and delete it.
-
Use the Flash object to insert gecko_banner.swf into the banner spot. Dreamweaver will size the banner automatically and set other defaults. Are there any defaults that you need to change to make the new banner behave just like the old one? (Hint: How many times does the lizard run across the page?) Remember, you can preview the animation without previewing the entire page in a browser, by clicking the Play button in the Flash Property inspector.
-
Open the original file (gecko_gifbanner.html) and compare it to the new version. You should notice right away how much smaller the file size is for the SWF animation GIF animations are made of pixels, and therefore aren't suited to large graphics. One difference you won't see unless you upload both pages to a web server and view them live is that the timing of the SWF will be better than that of the GIF. This is because the first time any animated GIF plays through, the frames display as quickly as they download, regardless of their built-in timing. It's only on the second and subsequent loops that the frame delay becomes consistent. Flash movies stream much more efficiently.
-
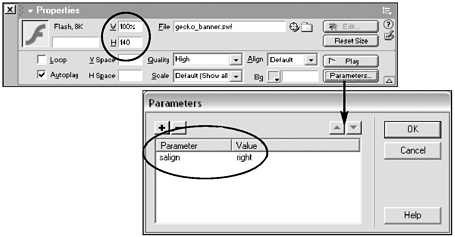
In gecko_swfbanner.html, the layout table is currently pixel-based, and therefore nonflexible. Using The Table Property inspector or Dreamweaver Layout view, change the table to a flexible table that is always 100 percent of the browser window's width. Then set the SWF banner so that it too has a width of 100 percent. Leave the scale attribute at the default so that extra space is added to make up for the excess width that could be added. Now you're taking advantage of Flash scalability. After you've done that, you might decide that the lizard animation looks silly in the middle of a big, wide page so, using the generic Parameters dialog box, set the salign so that the image hugs the right side of the page. Figure 20.9 shows how both of these settings will look in the various parts of the Property inspector.
Figure 20.9. The Flash Property inspector and generic Parameters dialog box, showing the gecko banner being assigned a variable width and right-side alignment.
-
Preview your page in the browser to see how the banner looks and how the animation resizes as you resize the window.
Optional: Have you actually done anything with the SWF banner that can't also be done with the animated GIF? Really, because you have only scaled the movie horizontally, you haven't resized the graphics only given the browser permission to add extra space on either side if needed. The same effect could be generated using the animated GIF, by setting the table to be 100 percent wide and changing the bgcolor of the banner's table cell to match the brown of the banner. Then you could set the cell alignment to right to mimic the salign.
Exercise 20.2 Stacking Flash Content and HTML with Layers (IE/Windows Only)
In this exercise, you'll see how much fancier your page can become if you layer HTML content over a Flash movie although this effect will only work for visitors with Internet Explorer 4+/Windows who are using the Flash Player ActiveX control.
-
This exercise creates an alternate version of the home page you saw in Exercise 20.1. Begin by opening gecko_layers.html. Examine the file and you'll see that the text and navigation bar are present, each in its own layer. This file includes an animated banner that extends under the page elements and becomes, in essence, an animated background.
-
You want to insert the background SWF movie on the page but not in a layer, and therefore behind all other layered content. (You could insert the SWF in its own layer, stacked behind the other two layers; but, because the movie will just be sitting in the background, this isn't necessary.) With the insertion point outside all layers, and using the Flash object, insert gecko_bg.swf. Leaving all the parameters at their default settings, preview the page in any browser you choose. You should get a lovely preview of the animated background, but the content layers won't show, even in IE/Windows. That's because you haven't set the wmode yet.
-
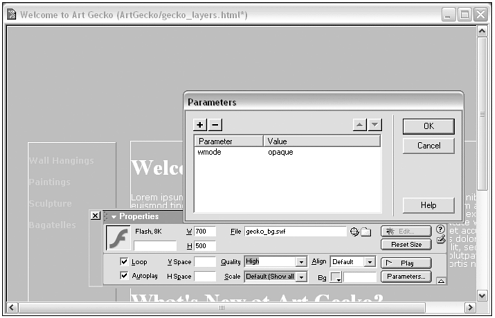
Select the background SWF and assign whatever parameters you think appropriate. In particular, use the generic Parameters dialog box to set the wmode to opaque (see Figure 20.10).
Figure 20.10. Setting the parameters for gecko_bg.swf in gecko_layers.html.
-
Change the page's bgcolor to match the background of the SWF. You want the movie to blend seamlessly with its environment, so that it looks more like a background element.
To match movie color and page color, do this:
-
Select the SWF and click the Property inspector's Play button to play it (so its colors show).
-
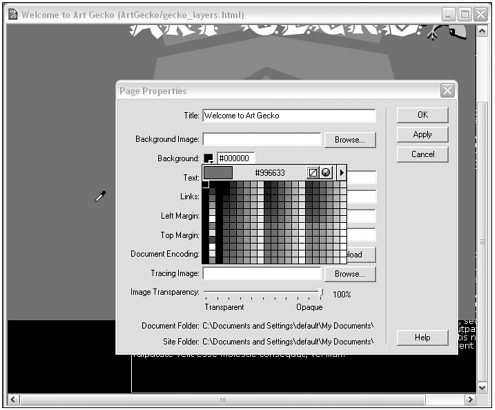
With the movie still playing, go to Modify > Page Properties. Click the Background Color button, and when the eyedropper appears, use it to sample the SWF movie's color. (Figure 20.11 shows this happening.) Voila! Seamless integration. (For more on color sampling in Dreamweaver, see "Working with the Color Picker" in Chapter 2.)
Figure 20.11. Playing a Flash movie in Dreamweaver, and sampling its color for the page background color.
Note

Do your colors match? If your monitor is set to display thousands of colors (16-bit color depth), you might notice that it's impossible to get the Flash movie color to match your page background. This is because the Flash Player renders colors slightly differently than the browser does. The difference won't show up on 8-bit monitors (displaying 256 colors) or in 24-bit monitors (millions of colors). However, any visitor who views your page on a 16-bit monitor will see the difference. It's not because you mismatched the colors, and there's nothing you can do about it.
-
-
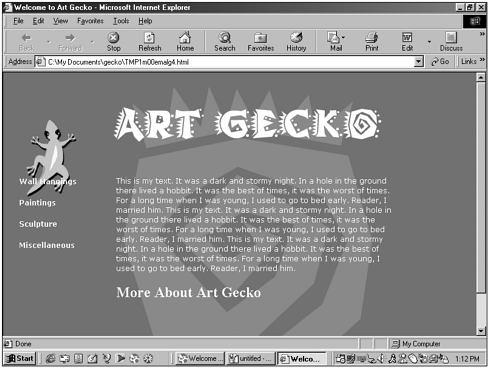
Preview your layered page in various browsers. In IE/Windows, you should see a complete page as shown in Figure 20.12. In other browsers and platforms, you'll just see the background movie.
Figure 20.12. The completed gecko_layers.html page as it appears in IE/Windows, with text showing on top of animated background.
Editing Flash Movies from Within Dreamweaver
| | New to Dreamweaver MX is a closer integration with Flash, similar in some ways to the Dreamweaver/Fireworks integration. Dreamweaver users with Flash MX on their computers can automatically launch Flash to perform edits, and even generate new SWFs. Links coded into SWF movies can be viewed and changed without leaving the Dreamweaver interface. |
Note
| | The Flash integration features will only work if you have both Dreamweaver MX and Flash MX on your computer. Earlier versions of Flash can't be used for this. |
Flash Launch-and-Edit
The procedure for creating a Flash movie and incorporating it into a Dreamweaver HTML page involves creating the main Flash file (FLA), exporting a SWF, and launching Dreamweaver to build an HTML document that houses the SWF. If you're working away in Dreamweaver and discover that the Flash movie needs editing, you have to launch Flash, open the FLA, make your edits, and export a new SWF, before coming back to Dreamweaver and continuing work on your HTML pages.
Note
| | In case you want to practice using Flash integration features on the exercise files from this chapter, the chapter_20/FlashFiles folder contains several of the original FLAs for the ArtGecko site. |
With the new launch-and-edit feature, the procedure is somewhat simpler.
-
Create the FLA in Flash MX, and export a SWF.
-
In Dreamweaver, insert the SWF into an HTML document.
-
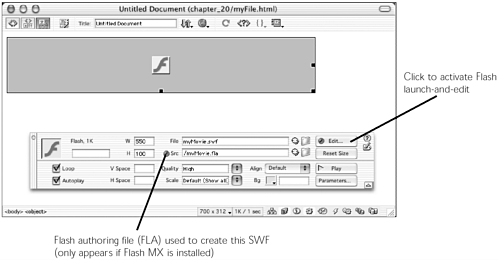
In the Src field in the Flash Property inspector (see Figure 20.13), browse or use Point-to-File to show Dreamweaver the FLA used to create this SWF. Dreamweaver will create a Design Note storing the information.
Figure 20.13. An embedded SWF and its Property inspector, with Flash integration features highlighted.
-
The next time you need to edit the FLA, select the SWF in your Dreamweaver document, and click the Property inspector's Edit button (see Figure 20.13). Dreamweaver will launch Flash and open the source file you specified earlier.
-
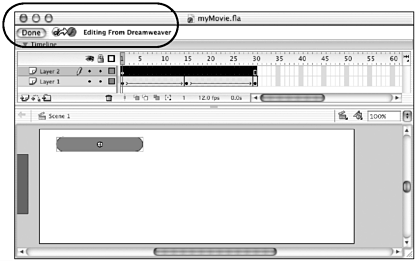
In Flash, make your changes to the FLA. When you're done, instead of reexporting, click the Done button (see Figure 20.14) to return to Dreamweaver. Flash exports a new SWF, and Dreamweaver now displays your document with the new movie in place.
Figure 20.14. The Flash authoring file (FLA) for an embedded SWF, showing in the special launch-and-edit version of the Flash application window.
Note
| | Launch-and-edit for Flash movies works the same as the launch-and-edit feature for integrating with Fireworks. For more on Fireworks integration, see Appendix A. |
Updating Links in SWF Files
If your SWF file contains links (ActionScript getURL() actions), you can change these links without launching Flash at all, using the Dreamweaver site map and Change Links command. Do it this way:
-
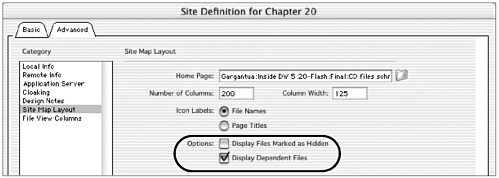
Configure your site map preferences to show dependent files. Choose Site > Edit Sites, and in the dialog box that appears, select your site and click Edit. In the Site Definition dialog box, choose the Site Map Layout category. If you haven't done so already, use the Home Page field to define a home page for your site. (You need to do this before you can use the Site Map feature.) Select the Show Dependent Dependent Files option (see Figure 20.15).
Figure 20.15. Setting site preferences so the site map displays dependent files.
-
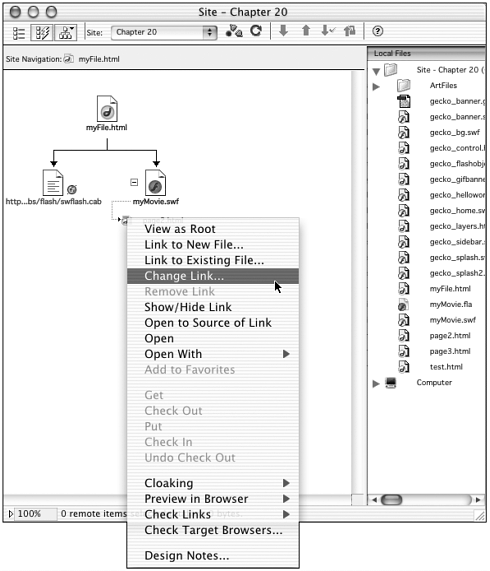
In the Site window, click the Site Map button to show the site map. Your embedded SWF file will show as a dependent file of its parent HTML document. All links within the SWF file will also be shown as dependents (see Figure 20.16).
Figure 20.16. Site map showing an HTML document, the SWF embedded within it, and the link within the SWF, along with the Change Links command.
-
Right-click (Windows) or Ctrl-click (Macintosh) on the linked file you want to change to access the contextual menu (as shown in Figure 20.16), and choose Change Link. In the dialog box that appears, choose a new file that the SWF should link to.
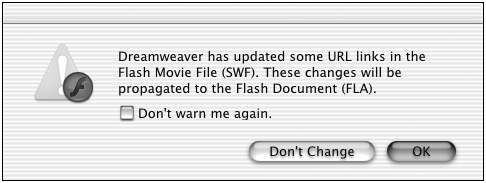
When you do this, several things happen. Dreamweaver updates the getURL() action within the SWF. It also generates a Design Note noting that this has been done. The next time you launch the FLA in Flash, that Design Note will tell Flash that a link has been changed, and it will offer to change the link in the source file as well (see Figure 20.17). (If you don't let Flash update the link in the source file to match the link Dreamweaver altered in the SWF, the next time you export a SWF the link will revert to whatever it was before you used Dreamweaver to change it, because the SWF Dreamweaver created will be overwritten.)
Figure 20.17. Launching a FLA file after Dreamweaver has updated a link in the SWF will cause Flash to prompt you with this alert.
Note
| | In case you're curious about how all this inter-application communication works, you can open and examine the Design Note that makes it happen. Because Design Notes are invisible in the Site window, leave Dreamweaver and use Explorer (Windows) or the Finder (Macintosh) to examine your root folder. Design Notes are stored in that folder, within a _notes folder. Open that folder and you'll find a text file with the name of your SWF file followed by the .mno extension myFile.swf.mno, for instance. Open that file in a text editor (or in Dreamweaver Code view) and you'll see in <infoitem> tag identifying the source FLA file, one for each original link in the SWF, and one for each changed link. Dreamweaver accesses this Design Note to populate the Flash Property inspector and to generate the Flash items in the site map; Flash accesses it to determine if any links need to be updated within the original FLA, when you open that file for editing. |
Interview: Jennifer Bennett
Business Name: Grass Roots Consulting
URL: www.g-r-c.com
Jennifer Bennett has long been one of the top Macromedia authorized Director trainers in the country, and a few years ago added Flash to her curriculum. She has trained Macromedia personnel, and given workshops at the Macromedia and MacWorld Expos, as well as providing in-house training across America.
Why is Flash so popular in web sites today? Do you see that trend continuing?
Flash gives designers or developers a great way to express themselves with graphics and text as opposed to text only. Also, the interactive aspect of Flash makes web sites more interesting, whether that interactivity is used for navigation or information. For web sites used for training, Flash content provides the ability to explore the subject matter in ways that help retain the information as opposed as simply reading text. I definitely see Flash's popularity continuing. I think eventually all web sites will incorporate Flash.
Some web design experts, like Jakob Nielsen, argue that Flash is more often a detriment than an asset to a web site. Would you say this is a fair assessment? What problems do you most often see in web sites that use Flash?
Flash is still a new technology and with any new technology, people feel they must use it, for good or bad. This churns out a lot of bad Flash design, which reflects on the technology as a whole badly. However, even though the technology is still new, Macromedia claims that 98.6% of browsers have the Flash plugin, which is a phenomenal number. Two years ago I would have said that having Flash on a web site could be a detriment because you don't want people to have to download a new plugin just to view your site, but that really isn't the case with Flash any more. I do still see problems with Flash and accessibility for those with disabilities. It doesn't matter how beautiful your design is if someone with a visual disability can't navigate your site because of the Flash elements.
How effective is Flash at creating data-driven sites, compared to straight HTML? What are the advantages of using Flash for this, over HTML?
I love Flash interfaces for data-driven sites. Flash offers a new dimension for these sites that has not been seen before. Flash and Generator allow the data to be retrieved to be graphics, sounds, charts, and more instead of simply text.
You do a lot of training for Flash users. What would you say Flash is mostly being used for, out there in the real world? Is it being used to its full potential?
There are still only a few sites that I think are using Flash to its full potential mostly because of the young age of the technology. However, those few sites just can't be beat. Strangely enough, I feel that Macromedia's site is not using Flash as effectively as it could. I think it's the young designers who don't know the "old school" rules of web design so they can more easily think "outside of the box" that are using Flash more effectively. They haven't heard "no, Flash can't do that," so they find a way to accomplish what they want with the application.
You really can't mention just one use of Flash out there. It's being used for Internet-based training, entertainment, navigation, disseminating information, and just about anything else you can think of.
What strategies do you recommend to web designers when dealing with plugin detection, redirection, and so forth?
Luckily, Flash can do a lot of that for you without you knowing anything. The Publish command in Flash will generate an HTML document for you that will detect whether the correct plugin is available. If the designer can take the time to fully research the Publish command, or take advantage of the Dreamweaver Check Plugin behavior, detection and redirection should not be a problem.
Working with Full-Screen Flash Pages
In a full-screen Flash page, the Flash movie is the only content on the page, and for all viewing and interactivity purposes, it becomes the page. Full-screen Flash can be used for an entire splash screen or opening animation; for individual pages, such as the home page or main section pages; or even for an entire web site.
Dreamweaver's Job: Create the HTML Framework
If the HTML document exists only as a framework to hold the Flash movie, there isn't much work to be done in Dreamweaver. Typically, your job in Dreamweaver is to do the following:
-
Set movie parameters. The <object> and <embed> tags and their parameters govern how the browser and Flash Player will present the movie. quality, scale, loop, and autoplay must be set for the movie to play as desired. The movie can be left to its original dimensions (best if it contains photographic elements), or set to be truly full-screen by assigning width and height to 100%x100%.
-
Set page margins. The HTML code determines where on the page the movie sits, including how closely it's allowed to snuggle up against the top and left edges of the browser window. To make the movie completely cover the browser window space, set its dimensions to 100%x100% and set the page margins to 0. (Do this in Modify > Page Properties. See Chapter 3 for more on margins.)
-
Set page background color. It's always a good idea to match the page and movie background colors, so no slivers of a different color appear at the edges of the browser window.
-
Perform plugin and browser checks. If the user's computer doesn't have the correct plugin, the entire full-screen movie won't play. You can use JavaScript behaviors, which execute onLoad, to make sure the movie will play and to reroute visitors who can't see the movie. (See Chapter 19 for a discussion of plugin detection in Dreamweaver.)
Flash's Job: Create Interactivity and Links
Because, after the page has been loaded, the Flash movie is the entire interface, all interactivity including links must be built in to the SWF. A Flash movie might just call another Flash movie to replace itself on the page, in which case the document's URL doesn't change and the visitor probably won't even be aware that there has been a change. This is done internally with Flash's loadMovieNum() ActionScript command.
The Flash movie also might link to another HTML document that contains other Flash movies. In this case, the user will see the URL change, and the browser's Back and Forward buttons can be used to navigate between movies. This is done internally with Flash's getURL() ActionScript command.
Exercise 20.3 Creating a Flash Splash Page
In this exercise, you add an opening splash page to the Art Gecko home page created in the preceding exercise. The splash page will consist only of a full-screen Flash animation with a built-in link to the home page. All exercise files can be found in the chapter_20 folder on the CD.
-
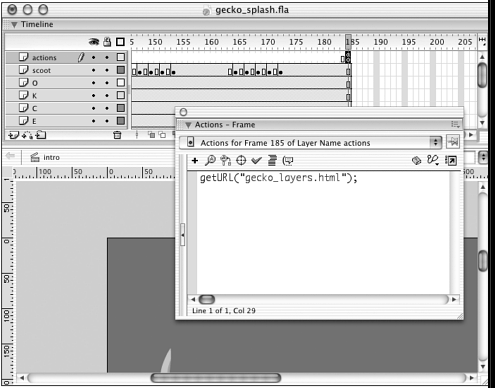
If this were a real project and you were responsible for it, you would start by creating the Flash movie and assigning a getURL() command within the movie to make it automatically load the home page. Because this isn't a real project, gecko_splash.swf has already been created for you, with the link in place. Figure 20.18 shows how the link has been added. (You can test-play gecko_splash.swf by opening it directly from your desktop double-clicking it should automatically launch the Flash Player.)
Figure 20.18. The gecko_splash.swf file being created in Flash. The getURL() action has been assigned to the final frame of the timeline, so it executes automatically as soon as the animation finishes playing.
-
To house this movie, create a new Dreamweaver document. Save it in the ArtGecko folder. (It must be in the same folder as the home page, because of how the relative URL has been written into the Flash movie). Call it gecko_splash.html.
-
Use the Flash object to insert gecko_splash.swf. To make the movie automatically resize with the browser window, set Width and Height to 100%x100%. In the Property inspector, make sure Autoplay is selected. Because you want the movie to play only once, you can deselect Looping; but because of the movie's internal scripting, it won't loop regardless of what setting you choose here in your HTML parameters.
-
To make the movie completely take over the page, you need to set the page's background color and margins. First, so you can sample the color, use the Property inspector's Play button to start the movie playing. Then go to Modify > Page Properties. Remove the page margins by setting Left Margin, Top Margin, Margin Width, and Margin Height all to 0. Using sampling, set the page background color to match the Flash movie (like you did in the preceding exercise) and click OK. If you check your code after having done this, your <body> tag should look like this:
<body bgcolor="#996633" text="#000000" leftmargin="0" topmargin="0" marginwidth="0" marginheight="0">
-
Save your file and try it out! When the page loads, the Flash animation should take over the screen. It should play once through and then load your layered home page. (If the home page doesn't load properly, make sure the filename is still gecko_layers.html, and that it and the splash page are in the same folder.)
| | Note |
The relative pathname used in the Flash movie's internal link requires that the two HTML documents be in the same folder. The gecko_splash.swf file does not need to be stored in that same folder. Try it and see you can move the SWF file to a subfolder (making sure to change the reference to it in gecko_splash.html), and when you browse the document it will still call gecko_layers.html.
Exercise 20.4 Creating a Full-Screen Flash Page
In this exercise, you create an alternate home page for the Art Gecko web site, doing away with the multilayered setup from the preceding exercise by using a Flash-built version of the entire opening presentation. You'll also see how Flash's internal loadMovie() command can be used to navigate between SWF movies without creating new HTML documents or changing the URL in the browser window. All exercise files can be found in the chapter_20 folder of the CD.
-
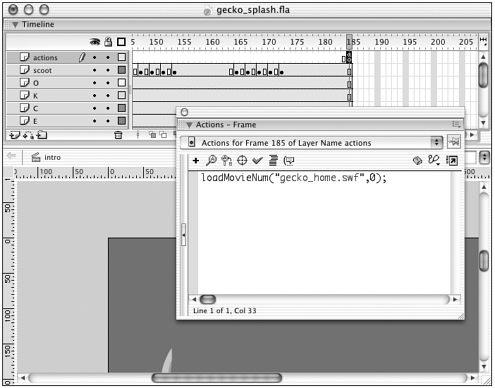
For this exercise, you need two Flash movies: a revised splash movie, and a movie containing the full-screen home page presentation. Again, in the real world you would start this project by building both the gecko_splash2.swf and gecko_home.swf files in Flash. You would assign a loadMovie() action to the final frame of the splash movie, to automatically load the home page movie. You can launch both files from your desktop to see what each one contains. Figure 20.19 shows the loadMovieNum() command begin to add to gecko_splash2.swf.
Figure 20.19. The gecko_splash2.swf file being created in Flash, with loadMovieNum() action being added.
-
You now need an HTML document to hold the Flash movies. Instead of creating a new page from scratch, open gecko_splash.html and save it as gecko_fullscreen.html.
-
This page currently contains gecko_splash.swf. If you delete this movie and insert the new movie, you'll have to set its parameters all over again. So, instead, use the existing movie code, but just change the src parameter to point to the new movie. Select the Flash movie, and, in the Property inspector, find the File input field and click the Browse button next to it. In the dialog box that appears, find and choose gecko_splash2.swf.
-
That's it! Try the movie out in a browser to see it work. Can you tell at which point the new movie is being loaded? Note that the URL shown in the browser's location bar doesn't change when the new movie loads. (This makes it impossible for users to bookmark the home page. They can bookmark only the splash page.)
Flash and JavaScript
Scripting Flash movies in the browser follows the same rules as scripting any plugin media type (see Chapter 19 for more on this). Whenever you want Flash movies to talk to the browser, or the browser to give commands to the Flash Player, you use Flash ActionScript to send JavaScript instructions, or JavaScript to send ActionScript code.
Scripting In: Using JavaScript to Control Flash
A variety of JavaScript commands exist for communicating with the Flash Player, in its plugin and its ActiveX form. Table 20.6 lists some of the most commonly used of them. As you can see from examining the figure, it's possible to send the Flash movie to a certain frame in its timeline; to start and stop playback; and even to control embedded movie clips by setting their properties and controlling their timelines. (The more you know about Flash authoring, the more useful this information will be to you.) Before relying on any of these commands, remember that although ActiveX media controls support extensive scripting for IE/Windows, no commands given to media objects will work within IE/Mac. Netscape 6 also has some difficulties passing commands to Flash movies.
| Name | Syntax | Description |
|---|---|---|
| Play() | myMovie.Play() | Starts playing the specified movie. |
| StopPlay() | myMovie.StopPlay() | Stops playing the specified movie. |
| Rewind() | myMovie.Rewind() | Sends the movie to its first frame. |
| GotoFrame() | myMovie.GotoFrame (frameNumber ) | Sends the movie to a specified frame number. |
| Zoom() | myMovie.Zoom(percent ) | Zooms the view by a factor() specified by percent. Numbers smaller than 100% increase the magnification. |
| SetZoomRect() | myMovie.SetZoomRect (left, top, right, bottom ) | Zooms in on a rectangular area of the movie. Values are integers representing twips (1440 twips per inch; 20 twips per point). |
| SetVariable() | myMovie.SetVariable (varName, value ) | Sets the value of a specified Flash variable. Both arguments are strings. |
| GetVariable() | var a = myMovie.GetVariable (varName ) | Returns the value of a specified Flash variable, as a string. |
| TCallFrame(), TCallLabel() | myMovie.TCallFrame (target, frameNumber ), myMovie.TCallLabel (target, frameLabel ) | In the target timeline, executes any frame actions in the specified frame. (Similar to the Flash call() method.) |
| TPlay() | myMovie.TPlay(target ) | Plays the specified movie clip. |
| TStopPlay() | myMovie.TStopPlay (target ) | Stops playing the specified movie clip. |
| TGotoFrame(), TGotoLabel() | myMovie.TGotoFrame (target, frameNumber ), myMovie.TGotoLabel (target, frameLabel ) | Sends the timeline of the specified movie clip to the specified frame. |
| TCurrentFrame(), TCurrentlabel() | var a = myMovie. TCurrentFrame(target ), var b = myMovie. TCurrentLabel(target ) | Returns the number or label of the current frame, for a specified movie clip. |
Not all methods work with the Flash plugin. For a complete list of supported JavaScript methods, visit www.macromedia.com/support/flash/publishexport/ scriptingwithflash/scriptingwithflash_03.html.
Scripting Within Dreamweaver: The Control Shockwave or Flash Behavior
For basic Flash control using JavaScript, the Control Shockwave or Flash behavior lets you use HTML page elements to start, stop, rewind, and send movies to specific frames without writing a lick of code. (Note that the only reason to use this behavior is if you want non-Flash page elements to control the movie. Flash movies are capable of containing their own internal buttons that will start, stop, and so on. If the movie contains its own interactivity, you don't need to add any JavaScript in Dreamweaver.)
To control a Flash movie using this behavior, follow these steps:
-
Insert a Flash movie in your document.
-
Give the movie a one-word name. You can do this in the Flash Property inspector by filling in the name field in the upper-left corner (refer back to Figure 20.6).
-
Decide what sort of page element, and event, you want to trigger the action (when the user clicks a text link, when the page loads, and so forth).
-
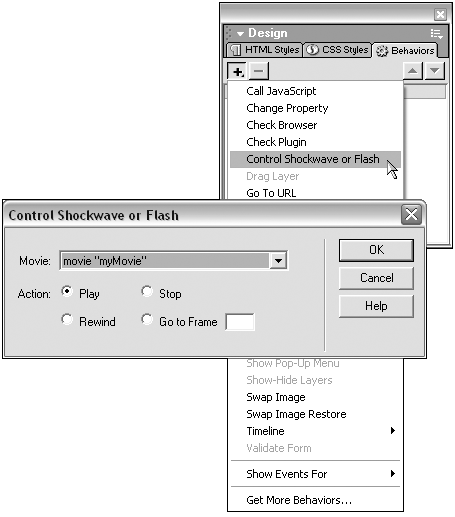
Select the element that should trigger the action (page, text link, and so on) and use the Behaviors panel to apply the behavior. Figure 20.20 shows the behavior being chosen and the resulting dialog box with its various options.
Figure 20.20. Choosing and configuring the Control Shockwave and Flash behavior.
Note
| | As its name implies, the Control Shockwave or Flash behavior also can be used to control a Director Shockwave movie. The same procedure outlined here would apply. (See Chapter 19 for more on working with Shockwave.) |
Scripting Out: Using Flash to Send JavaScript Instructions
Just as you can (theoretically, anyway) send scripting messages from the browser to the Flash Player, so you can send messages from the Flash movie to the browser. Because this is done in Flash, not in Dreamweaver, it's beyond the scope of this discussion. But it's handy knowledge to have, anyway. Just like, in the preceding exercise, you used javascript: in a link field to send a JavaScript command in to Flash, Flash uses the same syntax in its getURL link command to send commands out.
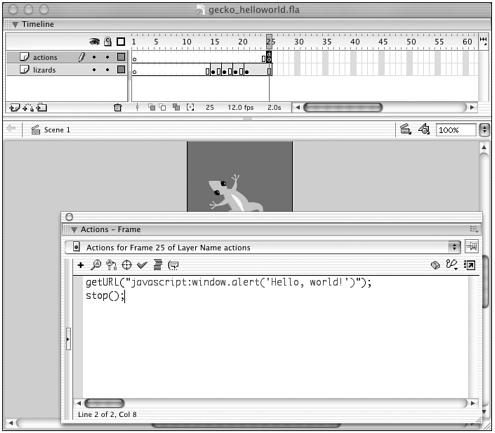
Figure 20.21 shows the Flash file gecko_helloworld.swf with this link in place. To see how the link works, find that file in the chapter_20 folder, place it in an HTML document, and preview in a browser. Note that, because this is JavaScript coming out of a Flash movie instead of going in, it should work much more reliably in the different browser/platform combinations.
Figure 20.21. The gecko_helloworld.swf file being created in Flash.
Flash Text and Flash Buttons
You've seen how complex Flash content, including interactive movies, can be inserted into HTML pages within Dreamweaver. The Flash Button and Flash Text objects enable you to create, customize, and insert simple Flash-based page elements (buttons and text) into a web page without ever leaving Dreamweaver, and without having to own or know how to use Flash (see Figure 20.22). This opens up all sorts of new horizons for integrating different kinds of Flash content in your web sites, quickly and inexpensively.
Figure 20.22. The Flash Button and Flash Text objects, as they appear in the Common tab of the Insert bar.

How Dreamweaver Creates SWF Files
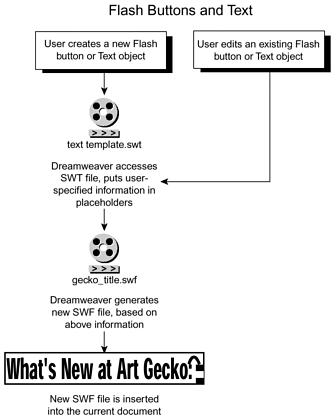
The technology that makes Dreamweaver-created SWF files possible is Macromedia Flash Generator. Generator is a software system for creating Flash graphics dynamically from changing information in a database, similar to the way ASP and ColdFusion create text and page layouts dynamically. To work with Generator, the Flash author creates a special SWT (small web template) file, which is essentially a SWF file with placeholders for collecting and displaying dynamic data. When the page is uploaded to a web server, then, as visitors access it, the Generator application server, which sits on the server, creates SWF files to display on the page by filling in the SWT placeholders with data from a server-side database.
Using Generator technology, Dreamweaver creates Flash Text and Flash Button objects from SWT files stored in its Configuration folder. Whenever you choose one of the Flash objects from the Insert bar, Dreamweaver collects information from you (text to enter, typestyle, and so on), feeds that information into placeholders in one of its SWT files, and generates a SWF file. Figure 20.23 shows an overview of the whole process.
Figure 20.23. How Dreamweaver creates the SWF files for Flash Button and Text objects from SWT templates.
Creating and Inserting Flash Objects
You create Flash Buttons and Text at the same time as you insert them by clicking the Flash Button or Flash Text object in the Insert bar. When you click the object, a dialog box displays, enabling you to customize the button or text that will be created. When you click OK to exit the dialog box, the SWF file is created and the object is inserted.
Note
| | For some reason, the code Flash Text nor Flash Button is not XHTML/HTML 4.01 compliant. Not all attribute values are placed within quotes, as XML standards require. To make your code compliant, go to Code view and add quotes around all attributes for your Flash objects. |
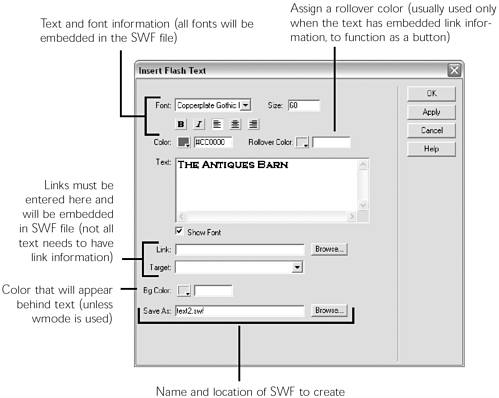
Figures 20.24 and 20.25 show the dialog boxes for the Flash Button and Flash Text objects. They give you similar choices for specifying type, color, and linkage. The Flash Button dialog box also enables you to choose a button style.
Figure 20.24. The Flash Button dialog box, which enables you to choose a button "style" or template to work from, and to customize its text and behavior.
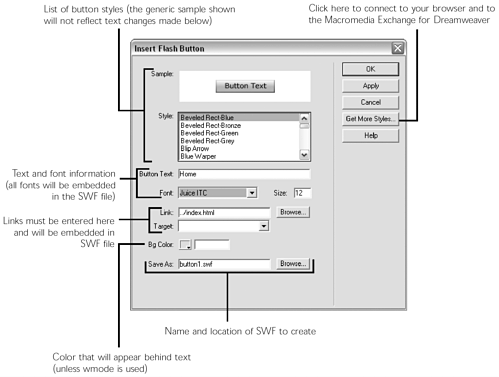
Figure 20.25. The Flash Text dialog box, which enables you to specify text and typestyle, colors, and links for the new text.
Button Style (Flash Button Object Only)
When you insert a Flash Button, Dreamweaver creates a SWF file based on one of a dozen or more SWT templates. Each template contains the graphic elements for a different button. In this dialog box, each SWT template is shown as a separate button style. The graphic appearance of the button styles (color, shape, decorations, and so on) is not customizable because this information is built in to the SWT. Any rollover effects also are built in to the button style and can't be edited here.
To get more button styles from the Macromedia Exchange, click the Get More Styles button in the editing dialog box. This will launch your browser and connect you to the Exchange (if your computer is connected to the Internet). When at the Exchange, navigate to the Flash Media category of extensions to see currently available buttons and other Flash-related extensions. Each set of button styles is saved as a Macromedia Extension Package (MXP) file, ready for use with the Extension Manager.
Text and Typestyle (Button and Text Objects)
If you're inserting Flash Text, or if the Flash Button style you're inserting includes a text label, you can determine what text will appear and how it will be formatted. Note that, because fonts are automatically embedded in all Flash movies, you can set the typeface to any font installed in your system. This font will then become part of the SWF movie.
Link and Target Information (Button and Text Objects)
If you want your Flash objects to contain any links, you need to assign the link information in this dialog box. The link will then become part of a getURL() command in the generated SWF file. This is because, unlike images and text, media objects cannot just be wrapped in an <a> tag so you can't use the Property inspector to assign links. (For more on links and targets, see Chapter 6, "Links and Navigation.")
Background Color (Button and Text Objects)
Like pixel images, Flash content always exists inside its own rectangle. This means that if you're creating Flash Text, or if the Flash Button style you've chosen is not square or rectangular, you'll need to assign it a background color that matches the color of whatever it will be sitting on (page, table cell, layer, and so on). The following tips apply to assigning background colors:
-
Color sampling works here like it does throughout Dreamweaver. To match your web page's background color, just position the Flash object dialog box so that you can see some portion of your document behind it, and then click the color swatch; when the eyedropper cursor appears, click to sample the page or other desired background color.
-
Background color is not just for Flash Text! Even for rectangular Flash Buttons, you still want to assign a background color, unless you want your button to be surrounded by a little white halo on the page.
-
Although this will have an effect only when seen in IE/Windows, you can use the wmode parameter to make the background invisible. After you've exited the dialog box, select the Flash object and use the generic Parameters dialog box from the Property inspector to assign wmode=transparent.
Previewing Your Work (Button and Text Objects)
Note that the dialog box offers only limited preview capabilities as you're creating the SWF. You can preview in general what a button style will look like, but other than that, you have no visual feedback as you're working. This is because, as you're making your choices in the dialog box, Dreamweaver has not yet created the SWF file it will be inserting, so there's nothing to preview. If you're using the dialog box to create a new Flash object, instead of editing an existing one, you can't even use the Apply button to see your changes in the Document window, because Dreamweaver can't apply changes to a SWF it hasn't created yet. For this reason, creating Flash Button and Text objects usually involves several trips to the editing dialog box.
Working with Flash Objects
After inserted, the Flash Button or Text is coded into your HTML the same way that any SWF file would be, using <object> and <embed> tags. Just like any Flash movie, you can assign any of the parameters listed in Table 20.1. By default, Dreamweaver assigns Flash Text objects a scale value of exactfit, allowing nonproportional scaling. Unlike standard Flash movies, the movie contents are always visible in Dreamweaver Design view, meaning you don't have to use the Property inspector's Play button to preview them. This makes resizing more intuitive, because you don't have to stop the playback before using the object's resize handles. Here are a few other things to consider when working with these Flash objects.
Editing
You edit a Flash Button or Text object by going to the Property inspector and clicking the Edit button or by double-clicking the object itself. Either method reopens the original Flash object dialog box, ready to accept customization changes. Be aware that, because SWF files can't be edited after creation, when you open the dialog box, make changes, and click OK, Dreamweaver is generating a new SWF, not editing the existing one.
Undoing
Again because Dreamweaver is creating SWF files as it goes, you can't use Edit > Undo or the History panel to undo edits made to Flash text or buttons. It makes sense when you think about it when you perform your edits, Dreamweaver creates an uneditable SWF file and saves it to your hard drive. Because that file is not editable, and is already saved, there's nothing to undo. The only way to undo changes to Flash Text and Button objects is to reopen the editing dialog box and manually change things back to the way they were.
Resizing
An obvious statement, but one worth repeating: Flash objects are resizable. Have a blast, with no worries about losing image quality if you scale an object up.
Duplicating
After you've created a Flash object, you can of course duplicate it as you would any page element (copy and paste, or Option/Ctrl-drag). Be aware, however, that each duplicate is an instance of the same SWF file. To change the text, color, link information, or other embedded properties in a Flash object, you'll need to tell Dreamweaver to generate a new SWF file, instead of replacing the original. The procedure is as follows:
Tip
| | Every program has its own way of handling dragging to duplicate. To Ctrl-drag in Dreamweaver/Windows, click the Flash button and hold the mouse button down until the cursor changes to an arrow with a dotted square; then press Ctrl, and a plus sign (+) will appear in the square; then drag. If you don't wait for the cursor change, the duplication might not work. |
-
Duplicate the Flash Button or Text object in the Document window.
-
Double-click the new object to open its editing dialog box, and make whatever changes you like.
-
Before closing the dialog box, go to the Save As Input field at the bottom of the dialog box, and enter a new filename.
-
Click OK to exit the dialog box. Dreamweaver will now generate a second SWF for you.
Exercise 20.5 Populating a Page with Flash Buttons and Text
It's time to create yet another Art Gecko home page! This time, you use gecko_ banner.swf for the top banner, but create your own navigation sidebar from Flash Button objects. Then you'll dress up the text headings by replacing them with Flash Text.
-
From the chapter_20 folder, open gecko_flashobjects.html.
-
First, replace those boring headings. Select Welcome to Art Gecko and delete it. With the insertion point still in position, go to the Media tab of the Insert bar and click the Flash Text object. Create a new Welcome to Art Gecko heading, using whatever font, size, style, and color your heart desires.
Leave the Link field and rollover color swatch blank; you don't need your heading text to link anywhere.
For a filename, you'll probably want to choose something more descriptive than text1.swf. Set the filename to welcome.swf.
Finally, don't forget to set the background color to match the page color, or your new heading will appear in its own little white box. When everything is set, click OK to close the dialog box.
-
Back in Design view, resize the new Flash heading until it's just the right size and shape for you. Note that the scale parameter for this Flash object defaults to exactfit, so you can squish and stretch the type if you like. (Warning: Typographic purists frown on this sort of activity. Resizing type nonproportionally distorts the letter shapes and can make them ugly.)
-
To replace the What's New at Art Gecko? heading, start by deleting the text heading that's currently there. Then copy the Flash Text heading you created in the previous step, and paste it into position where the text heading was. Double-click the new Flash Text heading, change the wording to What's new at Art Gecko?, and use the Save As Input field to enter a new filename call the new file whatsnew.swf.
-
Next, add your own sidebar buttons. With the insertion point in the sidebar table cell, go to the Objects panel and click the Flash Button object. Choose any button style you like, as long as it includes a text label.
For a text label, type in Wall Hangings. Format the type any way you please. Because you won't be able to preview the type without creating the button, you have to guess at what type size will be appropriate.
For the link, browse to ArtFiles/art1.html. For the filename, enter art1_button.swf. And don't forget to set the background color! After you have finished, click OK to close the dialog box.
-
Back in Design view, you might discover you don't like the button's size or the size of the type you put in it. You can resize the button by dragging its selection handles. (Note that the scale parameter for this Flash object has been set to show all, so the button maintains its proportions as you scale it. You can, of course, change this to exactfit if you like, although you risk making the button and its label look ugly.) To resize the text label in relation to the button, you have to double-click to reenter the Flash Button dialog box and change the number in the Type Size field. Keep tweaking the button until you like how it looks on your page.
-
You have three more buttons to create. You can start by copying and pasting the Flash Button you just created three times.
To change each Flash Button's text and link information, double-click the button to open the editing dialog box; change whatever settings you need to; then, in the Save As field, enter a new filename for the new SWF file that must be generated.
Note

It's crucial, when duplicating Flash Text or Buttons, to change the filename in the Save As Input field. If you don't remember this step, you'll be changing the original SWF file you duplicated from.
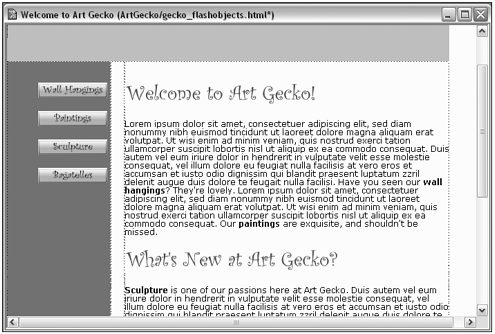
-
After you have finished, your page should look something like the one shown in Figure 20.26. Preview in a browser to check it all out.
Figure 20.26. The gecko_flashobjects.html home page, with Flash objects in place.
Using Flash Objects to Trigger JavaScript Commands
What if you want to use your Flash Button or Text object not as a standard link, but as a link that triggers a JavaScript action? You can't just select a Flash object and assign a behavior to it, as you would with regular text or images, because in HTML the <object> and <embed> tags don't accept event handlers. (See Chapter 16 for more on this.) JavaScript links, like other links, must be embedded in the Flash file itself.
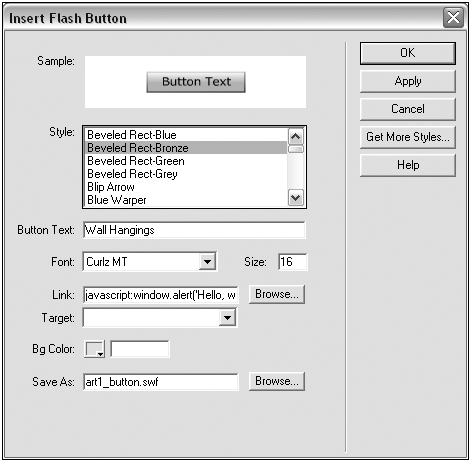
If you read the earlier section on sending JavaScript out of Flash movies, however, you already know it's possible to embed a JavaScript command in a Flash link. Therefore, just as you can add links to Flash Button and Text objects, you can add JavaScript links. You just use the javascript: keyword, followed by whatever command you want to execute. The Flash Button dialog box shown in Figure 20.27, for instance, will create a button that opens an alert window with the message Hello, world!
Figure 20.27. Creating a Flash Button object that will execute a JavaScript command when clicked.
This is fine if you like writing short little JavaScript statements by hand. To execute more complex scripts, write the code as a function in the document <head> and use the previous technique to embed the function call in the Flash object.
By following the procedure described in Chapter 17 for "hijacking" behavior function calls, you can even use the Flash object to trigger a Dreamweaver behavior, adding complex scripting functionality to your Flash object with minimal coding on your part. The steps are as follows:
-
Create a dummy text link a temporary page element that can be discarded later.
-
Select the text link and use the Behaviors panel to apply the desired behavior, configuring the behavior as you like.
-
Switch to Code view and find the text link, along with its function call. Copy the function call (everything between the quotation marks, after the onClick event handler).
-
Create the Flash button. In the button's dialog box, in the Link field, type javascript:. Then paste the function call in after the colon.
-
Back in Code view, find and delete the fake text link. Check the document <head> to make sure Dreamweaver hasn't deleted the function itself.
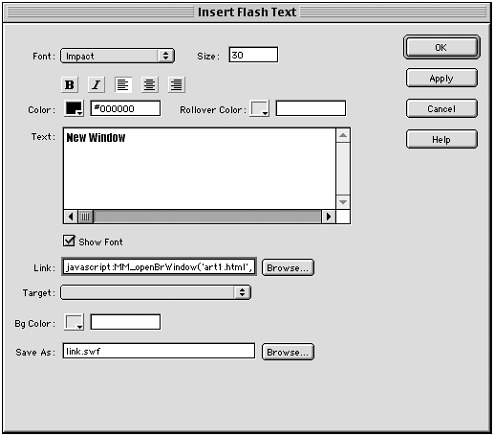
Figure 20.28 shows a Flash Button configured to call the Open Browser Window behavior function.
Figure 20.28. "Hijacking" a Dreamweaver behavior's function call for use in a Flash Button.
Summary
In this chapter, you got a taste of the possibilities for integrating Flash into a web site and you saw how Dreamweaver makes this task easier. Each of the different Art Gecko home pages you created represents a different approach to Flash/HTML coexistence. Each has its advantages and disadvantages. In your web design experience, you'll find that each project has its own needs and limitations, so you might use different strategies at different times. No matter what your Flash authoring strategy, though, Dreamweaver's Flash Text, Flash Buttons, and Flash integration features will make publishing and maintaining your Flash web site easier.
| CONTENTS |
EAN: 2147483647
Pages: 49