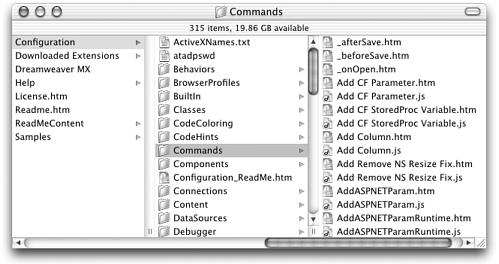
How Commands Are Constructed The basic API for regular commands is remarkably simple and flexible. Unlike the API for objects or behaviors, there are few required elements and few required procedural steps. We also have more control over the appearance of dialog boxes in commands than in other extension types, including the ability to specify what buttons will appear (OK, Cancel, and so on) and exactly what functionality each will have. Commands in the Configuration Folder Command files are stored in the Configuration/Commands folder. There are no subfolders within the Commands folder. By default, each file in the Commands folder appears in the Dreamweaver Commands menu, although special coding can be added to any file in the folder to prevent it appearing there. Figure 5.3 shows a typical Commands folder. Figure 5.3. The Configuration/Commands folder, showing files representing the contents of the Commands menu as well as a variety of other files. (Only partial contents are visible.)  Structure of a Command File As with objects and behaviors, commands are constructed from a combination of HTML and JavaScript, either located in one HTML file or created as an HTML file and linked JavaScript (JS) file. The following sections describe the required and optional elements for command files. Required Elements (Simple Command) A command file requires very little. It must be an HTML file with the proper HTML framework, of course. Beyond that, required elements include the following: -
Filename. Unless otherwise specified in menus.xml, the filename becomes the menu entry for the command. (Customizing menus.xml is discussed in the section "Working with menus .xml" later in this chapter.) -
Page Title. The page title shows in the title bar of any dialog box the command calls up. If there is no dialog box, the page title is not called on. -
Function and Function Call. The functionality of the command is provided by a function in the <head> section of the document, which is then called from the <body> tag using the onLoad event handler. What this function is called and what is in it are entirely up to you. Commands have no equivalent to objectTag() or applyBehavior() , functions that must be present and will automatically be called to insert or edit a document. If desired, this main function can call on other functions, also defined in the <head> . Listing 5.1 shows a basic command file, consisting of only the required elements. (This exciting function inserts the text "Hello, World!" at the insertion point.) Listing 5.1 A Basic Command File, Containing Only Required Elements <html> <head> <title>Hello, World</title> <script language="JavaScript"> function runCommand() { var myDOM = dw.getDocumentDOM(); myDOM.insertHTML("Hello, world!"); } </script> </head> <body onLoad="runCommand()"> </body> </html> Optional Elements Fancier commands use dialog boxes for user input and can interact with the program in other ways as well. A number of custom API functions can help dress up your command files, including the following: -
canAcceptCommand() function. Like the canAcceptBehavior() function for behaviors, this function returns true or false and determines whether a command will be available to the user or will be grayed out in the menu. A command for editing tables, for instance, should be grayed out if the user's current selection isn't a table. This function is called automatically as part of the API procedure, so it needn't be explicitly called. -
isDomRequired() function. Another function that doesn't need to be explicitly called, isDomRequired() determines whether Code view and Design view need to be synchronized before the new object's code can be inserted. The function should return true or false . -
form, or other <body> content. Any content placed in the <body> tag causes the command to generate a dialog box. To collect user input, use a form. Important: If your command includes a form, you must also use the commandButtons() function, described next . -
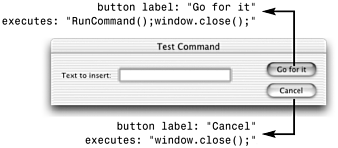
commandButtons() function. Dialog boxes called as part of a command are not automatically supplied with OK and Cancel buttons. Instead, we specify what buttons appear and what functionality they have by using the commandButtons() function. (If this function isn't present, the user has no way to get out of the dialog box after it comes up.) This function must return an array containing two elements for each button you want in the dialog box: The first element specifies the button's name ; the second specifies the action to be taken if the button is clicked. Figure 5.4 shows a typical commandButtons() function and the dialog box buttons that it creates. Note that if the user clicks OK or its equivalent, the button executes the runCommand() function, which is the function called in the <body> section of the command file. (If commandButtons() is used like this to execute the command's function, that function shouldn't be called in the <body> tag.) All buttons must also execute the window.close() function to close the dialog box. function commandButtons(){ return new Array("Go for it","runCommand();window.close();","Cancel","window.close()"); } Figure 5.4. The commandButtons() function in action, and the dialog box buttons it creates.  -
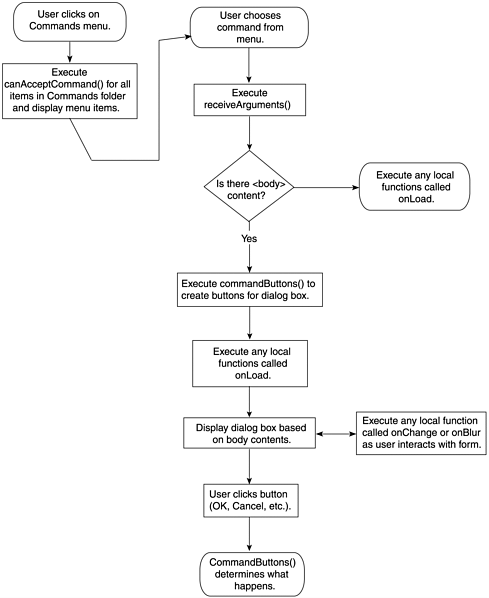
receiveArguments() function. This function allows for passing parameters to the command, which allows command files to be reused for different purposes in the interface. For instance, the same command file might be used to align text left, right, or center, depending on which menu item the user selected. (This function is discussed in-depth in the "Commands and Menus" section, later in this chapter.) API Procedure for Commands The API procedure for commands begins when the user clicks on a menu that contains commands. At that point, Dreamweaver looks through the command files for all items in the menu. For each command file, if the canAcceptCommand() function is present, Dreamweaver executes this command. If the function returns false , the menu item for that particular command is grayed out in the menu. If the function returns true or if there is no canAcceptCommand() function, the item is not grayed out. After the user chooses a command from a menu, the following events occur: -
Dreamweaver looks in the command file for the receiveArguments() function. If the function is present, it's executed. -
Dreamweaver looks for and calls the commandButtons() function, then scans the file for a form. If a form exists: -
Dreamweaver creates a dialog box. If the commandButtons() function is defined, it's used to create the buttons in the dialog box. -
Dreamweaver waits for the user to click one of the buttons in the dialog box and executes the instructions coded into that button by the commandButtons() function. If no form exists, Dreamweaver loads the <body> and executes any functions called in the onLoad event handler. As you can see, a lot of flexibility is built into this procedure because commands include so many optional elements. Commands can be very simple (like the Test command created in the previous chapter) or very sophisticated. The flowchart in Figure 5.5 diagrams the API procedure for commands, with the various optional elements in place. Figure 5.5. The API procedure for commands.   |


