11.1. Performance, Maintenance, and Troubleshooting Administrative Tools Provides a simple way to run a variety of troubleshooting and performance tools. To open Control Panel  [System and Maintenance] Administrative Tools [System and Maintenance] Administrative Tools Description This Control Panel applet opens a Windows Explorer window that includes shortcuts to a variety of performance and troubleshooting tools, such as the Reliability and Performance Monitor and other Microsoft Management Console applications. See also "Microsoft Management Console," in Chapter 10 |
Backup and Restore Center Back up (copy) files from your hard drive to a CD drive, DVD drive, removable storage device, or another PC or drive on a network for the purpose of safeguarding or archiving your data, or for saving your computer configuration so that you can restore it in the event of a crash. To open Control Panel Back up your computer Control Panel System and Maintenance Backup and Restore Center Description The Backup and Restore Center (Figure 11-1), new in Windows Vista, offers tools for backing up data as well as creating a restore "image" of your computer, which can be used to re-create the state of your PCincluding the operating system, applications, and settingsin the event of a hardware failure. It fixes a variety of shortcomings in the backup program built into Windows XP, such as not being able to back up across a network. On the other hand, it's less flexible than the XP backup program because it doesn't allow you to customize it to a great extent. You can't, for example, choose specific folders, or files from specific folders, to be backed up. Instead, you have to back up all files of a particular file type, such as documents. Figure 11-1. The Backup and Restore Center, which lets you back up data, as well as create an image of your PC that can be used in the event of a system failure 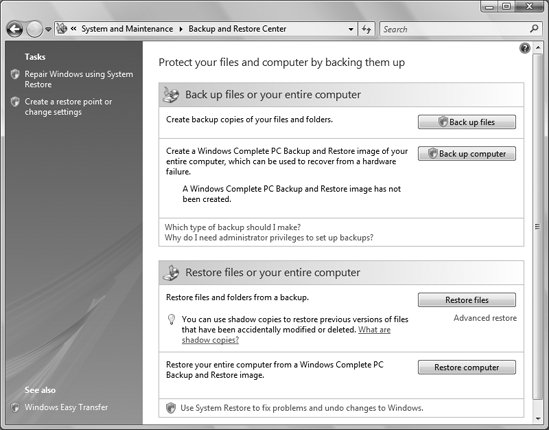
Click "Back up files" to back up data, or "Back up computer" to back up an image of your PC, called a Windows Complete PC Backup and Restore image. (Note that the Complete PC Backup and Restore feature is not available with Windows Vista Home Basic or Windows Vista Home Premium.) A wizard appears that walks you through the backup process. You'll choose where to save the backup, such as to a network drive or PC. You choose the backup location, as well as the location of the files or image being backed up and the types of files to back up. You also choose a backup schedule (Figure 11-2) so that backups can be performed automatically. Figure 11-2. Scheduling a backup 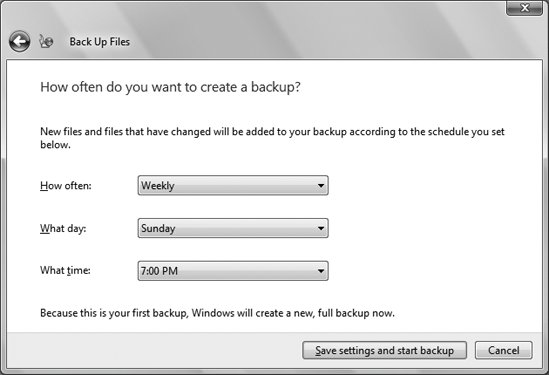
 | If you back up to a drive on a PC attached to the network, you'll need to have a user account on that PC, and you'll need to enter your username and password for that account. Make sure when entering the username that you include the computer name as well, such as MainPC\joeuser. |
|
When you do all this, you create what's called a backup seta collection of selected files to be backed up. The set and all the settings you've chosen, are collectively known as a backup "job." After your first backup, you can change the backup settingsfor example, the backup location, the files to be backed up, and the backup scheduleby clicking Change Settings in the Backup and Restore Center. To restore files from a backup that you've made, select Restore Files (or Restore Computer, if you've chosen to make a Complete PC backup). A wizard appears, letting you restore files. You can restore not only from the most recent backup, but also from previous backups so that you can restore previous versions of your files, not just the most recent versions. Or you can restore files that you have deleted since an earlier backup (see Figure 11-3). In addition, you can restore individual files and folders rather than the entire backup. Browse to the files or folders you want to restore, and select them. You can also restore backup files from a different computer. For example, if a backup has been made from another computer to the computer that you are currently using, you can restore files from that backup. To do so, select Advanced Restore from the Backup and Restore Center, choose "Files on a backup made from a different computer," browse to the location, and restore the files as you would normally. Figure 11-3. Restoring files from a previous backup 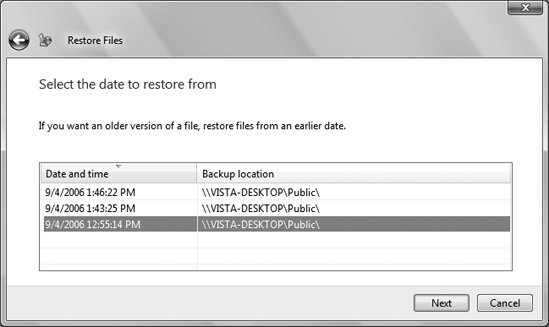
Notes When files are backed up, they are stored in compressed .zip files inside normal files. So you can restore them without having to actually use the Windows Backup and Restore Center. Browse to the location of the backup file and look for backup files. The folder will be named something like Backup Set 2006-09-05 125516 or Backup Files 2006-09-05 125516. Open the folder and any other folders beneath it until you come to compressed files named Backup Files 1.zip, Backup Files 2.zip, and so on. Double-click the files, and you'll open the compressed folder. You can now extract and use the files. You can use Windows Backup and Restore to recover shadow copies of files.
See also "System Protection and System Restore" |
Chkdsk: \windows\system32\chkdsk.exe Check the disk for errors and fix any that are found. To open Command Prompt chkdsk (requires an Administrator command prompt) Usage chkdsk [drive[filename]] [/f] [/r] [/x] [/i] [/c] [/v]
Description Chkdsk scans the disk surface, checks the integrity of files and folders, and looks for lost clusters (among other things), correcting any problems that it finds and sometimes even freeing disk space consumed by unusable fragments of data. If you run Chkdsk with no command-line parameters, it will check the current drive for errors. Or you can specify a drive letter to check a specific drive, like this: chkdsk e:
However, running Chkdsk this way will only report problemsit won't correct them. The report you'll get looks something like this: The type of the file system is NTFS. WARNING! F parameter not specified. Running CHKDSK in read-only mode. CHKDSK is verifying files (stage 1 of 3)... 36480 file records processed. File verification completed. 33 large file records processed. 0 bad file records processed. 0 EA records processed. 44 reparse records processed. CHKDSK is verifying indexes (stage 2 of 3)... 144121 index entries processed. Index verification completed. 5 unindexed files processed. CHKDSK is verifying security descriptors (stage 3 of 3)... 36480 security descriptors processed. Security descriptor verification completed. 6991 data files processed. CHKDSK is verifying Usn Journal... 3478288 USN bytes processed. Usn Journal verification completed. Windows has checked the file system and found no problems. 16774143 KB total disk space. 7062360 KB in 29402 files. 18156 KB in 6992 indexes. 0 KB in bad sectors. 106959 KB in use by the system. 65536 KB occupied by the log file. 9586668 KB available on disk. 4096 bytes in each allocation unit. 4193535 total allocation units on disk. 2396667 allocation units available on disk.
The report starts with a warning about the /f parameter (discussed in the following list), followed by descriptions of the stages of the scan. Without the /f parameter, Chkdsk will note errors but not fix them. Next comes the summary of the total disk space, used space, and other statistics, which are fairly self-explanatory. To use Chkdsk effectively, you'll need to use the following optional parameters:
/f Fixes any errors found. If /f is omitted, errors are merely reported and no changes to the disk are made. If you are running Chkdsk on your boot disk, the check won't be performed until you reboot.
/r Locates bad sectors and recovers readable information. Using the /r parameter implies /f (see preceding entry). Think of the /r parameter as a beefed-up version of /f. Keep in mind that bad sectors represent physical errors on the disk surface, and safe recovery of the data residing in those areas is not guaranteed. Use the /r option only if you have reason to believe you have one or more bad sectors, either because Chkdsk is reporting this problem or because you encountered another symptom, such as your computer crashing or freezing every time you attempt to access a certain file.
/x Forces the volume to dismount before the scan is performed. Using the /x parameter implies /f (discussed earlier). This effectively disconnects the drive from Explorer and all other programs, closing any open files stored on the drive before any changes are made. You may want to use this option when checking or repairing a shared drive used frequently by the several users on a network; otherwise, access to the drive might interrupt Chkdsk, or even corrupt data further.
/i Performs a less vigorous check of index entries. You can use the /i option only on NTFS disks, as index entries exist only on NTFS volumes. You'll probably never need this option, although you may choose to use it to reduce the amount of time required to check the disk.
/c Skips checking of cycles within the folder structure. Like /i, you can use the /c option only on NTFS disks. Likewise, you'll probably never need this option either, although you may choose to use it to reduce the amount of time required to check the disk.
/v Use of the /v parameter abandons Chkdsk's primary purpose and instead simply displays a list of every file on the entire hard disk (in no particular order). The /v parameter exhibits this behavior only on a disk with a FAT or FAT32 filesystem; on NTFS, it displays additional information about the volume's state. Notes To get to the Administrator command needed to run Chkdsk, locate Command Prompt in the Start menu, right-click on it, and choose Run as Administrator. You also can use Chkdsk to check a single file or a specific group of files for fragmentation (see "Disk Defragmenter," later in this chapter), but only on FAT or FAT32 disks. To do this, specify the full path- and filename (or use wildcards, such as *.*, to specify multiple files) instead of the drive letter on the command line. In Windows 9x/Me, regular usage of Scandisk was recommended, but that's not necessarily the case with Chkdsk and Windows Vista. Whenever Windows isn't properly shut down, or when it detects a potential problem during startup, Chkdsk is run automatically during the boot process. Additionally, given the added stability of Windows Vista, you may never need to run Chkdsk manually unless you suspect a problem. When Chkdsk is launched during Windows startup, it is preceded by a message and a 10-second delay, giving you the option of skipping the scan. While Chkdsk is running, either during Windows startup or at any other time, you can interrupt it by pressing Ctrl-C. During normal use of Chkdsk, you'll see references to various terms describing problems on your hard disk. Among the more popular players are lost clusters (pieces of data no longer associated with any file), bad sectors (actual flaws in the disk surface), cross-linked files (two files claiming ownership of the same chunk of data), invalid file dates and filenames, and a few other, more obscure errors. On a FAT or FAT32 disk, the /v parameter is a funny option, especially considering that it has very little to do, at least in terms of results, with the other functions of this program. However, when used in conjunction with pipe operators (see Chapter 14), this feature can generate filtered reports of the contents of a drive. If you want to schedule Chkdsk at regular intervals to help ensure a healthy disk, you can configure the Task Scheduler (discussed later in this chapter) to run Chkdsk, say, every Friday at 3:30.
See also "Chkntfs" |
Chkntfs: \windows\system32\chkntfs.exe Display or change the checking of a disk (using Chkdsk) at Windows startup. To open Command Prompt chkntfs Usage chkntfs [drive | /d | /t:time | /x drive | /c drive]
Description Chkdsk, described in the preceding section, is run automatically during Windows startup, either if the previous session was not ended gracefully (the computer was turned off without shutting down) or if errors are detected. Chkntfs is used to modify this behavior for one or all of your drives. If you run Chkntfs with only a drive letter (e.g., chkntfs c:), you get a somewhat cryptic report, like this: The type of the file system is NTFS. C: is not dirty.
The identification of the filesystem type on the first line is fairly self-evident. The "not dirty" report implies that the drive was properly "cleaned up" the last time the system shut down. In other words, the system shut down properly. If the system isn't shut down properly, any drives in use (drives containing one or more files that were open when the computer lost power, for example) are marked "dirty," and those drives are scanned the next time Windows starts. To change this behavior, use one of the following options. Note that all options, including the specification of the drive letter, are exclusive; you can use only one at a time.
/d Type chkntfs /d to restore the default behavior of the entire machine; all drives are automatically checked at boot time, and any drives found to be "dirty" are checked with Chkdsk.
/t: time Used to change the countdown before this scan is started, during which time the user can press the Space bar to skip the scan. Time is simply any number, in seconds: chkntfs /t:5 configures Windows to wait five seconds before running Chkdsk.
/x drive Excludes a particular drive from those checked at startup. For example, type chkntfs /x e: to exclude drive E: from the auto-check.
/c drive Includes a particular drive in those checked at startup; /c is the opposite of /x. For example, type chkntfs /c e: to instruct Windows to check drive E: during startup, and if it is found "dirty," to run chkdsk e: /f. See also "Chkdsk" |
Component Services: \windows\system32\dcomcnfg.exe See "Microsoft Management Console," in Chapter 10. |
Computer Shows an overview of all your system's drives. To open Start Computer Start All Programs Accessories System Tools Computer Description Gives a quick overview of all of your computer's drives and folders in Windows Explorer (see Figure 11-4). Figure 11-4. Computer, which provides a quick view of all of the drives attached to your PC 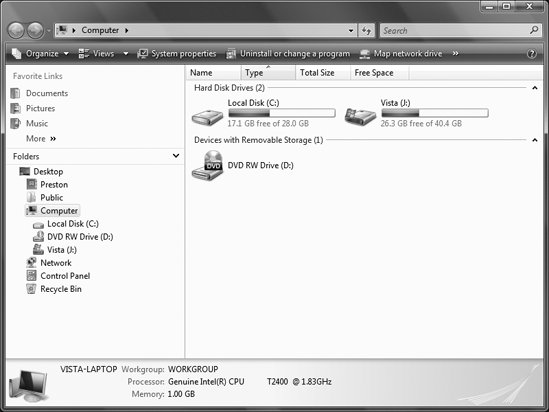
|
Computer Management: \windows\system32\compmgmt.msc Perform computer management tasks and run tools such as the Task Scheduler. To open Run as a plug-in for the Microsoft Management Console Command Prompt compmgmt Description This plug-in to the Microsoft Management Console lets you perform a variety of computer management tasks, including monitoring performance and reliability. It also provides a way to run tools such as the Task Scheduler. For more details, see "Microsoft Management Console," in Chapter 10. See also "Reliability and Performance Monitor" |
DirectX Management Tool: \windows\system32\dxdiag.exe Test, diagnose, and tweak DirectX drivers. To open Command Prompt dxdiag Description DirectX is the system that allows applicationsusually gamesto directly access graphics, audio, and input devices to maximize performance. Unless you're experiencing a problem with DirectX or a program that uses DirectX, you should never need to use the DirectX Management Tool. If you do indeed encounter a problem, such as poor performance, an apparent glitch in a game, an error message, or some other compatibility issue, follow these steps to diagnose and treat it: DirectX relies on hardware drivers, so the first thing you should do whenever you encounter problems with it is to make sure you have the latest drivers for your display adapter, sound card, and game controller (if applicable). Next, go to http://www.microsoft.com/directx and see if there's a more recent version of DirectX than the one installed on your system. To determine the currently installed version, open the DirectX Management Tool and read the DirectX Version on the bottom of the System tab. If you're experiencing problems with only a certain application or game, check with the manufacturer of that software to see if there's an update or compatibility issue with your specific hardware. Often, manufacturers will post workarounds, patches, or other fixes on their web sites. If you want to start exploring troubleshooting options, run the DirectX Management Tool and then choose the appropriate tab (e.g., display, sound, etc.) and see the test results, as shown in Figure 11-5. Figure 11-5. The DirectX Management Tool, which can help track down the cause of problems with DirectX 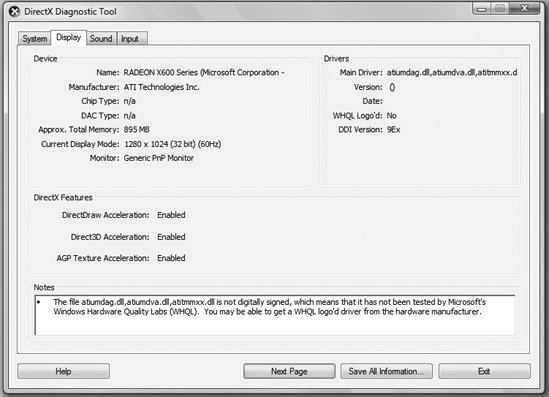
|
Disk Cleanup: \windows\system32\cleanmgr.exe Reclaim disk space by removing unwanted files from your hard drive. To open Start All Programs Accessories System Tools Disk Cleanup Control Panel [System and Maintenance] Free up disk space Command Prompt cleanmgr Description Disk Cleanup summarizes the disk space used by several predefined types of files, such as Temporary Internet Files and items in the Recycle Bin (see Figure 11-6). If you have more than one hard drive, Disk Cleanup prompts you to choose one. It also asks whether you want to clean up only your files, or files from all users on the computer (you'll need Administrator rights to do the latter). Figure 11-6. The Disk Cleanup dialog, which shows several locations of files that can probably be safely deleted 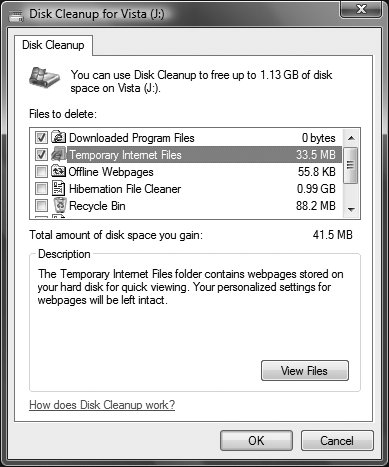
When you run it, after asking which drive you want to clean up, Disk Cleanup calculates how much space can be saved by doing a cleanup. Then, it presents a list of file categories from which desired items can be checked to have the corresponding files deleted. The approximate space to be reclaimed by any category is shown to the right. Here are descriptions of the various categories:
Downloaded Program Files This folder contains mostly ActiveX and Java applets downloaded from the Internet. If you clean out this folder, these components will simply be downloaded again when you revisit the sites that use them.
Temporary Internet Files Temporary Internet Files, commonly known as the browser cache, are web pages and images from recently visited web sites, stored in your hard disk for the sole purpose of improving performance when browsing the Web. Deleting the files will have no adverse effects other than requiring that they be downloaded again the next time the corresponding web sites are visited. You can set the maximum size of this folder. Choose Control Panel [Network and Internet] Internet Options, and from the dialog box that appears, click the General tab, then click Settings in the Browsing History area. Select the amount of space in the Disk Space area.
Offline Webpages If you store web pages on your PC so that you can view them when you're not connected to the Internet, they take up disk space. If you no longer need to view those pages, you can delete them here to free up disk space.
Hibernation File Cleaner The Hibernation file contains information about your computer that is used to restore your computer from a state of hibernation. If you don't use hibernation, you can safely delete this file. If you do use hibernation, deleting it will disable hibernation.
Recycle Bin By default, files that are deleted aren't really deleted; they are simply moved to the Recycle Bin for deletion at a later time. You can empty the Recycle Bin at any time by right-clicking the Recycle Bin icon on your Desktop and selecting Empty Recycle Bin. Right-click the Recycle Bin and select Properties to change the maximum amount of disk space allocated to the storage of deleted files (or to disable the Recycle Bin and have files permanently erased immediately).
Temporary Files Many applications open files to store temporary data but aren't especially meticulous about deleting those files when they're no longer needed. Application crashes and power outages are other reasons why temporary files might be left behind. The disk space consumed by temporary files, especially after several weeks without maintenance, can be several megabytes.
Thumbnails Windows keeps copies of all of your pictures, videos, and documents so that they can be displayed as thumbnailsfor example, when browsing in Internet Explorer. If you delete thumbnails, they will be re-created when they are needed, but it will slow down browsing.
System Archived Windows Error Reporting These files are used for troubleshooting and error reporting. If you delete them, you will lose that information.
Temporary Offline Files, Offline Files Temporary offline files are local copies of recently used documents normally stored on remote computers and marked "Offline." If you take advantage of the Offline Files feature in Windows Vista, you may want to examine the files in these folders before you indiscriminately delete them with this utility. Notes You may find other files in addition to what's listed. Some programs store installation files, and if Disk Cleanup is aware of them, it will list them here. For example, Microsoft Office setup files are listed here if they have been stored on your PC.
|
Disk Defragmenter: \windows\system32\dfrgui.exe Reorganize the files on a disk to optimize disk performance and reliability. To open Control Panel [System and Maintenance ] Defragment your hard drive Command Prompt dfrgui Description As you create files on your hard disk, they become defragmented so that a single file is stored in several different noncontiguous locations. As more files become fragmented, the reliability and performance of the hard drive diminish. Disk Defragmenter reorganizes the files and folders on a drive so that the files are stored contiguously, and the free space is contiguous as well. Running the Disk Defragmenter (Figure 11-7) is one of the simplest tasks you'll ever perform in Windows Vista. Click Defragment Now, and it goes to work rearranging the files and folders on your disk for optimal performance. If you don't need to defragment, you'll see the message "You do not need to defragment at this time." You'll get this message if the percentage of defragmented files on your hard disk is lower than about three percent. Figure 11-7. Disk Defragmenter, which reorganizes the data on your hard disk for quicker, more reliable operations and offers advice on whether your disk needs to be defragmented 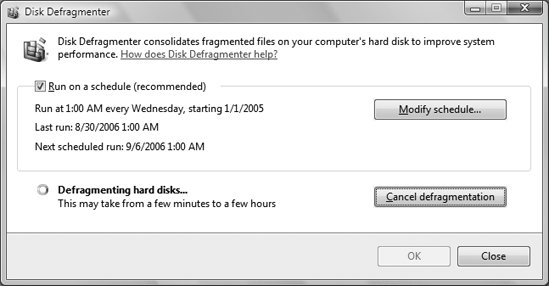
Click Defragment Now to begin the defragmentation. Unlike with previous versions of Windows, when you defragment your hard disk, you get no visual feedback that the job is being performed. And you get no time estimate; you're told only that it will take anywhere from a few minutes to a few hours. The time it takes will depend on the speed of your drive and processor, the level of fragmentation, and the amount of data to move. Notes You can automatically schedule the Disk Defragmenter to run at specified times. Check the box next to "Run on a schedule," click Modify Schedule, fill out the form that appears, and click OK.
See also "Chkdsk," earlier in this chapter, and "Microsoft Management Console," in Chapter 10 |
DiskPart: \windows\system32\diskpart.exe Prepare and partition a hard disk. To open Command Prompt diskpart Description DiskPart is a full-featured program used to prepare hard disks and, optionally, divide them into two or more partitions. It's a command-line program and has no interface to speak of. When you start DiskPart, you'll see a simple prompt: DISKPART>. Type help and press Enter to view a list of all the available commands:
active Activates the current basic partition so that it can be used as a boot disk; using it is not necessary if there's only one partition in the volume.
add Adds a mirror to a simple volume.
assign Assigns a drive letter or mount point to the selected volume. Note that it may be easier to use the Disk Management Tool; see "Microsoft Management Console," in Chapter 10, for details.
attributes Lets you change the attributes of the volume.
automount Enables and disables the automatic mounting of basic volumes.
break Breaks a mirror set (undoes the add command).
clean Clears the configuration information, or all information, off the disk; this effectively erases the disk.
convert Converts between different disk formats; most users will never need this command.
create Creates a volume or partition; this is the first step in preparing a hard disk.
delete Deletes an object (undoes the create command).
detail Displays details about a disk, partition, or volume. Note that you'll need to use select first.
exit Exits DiskPart (Ctrl-C also works).
extend Extends a volume.
filesystems Displays the current and supported filesystems on the volume.
format Formats the volume or partition.
GPT Assigns attributes to the selected GUID Partition Table (GPT) partition. GPT offers a more flexible mechanism for disk partitioning than does the older Master Boot Record (MBR) partitioning scheme.
import Imports a disk group.
inactive Marks the selected basic partition as inactive.
list Prints out a list of objects; similar to detail.
online Changes the status of the disk from offline to online.
REM Used to add remarks in scripts.
remove Removes a drive letter or mount point assignment (undoes the assign command). Note that it may be easier to use the Disk Management Tool; see "Microsoft Management Console," in Chapter 10, for details.
repair Repairs a RAID-5 volume.
rescan Rescans the computer, looking for disks and volumes.
retain Places a retainer partition under a simple volume. If you delete a partition at the end of a disk, you will change a dynamic volume to a basic volume. If you place a retainer partition on a dynamic volume, it will keep the volume as dynamic.
select Chooses a disk, partition, or volume to view or modify. Even if you have only one disk or partition, you'll still need to select the object before carrying out any other commands. Use list to obtain object numbers for use with select, and then use detail to get more information.
setid Changes the partition type.
shrink Shrinks the size of the volume. Each of these commands (with the exception of exit) has one or more subcommands. For example, if you simply type detail at the prompt, you'll get a list of the subcommands for use with the list command: disk, partition, and volume. So, to display a list of all the disk volumes on the system, you would type: list volume
and you'll get a report that looks look something like this: Volume ### Ltr Label Fs Type Size Status Info ---------- --- ------ ----- ---------- ------- --------- ------ Volume 0 C NTFS Partition 16 GB Healthy System Volume 1 D DVD-ROM 0 B No Media
From the report, it is clear that drive C: is Volume 0; the next step is to select the volume, like this: select volume 0
Subsequent commands will then apply to the currently selected volume. Notes Disk partitioning is tricky business and unless you're preparing a new drive, you'll probably never need to use DiskPart. If you need to repartition a drive that you're currently using, DiskPart is not the way to go, as it will erase any drive you attempt to repartition. A better choice is to use PartitionMagic by Symantec (http://www.symantec.com), which allows you to add, remove, and resize partitions without destroying the data they contain. Note that the Disk Management Tool of the Microsoft Management Console allows you to perform some elementary volume resizing as well.
See also "Microsoft Management Console," in Chapter 10 |
Dr. Watson: \windows\system32\drwatson.exe; drwtsn32.exe Records system error information when a system error occurs. It has been replaced by Vista's new error reporting mechanism and is used for compatibility with older applications and tools. To open Command Prompt drwatson Description Dr. Watson is a diagnostic tool that records information on the internal state of Windows when a system error occurs. It collects information such as system details, running applications, startup applications, kernel drivers, and user drivers. Although the reports that Dr. Watson produces are of little use to most users, they contain diagnostic information that may be helpful to developers and Microsoft support technicians for diagnosis of the problem. If activated, Dr. Watson waits invisibly in the background until a system error occurs, at which time a dialog box appears, asking for comments on the activities prior to the error. The comments you type will be added to a file as long as you select File  Save or File Save As from the dialog. The two available formats include Dr. Watson logfiles (.txt). The default is a .wlg file, and it is recommended if you want to subsequently use the Dr. Watson application to view a GUI version of the information. Save or File Save As from the dialog. The two available formats include Dr. Watson logfiles (.txt). The default is a .wlg file, and it is recommended if you want to subsequently use the Dr. Watson application to view a GUI version of the information. If Dr. Watson detects a fault that might not be fatal, you'll have the opportunity to ignore the fault or close the application. If you choose to ignore the fault, Windows continues without performing the faulting instruction. You might be able to save your work in a new file at this point, but you should then restart Windows. When you run Dr Watson, it also issues a report indicating whether it has found any current problems with your system, and then runs in the background. See also "System Properties" (specifically, the topic of error reporting in the Advanced tab) |
Event Viewer: \windows\system32\eventvwr.msc Read system logs and view other system events. To open Run as a plug-in for the Microsoft Management Console. Command Prompt eventvwr Description A plug-in to the Microsoft Management Console, the Event Viewer (Figure 11-8) provides an easy way to read system logs and view other system events. Figure 11-8. The Event Viewer, which provides a way to read a variety of performance and troubleshooting logs 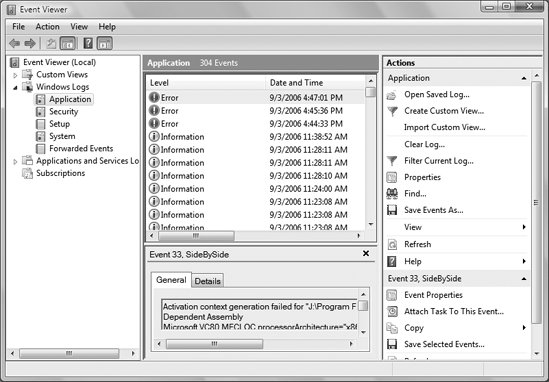
For more details, see "Microsoft Management Console," in Chapter 10. |
FAT to NTFS Conversion Utility: \windows\system32\convert.exe Convert a drive using the File Allocation Table (FAT) filesystem to the more robust NT File System (NTFS). To open Command Prompt convert Usage convert volume /fs:ntfs [/v] [/cvtarea:fn] [/nosecurity] [/x]
Description The filesystem is the invisible mechanism on any drive that is responsible for keeping track of all the data stored on the drive. Think of the filesystem as a massive table of contents, matching up each filename with its corresponding data stored somewhere on the disk surface. The FAT filesystem first appeared in DOS and has been the basis for each successive version of Windows, including Windows 95, Windows 98, and Windows Me. A slightly improved version of FAT, called FAT32, was introduced in Windows 95 OSR2 and included support for larger drives and smaller cluster sizes. Meanwhile, the Windows NT/2000 line of operating systems also supported the newer and more robust NTFS filesystem. Among other things, NTFS provides much more sophisticated security than FAT or FAT32 does, as well as encryption and compression. However, NTFS and FAT/FAT32 are not compatible with each other, and because Windows 9x/Me doesn't support NTFS, you'll need to stick with FAT or FAT32 if you intend to have a dual-boot system. This tool is used to convert a FAT or FAT32 drive to an NTFS drive without damaging the data stored on it. To convert drive C:, for example, type the following: convert c: /fs:ntfs
The following options are also available:
/v Run the Conversion Utility in verbose mode (provide more information).
/cvtarea: filename Specify a contiguous file in the root directory as the placeholder for NTFS system files.
/nosecurity Include this parameter if you want the initial security privileges for all files and folders on the newly converted volume to be set so that the files and folders are accessible by everyone.
/x Force the volume to dismount firstif necessary, closing any opened files on the volume. Use this option if you're on a network and are concerned that other users may disrupt the conversion by accessing your drive during the process. Notes See also "Chkntfs" and "DiskPart" |
Format: \windows\system32\format.com Prepare floppy diskettes, hard disks, and some removable media for use. To open Command Prompt format.com Usage format volume [/q] [/c] [/x] [/v:label] [/fs:file-system] [/a:size]
Description Before you can store data on a floppy disk, hard disk, or many removable media disks (such as ZIP disks), you must format the disk. This process creates various low-level data structures on the disk, such as the filesystem (FAT, FAT32, NTFS, etc.). It also tests the disk surface for errors and stores bad sectors in a table that will keep them from being used. If there's any data on the disk, it will be erased. The options for Format are:
volume The drive letter, followed by a colon, containing the media to be formatted. For example, to format the floppy in drive A:, type: format a:
If the specified drive is a hard disk, you'll be prompted to verify that you actually want to erase the disk.
/q Performs a "quick" format, a process that wipes out only the file table, resulting in an empty disk. This option does not check for bad sectors, nor does it rewrite the filesystem. Also, it does not write over data on the disk, meaning that files could potentially be recovered or "undeleted." The advantage of the /q option is that you can erase a disk in a few seconds.
/c Files created on the new volume are compressed by default (NTFS volumes only).
/x Forces the volume to dismount first, if necessary. All opened handles to the volume would no longer be valid. This effectively disconnects the drive from Explorer and all other programs, closing any open files stored on the drive, before any changes are made.
/v: label Specifies the volume label, an arbitrary title you assign to any disk. It can be up to 11 characters and can include spaces. The volume label will show up next to the drive icons in Explorer (hard disks only) and at the top of dir listings (see Chapter 14). See "Label," in Chapter 4, for more information. If the /v option is omitted or the label isn't specified, a prompt for a volume label is displayed after the formatting is completed. If a label is specified with /v and more than one disk is formatted in a session, all disks will be given the same volume label.
/f: size Specifies the size of the floppy disk to format (such as 160, 180, 320, 360, 720, 1.2, 1.44, 2.88). The format size (specified with the /f option) must be equal to or less than the capacity of the disk drive containing the disk to be formatted. For example, a 2.88 MB capacity drive will format a 1.44 MB disk, but a 1.44 MB drive will not format a 2.88 MB disk.
/fs: filesystem Specifies the type of the filesystem; can be fat, fat32, or ntfs.
/a: size Overrides the default allocation unit size, which, when multiplied by the number of clusters, equals the final capacity of the disk. Allowed values for size depend on the filesystem: NTFS supports 512, 1,024, 2,048, 4,096, 8,192, 16K, 32K, and 64K. FAT and FAT32 support 512, 1,024, 2,048, 4,096, 8,192, 16K, 32K, and 64K (and 128K and 256K for sector size greater than 512 bytes). Note that the FAT and FAT32 filesystems impose the following restrictions on the number of clusters on a volume: for FAT, the number of clusters must be less than or equal to 65,526; for FAT32, the number of clusters must be between 65,526 and 4,177,918. NTFS compression is not supported for allocation unit sizes greater than 4,096.
Notes The /f, /t, and /n parameters are also available for use with Format but are essentially obsolete. Type format /? for more information. If formatting an ordinary 3.5-inch floppy diskette, the disk will always be formatted to a capacity of 1.44 MB. The DMF diskette format, which squeezes about 1.7 MB on a standard floppy, is not directly supported by Format. If formatting a preformatted DMF diskette, use the /q parameter to preserve the format and erase only the files. To create new DMF diskettes, you'll need the WinImage utility (version 2.2 or later), which you can download from http://www.annoyances.org. The easiest way to format a disk is to right-click on the drive icon in Explorer or My Computer and select Format. However, using Format from the command line is more flexible and, in some cases, faster.
See also "FAT to NTFS Conversion Utility," earlier in this chapter, and "Label," in Chapter 4 |
Help and Support The primary online documentation for Windows Vista. To open Start Help and Support Description Think of Help and Support (see Figure 11-9) as a Windows help file on steroids. It provides documentation for many of the components included in Windows Vista, a collection of tips and tricks, troubleshooting information, and walkthroughs for such tasks as keeping your computer up-to-date and adding hardware and software. It's more than just a plain-text file, though, because it also includes direct links to the tools you need to accomplish tasks. So in the entry on connecting to a network, for example, a link opens the Connect to a Network screen. Figure 11-9. The Help and Support Center, which includes links to tools, as well as information on how to accomplish Windows tasks 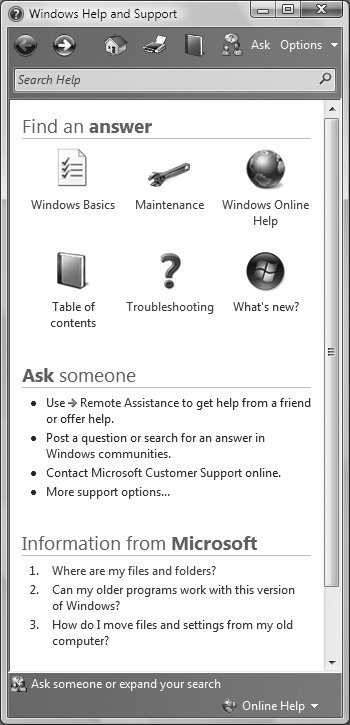
Help and Support works particularly well when you're connected to the Internet, because it integrates with Microsoft help and other tools. After you do a search, click "Ask someone or expand your search" at the bottom, and a new screen launches with links to posting a question or searching for an answer in Microsoft newsgroups, launching Remote Assistance to get online help, and most useful of all, accessing Microsoft Knowledge Base, an immense database of troubleshooting information, frequently asked questions, bug reports, compatibility lists, and other technical support issues. In addition, you can click the link to Windows Online Help to visit the Windows Vista online help site. Notes If you need help with a specific Windows component, such as WordPad or Explorer, use that application's Help menu, rather than the more general Help and Support.
See also "Remote Assistance" |
Memory Diagnostics Tool: \windows\System32\MdSched.exe Check a PC's memory for problems. To open Command Prompt mdsched Description This tool checks your PC's memory for any errors and reports on the results. You should save all your files and close all your programs before running the program, because it restarts your computer in order to run the tests. After the restart, it runs tests before your system boots. (They take several minutes to run, so be patient.) After the tests run, you boot into Windows, and after you log in, a report will be displayed telling you whether any errors have been found. Notes You can specify which memory tests to run and set other options, such as how many times you want to repeat the tests. When the Memory Diagnostics Tool starts, press F1, make your selections, and then press F10 to start the test. You can also run this tool from the boot menu. Press F1 when you restart your PC to display the boot menu, and then run the tool from there.
|
Performance Information and Tools Rate your computer's capability to run Windows Vista. To open Control Panel System and Maintenance Performance Information and Tools Description This screen (Figure 11-10) rates your PC according to how well it runs Windows, using what it calls a Windows Experience Index. It rates the processor, RAM, graphics subsystem, gaming graphics subsystem, and primary hard disk on a scale of one to five. The higher the number, the better the performance. The lowest rating of any of those is called the system's Base Score. Figure 11-10. Rating how well a PC can run Windows Vista 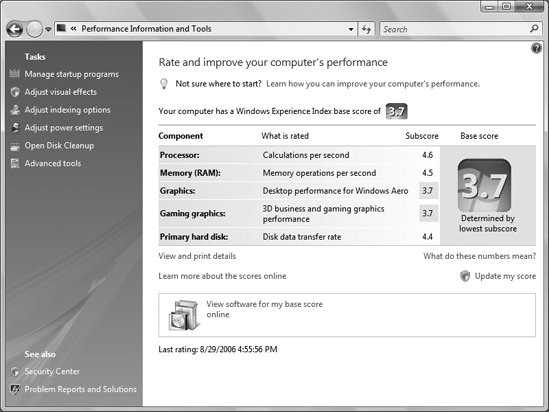
The rating system is designed to be used in concert with software being rated by the same system. So, for example, you would check your hardware rating before buying a piece of software to know it was capable of running it. As of this writing, no software actually uses the rating system, so it's hard to know how useful this system will be. |
Performance Log Manager: \windows\system32\logman.exe Manage the Performance Logs and Alerts service for creating and managing Event Trace Session logs and Performance logs. To open Command Prompt logman Usage logman command collection_name [options]
Description The Performance Log Manager is a command-line utility used to manage Performance Logs and Event Trace Session logs. Commands can be any of the following (type logman command /? for help with each one):
create Creates a new collection.
start Starts an existing collection and sets the beginning time to manual.
stop Stops an existing collection and sets the end time to manual.
delete Deletes an existing collection.
query Queries collection properties. If collection_name is omitted, all collections are listed.
update Updates the properties of an existing collection. Notes |
Performance Options Controls the balance between using advanced Windows Vista visual features and performance. To open Control Panel [System and Maintenance] System Advanced System Settings Advanced, click Settings under Performance Description Windows Vista contains a great deal of "eye candy" that makes using the operating system a far more visually pleasing experience. But on some systems, these visual effects can slow a system down. Use Performance Options to balance visual effects against performance. It contains these tabs:
Visual Effects This tab (Figure 11-11) lets you selectively disable many visual effects, such as transparent glass, animating windows when minimizing and maximizing, fading or sliding menus into view, and so on. Depending on your system, especially the capabilities of your display adapter (video card), disabling some of these items may substantially improve system performance. It's worth experimenting with these settings to make Windows more responsive. Figure 11-11. Balancing system effects against performance in the Performance Options dialog box, accessible from the Advanced tab 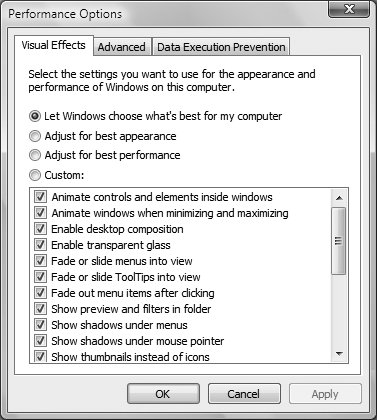 If you don't want to experiment with turning effects on and off individually, choose one of the settings at the top of the tab to let Windows choose what's best for your computer, or have Windows automatically adjust for best appearance or best performance.
Advanced The "Processor scheduling" section lets you decide whether to adjust for best performance or for programs or services. In most cases, you'll want both of the "Processor scheduling" usage options set to Programs. However, if your computer is used as a web server, for example, you may experience better performance if you change this setting. Click Change in the Virtual Memory section to adjust how Windows uses virtual memory, commonly known as your swap file. When Windows has used up all of your physical memory (RAM) with programs and data, it stores some of that data on your hard disk to make room for other running programs. Because your hard disk is much slower than your RAM, this process (known as paging or swapping) can significantly impair system performance, which is why adding more memory to your system (up to a point) will make it faster. In most cases, you'll want to leave these settings alone, but if you're running out of disk space, you may want to limit how much of it is used as virtual memory.
Data Execution Prevention This controls the use of Data Execution Prevention (DEP), a security feature that helps prevent damage from viruses, malware, and other threats by monitoring programs to make sure they use system memory safely. By default, DEP is turned on for essential Windows programs and services. But if you think that a program isn't running properly under DEP, you can turn it off for individual programs. Notes See also "System Properties" |
Prefetch Speeds up the performance of your PC by prefetching commonly used files. Description As a way to speed up the startup process, Windows tracks how your computer starts and which programs you frequently open. This information is automatically saved in the prefetch folder, located in \Windows\prefetch. Whenever you start your PC, Windows uses the files in the folder to speed up startup and application and file launches. You can delete the files in \Windows\prefetch if you're an administrator; use Windows Explorer to delete them as you would any other files. But if you do, startup and applications will most likely load more slowly the next time you start Windows. Notes |
Problem Reports and Solutions Automatically solve problems with your computer and Windows Vista. To open Control Panel [System and Maintenance] Problem Reports and Solutions Description One of the best new troubleshooting features in Windows Vista is its capability to automatically detect problems with your computer and offer automated fixes for them. The Control Panel's Problem Reports and Solutions applet, shown in Figure 11-12, is the place to go to find and launch these solutions. Figure 11-12. Problem Reports and Solutions, command central for checking and fixing computer problems 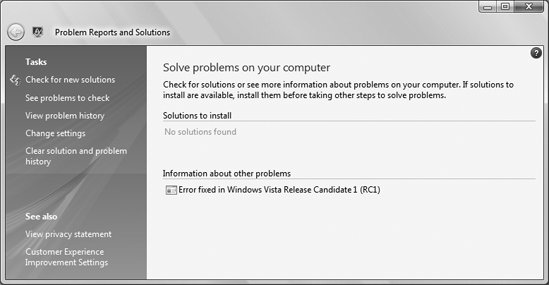
The applet displays any solutions to install, as well as information about problems that do not yet have solutions, are not serious enough to require solutions, or will have solutions. Click any to launch a wizard that walks you through the steps to fix the problem. In addition, the Problem Reports and Solutions applet lets you perform the following tasks by clicking the appropriate links on the lefthand side of the screen:
Check for new solutions Checks for additional solutions to any problems you may be having.  | During the process of finding fixes for your PC, Windows Vista sends details about the problem to Microsoft, which not only uses it to find a solution to the problem, but also puts the information in a database to help create patches to make Windows Vista more stable. |
|
See problems to check Lists all the errors and problems that Windows has detected (see Figure 11-13) but that have not yet been fixed or checked. These are not necessarily ongoing problems; they may include a one-time instance of an application not responding, for example. Check the boxes next to any that you want to find solutions for, then have Windows Vista see if there are solutions. If it finds any, you can launch a wizard to fix the problem. Figure 11-13. A list of problems encountered by this Windows Vista PC 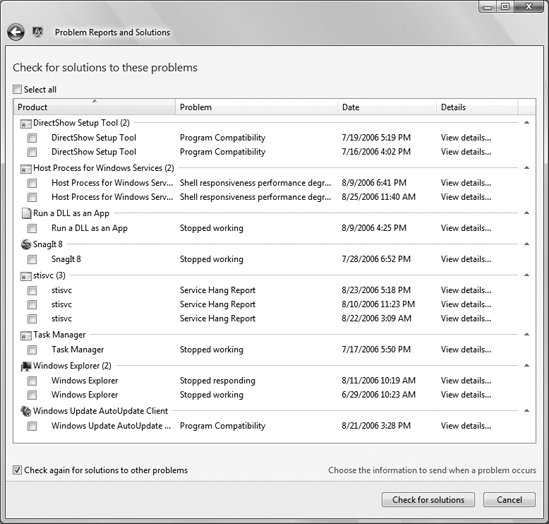
View problem history Displays a list of problems that Windows has detected and fixed, or that Windows has been unable to fix but has sent an error report to Microsoft about. This list won't include current problems. The screen lists the product, program, or service involved, what the problem was, the occurrence date, and the status of the problem. Double-click any problem for more details, as shown in Figure 11-14. Click Copy to Clipboard if you want to send the details to tech support for additional help. Figure 11-14. The details of a problem report 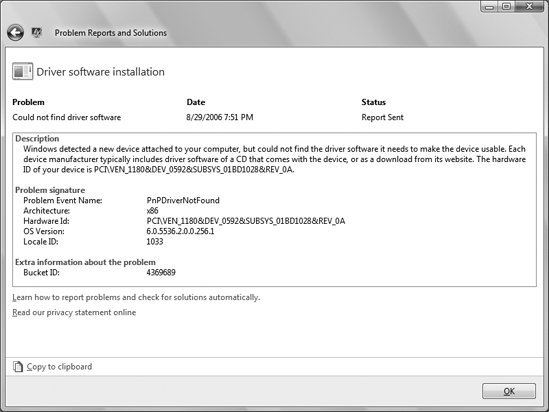
Change settings This lets you change how solutions are checked for and solved. The default is to check for solutions, but you can change that so that instead, Windows Vista will prompt you to check for a solution when an error occurs. Some settings related to automatic problem checking are set by the administrator account, rather than a standard user account. To change them, log in as an administrator, and then on this screen click Advanced Settings. The screen shown in Figure 11-15 appears. From here, you can turn problem reporting on or off, block information from being sent about specific programs, and change these settings globally or on an account-by-account basis. Figure 11-15. Configuring advanced options 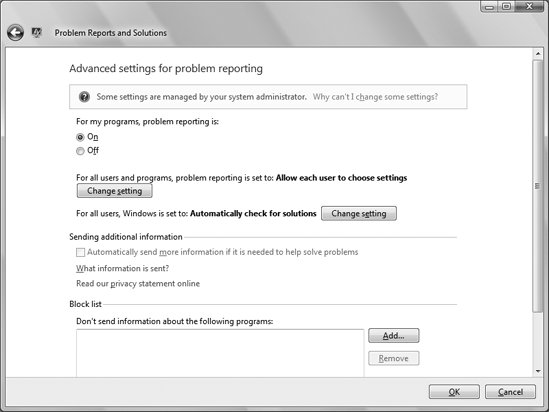
Clear solutions and problem history This clears the list of your problems. Note that this list includes problems that have yet to be solved, and if you clear them, you may not be able to find their solutions. Notes To help diagnose and fix problems, data about errors is sent to Microsoft over the Internet. The information may include the application or hardware in which the error occurred, the type of problem, the system- or report-generated files related to the problem, basic software and hardware information about your system, and your Internet Protocol (IP) address. It's possible that personal information could be sent as wellfor example, if that information is found in a snapshot of memory that needs to be sent to Microsoft for troubleshooting. Microsoft claims that this information is not used to identify you and is kept private. When a problem is found, you are alerted and asked whether to send the information, so if you are worried that your privacy may be impinged upon, do not send the information. If you're part of a corporate network, even a local administrator may not be able to change settings because they are managed by system administrators using Group Policy. For details, see "Group Policy Object Editor," in Chapter 10.
|
Query Process: \windows\system32\qprocess.exe Display a list of running processes. To open Command Prompt qprocess Usage qprocess [target] [/server:computer] [/system]
Description Query Process is a simple, command-line utility used to display a list of the running processes. A process is essentially any program running in the foreground or running invisibly in the background. Task Manager, discussed later in this chapter, does the same thing but is much easier to use. Query Process takes the following parameters:
target target can be any of the following: specify a username to display the processes started by that user; specify a session name or number (via /id:sessionid) to display all the processes started in that session; specify a program name to display all the processes associated with that program; and specify an asterisk (*) to list all processes. Finally, omit target to display all the processes started by the current user.
/server: computer Query a remote computer, where computer is the network name of the machine. Omit to display processes for the local computer.
/system Include system processes. Type qprocess * /system to display all the currently running processes. See also "Task Manager," "Taskkill," and "Tasklist" |
ReadyBoost Speeds up computer performance by storing commonly used files in a flash device. Description ReadyBoost, new to Windows Vista, uses a flash memory device (USB stick, SD card, etc.) to prefetch and store commonly used files, and essentially treats the device as a way to augment RAM. It's an inexpensive and easy way to speed up Windows Vista performance. ReadyBoost speeds up Windows Vista performance in several ways. It increases the size of the prefetch cache, and it frees up RAM that would otherwise be used by prefetch. Depending on your system configuration, you may see a dramatic speed improvement. To use ReadyBoost, connect a flash drive to your PC. Windows Vista will recognize the device, and then it will ask whether to use it to speed up your PC with ReadyBoost (Figure 11-16) or use it as a normal drive. Select "Speed up my system" and ReadyBoost goes into action, without further intervention required on your part. Figure 11-16. Pop a flash drive into your system, and this alert lets you use it for ReadyBoost 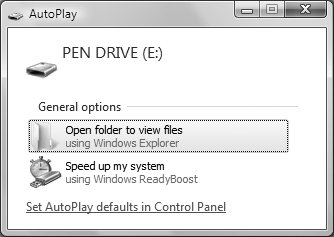
Not all flash drives meet the performance requirements needed to use ReadyBoost, so Windows Vista tests the drive when you first insert it. If it doesn't meet the requirements, a screen appears, telling you that it doesn't. If the device meets the requirements, a configuration screen appears (Figure 11-17), allowing you to set the amount of space on the device that you want to devote to ReadyBoost. It's a good idea to accept at least the minimum, and to possibly add more as well. Figure 11-17. Configuring ReadyBoost 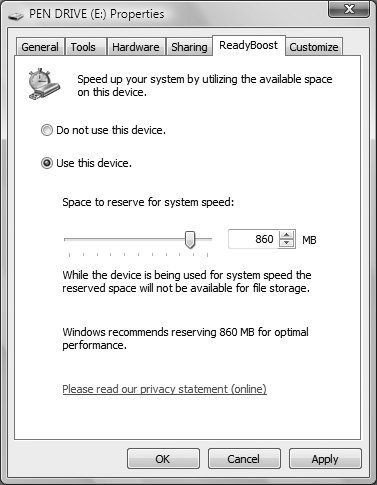
Notes To use ReadyBoost, a USB flash drive must be at least USB 2.0. Flash drives used with ReadyBoost must be able to access data at 3.5 MB per second for 4 KB random reads uniformly across the entire device, and at 2.5 MB per second for 512 KB random writes uniformly across the device. It also has to have at least 64 MB of free space. Microsoft is working to have a ReadyBoost label for manufacturers so that the packaging and advertising of the devices will make it clear that they work with ReadyBoost.
See also "Prefetch" |
Reliability and Performance Monitor: \windows\system32\perfmon.msc or \windows\system32\perfmon.exe Track and review system performance. To open Run as a plug-in for the Microsoft Management Console. Command Prompt perfmon Description This plug-in to the Microsoft Management Console tracks system performance and shows a history of application, Windows, hardware, and miscellaneous failures, as well as software installations and uninstallations (Figure 11-18). Go to any day for details for the failures, installations, and uninstallations for that day. The graph displays the overall reliability over time, so you can see whether your computer is becoming less reliable as it ages. Figure 11-18. The Reliability Monitor in the Microsoft Management Console, which tracks system reliability over time and lets you quickly see the details of failures on any given day 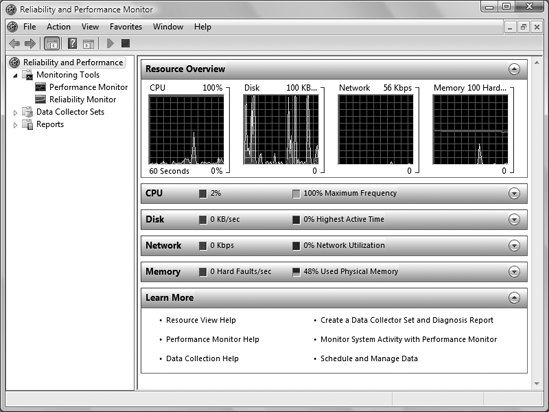
See "Microsoft Management Console," in Chapter 10, for details. |
Remote Assistance Allow others to connect to your computer using Remote Desktop Connection. To open Start Help and Support Remote Assistance Description Remote Assistance allows another user to connect to your computer so that a technical support representative, a friend, or a coworker can help you with a computer problem by connecting to your computer as though she is sitting in front of it. You can also connect to someone else's computer to provide technical assistance. First you need to configure your PC to allow Remote Assistance connections. Select Control Panel [System and Maintenance] Allow Remote Access. Then under Remote Assistance, select "Allow Remote Assistance connections to this computer." Once that is done, you need to invite another user to connect. Select Start Help and Support Remote Assistance, and select "Invite someone you trust to help you if you want to get help, or "Offer to help someone" if you want to offer help. You'll send an invitation via emailand you can choose either to use your default email program, or to save the necessary information to a file so that you can send it as an attachment via a web-based email program. You'll need to provide the remote user with a password, which you can do by telephone for maximum security, or via instant messaging or email, which is much less secure. | If you choose to send the invitation as a file, you can also copy the file to a disk, removable drive, or network folder, and have it accessed that way. |
|
After you send the invitation, a screen appears, telling you that you're waiting for an incoming connection. When the remote person makes a connection, you're asked if you want to accept it. Click Yes, and the connection is made. From this point on, the remote user sees everything on your screen. You can also chat with each other and send files back and forth to help with troubleshooting. You can also pause the connection by clicking Pause, or end the connection by clicking Disconnect. Figure 11-19 shows what Remote Assistance looks like on the PC that is getting assistance; Figure 11-20 shows what it looks like on the PC providing assistance, with the Remote Assistance connection inside a window. Figure 11-19. Getting help with Remote Assistance 
Figure 11-20. Providing help with Remote Assistance 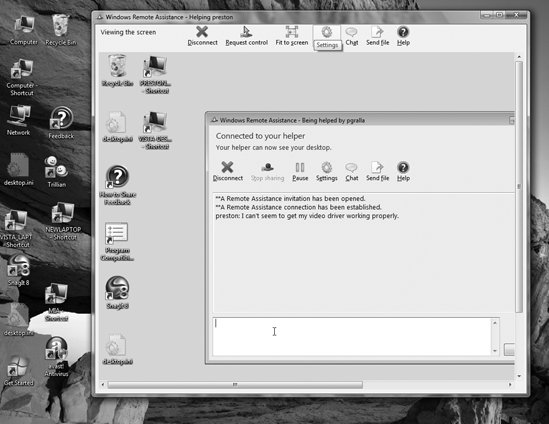
Notes When you send an invitation via email, the recipient receives a link to http://windows.microsoft.com/RemoteAssistance/RA.asp, as well as a file attachment (rcBuddy.MsRcIncident) with your connection information. The information stored in the file attachment is not easily readable; the recipient simply opens the attachment to initiate a connection.
See also "Remote Desktop Connection," in Chapter 7 |
System Information: \windows\system32\msinfo32.exe Collect and display information about your computer. To open Start All Programs Accessories System Tools System Information Command Prompt msinfo32 Description Microsoft System Information is a reporting tool used to view information about hardware, system resources used by that hardware, software drivers, and Internet Explorer settings (see Figure 11-21). Information is arranged in a familiar Explorer-like tree. Expand or collapse branches with the little plus (+) and minus (-) signs, and click any category to view the corresponding information in the righthand pane. Figure 11-21. The System Information window, which shows an exhaustive amount of information about your system 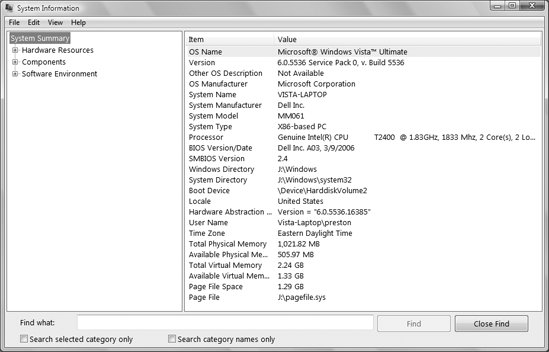
The Components view of your hardware is similar to Device Manager, except that Device Manager also allows modification and removal of the devices. Likewise, the Hardware Resources view can also be duplicated in Device Manager with View Resources by type. One advantage Microsoft System Information has over Device Manager is its capability to show a history of changes, using View System History. The information displayed in the Software Environment category is also available in bits and pieces through other utilities (such as Driver Query, discussed in Chapter 9), but only here is it presented all in one place. Notes Rather than wading through all of the categories, jump right to the item you want by using the "Find what" field at the bottom of the window. As with Device Manager, you can also connect to another computer and view information about that system. Go to View Remote Computer and enter the name of the remote machine. .wlg files), Windows Report Tool (.cab files), and even .txt files. You can print a report with System Information, but you can print only the entire system information collection, which usually comes out to more than 75 pages. If you want to print only sections of the system information, copy it to Notepad and print it from there. If information appears to be incorrect, out-of-date, or missing altogether, try View Refresh or press F5.
See also "Microsoft Management Console," in Chapter 10 |
Scheduled Tasks Console: \windows\system32\schtasks.exe Control the Task Scheduler from the command line. To open Command Prompt schtasks Usage schtasks /command_name [arguments]
Description The Scheduled Tasks Console is the command-line equivalent of the Task Scheduler, discussed later in this chapter. Although it doesn't do anything not already possible with the Task Scheduler window, it can be convenient for automating the creation and management of tasks. The Scheduled Tasks Console accepts one of six options. To find out more about any of the commands, type schtasks /command_name /?:
/create [/s system [/u user [/p password]]] /ru user [/rp password]] /sc schedule [/mo modifier] [/d day] [/i idletime] /tn taskname /tr taskrun [/st starttime] [/m months] [/sd startdate] [/ed enddate] Creates a new scheduled task on the local computer or a remote system
/delete [/s system [/u user [/p password]]] /tn taskname [/f] Deletes one or more scheduled tasks
/query [/s system [/u user [/p password]]] [/fo format] [/nh] [/v] Displays all scheduled tasks on the local computer or a remote system
/change [/s system [/u username [/p password]]] [/ru runasuser] [/rp runaspassword] [/tr taskrun] /tn taskname Changes some of the properties of an existing task, such as the program to run or the username and password
/run [/s system [/u user [/p password]]] /tn taskname Runs a scheduled task immediately
/end [/s system [/u user [/p password]]] /tn taskname Stops a currently running scheduled task See also "Task Scheduler" |
Services: \windows\system32\services.msc Manage system services. To open Run as a plug-in for the Microsoft Management Console. Command Prompt services Description This plug-in to the Microsoft Management Console displays system services and lets you start and stop services, control whether they run at startup, and customize how they run. It's pictured in Figure 11-22. Figure 11-22. Customizing how services run, using the Services console 
See "Microsoft Management Console," in Chapter 10, for more details. |
System Configuration Editor: \windows\system32\sysedit.exe Obsolete; quick editor for system.ini, win.ini, config.sys, and autoexec.bat. To open Command Prompt sysedit Description The System Configuration Editor is essentially a special version of Notepad that provides convenient access to a few configuration files used in previous versions of Windows. When you start it, the four following files are opened: system.ini, win.ini, config.sys, and autoexec.bat. Because none of these files is actively used in Windows Vista (except for legacy application support), this tool has very little use. It's included for legacy purposes only, and you should not use it unless such changes are specifically required for old applications you may be running. |
System Control Panel Get basic information about your computer. To open Control Panel [System and Maintenance] System Description The System Control Panel (Figure 11-23) shows you at a glance basic information about your computer, including the type of processor and speed, installed RAM, Windows Vista edition, computer name, product ID, and more. Figure 11-23. The System Control Panel, where you can get a quick overview of your Windows version, amount of installed memory, and other information 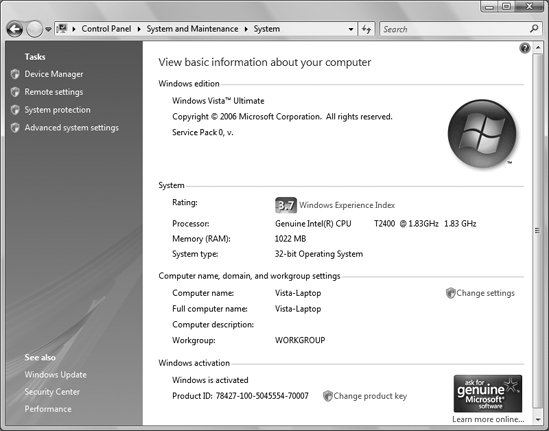
The panel also includes a variety of links to settings, such as System Properties. See also "System Properties" |
System Properties: \windows\system32\sysdm.cpl View and modify many general Windows settings. To open Control Panel [System and Maintenance] System, then click Change settings Command Prompt control sysdm.cpl Description The System Properties window contains settings that affect hardware, system performance, networking, and other Windows features. The tabs in this dialog are as follows:
Computer Name These settings affect how your computer is identified on your network, such as the computer's name and whether you're connected to a domain or workgroup. The Computer description field is for entering a comment only; it has no effect on any networking settings. To join a domain or workgroup, click Network ID; to change your computer name or its domain or workgroup, click Change (see Figure 11-24). Figure 11-24. The Computer Name tab, where you can rename your computer or join a domain or workgroup 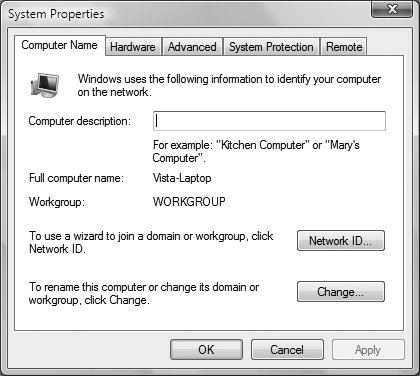
Hardware This gives you access to the Device Manager that lists all the hardware on your system (see Chapter 9 for details). The Windows Update Driver Settings button controls whether to have Windows automatically check for new and updated hardware drivers.
Advanced In this tab, you'll find important Windows settings covering a wide variety of areas, including how to handle visual effects, how to handle logons and user accounts, and startup and recovery options. The "Performance settings" button leads to the Performance Options dialog box, which lets you selectively disable and change several enhanced display features, such as transparent glass, animated windows when minimizing and maximizing, facing or sliding menus into view, and so on. For more details, see "Performance Options," earlier in this chapter.
System Protection This tab offers tools to control the System Restore feature for the drives in your computer. See "System Protection and System Restore," later in this chapter, for details.
Remote These settings control the Remote Desktop (see Chapter 7) and Remote Assistance features (discussed earlier in this chapter). Unless you specifically want others to be able to connect to your computer using Remote Desktop or Remote Assistance, it's strongly recommended that you disable both options on this page. If you are running one of the Home editions of Windows Vista, you will not see the Remote Desktop option here. See also "System Control Panel" |
System Protection and System Restore: \windows\system32\restore\rstrui.exe (System Restore only) Roll back your computer's configuration to an earlier state, with the intention of undoing potentially harmful changes. To open Start All Programs Accessories System Tools System Restore Control Panel [System and Maintenance] System System Protection Command Prompt rstrui Description System Protection (also confusingly called System Restore) is a feature that runs invisibly in the background, continuously backing up important system files and Registry settings. The idea is that at some point, you may want to roll back your computer's configuration to a time before things started going wrong (see Figure 11-25). By default, System Restore is turned on, using at least 300 MB of your computer's hard-disk space. System Restore is particularly useful for restoring the state of your computer if you ever install an application that wreaks havoc on your system. Theoretically, every time you install a new application or drive, a new restore point is created, which is then used to restore the state of your PC to what it was before the installation. But a restore point may not always be created, so if you're about to install a new application that you fear may not be well behaved, it's a good idea to manually create a restore point. (I'll discuss how to do that later in this section.) System Restore automatically creates a Restore Point once a day as well as whenever a significant system event occurs, such as installing a driver or a new program. Oddly enough, Windows calls the feature both System Protection and System Restore. System Protection actually refers to the overall configuration screen for System Restore (see Figure 11-25), and System Restore is the actual application that creates restore points and performs system restorations. Figure 11-25. The System Protection screen, which lets you configure and access System Restore 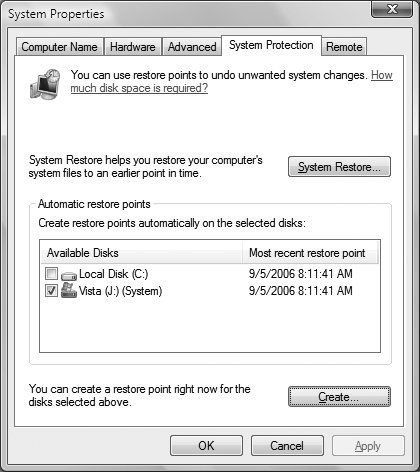
System Protection lets you turn System Restore on and off for specific volumes. Check the box next to any volumes for which you want to turn on System Restore. Note that if you have a volume that contains only data and no system settings, you should still use System Restore on it because it creates shadow copies that you can use to restore old versions of your files. To manually create a restore point, click Create. Start the System Restore application if you want to restore an earlier configuration or create a restore point. Restore points are packages containing files and settings, created at regular intervals. To roll back your computer's configuration to an earlier time, click System Restore, or bypass the System Restore screen altogether and go straight to System Restore by typing rstrui at a command prompt (see Figure 11-26). Figure 11-26. Launching System Restore to restore your computer to a time when it was more stable 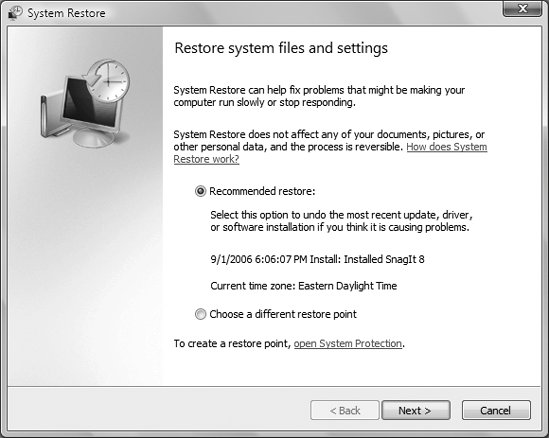
Follow the wizard's instructions. It will recommend a restore point to use, but it's a good idea to instead select "Choose a different restore point" to make sure that the restore point is the one you want to use. You'll see a list of points from which you can choose. See also "Backup and Restore Center" |
Taskkill: \windows\system32\taskkill.exe End one or more running processes, either on a local or a remote system. To open Command Prompt taskkill Usage taskkill [/s system [/u username [/p [password]]]] { [/fi filter] [/pid pid | /im image] } [/f] [/t]
Description You use Taskkill to end one or more running processes from the command line. Taskkill works together with Tasklist, discussed in the next section, to provide command-line equivalents to the functionality provided by the Processes tab in the Task Manager. For more information on processes, see "Task Manager," later in this chapter. Taskkill takes the following command-line parameters:
/s system Specifies the remote system to which to connect.
/u [ domain\] user Specifies the user context under which the command should execute.
/p [ password] Specifies the password for the user specified by \u; prompts for input if omitted.
/f Specifies to forcefully terminate process(es).
/fi filter Displays a set of tasks that match given criteria specified by the filter. Use Tasklist for more display options.
/pid process_id Specifies the process ID of the process to be terminated. To obtain the process IDs, use Tasklist.
/im image_name Specifies the image name of the process to be terminated; specify * to terminate all image names.
/t Terminates the specified process and process tree, which includes any child processes that were started by it. See also "Tasklist" and "Task Manager" |
Tasklist: \windows\system32\tasklist.exe Display a list of running applications and processes running on either a local or a remote system. To open Command Prompt tasklist Usage tasklist [/s system [/u username [/p [password]]]] [/m [module] | /svc | /v] [/fi filter] [/fo format] [/nh]
Description You use Tasklist to list running processes from the command line. Tasklist works together with Taskkill, discussed in the preceding section, to provide command-line equivalents to the functionality provided by the Processes tab in the Task Manager. For more information on processes, see "Task Manager," later in this chapter. Tasklist takes the following command-line parameters:
/s system Specifies the remote system to which to connect.
/u [ domain\] user Specifies the user context under which the command should execute.
/p [ password] Specifies the password for the user specified by \u; prompts for input if omitted.
/m [ module] Lists all tasks that have Dynamic Link Library (DLL) modules loaded that match the pattern, module. If module is not specified, /m displays all modules loaded by each task.
/v Verbose mode; display all available information.
/fi filter Displays a set of tasks that match given criteria specified by the filter. Use Tasklist for more display options.
/fo format Specifies the format of the display: type /fo table (the default) for a formatted table, /fo list for a plain-text list, or /fo csv for a comma-separated report, suitable for importing into a spreadsheet or database.
/nh If using the /fo table or /fo csv format, the /nh option turns off the column headers. See also "Taskkill," "Task Manager," and "Query Process" |
Task Manager: \windows\system32\taskmgr.exe Display currently running programs, background processes, and some performance statistics. To open Ctrl-Alt-Delete Start Task Manager Right-click on empty portion of the Taskbar Task Manager Command Prompt taskmgr Keyboard shortcut: Ctrl-Shift-Esc Description The Task Manager is an extremely useful tool, but you won't find it on the Start menu. In its simplest form, it displays all running applications, allowing you to close any that have crashed or stopped responding. The main window is divided into the following six tabs:
Applications Shows all foreground applications as well as the status of each one (see Figure 11-27). The Status can be "Running" or "Not responding." You can switch to any running application by double-clicking it, which makes it similar to the Taskbar in this respect. Click New Task or go to File New Task (Run) to start a new program by typing a filename or command. Figure 11-27. The Applications tab, which shows the currently running programs 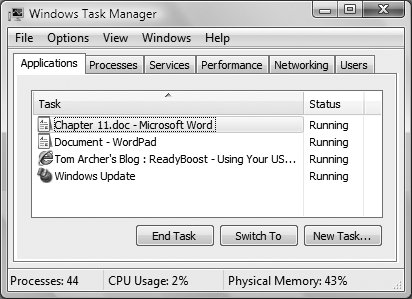 Select any item and click End Task to close the program. Although it is preferred to use an application's own exit routine, this function is useful for programs that have crashed or have stopped responding.
Processes A process is any program running on your computer, including foreground applications shown in the Applications tab and any background applications that might be running (see Figure 11-28). Like the End Task button in the Applications tab, the End Process button is used to close unresponsive programs. Additionally, however, it allows you to close background applications that otherwise have no window or other means of exiting gracefully. Figure 11-28. Viewing all running programs (including background tasks) with the Processes tab  Right-click on any running task to display a list of options, including End Process (discussed earlier), End Process Tree (similar to End Process, but ends all "child" processes as well), Set Priority, and Set Affinity, among others. The Set Priority menu allows you to increase or decrease the priority of a program; higher-priority processes may run better and are less likely to be interrupted or slowed down by other processes, and lower-priority processes are more likely to yield CPU cycles to other processes. Note that changing a process's priority may have unpredictable results. It should be used only if that process or application explicitly supports running at higher or lower priorities. If you have a PC with more than one processor, use Set Affinity to determine which processor(s) the process is allowed to use.
Services A service is a program or process that runs in the background in Windows and provides support to other programs. For example, the Windows Image Acquisition (WIA) service helps scanners and cameras obtain graphics via Windows. The Services tab (Figure 11-29) displays all services; the status can be Stopped or Running. Right-click any service and choose Start Service to start it, or Stop Service to stop it. Figure 11-29. Viewing all running services with the Services tab 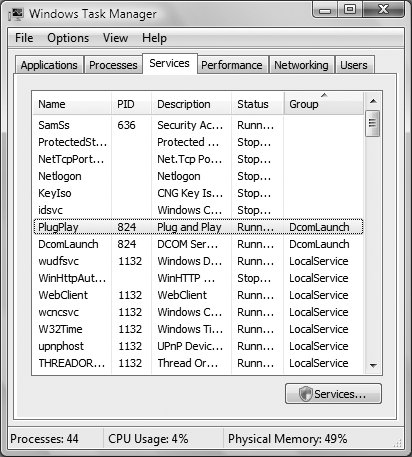
Performance The Performance tab shows several graphs, all updated in real time, used to monitor the performance of the system. You can change the refresh rate of the graphs by going to View Update Speed. The CPU Usage is expressed as a percentage, in which an average idling computer will take about 3 to 7 percent of a processor's clock cycles and a computer running a graphics-intensive game might take 80 to 90 percent. Don't be alarmed if your CPU Usage appears to be unusually high, but if such usage has no reasonable explanation, you may want to investigate running processes for crashed programs or even tasks that may have been started by unauthorized intruders. CPU Usage History provides a running history of the last few minutes of CPU Usage readings; it can be very interesting to see what happens to the CPU Usage History when you start a particular program or just move the mouse around the screen. If you have a multiprocessor system, you'll see a separate graph for each processor, which can be very useful to see how your processors are being utilized (see Figure 11-30). Figure 11-30. The Performance tab, which shows a time-based graph of the load on your processor and virtual memory 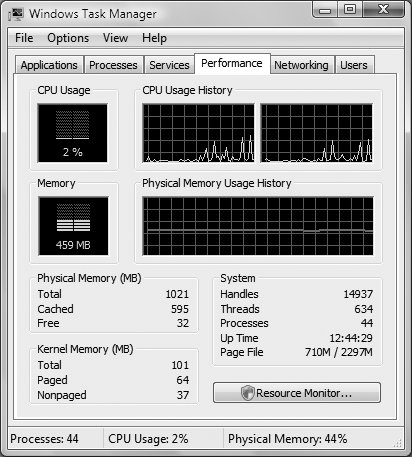 Page File Usage and Page File Usage History work the same as CPU Usage, except that they report on the performance of the virtual memory. Virtual memory is the portion of your hard disk used to store data when Windows has used up all of your installed RAM. To change virtual memory settings, go to Control Panel [System and Maintenance] System Change Settings Advanced tab, click Settings in the Performance section, choose the Advanced tab, and click Change. Also shown in the Performance tab are several performance-related statistics, such as the amount of total and available memory, or even the number of active handles (unique identifiers of resources, such as menu items, windows, Registry keys, or anything else Windows has to keep track of).
Networking Similar to the Performance tab, the Networking tab shows real-time graphs depicting the performance of your network connections. You'll see a graph for each network connection currently in use. See Chapter 7 for more information.
Users This tab lists the current users of the PC and lets you disconnect them or log them off. You can use the Options and View menus to set several preferences; note that the options available in these menus change depending on the currently selected tab. For example, if you want to leave the Task Manager open all the time, you may want to turn off the Always On Top option so that you can see other running applications. At the bottom of many of the tabs are buttons that perform additional tasks, launch a related utility, or launch a related Microsoft Management Console plug-in. For example, click Resource Monitor at the bottom of the Performance tab to launch the Resource Monitor, which provides more details about the current PC's performance and resource use. See also "Query Process," "Taskkill," "Tasklist," and "Reliability and Performance Monitor" |
Task Scheduler: \windows\system32\taskschd.msc Run a program or script at a specified time. To open Control Panel [System and Maintenance] Schedule tasks Command Prompt taskschd Description The Task Scheduler allows you to schedule any program or WSH script to run at a specified time or interval (see Figure 11-31). Figure 11-31. The Task Scheduler, which lets you run programs at predetermined times or intervals 
To create a new scheduled task, click Create Basic Task to open the Task Scheduler Wizard (Figure 11-32). You'll be prompted to do the following: Type in a name for the task and its description. Select a trigger (for example, at a specific day, when your computer starts, when you log on, when a specific event occurs, and so on). The trigger can also be a specific time of the day and day of the week. Select an action that the Task Scheduler should take (for example, run a program, send an email, or display a message).
Figure 11-32. Starting the Task Scheduler Wizard 
Click Finish, and you're done. The task will now run at the scheduled time. What if you want to delete or edit the task? At first, there seems to be no clear way to do that. The task you just created may not show up in the Task Activity and Status area. It will appear in the Active Tasks area, but only the name shows updouble-click it, or highlight it and press the Delete key, and nothing happens. To edit or delete the task, click Task Scheduler Library in the lefthand pane. Your task now shows up. To delete it, highlight it and select Delete from the rightmost pane. To edit it, double-click it. Editing the task doesn't launch a wizard but instead brings up a multitabbed screen (shown in Figure 11-33). This screen gives you far more control over how the task runs. Figure 11-33. Editing a task, which gives you far more control over how the task will run 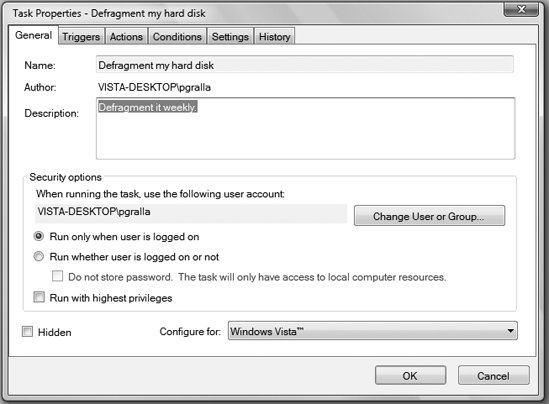
Here is a brief rundown of each tab, and what each controls:
General Lets you select a user account that should run the task, as well as choose other options such as whether to run when the user is logged in, and whether to run with the highest privileges. (For details about privileges, see "User Account Control," in Chapter 8.)
Triggers Lets you pick an extremely wide variety of triggersfor example, when connecting to or disconnecting from a user session, when a workstation is locked or unlocked, and so on. It also allows you to delay tasks for a certain amount of time after a trigger, repeat tasks, stop tasks from running too long, set an expiration date, and more.
Actions Allows you to specify the command line, the full path- and filename of the application, or the script to run. You can also choose the default folder in which to run the program.
Conditions Lets you determine the conditions under which the task will runfor example, when the computer is idle for a certain amount of time, when the computer is on AC power or when it switches to battery power, and so on.
Settings Lets you set more preferences, including what actions to take if the task fails (whether to restart it, and how often to try, for example), under what circumstances to have the task automatically deleted, and more.
History Displays a history of the running of the task. If you want the kind of control over your tasks that these tabs afford, you can bypass the wizard entirely. Click Create Task, instead of Create Basic Task, and you'll be presented with the multitabbed screen that you can fill out, instead of filling out a wizard. The Task Scheduler also lets you look at all the tasks scheduled to be run on your PC and at those that have completed, using the Task Activity and Status as well as the Active Tasks areas. Notes See also "Scheduled Tasks Console" and "Windows Script Host" |
Windows Easy Transfer Transfers file, folders, and settings among PCs. To open Control Panel [System and Maintenance] Welcome Center Transfer Files and Settings Description Windows Easy Transfer can transfer files, programs, and settings from a PC running Windows 2000, Windows XP, or Windows Vista to a PC running Windows Vista. | If you upgrade from a PC running Windows XP to Windows Vista, your files, settings, and programs will be transferred automatically. |
|
You can use Windows Easy Transfer to transfer files and program settings from a computer running Windows 2000, Windows XP, or Windows Vista to another computer running Windows Vista. Start Windows Easy Transfer on the computer running Windows Vista, and then follow the instructions. To transfer files, you need to connect the two PCs via a direct USB cable or via a network, or copy the files to a CD, DVD, or USB flash drive and then copy from there to the new PC. You'll be able to copy only selected files and folders (Documents, Pictures, and Shared Documents folders). You can copy email settings from Windows Mail, Outlook, Outlook Express, and other email programs. Windows Easy Transfer also transfers a variety of program settings, but it doesn't actually copy the programs themselves; for those you'll have to go through a normal installation procedure. You'll also copy user accounts and settings including color schemes, desktop backgrounds, and so on, as well as Internet connection settings, favorites, and cookies. Performing the transfer is straightforward. A wizard appears, letting you select which files, folders, and settings to transfer; just follow the directions. Notes |
Windows File Checker: \windows\system32\sfc.exe Verify the existence and integrity of some Windows files. To open Command Prompt sfc (requires an Administrator command prompt) Usage sfc [/scannow] [/verifyonly] [/scanfile=filename] [/verifyfile=filename] [/offwindir=offline windows directory /offbootdir=offline boot directory Description
Description Windows File Checker scans your system for corrupt, changed, or missing files, as long as those files are specified in a predetermined list of important system files. By default, Windows File Checker automatically scans your system every time Windows is started. Use the Windows File Checker utility to perform a manual scan or change the automatic settings. The Windows File Checker takes the following options:
/scannow Performs an immediate scan of all protected system files.
/verifyonly Scans the integrity of all protected system files. No repair operation is performed.
/scanfile Scans the integrity of the file and repairs the file if problems are identified. You must specify the full path of the file.
/verifyfile Verifies the integrity of the file but does not perform a repair operation. You must specify the full path of the file.
/offwindir When performing an offline repair, specifies the location of the offline Windows directory.
/offbootdir When performing an offline repair, specifies the location of the offline boot directory. |
Windows Script Host: \windows\system32\wscript.exe; cscript.exe Runs WSH scripts. To open Command Prompt wscript Command Prompt cscript Usage wscript filename [options] [arguments] cscript filename [options] [arguments]
Description The Windows Script Host runs WSH script files you create and edit. Of the two executables, wscript.exe is used to run. Both executables take the following options (note the use of double slashes to distinguish them from ordinary arguments passed onto the script):
//b Batch mode; suppresses script errors and prompts from displaying.
//d Enables active debugging.
//e: engine Uses engine for executing the script; the default depends on the filename extension of the script file.
//h: cscript Changes the default script host to cscript.exe, the command-prompt-based host.
//h: wscript Changes the default script host to wscript.exe, the Windows-based host (the default).
//job: xxxx Executes a WSF job.
//nologo Prevents the display of the banner logo at execution time.
//s Saves current command-line options as the default for this user.
//t: nn Timeout in seconds; the maximum time a script is permitted to run.
//x Executes the script in the debugger.
//u Uses Unicode for redirected I/O from the console. |
Welcome Center Offers access to basic settings and services for getting started with Windows Vista. To open Control Panel [System and Maintenance] Welcome Center Description The Welcome Center (Figure 11-34) appears not only the first time you start Windows, but every time thereafter as well. It includes links to common tasks you'd want to perform when you start up, including transferring files and settings from another computer, adding new users, creating an Internet connection, and seeing system details. Figure 11-34. The Welcome Center, which includes links to common tasks you might want to perform when you start up Windows Vista 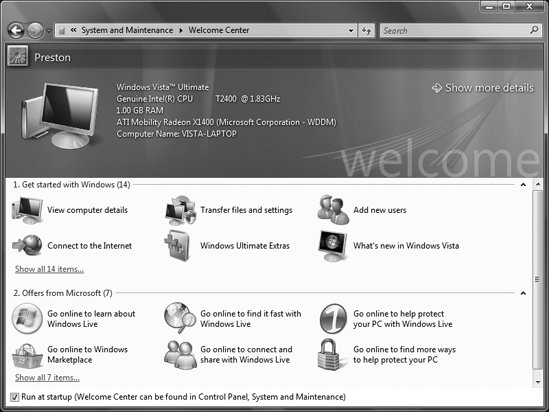
To see more items and tasks you can perform, click the "Get started with Windows" link. To turn off the Welcome Center so that it doesn't launch every time you start up Windows, uncheck the box next to Run at Startup. |
|