7.6. Network Applications Windows Vista includes several new network applications, notably those for collaboration. This section details each. Network Projector: \Windows\System32\NetProj.exe Give a presentation over a projector attached to your network. To open Start  All Programs Accessories Connect to a network projector All Programs Accessories Connect to a network projector Windows Meeting Space Options Connect to a network projector Command Prompt netproj Description A network projector is a projection device, like a standard projector, with one important difference: it's connected to a network. You can use Windows Vista to give presentations over the projector. When you give a presentation, whatever is on your screen will be displayed by the projector. When you run Network Projector, a wizard launches that helps you find a network projector. The wizard can automatically find all projectors attached to the network, or it will let you type in the address of a projector, if you happen to know it. You can use either Internet or network addressesfor example, http://BigServer/projectors/fancyprojector or \\BigServer\projectors\fancyprojector.  | In order to connect to a network projector in Windows Meeting Space, a meeting needs to be underway; people will have to be in your meeting. If you launch Windows Meeting Space and you don't invite people to a meeting, or no one attends the meeting, you won't be able to use Network Projector. |
|
When you see a list of projectors, icons next to each projector indicate whether it is secured (requiring a password) or unsecured (allowing anyone to connect to it without a password). When you make the connection, you have the option of having the projector mirror exactly what is on your display, or using the projector as an extension of your displayin other words, you will be able to drag windows between the projector and your own desktop. When you use the projector, the Network Presentation dialog box lets you pause and resume your presentation, as well as disconnect from the projector. See also "Windows Meeting Space" |
People Near Me: \Windows\System32\p2phost.exe \Windows\System32\collab.cpl Identifies nearby network users with whom you can collaborate using tools such as Windows Meeting Space. To open Control Panel [Network and Internet] People Near Me Command Prompt Control Collab.cpl Command Prompt p2phost (logs in automatically) Description Windows Vista, for the first time, introduces the idea of "presence" to the world of Windows networking. Presence lets other network users know about your availability online so that they can work with you online, using Windows Meeting Space. People Near Me allows other network users to know that you are online and available for Windows Meeting Space. In addition, if you want to start a Windows Meeting Space session, you'll first have to sign in to People Near Me. The first time you sign in to People Near Me, you'll see the screen shown in Figure 7-42. Figure 7-42. Signing in to People Near Me for the first time 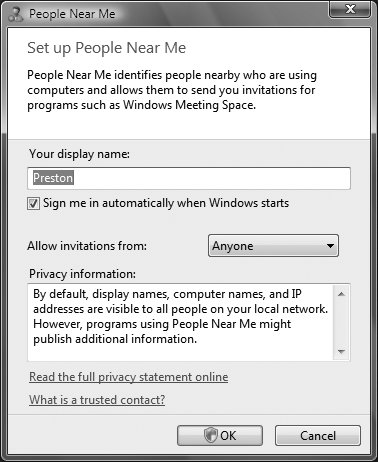
Your display namethe name that other people seeis the same as your Windows Vista account name by default, although you can change that. Pay attention to the "Allow invitations from" drop-down box; this will determine who is allowed to see your availability. You can choose to have anyone see you, only Trusted Contacts, or no one. Although the default is to have anyone, for maximum privacy you should choose Trusted Contacts. That will cut down on the inevitable spam that presence brings. This is particularly important when you are on a public network, such as a hotspot. On the other hand, if you are on a secure network, such as your own home network or a corporate network, choosing Anyone is a good bet. That will allow any business associates to see your presence, even if you haven't yet established a trusted relationship with them. | A Trusted Contact is someone who has sent you his contact information vie email, or on a disk, USB flash drive, or other removable media. Trusted Contact information includes a certificate to confirm that contacts are who they say they are; that's why they are trusted. |
|
When first signing in to People Near Me, you also have the option of signing in to it automatically whenever Windows starts. After you sign in, you'll see a small People Near Me icon in the System Tray. You can sign out by right-clicking the icon and choosing Sign Out. Once you sign in, you're available to be contacted for Windows Meeting Space sessions.  | A Trusted Contact will be able to see a variety of information about you when you sign in to People Near Me, such as your username, display name, and IP address. |
|
After you've set up People Near Me, you can change your options by right-clicking the icon in the System Tray and choosing Properties, or by going to Control Panel  [Network and Internet] People Near Me Change People Near Me settings. Youll find the following tabs: [Network and Internet] People Near Me Change People Near Me settings. Youll find the following tabs:
Settings This lets you change the name that other people see. In addition, it lets you use a picture of yourself so that others will see your picture when collaborating with you. The picture, by default, is your user account picture. But you can choose to use any picture you want, including a photograph of you. Click Change Picture, and you'll be sent to the User Accounts Change Your Picture screen. Choose a new picture as you normally would for changing a user account picture. (See Chapter 10 for details.) Keep in mind, though, that when you change your picture for People Near Me, youre also changing it for your user account; there's no way to have separate pictures for each. This tab also lets you change who can see you in People Near Me, and whether to sign in automatically when Windows starts. In addition, it lets you decide whether to display a notification when you've received an invitation.
Sign in This screen signs you in to or out of People Near Me. Notes To find out whether a contact is trusted, select it in the Windows Contacts folder. If the person is a trusted contact, the words "Trusted Contact" will appear below the contact's display name. People Near Me works on any network, including public networks such as hotspots. For maximum security, don't use the feature on a public network, unless you specifically want to collaborate with others on that network. For example, if you and coworkers want to set up a Windows Meeting Space session at a public hotspot, you would use People Near Me. When you sign in to People Near Me, you won't actually be visible to others until they initiate a Windows Meeting Space session. The opposite holds true as well; you won't be able to see others until you initiate a Windows Meeting Space session. When you right-click the People Near Me icon and choose Properties, you'll notice there is one option for signing out and another option for exiting. When you sign out, you're still running People Near Me, but you've signed out of the service. To sign back in, right-click the icon again and choose Sign In. If you instead exit, you'll stop running People Near Me. To sign in, you'll have to go to Control Panel [Network and Internet] People Near Me.
See also "Windows Meeting Space" |
Remote Desktop Connection: \windows\system32\mstsc.exe Access another computer remotely and use it as though you are sitting in front of it. To open Start All Programs Accessories Remote Desktop Connection Command Prompt mstsc Description Remote Desktop Connection allows you to connect to another computer (or allows someone else to connect to your computer) and use it as though you were sitting in front of it. Much more than simply a remote command prompt (like SSH or Telnet), Remote Desktop Connection allows you to see a full Desktop, complete with icons and the Start menu, and even run programs on the remote computer (see Figure 7-43 for configuring a connection). Figure 7-43. Connecting to another Windows Vista computer using a Remote Desktop Connection 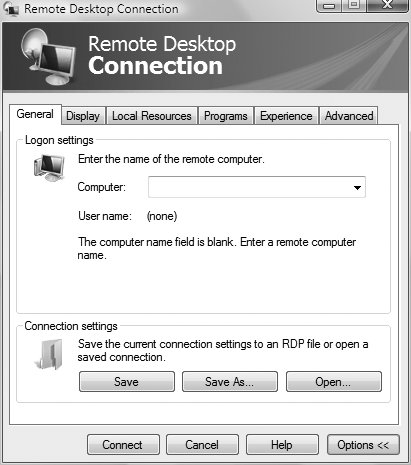
To configure a computer to accept incoming connections via Remote Desktop Connection, go to Control Panel [System and Maintenance] System Remote Settings Remote Desktop, and turn on "Allow connections from computers running any version of Remote Desktop (less secure)" or "Allow connections only from computers running Remote Desktop with Network Level Authentication (more secure)." By default, all users with administrator privileges always have access, but you can enable access for other users as well by clicking Select Users. Once a computer has been set up, you can connect to it by opening Remote Desktop Connection and typing that computer's name (if connected on a local network) or that computer's IP address (if connected to the Internet). Click Options to specify a username, password, and domain (only for Windows Server domains), and even to save your connection settings to a file so that you can connect more easily later. | To make a Remote Desktop Connection, you need a user account on the computer to which you're connecting. You can't use the user account on the computer from which you're connecting, unless that account has the same user ID and password as the computer to which you're connecting. |
|
The Display tab lets you choose the size of the windows in which you want to run a Remote Desktop connection, as well as the color quality. The Local Resources tab lets you choose whether sounds generated by the remote computer are played locally (which can slow the connection), whether certain keystroke combinations are interpreted locally or sent to the remote computer, and whether to automatically connect you to the remote computer's disks, printers, or serial ports. Choose the Programs tab to set up a program to start automatically when a connection has been established. The Experience tab allows you to turn on or off features that will affect performance; depending on your connection, for example, you may want to enable or disable the remote computer's background wallpaper or windows animations. The Advanced tab configures what should happen if your authentication on the remote PC fails (retry, do not connect, or receive a warning), and lets you configure the use of a Terminal Services Gateway (TSG) if you need to connect to users on a corporate network using a public Internet connection. Figure 7-44 shows a Remote Desktop Connection. Figure 7-44. A Remote Desktop Connection with the remote desktop running inside a window 
You can save the connection profile for a particular connection by clicking Save As. This will create a Remote Desktop Profile (.rdp) file, which you can double-click to start the connection without having to retype the connection information. Right-click any .rdp file and select Edit to return to the Properties dialog for the profile. (By default, the files are saved in your Documents folder.) Notes Remote Desktop Connection differs from Remote Assistance, even though in both cases, a connection is being made to a remote PC. With a Remote Desktop Connection, you access the resources of another PC, but you don't perform troubleshooting tasks. When you make a Remote Desktop Connection, you're logging on to a remote PC using your account on it. If someone on the PC logs on, your remote connection will be terminated. To end the connection, close the window in which the connection is being made.
See also "Remote Assistance," in Chapter 11 |
Windows Meeting Space: \Program Files\Windows Collaboration\WinCollab.exe Share documents, programs, and your desktop with others. To open Start All Programs Windows Meeting Space Command Prompt wincollab Description Windows Meeting Space is Windows Vista's tool for allowing people to collaborate in online meetings by sharing presentations and files. When you first run Windows Meeting Space, a wizard configures the Windows Firewall to allow communications through. The wizard also enables file replication, because Windows Meeting Space allows people to share files across a network. You can use Windows Meeting Space to create online meetings on a private network, such as at a business or home, but you can also use it in public spaces, such as hotspots. Windows Meeting Space works closely in concert with People Near Me. (For details, see "People Near Me.") In fact, People Near Me's only real purpose is to make it easier for people to connect to Windows Meeting Space. To start a meeting, click "Start a new meeting" and type in the meeting name and a password for the meeting (Figure 7-45). You have the option of allowing those logged in to People Near Me to see the meeting without you having to alert them, or to hide the meeting from them. Figure 7-45. Starting a new meeting 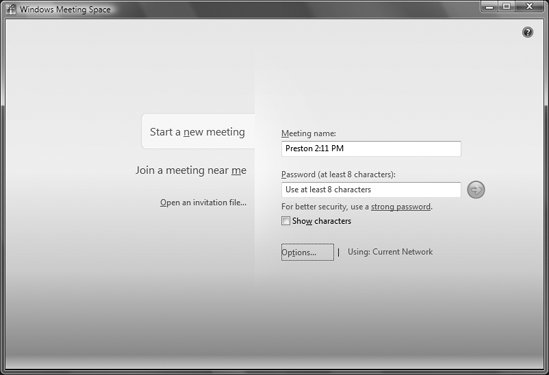
Once you've created the meeting, click Invite People. A list of those who are signed in to People Near Me will appear. Check the boxes next to the names of people you want to invite, and click "Send invitations." If you want to invite people who are not on the list, click Invite Others, and you'll be able to send an invitation via email or create an invitation file that you can send via instant messaging, or use some other means of file transfer. When you directly invite someone (in other words, not via email or instant messaging), she'll get a notification (Figure 7-46), including your name and the name of the meeting. She'll be told whether the invitation is from someone who is one of her trusted contacts. (Trusted contacts are contacts in Windows Contacts who have provided a certificate proving that they are who they say they are.) She can accept or decline the invitation. In order to join the meeting, she needs to have the meeting password. So you will have to find some way to provide her with a password for the meetingfor example, by phone, instant messaging, or email. | If you want to allow people to join your meeting without requiring a password, when you fill out the "Invite people" form, uncheck the box next to "Require participants to type the meeting password." |
|
Figure 7-46. A Windows Meeting Space invitation 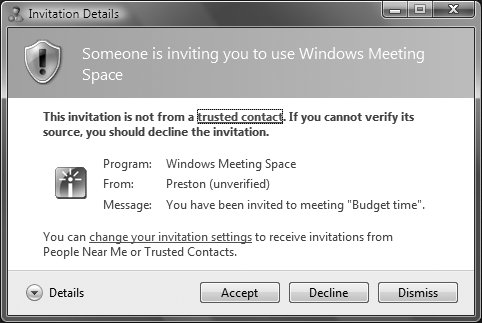
Once you've set up a meeting, you can do the following:
Share a program or your desktop This lets you share either your entire desktop or a single program or file. "Sharing" means that other meeting participants can see exactly what you're doing on-screen. So, for example, you can give a PowerPoint presentation, display a spreadsheet or other document, and so on. As you move your cursor, type, minimize and maximize programs, and so on, the participants will see exactly what you do. If you share only a program, they will see only that program. | When you share your desktop or a program with other participants, you may all revert to the Windows Basic interface because there may be incompatibilities between your desktop settings and theirs. |
|
You spend the meeting not in the Windows Meeting Space window itself, but rather using your program or desktop as you would normally. You use the Windows Meeting Space window only when you want to take additional Windows Meeting Space options, such as creating handouts (covered in the next section). A bar also appears at the top of your desktop or program, depending on which you are sharing. The bar includes buttons for stopping sharing, pausing sharing, giving control to another user so that he has control of the meeting, showing the Windows Meeting Space window, and connecting to a network projector. A network projector is a specialized projector connected to your network that will allow you to make presentations over the network using Windows Meeting Space. In that way, you can connect to a distant physical projector to make a presentation. The Windows Meeting Space window itself doesn't change when you're sharing your desktop, but if you'd like, you can see what others are seeing as you share your desktop or programs. Be aware, though, that this can be a bit like looking in a fun house mirror, because you'll see your desktop mirrored multiple timesfirst is your desktop itself, then inside that is the Windows Meeting Space window in which you see your desktop mirrored on someone else's PC, and in that desktop there is a Windows Meeting Space window with a mirror of the desktop, and so on. Figure 7-47 is an example. Figure 7-47. Lost in the funhouse 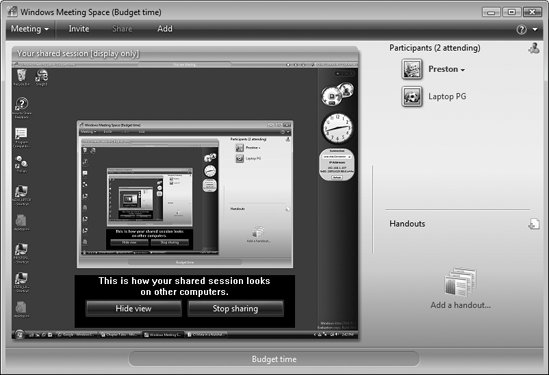
Add a handout This lets you create a "handout" that appears on everyone's screen. You don't actually create a new handout. Instead, you send a file of any type to everyonea Word document, an Excel spreadsheet, a PowerPoint file, a graphics file, and so onso that everyone can view it on her screen. Everyone can then mark up the handout. That markup, however, does not alter the handout itself; the original stays untouched. Only one person at a time can mark up and change the document, however. In order for a person to mark up the document, the current owner of the meeting has to turn ownership over to that person. Anyone in the meeting can add handouts at any time, though; the owner does not need to give permission. Indicated underneath each handout is the name of the person who added it. You can list multiple handouts for each meeting, as you can see in Figure 7-48. Figure 7-48. Each handout showing who added it to the meeting 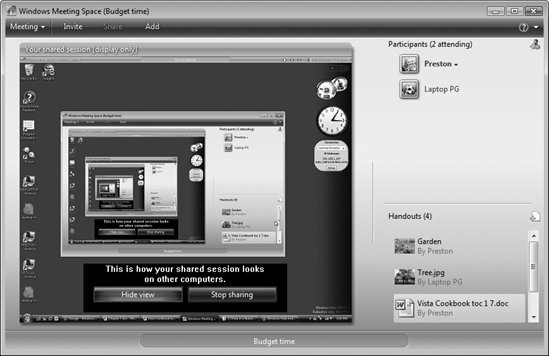
Send a note Windows Meeting Space includes a very rudimentary instant messaging component. Double-click the person to whom you want to send a note, and a small window pops up, shown in Figure 7-49. Type in a message, or if you prefer, click the Ink button, and you can instead draw something and send the note. Figure 7-49. Windows Meeting Space's rudimentary instant messaging component 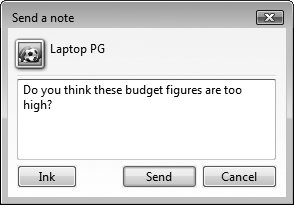 The instant messaging component is about as bare-bones a feature as you can imagine. Send the note, and it vanishes from your screen so that when someone sends you a reply, you won't see the note that you sent. As a result, there's no conversation thread to follow. Along the top of the Windows Meeting Space window is a toolbar that lets you leave the meeting, exit the Windows Meeting Space program, save the handouts from the meeting, invite others to the meeting, share applications, and add handouts. Notes When you're in a meeting, if someone else has control and you would like to be in control, click the button on the top right of the Windows Meeting Space Toolbar (it will list who is currently in control of the meeting) and select Request Control. When you send an invitation to someone via email, he'll have to open the attachment, which will launch Windows Meeting Space. He'll still need to know the meeting password. The same holds true for when you send an invitation file via instant messaging or some other means. Invitation files and attachments are in the .wcinv format. When you use Windows Meeting Space, you may notice some flickering in your applications or desktop, or when starting up or exiting the program. When you exit a meeting, you can save all the handouts, even if other people created them.
See also "People Near Me" and "Network Projector" |
|