Section 7.3. Setting Up a Network
7.3. Setting Up a NetworkSetting up a peer-to-peer network in Windows Vista is quite straightforward. This section assumes that you have a broadband connection (such as a DSL or cable modem) and that you want several PCs to share that Internet connection as well as to share resources with one another. You'll need to buy a router, which is commonly available for between $50 and $100, depending on its capabilities. Your best bet is to buy a wireless router, as described earlier in this chapter. Wireless routers include Ethernet ports (most commonly four) so that you can use them to network both wired and wireless PCs. Make sure that each PC has a wired or wireless network adapter. (See the entry for "NIC," in the "Networking Terminology" section, earlier in this chapter.) Virtually any desktop PC you buy should already have an Ethernet adapter built in, and laptop PCs almost always include both built-in wireless and Ethernet adapters. If not, though, you can buy wireless adapters as PC cards for laptops, PCI cards for desktops, and USB adapters for either desktops or laptops. If you're buying new adapters, make sure that your wireless router and all the wireless adapters follow the newer, faster 802.11g wireless standard, not the older, slower 802.11b standard.
Follow the instructions of the router manufacturer for installing the network. Take note of the IP address range used by your router (such as 192.168.0.x, where x is between 1 and 254). As a general rule, though, you need to first install all the adapters or wireless adapters on all the PCs. Then connect the router to your DSL or cable modem using an Ethernet cable. Make sure you use the correct port on the router. It may be labeled as "Internet" or "WAN," and it may be set apart from the other ports on the router in some way. For example, in some Linksys routers, the port for connecting to a DSL or cable modem is outlined in blue, and the ports for connecting to PCs are outlined in yellow. Next, connect one of your PCs via an Ethernet cable to the router. This will be used to configure the router. Follow the manufacturer's instructions for doing so.
After that, configure each individual PC to connect to the network, either via Ethernet cables or wirelessly. Details on how to do that are covered in "Connect to a network," later in this chapter. Once you've configured the PCs, they should all have Internet and network access. It's a good idea to test each PC's connection using Ping (see "Ping," later in this chapter). By default, your router will assign IP addresses in the following way: the first computer will be 192.168.0.2 (.1 is usually reserved for the router), the second will be 192.168.0.3, and so on.
Assuming your network is similar, pick a computer (or your router), go to a command prompt, and type ping address, where address is the IP address of the other computer. For example, from the 192.168.0.2 computer, you would type: ping 192.168.0.1 If the network is working, you'll get something like this: Pinging 192.168.0.1 with 32 bytes of data: Reply from 192.168.0.1: bytes=32 time=7ms TTL=128 Reply from 192.168.0.1: bytes=32 time=1 TTL=128 On the other hand, if you get this result: Pinging 192.168.0.1 with 32 bytes of data: Request timed out. Request timed out. it means the network is not functioning. If your network is functioning, you can proceed to set up the various services you need, such as file sharing, printer sharing, and so on. You can also use ping to test your connection to the Internet, for example, by typing: ping www.oreilly.com If you receive a Request timed out response, try pinging another web site, because the issue could be caused by the web site rather than your own network. 7.3.1. What to Do If Your Connection Doesn't WorkIf all goes well, you should be able to set up a network without problems. But if you do run into trouble, follow these tips to help you get around most of the common hurdles you'll encounter when setting up a LAN:
These instructions assume the network settings for your connections haven't been tampered with. If you suspect that your settings might be wrong, open Device Manager, right-click the entry corresponding to your network adapter, and select Uninstall. (Note that it's not necessary to physically remove the device from your system.) When you restart Windows, the adapter will be redetected and the drivers will be reinstalled. 7.3.2. Understanding Private and Public IP AddressesAny computer on the Internet or a LAN must have an IP address in order to be connected and to use all its services. (An exception is if you are connected to an older-style network that is not based on IP, but this is extremely rare these days.) But because of the explosion of the Internet and networks, including home and small-office networks, there are not enough IP addresses to go around for everyone who wants to connect. To solve that problem, home networks and small-office networks use a technique called Network Address Translation (NAT). With NAT, each PC on the network receives its own private IP address that can be used only for communicating internally on the network. The network, as a whole, has a single public IP address used on the Internet. So a PC on the internal network may have an IP address of 192.168.1.103, but to the Internet, its IP address may be 66.30.117.9. How does this magic happen? The home router has the IP address of 66.30.117.9. Every PC that connects to the Internet uses that IP address. But inside the network, the router uses DHCP to assign each PC an internal, private IP address, such as 192.168.1.100, 192.168.1.101, and so on. Several blocks of IP addresses are assigned to be private IP addresses, including 192.168.0.0 to 192.168.255.255, which are the private IP addresses commonly used by home and small-office routers. That means the PCs on your network can use any IP address in that range, and your neighbor's PC can use any IP address in that rangein fact, anyone with a private network can use any IP address in that range. There will not be a conflict between you and others using the same IP address because those IP addresses are internal to the networks, are private, and are not used on the public Internet. Other private IP addresses include 10.0.0.0 to 10.255.255.255, 172.16.0.0 to 172.31.255.255, and 169.254.0.0 to 169.254.255.255.
7.3.3. Networking Windows Vista with Windows XP and Other Windows VersionsIf you have a network that combines Windows Vista PCs with PCs that have earlier versions of Windows, you may notice anomalies and problems. Windows Vista includes new technologies that make networking easier than previous Windows versions, notably the new Link Layer Topology Discovery (LLTD). LLTD allows Windows Vista to automatically detect wired and wireless devices attached to the network, obtain and display information about those devices, and diagnose problems with them, such as low bandwidth in home networks or weak wireless signals. The devices have to support LLTD, but many existing devices are upgradeable via firmware, and many new devices include built-in LLTD support. The problem, though, is that older versions of Windows do not include LLTD. So those PCs are not supported as well as Windows Vista-based PCs. For example, when you view a network map (see "Network Map," later in this chapter, for details), the PCs may take a very long time to show up on the mapeven as long as 15 minutes. In addition, they generally appear at the bottom of the screen, but not as part of the map itself. At the launch of Windows Vista, Microsoft was slated to issue a patch that will add LLTD capabilities to Windows XP PCs. But it currently has no plans to add LLTD to any other earlier versions of Windows. 7.3.4. Implementing Network SecuritySecurity is a very real concern for any computer connected to a network or the Internet. There are three main categories of security threats:
There are a variety of ways to protect your network from attack, including using the Windows Firewall, Windows Defender, the Security Center, and more. For details, see Chapter 8, in particular the "Internet Security" section. 7.3.5. Setting Up Wireless EncryptionIf you have a wireless network, it's a good idea to use encryption to protect it. If your network isn't protected by encryption, passersby may be able to easily connect to it or use a network "sniffer" to read all of its traffic. Setting up wireless encryption is a two-step process. First, you enable wireless encryption on your wireless router, and then you configure every wirelessly equipped PC on your network to use that encryption.
Every router manufacturer has a different method for configuring wireless encryption, and it even varies from model to model of the same manufacturer. So read your router's documentation for how to configure yours. The instructions that follow are for the Linksys SRX400 router. First, log in to your administrators screen, then select Wireless
Fill out the form that appears (Figure 7-5). Enable WPA and WPA2, and choose the kind of encryption algorithm you want to use. Then type in a personal "key," which is a password between 8 and 63 characters long. The longer the key, the more secure the network. Write down the password, because you'll need it in order to configure encryption on each of your wireless PCs. Click Save Settings when you're done. Figure 7-5. Setting up encryption on a Linksys router Now you have to go to each of your wirelessly equipped PCs and match their encryption information and key to the routers. Go to Control Panel Figure 7-6. Setting up encryption on your PC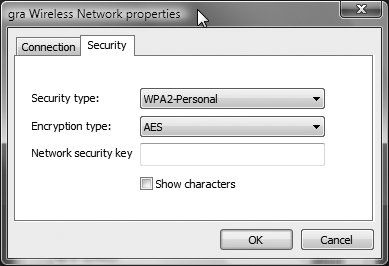 Select the Security type and Encryption type that match the types you chose on your router, and in the Network Security key field, type in your password. Click OK. Your PC will now be able to connect to the router using encryption. 7.3.6. Sharing an Internet Connection with Internet Connection SharingThere is a way to share a single Internet connection among multiple PCs without using a router to connect to the Internet. It's called Internet Connection Sharing (ICS). In ICS, a single computer with an Internet connection acts as a gateway, allowing other computers on the LAN to use the connection. The computer that is connected directly to the Internet is called the host; all the other computers are called clients. It's usually best to use a router to provide shared Internet access, but if you prefer, you can set up a network using two PCs, one of which (the host PC) is connected to a broadband connection (such as a cable/DSL modem or an Ethernet connection in a hotel room). That PC can share the broadband connection to a second PC using a second Ethernet port or its wireless card. To get ICS to work, you'll need the following:
The first step in setting up ICS is to configure the host, the computer with the Internet connection that will be shared:
Figure 7-7. Enabling Internet Connection Sharing via the Sharing tab of a network connection's properties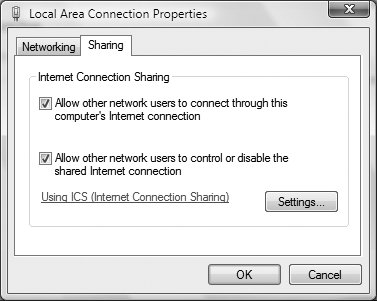 The next step is to configure each client computer to use the shared connection. See "Connect to a network," later in this chapter, for details on how to set up an Internet connection for each PC. They must be set up to get an IP address automatically. 7.3.7. Setting Up a Bluetooth DeviceBluetooth is a wireless networking technology used primarily to connect devices and PCs over short distances. It is commonly used in cell phones, PDAs, and even mice, keyboards, and printers. To set up a Bluetooth device, you'll need a Bluetooth adapter for your PC. The adapter will allow your PC to wirelessly connect with a Bluetooth device. If you don't have a Bluetooth adapter already, buy one and plug it into your USB port. Windows Vista will recognize the adapter and install it via a wizard. Next, turn on the Bluetooth device and make it discoverable. Doing this will allow it to communicate with your PC. The way you make a device discoverable varies from device to device, so check the device's documentation or the manufacturer's web site. Now go to Control Panel |

 Network and Internet
  Network and Sharing Center
 EAN: 2147483647
Pages: 107