Formatting Reports In Chapter 13, "Customizing Forms," you learned about form properties; reports also have properties, and you can change them to create just the right look for your reports. You can add subtle shading to controls or entire sections. Or, you might want to apply a border or other special effects to a control. In this section, you'll use AutoFormat and the Properties window to set report properties. Using AutoFormat The AutoFormat feature quickly applies an overall display scheme to a report, the same way it does to a form (which you learned about in Chapter 13). Although Access comes with several predefined formats, you can create your own. Now, let's get to work and apply an AutoFormat to quickly format a new report by performing the following steps: -
Select Catalogs in the Tables section of the Database window, and then select Report from the Insert menu. -
Double-click AutoReport: Tabular in the New Report dialog box. -
After Access displays the report, review it carefully so you'll be able to identify the changes after you reformat it. Next , click the View (Design View should be the default) button on the Print Preview toolbar to open the report in design view. -
In design view, select AutoFormat from the Format menu; then select any of the predefined formats other than the currently selected one. As you select each format, the sample report to the right changes to reflect the new format. That enables you to see what the new format looks like before you actually apply it. Our wizard chose the Corporate AutoFormat. Figure 14.1 shows the Soft Gray option selected. After you've selected an AutoFormat, click OK . Figure 14.1. Choose a predefined AutoFormat for your report. 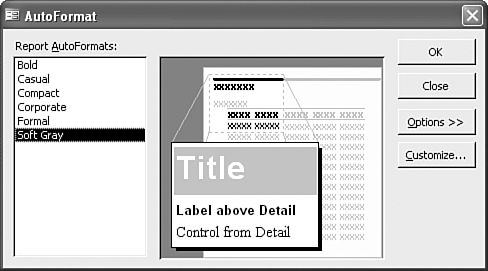 -
Click View on the Report Design toolbar to view the changes shown in Figure 14.2. If you chose a format other than Soft Gray, your report won't look like the one in the figure. Close and save the report as Catalogs. Figure 14.2. Selecting an AutoFormat is a quick way to apply a complete scheme to a report. 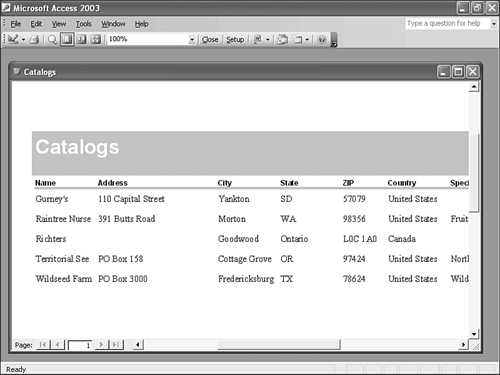 Note  | You can download the Chapter 14.mdb sample file, which is inclusive of all the examples in this chapter, from http://www.quepublishing.com/. If you want to follow along with our examples, download Chapter 13.mdb . |
Note | | You might notice that the wizards seem to create reports that don't always have the same format. That's because the wizards default to the AutoFormat that was used last. When you install Access, the wizard defaults to the Corporate AutoFormat. The first time you apply a different AutoFormat, that newly applied format becomes the default for the next wizard-generated report. |
Customizing AutoFormat We mentioned earlier that you can create your own AutoFormat options. Doing so can save you a lot of time if you routinely apply the same formatting to your reports. There are two ways to create your own: You can base a new AutoFormat on an existing format, or you can modify an existing AutoFormat. More than likely, you'll just create your own, rather than change the built-in choices, so let's look at the first method. Specifically, let's base a new AutoFormat on Corporate and change some fonts. To do so, follow these steps: -
Return to the report you created in the previous exercise. If you didn't save it, open any report. Just be sure not to save any of the changes you make during this exercise. -
In Design view, select all the controls in the Page Header section. Clicking the ruler to the left of the section automatically selects the controls in that section. Click the Italic button on the Report Design toolbar. Then, select any color other than black (or the current color) from the Font/Fore Color list. -
Select all the controls in the Detail section, and then select Shadowed from the Special Effect list. -
Now, select AutoFormat from the Format menu. -
In the AutoFormat dialog box, click the Customize button to open the Customize AutoFormat dialog box. The default option is Update Soft Gray with values from the Report 'ReportName' , where ReportName is the name of the report that's currently open in design view. This option modifies the current AutoFormat with the formats in the current report. This isn't the option you want, though. -
Select the Create a New AutoFormat Based on the Report 'ReportName' , as shown in Figure 14.3. Then click OK. Figure 14.3. Base a new AutoFormat on an existing format. 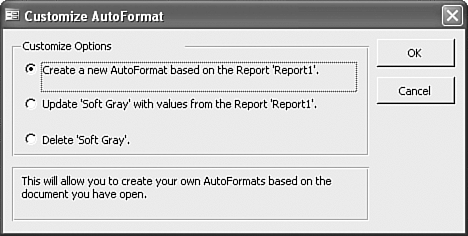 -
Enter a name, such as Custom1 , for the new AutoFormat in the resulting dialog box; then click OK. -
Access automatically selects the new format in the AutoFormat dialog box. Click OK to apply the new format to the current report. Then, take a look at the report in Print Preview. Anytime you want a report to look like the one shown in Figure 14.4, just assign the Custom1 AutoFormat. Figure 14.4. Apply this report's format to another by selecting the Custom1 AutoFormat you just created. 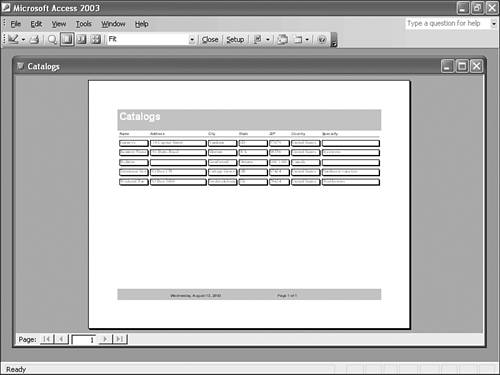 Using the Properties Window You're probably familiar with the Properties window because you used it to set properties for forms in Chapter 13. Reports also have properties you can use to determine the way reports look or the data they display. To change report properties, open the report in design view. Then, double-click the Report Selector the gray square at the intersection of the two rulersto open the Properties window. The title bar displays the word Report , which means the offered properties belong to the report object. To change a property, select an option from the field's drop-down list or simply type over the current property. If the field offers a list of options, you can also double-click the property name to cycle through the options. Simply stop clicking when the field displays the property you want. Now, let's look at a quick example by changing the Catalog report's Caption property. To do so, follow these steps: -
Open the Catalogs report you've been working with in design view. -
Double-click the Report Selector to open the Properties window. -
Currently, the Caption property is Catalogs. Type Seed Catalogs into the Properties window to change the value, as shown in Figure 14.5. Figure 14.5. Change the Caption property. 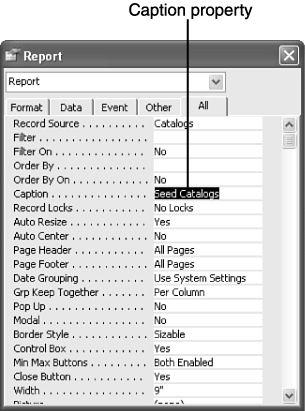 -
Click View on the Print Preview toolbar to see the change. The Access title bar displays the caption text if the report is maximized within the Access window. Caution  | In design view, you can set properties for a form or a report, which also includes many other objects such as controls. Fortunately, the Properties window's title bar always displays the current object's type. You can take advantage of this behavior by checking the Properties window's title bar to make sure the correct object is selected before you start changing properties. |
Note | | The Properties window displays properties for the current object. To open the window, double-click an object or select Properties from the View menu. Clicking the Report Selector always displays the report's properties. |
Note | | In Chapter 13, you learned how to format controls and use the Toolbox. You use the same techniques to add and modify controls in reports. If you've already read Chapter 13, you should be able to apply what you learned on your own. If you haven't, read the appropriate sections in that chapter and work through the exercises in a report instead of in a form. |
|