Using the Relationships Window
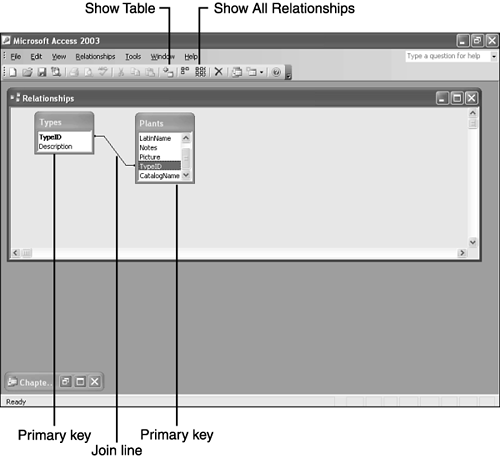
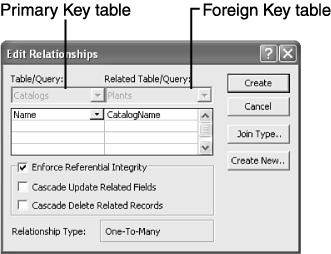
| It's fine to use the Lookup Wizard or the Table Analyzer, but you can create relationships yourself. First, open the Relationships window shown in Figure 6.11 by clicking the Relationships button on the Database toolbar. If that button is not visible, press F11 to give focus to the Database window. Then, the button should be available. Figure 6.11. Open the Relationships window. The window contains two field lists, one for Plants and one for Types. (If your window is empty, click the Show All Relationships button on the Relationship toolbar.) In addition, there's a line between the two tables, which is known as a join line . When you created the lookup field for the TypeID field in the Plants table, the wizard created this relationship. When you need to create a relationship, drag a field from one list to another. In almost all cases, you'll drag the primary key field to its counterpart in the related table. If you look closely at the existing join line, you'll see that it connects the two TypeID fields in both tables. You can easily find the primary key fields in both tables because Access displays the primary key fields in bold text. Most of the time, you'll rely on the Relationships window to create permanent relationships between tables. You still have a relationship you need to createthe one between the Catalogs and Plants tables. So, let's get started:
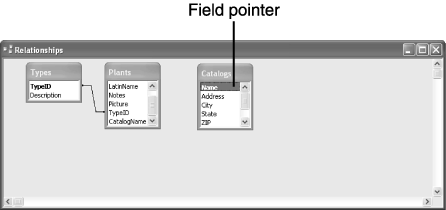
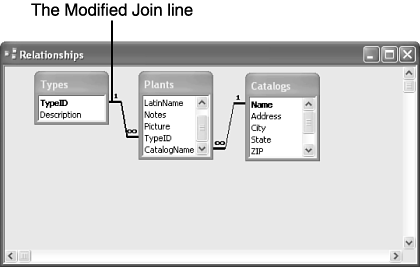
Figure 6.14 shows the new relationship between the two tables. Notice that the join line is very different from the one connecting the Plants and Types tables: Figure 6.14. The join line reflects the relationship you just created.
The Many Sides to RelationshipsWe just introduced you to a new concepta one-to-many relationship between the Plants and Catalog tables. There are three types of relationships. A thorough discussion of the relationship types is beyond the scope of this book, but you should be familiar with the terms:
Don't spend too much time thinking about the types of relationships right now. Fortunately, Access does a good job of interpreting the relationships between tables. Modifying a RelationshipNow that you know how to create a relationship, let's modify one. Specifically, let's turn on referential integrity for the relationship between the Plants and Types tables. Referential integrity refers to a set of rules that protects data from changes that don't make sense. For example, think about the relationship between plants and types. What would happen if you deleted the first row from the Types table? You'd no longer be able to look up the descriptions of plants with a TypeID of 1. That's the sort of problem referential integrity prevents . We'll demonstrate how this works after adding referential integrity to the relationship. To display the Edit Relationships dialog box for the relationship between the Plants and Types tables, double-click the join line between those two tables. In the resulting dialog box, check the Enforce Referential Integrity option. Then click OK , which is a little different from the last time when you clicked Create when you were done (refer to Figure 6.13). After you modify the relationship between the Plants and Types tables, Access updates the join line accordingly , as shown in Figure 6.15. It's easy to see that the relationship between the two tables enforces referential integrity in a one-to-many relationship. Figure 6.15. Access updates the join line between the Plants and Types tables. You probably noticed that several other buttons are available in the Edit Relationship dialog box (refer to Figure 6.13). Let's take a brief look at the remaining edit possibilities:
Close the Relationships window. When Access prompts you to save changes, click Yes. Using Referential IntegrityPreviously, we told you to select the Enforce Referential Integrity option in the Edit Relationships dialog box (refer to Figure 6.13). Referential integrity is simply a set of rules that protects your data because Access restricts the records you can add and delete. With referential integrity turned on
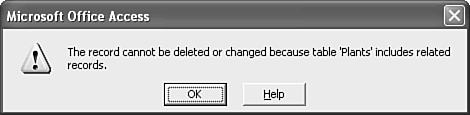
These rules will make more sense if you see them in action, so let's return to your tables and make a few changes. First, open the Catalog table and try to delete the first record. When you do, Access displays the warning message shown in Figure 6.16. Click OK to clear the message. Figure 6.16. Referential integrity won't allow you to delete the record for Gurney's catalog. Note
You can't delete the record for Gurney's catalog because two plants, cosmos and German Chamomile, are related to that catalog. As long as even one of those records is there, Access won't let you delete the record for the Gurney's catalog. Deleting that record would create what's known as an orphan related records where the foreign key value (in this case, Gurney's) doesn't match a record in the related table. In other words, if you deleted the record for the Gurney's catalog, there would be no way to know from which catalog you purchased chamomile and cosmos seeds . This doesn't seem too terribly important, but can you imagine not knowing which customer placed a particular order? That would be a much more serious problem. Now, let's see what happens when you try to modify a primary key value. In the Catalogs table, try to change Gurney's to Gurneys (delete the apostrophe character). You'll have to move the insertion point to another row to complete the action. When you do, Access displays another warning message: The record cannot be deleted or changed because table 'Plants' includes related records . Click OK to clear the message and then press Esc to clear the change. The problem is the same as before. Changing Gurney's to any other value would strand orphanscosmos and German Chamomilein the Plants table. |

EAN: 2147483647
Pages: 124