| As you work with Access, you'll notice that there is usually more than one way to do things. The following are the three ways in which you can create a new table in Access: -
Start typing data into a blank table Access will create the fields in the table for you. If you're used to working with Microsoft Excel, this method might be the most comfortable one for you. -
Use the Table Wizard It guides you through the steps of building some common table types. -
Work directly in table design view You specify the details of each field yourself. This is the most powerful and flexible way to design a new table. In this section, you'll learn how to use each of these techniques. Entering Data to Create Your Table To begin with, we'll show you how to create the Types table, just by entering data. Table 5.1 shows the data this Access table will contain. Table 5.1. Data for the Type Table | TypeID | Description | | 1 | Decorative | | 2 | Edible | | 3 | Medicinal | To create the Types table, follow these steps: -
Launch Access. -
In the New File task pane, click the Blank Database link. Name the new database Plants.mdb , and click Create. -
In the Database window, click the Tables shortcut. -
Double-click the Create Table by Entering Data shortcut in the Database window to open a blank datasheet. -
Click the mouse in the first row of the first column of the datasheet; then type the value 1 . -
Press the Tab key to move to the next column, and type the value Decorative . -
Use the mouse or arrow keys to move to the first column of the second row. Continue entering data by typing it into the table until the datasheet looks similar to Figure 5.2. Figure 5.2. Creating a table by entering data. 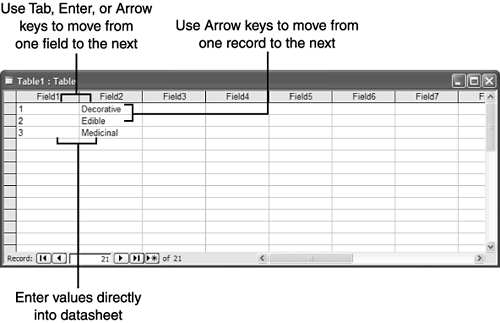 -
Right-click the header for the first column, where the text Field1 appears. Select Rename Column (see Figure 5.3) from the shortcut menu to highlight the current name of the field. Type the new name, TypeID , and press Enter. Figure 5.3. Change a field's name. 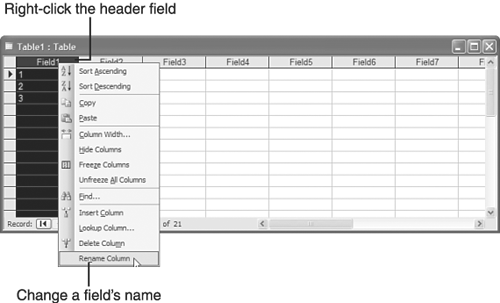 -
Here's another way to rename: Double-click the header for the second column, where the text Field2 appears. This highlights the current name of the field. Type the new name, Description , and press Enter. -
Select File, Save to open the Save As dialog box. Enter Types and click OK. -
Access displays the warning dialog box shown in Figure 5.4 because you can't specify a primary key when you create a table by typing in data. For now, just click No. Figure 5.4. Access warns you that your table doesn't have a primary key. 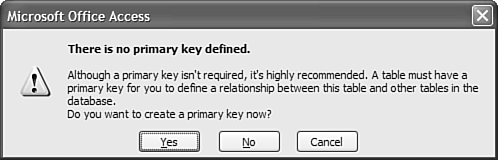 -
The blank cells in the datasheet will vanish (except for one blank row, which is discussed later in the "Using Datasheets" section of the chapter), and the caption of the table will show its new name. Click the Close button to close the new table. Congratulations! You've just created your first Access table. Note  | In Access, column and field mean the same thing. |
Using the Table Wizard Access also includes a Table Wizard that can streamline the job of creating new tables. The Table Wizard knows how to create fields for a variety of common situations. You'll use it to create the basic structure of the Catalogs table. To build the initial Catalogs table, follow these steps: -
Double-click the Create Table by Using Wizard link in the Tables section of the Database window. Like most wizards, this one presents information and asks for input in a series of panes. Each pane displays and fills the entire wizard window, and you can navigate from pane to pane by clicking Next or Back. -
On the first pane of the Table Wizard, select the Business radio button and the Mailing List sample table. (Actually, these are the default choices, so you shouldn't have to do anything, but do make sure these options are the current choices.) If you scroll down the list, you'll see that you have the choice of many sample tables here. You should start with a sample table that's relatively close to the one you want to build. -
The next step is to move fields from the Sample Fields box to the Fields in My New Table box. You'll see this dual box interface at many places in Access. Figure 5.5 shows the functions of the four buttons between the boxes, which move items back and forth between the lists. Click the Select One button to select the OrganizationName, Address, City, State, PostalCode, Country/Region, and Notes fields. (Our original plan called for naming the address field, StreetAddress, but Address will do.) Figure 5.5. Controls to select items in the Table Wizard. 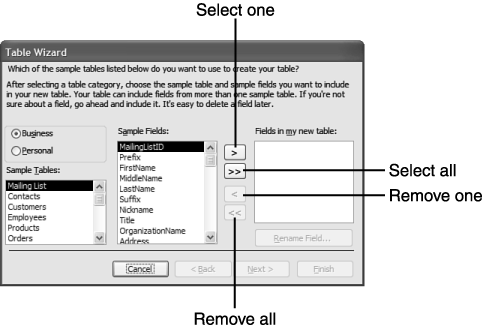 -
Select the OrganizationName field in the Fields in My New Table box. Then click the Rename Field button and enter Name in the Rename Field dialog box. Click OK to rename the field. Similarly, rename PostalCode to ZIP , Country/Region to Country , and Notes to Specialty . This matches the field names you designated in Chapter 4. (In Chapter 4, you worked with pen and paper lists and the table names contained spaces, which we've omitted in our actual table names .) -
Click the Next button. -
In the second pane of the Table Wizard, name the new table Catalogs . Click the radio button labeled No, I'll Set the Primary Key , as shown in Figure 5.6. Click Next. Figure 5.6. Creating a table in the Table Wizard. 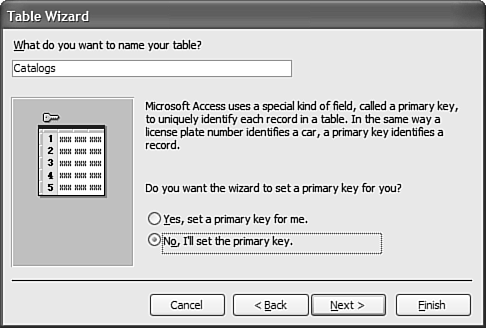 -
In the third pane of the Table Wizard, specify the Name field as the field that will hold unique data. Select the radio button for Numbers and/or Letters I Enter When I Add New Records and click Next. -
The fourth pane of the Table Wizard asks how this table is related to the Types table you already created. You'll learn more about relationships in Chapter 6, "Tapping the Power of Relationships." For now, just accept the default (no relationship) and click Next. -
Select the Enter Data Directly into the Table radio button and click Finish . This creates the table and opens it as a datasheet. Now you can type the data for the Catalogs table directly into the datasheet, as shown in Figure 5.7. Figure 5.7. Entering data in a new table from the Table Wizard. 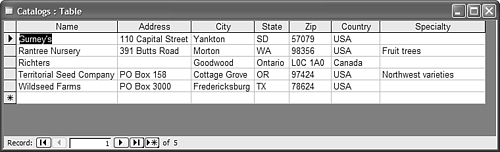 Note | | The design you worked through in Chapter 4 defines the TypeID field in the Types table as an AutoNumber primary key field. However, that isn't what actually happened because Access automatically assigns the Number data type to the TypeID field when the contents are numerical values. This small deviation from the original plan is insignificant at this stage. |
When you're dealing with common tables, the Table Wizard can provide a fast way to get started. But sometimes your database needs a table that doesn't resemble any of the choices from the wizard. Those are the times when you'll need to use table design view. Working in Design View Design view gives you a way to look at all the nuts and bolts of a table and its fields. You can change anything about a table in design view: the names and numbers of the fields, the type of data they can hold, the primary key of the table, and more. This section introduces you to table design view, and you'll learn more about this view in Chapter 11, "Customizing Your Tables." The plants table in the database isn't really like any of the sample data in the Table Wizard. So, in this section, you'll use table design view to create this table. To build the plants table, follow these steps: -
Double-click the Create Table in Design View link in the Tables section of the Database window to open the design view of a new table. -
Type CommonName in the first row of the Field Name column. Access automatically assigns Text as the data type for the field, as shown in Figure 5.8. You'll learn more about data types in a few pages. Figure 5.8. Creating a new table in design view. 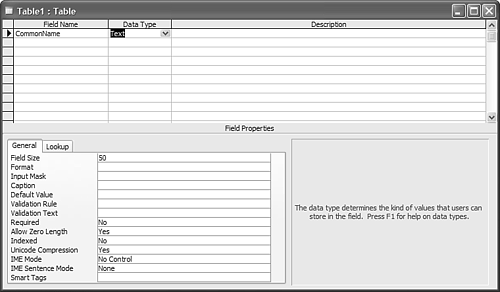 -
Type LatinName in the second row of the Field Name column to create another field. Accept the default Text data type. -
Type Notes in the third row of the Field Name column to create another field. For this field, click the drop-down arrow next to the Text data type and select Memo as the data type for this field. -
Similarly, add three more fields to the table: Picture (data type should be OLE Object), TypeID (data type should be Number), and CatalogName (data type should be Text). -
Right-click the CommonName field and select Primary Key . Access places a small key icon next to this field's name to indicate that it is the primary key. -
Select File, Save and name the new table Plants . Figure 5.9 shows the completed table in design view. Figure 5.9. A newly saved table in design view. 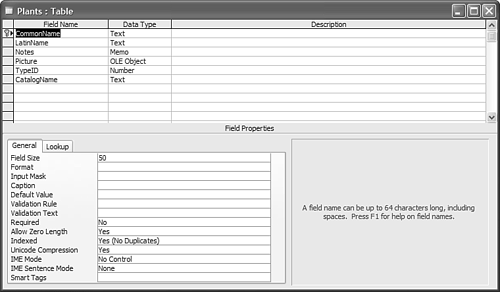 -
Click the Close button to close the newly created table. You might have noticed the Field Properties area at the bottom of design view as you worked through the previous steps. As you select different fields, this area shows more information about each field. For example, the first property for the CommonName field is Field Size, and it has a default value of 50. This tells Access that the CommonName field can hold up to 50 characters , but no more. Field properties are an important part of ensuring that only reasonable data is saved in your database. You'll learn more about field properties in Chapter 12, "Getting Down to Business with Queries." Tip  | Although Access lets you include spaces in field names, we recommend that you avoid this. Using spaces makes working with some other parts of the product, such as queries, more difficult. In steps 4 and 5 of the accompanying exercise, you must select a data type other than the default, from the Data Type column's drop-down list. If you prefer to designate a data type from your keyboard, enter the first letter of the data type's name and Access will automatically fill in the rest of the entry for you. For instance, when selecting Memo in step 4, just type m , and Access will do the rest. |
Modifying an Existing Table You can also use table design view to modify an existing table. For example, you'll recall that you didn't create a primary key for the Types table. You can use table design view to correct this oversight by following these steps: -
Click the Types table in the Database window. -
Click the Design button at the top of the Database window, in what's known as the Database Window toolbar, to open the table in design view. -
Click the TypeID field to select it. You'll see a black triangle to the left of the field name when you do. -
Click the Primary Key button on the Access toolbar, as shown in Figure 5.10, to set this field as the primary key of the table (another case of Access providing more than one way to do something). Figure 5.10. Setting the primary key for an existing table.  -
Select File, Save to save your changes. Alternately, you can click the Save tool on the Table Design toolbar. -
Click the Close button to close the table. You can change almost anything about a table in design view. In fact, you can change things you probably shouldn't. For example, what happens if you click in the data type column for the Description field and change the data type of the field from Text to Number? Well, the existing data isn't numbers, so if you save this change, Access will just throw your data away! Fortunately, it gives you a warning, as shown in Figure 5.11, before saving any such potentially disastrous changes. Be sure to click No if you followed along with this example. Figure 5.11. Access warns you if you try to do something that will cause a loss of data. 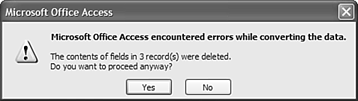 Adding a Smart Tag  | Right now, we'd like to introduce you to a table property that's new to Access 2003smart tag. (Chapter 11 discusses common table properties in depth.) Smart tags are one of those features that you'll love or totally ignore, but they're certainly not critical to any application. They are useful in the right circumstances. | If you use Excel 2002 (or later), you've probably seen a smart tag or two. Excel uses smart tags to flag spreadsheet errors and offer possible solutions. A smart tag is an icon that reacts dynamically to a predefined term when clicked. For instance, a smart icon might access information on the Internet or perform a specific data task. For the most part, you'll use them to automate tasks that require input from another program. Smart tags are provided by Microsoft and other vendors , and so far, most of them are free. You can also create your own. You'll apply a smart tag at the field level and forms inherit the property. When you move the mouse over a form control that has a smart tag setting, Access will display a small icon to the right of the control. Clicking the icon will activate the smart tag link and download the appropriate information or perform the appropriate task automatically. In this short example, we'll grab local weather information using a smart tag provided by MSNBC. It's free, but you must download it from http://www.msnbc.com/tools/newstools/d/smart_tags.asp. Follow the instructions on that page to install the smart tag on your computer, and learning whether today will be a good day to work in your garden will be just a click away. You can also work with any of the smart tags that come with Access 2003. In that case, you don't have to download a thing. Doing so will allow you to walk through this next example, but of course, the tag you choose won't respond the same as the one in our example. Now, let's add that smart tag to the Catalogs table: -
Click the Tables shortcut in the Database window, select Catalogs , and then click the Design button on the Database Window toolbar to open Catalogs in design view. -
Select the Name field row (it should be selected by default) because we're adding the smart tag to that field. -
Find the Smart Tags property. It's the last property field in the Field Properties section. Click in the field to display the builder button (three little dots). Click the builder button to open the Smart Tags dialog box. -
Check the weather smart tag. In this case, that's Local News on MSNBC.com , as shown in Figure 5.12. If that tag's not available and you don't want to download it, select an available tag. Click OK to continue. Figure 5.12. Choose a smart tag file. 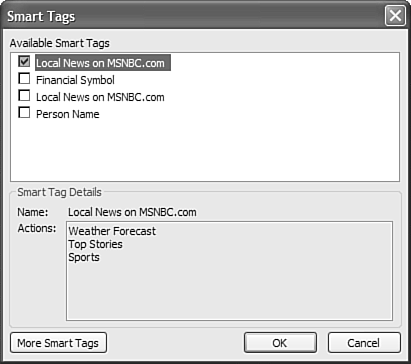 -
Access adds the appropriate tag reference in the Smart Tags property, as shown in Figure 5.13. Click Save and close the table. Figure 5.13. Access updates the Smart Tag property setting. 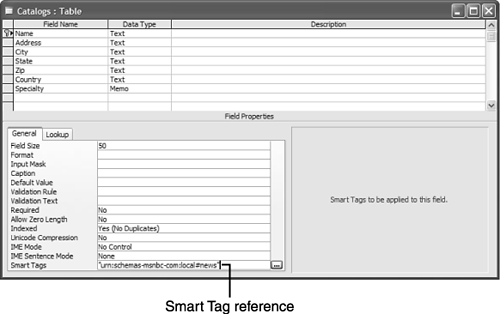 Click View on the Table Design toolbar to see how adding the smart tag changes your sheet. Each field in the Name field now contains a small black triangle in the bottom-right corner. That triangle is your visual clue that the field has a smart tag. Hover over any triangle and Access will display a smart tag icon. Click the icon to display that tag's options, shown in Figure 5.14. Figure 5.14. A form based on the Catalogs table displays a smart tag icon. 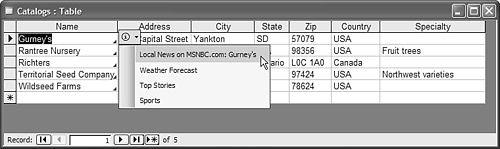 Clicking the icon displays a drop-down list of information you can download. Choosing Weather Forecast will launch your browser and link to a site that displays a local forecast. (If you're not connected to the Internet, the smart tag will prompt you to connect.) Tip | | If you have an Internet connection, you can quickly download smart tags. Open any table in design view, and click the builder button to the right of the Smart Tag property. Doing so will open the Smart Tags dialog box. Click the More Smart Tags button to launch your default browser and access the Microsoft Office eServices site. From there you can find any number of free smart tag files. After downloading the smart tag, you'll probably need to install it and then restart your system before it will work properly. See the smart tag documentation for precise instructions. |
|