Setting Up a DHCP Server
You ve already come across the Dynamic Host Configuration Protocol (DHCP), during the installation process in Chapter 1 in the Setting the Network Parameters section. In that step you are asked to choose between two options:
-
You can specify the TCP/IP settings (IP address, netmask , default gateway, and DNS servers) explicitly.
-
You can allow a DHCP server to dictate those settings.
This is what DHCP is all about. DHCP is a network protocol, whose purpose is to assign TCP/IP settings to client machines. By configuring a client machine to use DHCP, you re telling it that it must contact a DHCP server (on the network), and get its TCP/IP settings (IP address, netmask, default gateway, DNS servers) from there.
How Does DHCP Work?
The concept of DCHP is actually quite simple. Suppose you have a client machine that is configured to get its TCP/IP settings from a DHCP server ”that machine is a DHCP client . At the time when the DHCP client requires a TCP/IP configuration (discussed in greater detail later in this section), it sends a broadcast message across the network, to request TCP/IP address information.
Elsewhere on the network, the DHCP server receives this request. It examines its IP pool (a pool of IP addresses that it is allowed to lend out to clients ), and assigns one of these IP addresses to the client for a defined lease period. It sends this IP address, and other network configuration information, to the client.
The DHCP client then acknowledges the receipt of the network configuration information and sets up its network configuration. The DHCP server will not allocate the same IP address to other clients within the lease period.
So, when does a DCHP client need to request a TCP/IP configuration? The most obvious scenario is when the client is booting up and joining the network; it might also do so when its lease on the existing IP address expires , and it needs to ask for a new one.
The Benefits of DHCP
If you re a system administrator responsible for a network containing hundreds of computers, manual TCP/IP management quickly becomes a nightmare. Each machine on the network must be configured manually, and differently from all the others, which means that you need to keep a careful note of the TCP/IP configuration of each machine. The potential for error and time-consuming manual configuration tasks is great.
Implementing a DHCP server provides relief from this burden . It allows you to configure all client machines in exactly the same way ”you just tell them all to use the DHCP server. It s also much more reliable than manual TCP/IP management because the DHCP server is designed to manage its IP pool and the lease periods so that you never get two machines using the same IP address at the same time.
In addition, a DHCP server provides a single central control for all TCP/IP resources. It allows IP addresses to be tracked and reserved. Critically, it facilitates performing cross-network changes ”for example, if you need to change your gateway, or the range of allowed IP addresses, you can handle this smoothly and easily by updating just the DHCP central server configuration.
DHCP also provides the flexibility for mobile users with laptops who need to work in different offices. If a DHCP server controls each office s TCP/IP allocations , simply configure the laptop to request its TCP/IP settings from a DHCP server. Then, whenever you plug into any office network, your laptop will automatically ask the local DHCP server to serve up the appropriate network settings to allow you to get working.
The following section looks at how to set up a Linux machine as a DHCP server.
Installing the DHCP Server Packages
As you ve probably already gathered, you need only one DHCP server per network. If you decide that you need a DHCP server, a Fedora 2 machine will suit your purposes. To configure your machine as a DHCP server, you need to install the appropriate package; you can do that via the RPM GUI.
To do this, launch the RPM GUI (Main Menu>System Settings>Add/Remove Applications); when the dialog box appears, select the Network Servers package group (which you ll find under the Servers category). Click the Details button to view the package details (see Figure 9-22).

Figure 9-22
The package you need here is the one called dhcp ”the others are not important for the purposes of installing a DHCP server (although you won t want to deselect them unless you re sure you re not using them for something else).
When you ve selected dhcp, click Install Packages to start the installation. As usual, you ll need the Fedora 2 distribution CDs to complete the installation.
Configuring the DHCP Server
We will set up a simple DHCP configuration to provide clients with network information. The DHCP server can be configured using the default configuration file /etc/dhcpd.conf .
The DHCP server package comes with a sample dhcpd configuration file called dhcpd.conf.sample . Use this file as a starting point for the DHCP configuration. Make a backup of your existing dhcpd.conf file, and then copy the sample file in its place:
# cp /etc/dhcpd.conf /etc/dhcpd.conf.backup # cp /usr/share/doc/dhcp-3.0.1rc12/dhcpd.conf.sample /etc/dhcpd.conf
Now open the /etc/dhcpd.conf file, using gedit or another text editor, and we ll edit it so it contains all the required options. A simple dhcp configuration file looks like this:
ddns-update-style interim; ignore client-updates; subnet 192.168.0.0 netmask 255.255.255.0 { option routers 192.168.0.1; option subnet-mask 255.255.255.0; option domain-name "linux4biz.net"; option domain-name-servers 192.168.0.1; range dynamic-bootp 192.168.0.128 192.168.0.254; default-lease-time 21600; max-lease-time 43200; }
You can use hash ( #) characters to comment out the lines you don t need, or simply delete them to keep the file tidy. Have a look at the settings in this example:
-
The first two lines of the configuration file instruct the DHCP server not to accept dynamic DNS updates.
-
The next line defines a subnet and netmask that are used to supply the DHCP information. After that, all the options are defined, as you can see in the following table.
Option
Description
routers
Specifies the default gateway.
subnet-mask
Specifies the default netmask.
domain-name
Specifies the default domain name.
domain-name-servers
Specifies the name servers for the network.
range dynamic-bootp
Specifies the range of IP addresses that the DHCP server is allowed to allocate to clients. In our example, all allocated IP addresses will lie in the range 192.168.0.128 to 192.168.0.254.
default-lease-time
Defines the default lease time, after which the client s DHCP configuration will expire, and the client must request a new DHCP configuration from the DHCP server. In this example, the DHCP lease will expire after six hours, unless the client asks for a specific time frame.
max-lease-time
Defines the maximum lease allowed to the client.
Note There are other options in the sample configuration file, /usr/share/doc/dhcp-3.0.1rc12/dhcpd.conf.sample , that we won t discuss here. There s more about these options at the dhcpd.conf man page.
The DHCP Lease Database
How does the DHCP server keep track of the IP addresses it has leased out? In Red Hat Linux 9 systems, this information is stored in the database file /var/lib/dhcp/dhcpd.leases . The data stored here includes a client identifier used by the client that requested the lease, the time and date of both the start and end of the lease, and the address of the Ethernet network interface card (NIC) that was used to retrieve the lease.
| Caution | DHCP can recognize a server by the address of its Ethernet network interface card, which is unique. This address is also known as the Media Access Control (MAC) address . |
The DHCP server stores lease information for each recently assigned IP address automatically in the lease database, and you should not modify it by hand.
Starting the dhcpd Service
You can start the dhcpd service in the usual ways ”using the Service Configuration GUI Tool, or the /etc/rc.d/init.d/dhcpd command line script.
In the Service Control GUI Tool (Main Menu>System Settings>Server Settings>Services), the service you re interested in is called dhcpd (see Figure 9-23).

Figure 9-23
It s typical to select the check box so that the service starts automatically on startup. Don t forget to save your new settings using File>Save Changes.
Alternatively, you can use the service command to control the dhcpd script:
# service dhcpd Usage: /etc/init.d/dhcpd {startstoprestartcondrestartstatus} # service dhcpd start Starting dhcpd: [OK]
Assigning Static IP Address Using DHCP
It s not always the best thing to have DHCP assign IP addresses dynamically. If you had a production server, such as a Web server or e-mail server, whose IP address changed every time its lease expired , it would be impossible for other machines on the network to find them. For servers and other machines like this, there are two alternatives:
-
You can configure the machine with its own static IP address and TCP/IP information.
-
Alternatively, you can configure the DHCP server to reserve fixed IP addresses for specific servers.
The second of these options is generally preferable because it means it s still easy to make global network configurations (such as changing the DNS server) in a single location (the DHCP server configuration).
To allocate a static IP address to a production server, you can add a host clause to the /etc/dhcpd.conf , as shown:
host emailserver { option host-name "test.linux4biz.net"; hardware ethernet 00-20-18-8B-3F-9E; fixed-address 192.168.0.10; }
Here, the first line defines the declaration for a single computer: host is a configuration option, and emailserver is a reference name for the computer that will be allocated a static IP address. You can use any reference name here, usually a name that reflects the purpose of the machine in question.
The second line specifies the hostname of the machine ( test.linux4biz.net ), and the third line defines the Ethernet hardware address.
You can find the Ethernet hardware address of a Linux machine by executing the following command on that machine:
$ /sbin/ifconfig Check the first line of output; it should look something like this:
eth0 Link encap:Ethernet HWaddr 00:D0:B7:0A:E7:41
You can find the Ethernet hardware address on a Windows machine by executing this command at the command prompt:
> ipconfig /all In this case, search for the line that starts with the string Physical Address , under your Ethernet card description:
Physical Address. . . . . . . . . : 00-20-18-8B-3F-9E The fourth line defines the static IP address to be assigned to the server whose hardware Ethernet address matches the one given.
It is recommended that you back up the /etc/dhcpd.conf file when you ve finished your initial configuration, and keep it safe ”just in case it gets corrupted or changed accidentally .
Installing and Configuring a DHCP Client
We ve talked about how to configure the DHCP server, but what about the DHCP client? A default DHCP client software is installed on all Fedora 2 installations, and if you ve configured your Linux machine to be a DHCP client, it s using that DHCP client program now.
If you want to configure a Linux machine to be a DHCP client, you can set this configuration either at installation or subsequently via the Network Configuration Tool. To launch the Network Configuration Tool, select Main Menu>System Settings>Network, or type the following command at the command line:
$ system-config-network Under the Devices tab, select the Ethernet device and click Edit. Make sure the Activate device when computer starts option is enabled, and select the Automatically obtain IP address settings with dhcp option (see Figure 9-24).
Click OK when you re finished, and then Apply to apply the changes. The changes will take effect from the next reboot.
Configuring a Windows 2000 Machine to Use a DHCP Server
If you ve got a Windows 2000 machine (for example, a Win2K laptop that you use both at home and at work), here s how to configure it to get its network settings from a DHCP server:
-
Click Start>Settings>Control Panel to open the Control Panel window.
-
Double-click Network and Dial-up Connections and then Local Area Connection.
-
Click the Properties button. In the resulting Local Area Connection Properties dialog box, highlight Internet Protocol (TCP/IP), and click Properties.
-
In the resulting Internet Protocol (TCP/IP) Properties dialog box, select Obtain an IP Address automatically and Obtain DNS server address automatically.
-
Click OK to confirm the changes, and then OK again to implement the changes. At this point, the DHCP client program will try to get address information from the DHCP server.
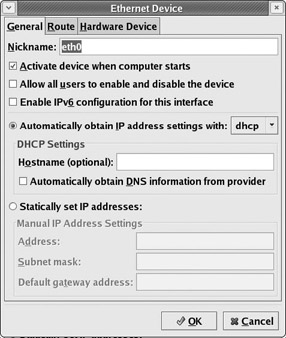
Figure 9-24
If you like, you can check the new IP address allocated by the DHCP server by executing the ipconfig /all command at the command prompt:
C:\>ipconfig /all Windows 2000 IP Configuration Host Name . . . . . . . . . . : my-win2k-laptop Primary DNS Suffix . . . . . : Node Type . . . . . . . . . . : Hybrid IP Routing Enabled. . . . . . : No WINS Proxy Enabled. . . . . . : No DNS Suffix Search List. . . . : linux4biz.net Ethernet adapter Local Area Connection: Connection-specific DNS Suffix: linux4biz.net Description . . . . . . . . . : Xircom CreditCard Ethernet 10/100 + Modem 56 Physical Address. . . . . . . : 00-80-C7-8B-C2-E3 DHCP Enabled. . . . . . . . . : Yes Autoconfiguration Enabled . . : Yes IP Address. . . . . . . . . . : 192.168.0.129 Subnet Mask . . . . . . . . . : 255.255.255.0 Default Gateway . . . . . . . : 192.168.0.1 DHCP Server . . . . . . . . . : 192.168.0.99 DNS Servers . . . . . . . . . : 192.168.0.1 Lease Obtained. . . . . . . . : 19 February 2003 09:01:21 Lease Expires . . . . . . . . : 22 February 2003 09:01:21
This allows you to see the TCP/IP information that the Windows DHCP client has acquired from the DHCP server. In the preceding output, the DHCP Enabled property is set to Yes , indicating that the Windows client machine is configured to get IP information from a DHCP server. The physical address of this machine (its MAC address, taken from its Ethernet card) is 00-80-C7-8B-C2-E3; the DHCP server has leased the IP address 192.168.0.129 to the machine, and the lease will expire three days from when it was obtained.
EAN: 2147483647
Pages: 170