Setting Up a File Server
A file server is essentially a shared storage space. File servers are generally accessed across a network, and provide their users with a central location for file storage. Filesystems are also helpful when you need to share files with other users: you can simply place your file in a public directory on the file server, where other users can access it.
Like FTP servers, there are essentially two fundamental components to a file server: the storage space itself and the mechanism for accessing it. Whether you re working on a single machine at home, or as part of a large network in a major organization, you ll be using a filesystem to store your files; what a file server adds to this is the notion that the filesystem is a shared one, accessible by (possibly) many users.
A number of benefits can be gained by implementing a file server:
-
It reduces administration cost. Instead of having important data stored on many individual PCs (all of which would require backing up), you can store all your important data in one place (on the file server). Then, only the file server needs regular backing up.
-
It provides the opportunity to enforce a more controlled and focused security policy because the security policy needs to be applied only to the file server.
-
It enables you to provide a more stable and reliable storage solution. It enables you to implement your storage solution on high-spec machines that provide high levels of uptime. Moreover, implementation of RAID or of mirrored SCSI disks (which help ensure data reliability) is more feasible on a central file server than on many PCs.
-
There s also something to be gained in terms of cost of file storage (although this is less pertinent in these days of cheap storage). First, it makes best use of the available storage capacity by making it accessible to all users. Second, it provides a central repository from which common resources can be made available to all (eliminating the need for each user to store her own copy).
Once you ve got a filesystem, what makes it a file server is the mechanism that enables the filesystem to be shared. There is plenty of software around for this purpose ”Samba, the Network FileSystem (NFS), the Andrew filesystem (AFS), and Coda are all examples. Some of these are shipped as part of the Fedora 2 distribution. We ll focus on Samba here.
| Note | For more information on the others, see www.nfsv4.org , www.transarc.com/Product/EFS/AFS/index.html , and www.coda.cs.cmu.edu . |
An Overview of Samba
Samba is an implementation of the Windows server message block (SMB) and CIFS protocols on UNIX. The Samba project was started by Andrew Tridgell, who wanted to mount his UNIX server disk space onto a DOS PC. When he d solved the problem, Tridgell discovered that what he d built was an implementation of the SMB protocol ”a protocol for sharing files and other resources. Tridgell named his implementation Samba, and published version 1.0 in early 1992. Since that time, the Samba project has grown tremendously, and today Samba development is ongoing in the open source community.
So, Samba is a collection of programs that make it possible to share files and printers between computers equipped to use the SMB protocol ”Windows by default, Linux/UNIX with Samba, and (more recently) Mac OS X. Samba is freely available under GNU General Public License, and is included as part of the Fedora 2 distribution.
This section looks at how to install Samba, perform some basic configuration, and set up a shared file server on a Linux machine. You ll also see how to use Samba to access a Linux-hosted file server from a Linux or Windows machine, and how to access a Windows-hosted file server from a Linux machine.
There should be enough in this section to get you started working with file servers in Linux. If you want to explore further with SMB and Samba, try www.samba.org ( specifically , www.samba.org/cifs/docs/what-is-smb.html ).
Installing SAMBA
Perhaps the easiest way to install the Samba software suite is via the RPM GUI Tool. After you ve started the RPM, use the Package Management dialog box to locate the Windows File Server package group (which you will find under the Servers category). Click its Details button to see the package details. You will find packages for samba and samba-client under the heading Required Packages (see Figure 9-15).
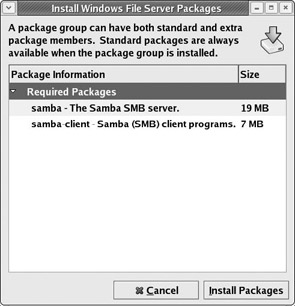
Figure 9-15
As you can see, there are two required packages: samba and samba-client . Click the Install Packages button to begin the installation of samba. You ll need the disk from your Fedora 2 distribution to complete the installation.
Starting and Stopping the Samba Service
As with other services you ve seen, there are a number of ways to start and stop the Samba service. Once again, you can do so via the Service Configuration GUI Tool. To launch the Tool, select Main Menu>System Settings>Server Settings>Services, or type the following command at the command line:
$ system-config-services Then locate the smb service, as shown in Figure 9-16.
If the service is stopped (as shown in the Figure 9-18), start it by clicking the Start button. It s also a good idea to select the check box to configure the Samba service to start automatically whenever you boot up the system. For example, if you ever have to perform an emergency reboot on your file server, the automatic start configuration means that the file server is immediately available to users after the reboot. When you ve done this, select File>Save Changes to save your new setting.
Alternatively, you can stop and start smb service at the command line, using the service command to run the /etc/rc.d/init.d/smb script. Typing the script name at the command line like this reveals the possible usages:
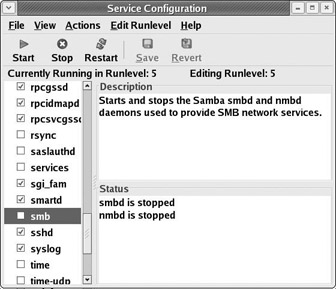
Figure 9-16
# service smb Usage: /etc/rc.d/smb {startstoprestartreloadstatuscondrestart} As you can see, it works in much the same way as the httpd and vsftpd scripts you saw in earlier sections of this chapter. So, to start the service, type the following:
# service smb start Starting SMB services: [ OK ] Starting NMB services: [ OK ]
This command starts both SMB and NMB (NetBIOS name server), which are both services related to Samba. To stop the service, type the following:
# service smb stop Shutting down SMB services: [ OK ] Shutting down NMB services: [ OK ] You get the idea. Note, however, that this script allows you to control the service manually only. It doesn t allow you to configure the service to start automatically on boot-up ”for that, you need the Service Configuration GUI.
Samba Configuration Files and Utilities
We won t take a look at every single item that is installed during the process described in the preceding subsection, but it is worth pointing out some of the most important files, both to give you an idea of Samba s capabilities and because we ll be using some of these files and programs later in this section. Specifically of interest here are Samba s configuration files and programs.
Samba s configuration files are contained in the directory /etc/samba . The table that follows provides a brief description of the Samba configuration files that you ll find there.
| Configuration File | Description |
|---|---|
| smb.conf | This is the main configuration file for Samba. |
| Lmhosts | This contains Samba s NetBIOS-to-IP address mappings. |
| secrets.tdb | This is the Samba secrets database. It stores private information such as the local SID and machine trust password. It is generated by the machine and cannot be read in a text editor. |
| Smbusers | This is a text file that maps your Linux system s users to various SMB-specific usernames. |
| Smbpasswd | This is an encrypted password file. The format of this file is very similar to that of the passwd file you met in Chapter 7. This file doesn t exist when you first install Samba, but is created when you add Samba users. |
To work with file servers through Samba, you can use its many programs. The following table lists some of the most important utilities provided by Samba. They re all contained in the directory /usr/bin , and some of them are used later in this section.
| Program | Purpose |
|---|---|
| smbclient | This is an FTP-like client, used to access SMB/CIFS resources on a file server. |
| smbadduser | This is a script, used for adding Samba users. It updates the smbusers and smbpasswd files. |
| smbpasswd | This changes a Samba user s SMB password. It is similar to the UNIX passwd command discussed in Chapter 7. |
| smbmount | This is used to mount an SMB filesystem. |
| smbumount | This is used to unmount an SMB filesystem. |
| smbstatus | This lists the current Samba connections. |
| testparm | This checks the smb.conf configuration file for correctness. |
| nmblookup | This is used to query NetBIOS names and map them to IP addresses in a network using NetBIOS over TCP/IP. |
In addition, we ll also make use of the script /etc/rc.d/init.d/smb , which is used to start and stop the Samba file service.
Samba Configuration with SWAT
If you open the Samba configuration files using gedit (or any text editor), you ll see that the information and syntax used is rather complex. You can configure Samba by editing these files in a text editor, but if you re not familiar with it, it can be quite difficult and prone to error.
Samba provides a number of command line utilities for configuration, too, but perhaps the easiest way to configure Samba is by using the Samba Web Administration Tool (SWAT) . SWAT is a Web-based interface, which means that you can use it to configure and manage your Samba server through a Web browser ”if you want, you can even do it remotely across a network or even across the Internet.
| Note | If you are thinking of using SWAT for remote Samba management, you should note that SWAT will transmit your username and password in clear text when you log in. Across an insecure connection, this presents the risk that an unwelcome visitor could sniff out your login credentials and use them to ill effect. To avoid this, you should use SWAT only from within a secure network. In fact, as you ll see it in the section Starting the SWAT Service, shortly, SWAT s default configuration makes it available only at http://localhost:901 . |
Let s see how to install SWAT and start the SWAT service. When you ve done that, you ll be ready to use SWAT to configure Samba and set up your file server for use.
Installing SWAT
Fedora 2 s Package Management GUI Tool doesn t provide an option for installing the SWAT package. Instead, you must install this package via the RPM s command-line utility. The SWAT utility is made available through the samba-swat package. Here s how to install the sambaswat package at the command line:
-
Launch a terminal window, and switch to the root user account by using this command:
$ su - -
Insert the appropriate Fedora 2 distribution disc. Change to the directory on the CD that contains the RPM package files:
# cd /mnt/cdrom/Fedora/RPMSNote If you get a No such file or directory message, it s probably because the CD wasn t mounted automatically when you inserted it. In this case, mount the CD manually:
# mount /dev/cdromThen try the cd command again.
-
Use the ls command to find out the exact version of samba-swat contained on the disc. For example:
# ls samba-swat*.rpm samba-swat-3.0.3-5.i386.rpm -
Install the samba-swat package you ve just found, by using the rpm command:
# rpm -ivh samba-swat-3.0.3-5.i386.rpm Preparing... ########################################### [100%] 1:samba-swat ########################################### [100%]
Alternatively, view the available package files on your disk by using the Nautilus file manager GUI to navigate to /mnt/cdrom/Fedora/RPMS . Locate the file matching the name samba-swat-*.rpm . Double-click this file to open the RPM GUI Tool, from which you can install the package.
Starting the SWAT Service
To start the SWAT service, take the following steps:
-
Launch gedit or your favorite text editor and open the file /etc/xinetd.d/swat . This is the configuration file for the SWAT service:
# default: off # description: SWAT is the Samba Web Admin Tool. Use swat \ # to configure your Samba server. To use SWAT, \ # connect to port 901 with your favorite web browser. service swat { port = 901 socket_type = stream wait = no only_from = 127.0.0.1 user = root server = /usr/sbin/swat log_on_failure += USERID disable = yes } -
Change the disable value, like this:
disable = no -
Save the file, and close your text editor.
Note that this default configuration ensures that the SWAT service will be accessible only through the IP address 127.0.0.1 , and on port 901. The IP address 127.0.0.1 is a special address known as the loopback address because requests to http://127.0.0.1 are sent to the Web server on the same machine as the browser from which the request is made. Hence, by default, SWAT is available only from the file server machine itself, via http://127.0.0.1:901 or http://localhost:901 (as mentioned earlier in the chapter).
-
Restart the xinetd service. (You must do this because SWAT runs as an xinetd service. The xinetd service is out of scope of this book, but it is enough to know that its purpose is to support Internet services such as SWAT.) To do this, first launch the Service Configuration GUI Tool by selecting Main Menu>System Settings>Server Settings>Services (see Figure 9-17).
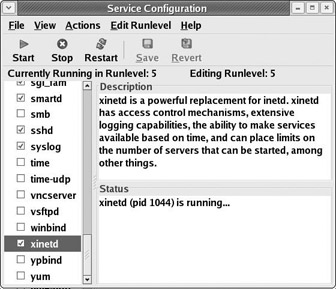
Figure 9-17Then locate and select the service called xinetd , and click Restart. You ll get a dialog box to confirm that the restart was successful; then you can exit the tool by clicking Quit.
Using SWAT for the First Time
Now you can test SWAT. Open a browser on the Linux server and type in the URL http://localhost:901 . You ll be prompted for a username and password ”use the system s root username and password. You should see the SWAT HOME page.
This page contains the index of Samba s very comprehensive online documentation, where you can find out much more about Samba and SWAT. There are also eight buttons listed across the top of this page, which provide access to SWAT s various utilities:
-
HOME: The home page of SWAT, and the first page that you see when you fire up the SWAT interface
-
GLOBALS: For setting the global variable values of the /etc//smb.conf configuration file
-
SHARES: For creating and deleting Samba shares, and setting Samba parameters
-
PRINTERS: For creating and deleting Samba printer shares and setting printer parameters
-
WIZARD: Like GLOBALS, this is also for setting various values in /etc//smb.conf
-
STATUS: For viewing the Samba server s status, and starting and stopping Samba-related services
-
VIEW: For viewing the content of the /etc//smb.conf configuration file
-
PASSWORD: For adding, removing, enabling, and disabling Samba users, and for setting Samba users passwords
So SWAT is up and running, and ready to use; the next task is to use it to configure the Linux machine as a file server. To do that, you ll make use of some of the features in the preceding list. Then, when you ve set up the file server, you ll examine it from the client s perspective, by looking at how different clients use Samba to access the file server you ve created.
Adding a Samba User
To grant a system account access to the Samba services, you can use SWAT s PASSWORD feature. Once you ve logged into SWAT using the root username and password, click the PASSWORD button. In the Server Password Management section of the window that opens, enter the name of an existing account on the system, and supply a password. Then click the Add New User button. This adds an entry to Samba s smbpasswd configuration file, to indicate that this user has access to Samba s services.
| Note | Normal accounts that have access to the Samba services also have access to SWAT. However, only root users have access to the full range of SWAT s utilities; normal users are allowed to use only limited features contained in the HOME, STATUS, VIEW, and PASSWORD screens. |
Creating and Configuring a Samba Share
Now you re ready to configure your Linux server as a file server, by creating a share (a dedicated directory on the server that will be accessible to other users). You can do all this using SWAT:
-
Create a directory, which we ll call /share , to be used for the file server. With root permission, you can do this at the command line using the following command:
# mkdir /share -
If you haven t done so already, use the Mozilla browser (or your favorite Web browser) to browse to the SWAT home page at http://localhost:901 , and log in using the root user account.
-
Click the GLOBALS toolbar icon. In the Base Options section, use the Workgroup field to enter the name of the workgroup that you want your server to appear in when clients use it. (If you haven t set up a workgroup, this is probably the default value, WORKGROUP). You should also name the service by entering a value in the server string field ”it can be any string that you want your Samba clients to see. We ll stick with the default, Samba Server.
Click Commit Changes to save your changes to the configuration files.
-
Now click the SHARES toolbar button at the top of the screen. We ll share our /share directory by giving it a share name; let s call it linuxbox-share . You should first check the entries in the drop-down list on this page, to ensure that your chosen share name hasn t already been used for a different share; then, enter the share name in the Create Share field.
Now click the Create Share button to create the share. This will present you with another screen in which you can specify the properties of your share. You will certainly need to set the path field to the path of your share directory (in this example, it s /share ). You can also set a number of other fields, such as the following, for example:
-
Set the read-only field to No to make it a writeable share.
-
Set the browsable field to Yes, to allow the contents of the /share directory to be visible.
-
Set the available field to Yes, to enable the share (that is, make it available to users).
-
Add a comment to remind you what the share is for.
When you re done, click the Commit Changes button to commit these settings to the Samba configuration file.
Note If you like, you can click the Advanced View button in the SHARES screen to set further settings (for example, you can insert a space-delimited list of users into the valid users or invalid users text boxes, to control which users are allowed or denied access to the Samba share). You can also click the VIEW button to view the complete contents of the /etc//smb.conf configuration file.
-
-
Restart the Samba service so that the configuration changes can take effect. To do this, click the STATUS button and then click the Restart smbd button to restart the service. Wait for the page to reload, and then click the Restart nmbd button to restart that service, too.
Accessing the Share from a Windows NT/2000/XP Machine
Now that you have a Samba share configured on your Linux server, you can access it from a range of other machines on the network. To access the share from a Windows system, you can browse to it using Windows Network Neighborhood, and even map it to a network drive using Tools>Map Network Drive.
Accessing the Share from Another Linux Machine
You can also access your Linux filesystem share from any SMB-equipped client machine (for example, from another Linux machine). To do this, the client machine can use functionality that is contained within the Samba client package. In fact, there are two different applications that you can use to access your Linux file share across the network from an SMB-equipped client machine:
-
You can use the smbclient command, which provides an FTP-like interface to perform the same functions as FTP.
-
If your client machine is a Linux machine, you can use the smbmount command to mount the remote smb share as a local directory.
To access an smb share via a remote machine, you will need to know the username and password of a Samba user account on the remote Samba server machine (such as the kapils account shown earlier).
The smbclient Utility
If you re using a client Linux machine to access your Samba share, you can do so using the smbclient utility. To do this for the share we ve created here, run the following command at the command line:
$ smbclient //linuxserver/linuxbox-share -U kapils added interface ip=192.168.0.114 bcast=192.168.0.255 nmask=255.255.255.0 Password: Domain[WORKGROUP] OS=[Unix] Server=[Samba3.0.3-5] smb: />
In the smbclient command, we needed to specify three things:
-
The name of the file server
-
The name of the share
-
The name of the user we re using to access the share (that is, a user that we created using the SWAT facility s PASSWORD screen earlier in the section).
Note that you re prompted for a password. When the password authentication with the Samba server is successful, you will get an smbclient session, which looks similar to an FTP session. Now you can use all the available commands to work with the files in the remote filesystem:
smb: \>ls temp1.txt temp2.txt temp3.txt To get a list of all the commands you can use through the smbclient session, type help at the prompt:
smb: \>help ? altname archive blocksize cancel cd chmod chown del dir du exit get help directory ... For more on using Samba shares via an smbclient session, see the documentation at http://us3.samba.org/samba/ftp/docs/htmldocs/smbclient.1.html . To exit the smbclient session, type exit at the smb: \ > prompt.
The smbmount Utility (Mounting an SMB Share Locally)
The smbmount utility allows you to mount a (possibly) remote smb share on a client Linux computer. You can try this out if you have two Linux machines networked together ”use the one with the Samba share as the server and the other one as the client. Alternatively, if you ve got a single Linux machine, the machine acts as both file server and as a client of its own service.
The smbmount application uses a helper application called smbmnt , and the first thing to do is change the permissions on smbmnt so that your smbmount command can use it. By default, smbmnt s permissions allow it to be used only by the root user of the machine on which it is running. Assuming you re using the client machine as a normal user, you ll need to use the root account to adjust these permissions, like this:
$ su - Password: # chmod s+u /usr/bin/smbmnt You can check the new permissions, like this:
# ls -l /usr/bin/smbmnt -rwsr-xr-x 1 root root 491096 Jan 10 00.05 /usr/bin/smbmnt Now you re ready to test smbmount. Change back to your normal user account, and create the directory onto which you want to mount the Samba share:
# exit $ mkdir /home/kapils/mnt $ mkdir /home/kapils/mnt/remote
Here, we re using the local kapils account on the client machine, and we ve created a directory called mnt/remote underneath this user s home directory /home/kapils .
Now, run the smbmount command to mount the remote Samba share on the local directory:
$ smbmount //linuxserver/linuxbox-share /home/kapils/mnt/remote -o username=kapils Password: Here, linuxserver is the name of the Linux server that is hosting the Samba share, and linuxbox-share is the name of the share; /home/kapils/mnt/remote is the chosen mount point, and kapils is the name of the Samba user on the Linux server. You re prompted for the password of the Samba user.
When you ve done this, and assuming the connection is good, you can navigate the contents of the Samba share as if they were contents of the mount point. For example:
$ ls /home/kapils/mnt/remote temp1.txt temp2.txt temp3.txt To unmount, you can use the smbumount command. However, like smbmnt , you may first need to use the client machine s root account to change the permissions on smbumount :
# chmod s+u /usr/bin/smbumount Now you can safely unmount the share from your mount point using your normal user account:
$ smbmount /home/kapils/mnt/remote Accessing NT Shares from a Linux Machine
What if you want to use a Linux client machine to access a filesystem hosted by a Windows server? In fact, you can access Windows NT shares in the same way that you access Linux shares.
For example, suppose you have a Windows NT machine called winserver that acts as a file server by hosting a share called salesarchive . You can treat the contents of this share as if it were part of the client machine s filesystem, by mounting it just as we did before.
First, you need a directory that will act as your mount point. For example, let s create a local directory called sales , under our user s home directory:
$ mkdir /home/kapils/mnt/sales Next, use smbmount to mount the filesystem onto the mount point:
% su - Password: # smbmount //winserver/salesarchive /home/kapils/mnt/sales -o username=kapils Password: There are two points to note here. First, the normal user does not have permission to mount a filesystem, so you must change to root user before using smbmount . Second, the smbmount command itself requires that you specify a username and password. This username corresponds not necessarily to a user on the Linux machine, but to a network user that has permission to access the share.
Having achieved a connection, you can work with the files on the remote file server as if they were part of the local directory:
$ cd /home/kapils/mnt/sales $ ls sales2002Q2 sales2002Q3 sales2002Q4 sales2003Q1 salesnotes.txt
Your permissions on the contents of this folder will depend on the permissions assigned to the network user whose account you specified in the smbmount command. To unmount the share, use smbumount again:
# smbumount /home/kapils/mnt/sales Accessing SMB/CIFS Shares Using Nautilus
You can even use the Nautilus file manager to access SMB/CIFS resources such as Windows and Linux Samba shares. To access Samba shares using Nautilus, first launch a Nautilus window (for example, by selecting Main Menu>Run Program and typing nautilus ).
Then type smb: in the Location bar. This will cause Nautilus to show you a list of all local domains and workgroups. From here, double-click the workgroup of your Windows machine, and then on the name of the Windows machine itself, to view all directory shares on that machine.
If you are connecting to smb shares that require a username and password, you can specify this information within Nautilus s Location bar. In this example, the Location bar with username and password should look like this:
smb://kapil:password@winserver/salesarchive/ After successful authentication, Nautilus shows you all the files under that share.
There s a lot to Samba, and we ve covered only a little of the detail here. For more depth, take a look at Samba s software suite manual pages (using the man command), the SWAT documentation (on the HOME page of your SWAT tool), and the Samba official Web site ( www.samba.org ). You must always check your firewall settings for the SWAT port. Firewalls must be configured to open port 901 for SWAT.
EAN: 2147483647
Pages: 170