Setting Up a Web Server
When you want to publish Web pages on the Internet (or on an intranet), you use a Web server . In essence, a Web server is an application that does two things:
-
It listens for page requests .
-
When it receives a page request, it examines the request and responds with the page that was requested .
For example, when you use a Web browser to browse www.wrox.com , the browser turns this into a request message and sends it across the Internet to Wrox s own Web server. When the Web server receives this request, it processes it, works out what page you requested, puts that page together from whatever resources are necessary, and sends the page back to your browser in the form of a response message.
Of course, there are many different Web browsers in existence (including Mozilla, Opera, Internet Explorer, and others), and a great many types of Web server software also exist. To enable a browser to request pages from a Web server, they communicate using Hypertext Transfer Protocol (HTTP) ”this is the standard protocol for the Internet. The request and response messages are composed using HTTP, and this is what allows any browser to request Web pages from any type of Web server.
| Note | By default, all Web servers listen for HTTP requests on port 80. Web servers also use port 443 to listen for requests made through secure HTTP connections, over the secure sockets layer (SSL), through a protocol called HTTPS . |
So, if you want to publish your own Web site, you ll need a machine with some Web server software. However, the chances are that if you build your own Web site, you probably won t want to expose it to the Internet from your own machine. There are security and maintenance issues to manage, and you d need to buy enough hardware and bandwidth to handle all the page requests. More likely, you d choose an ISP, and use its Web servers to host your Web site for you.
So, why would you want to install a Web server on your Fedora 2 Linux machine? Here are two scenarios:
-
If you re building a Web site, you ll need a Web server so that you can test your site as you re developing it.
-
Although you might not host an Internet site from your own machine, you might host an intranet site, a private Web site available only to other machines inside your private network. The demand for intranet pages is much more predictable than for Internet pages, and the security risks are not so significant.
This section shows you how to set up a Web server on your machine, configure it, and publish pages on it. From there, you ll soon be developing your own sites.
The Apache Web Server
As mentioned, a number of commercial and freely available Web servers are in existence. Among the commercial Web servers are offerings from Netscape, IPlanet, SunONE, Microsoft (the Internet Information Server, or IIS), and Zeus. Among the open source Web servers are Apache, thttpd, and RedHat TUX.
Of all these, Apache is most widely used. At the time of writing, 66 percent of all Web sites are hosted on Apache Web servers (according to the Netcraft Web Server Survey, www.netcraft.com/survey ) ”the vast majority of them running on Linux or UNIX operating systems. Apache s popularity is due not only to its open source pedigree, but also to its highly competitive levels of performance, functionality, stability, flexibility, and security:
-
Apache s flexibility comes from the fact that it is a modular Web server. That means that you can meet your requirements by plugging any number of external modules into the core httpd daemon. Of course, because it is open source software, you also have access to Apache s source code, which you can customize to fit your needs.
Apache is also very scalable. You can run Apache on high-end hardware, and it s possible to increase the capacity of Apache Web servers by sharing the load across any number of servers. It s also very portable, being available for a number of operating systems.
-
Apache s security is very good in comparison to other Web servers. Moreover, the Apache Foundation is extremely active in the continued defense of Apache from security problems, particularly in the form of announcements and patches.
-
Apache performs very well ”it boasts a highly optimized daemon for serving static content that dramatically outperforms its nearest rivals. Moreover, it rarely crashes and achieves extremely long up-times.
-
Apache comes with detailed documentation, which helps to make the setup and configuration easy. And, because it s so popular, there s a wide network of support for Apache, in the form of mailing lists, newsgroups, and commercial vendors such as Red Hat.
-
Apache development is active. The Apache Foundation is actively involved in development of new modules and new versions of Apache to make it reliable, stable, and secure.
Because you ve already got Fedora 2, there s another good reason for choosing Apache as your Web server software ”it s included as part of the Fedora 2 distribution. At the time of writing, the latest version of Apache is 2.0.49.
Installing Apache
As previously noted, Apache is a modular server ”the core server provides the basic functionality, with extended features available in various modules. This makes it very flexible and easy to configure, because you have to configure only the modules you need. So, it s worth looking at how to control the installation and removal of these modules.
In fact, the different modules are contained in the different packages that you can install via the Package Management Tool. Recall that to start RPM s graphical interface, you can select Main Menu>System Settings>Add/Remove Applications, or type the following command at the command line:
$ system-config-packages The Apache Web server packages are listed in the Web Server package group, which is found under the Servers category in the RPM Package Management Tool. If you look at the details of this package group , shown in Figure 9-2, you ll see that there are many packages listed.
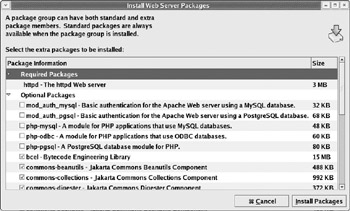
Figure 9-2
Only one of these packages in the group is a Required Package ”that s the httpd package that contains the base Apache Web server functionality. The remaining packages are all optional packages. The important packages are explained in the table that follows .
| Package | Description |
|---|---|
| httpd-manual | Contains the documentation for the Apache Web server. After installation, you can access this documentation from the command line by typing man httpd . |
| hwcrypto | Provides support for hardware SSL acceleration cards. This package should be installed if you have hardware SSL acceleration cards, such as Ncipher Nforce, on your server. |
| mod_ssl | Provides an SSL interface to the HTTPS Web server, and enables the Apache Web server to support SSL. This package should be installed if you want to provide secure connections to your clients . |
| php | Provides the PHP module for Apache, which enables the Web server to serve PHP Web pages. This package is required if you want to host Web sites that contain pages written with the PHP scripting language. |
| Webalizer | Provides programs for Web server log file analysis. This package enables you to generate HTML usage reports for your Web site. |
| Note | You can find out more about other Apache modules at the Apache Web site, http://httpd.apache.org/docs-2.0/mod . |
You can choose whichever extra packages fit your requirements; it s definitely worth installing the httpd-manual package, and then you should choose whatever other packages fit your own requirements. Remember that you can re-launch the RPM at any time, and add or remove packages, as you need them.
When you ve selected the packages you need, click the Install Packages button to begin the installation. During the installation, you ll be prompted to insert the distribution discs as they re required. The RPM will also inform you of any conflict between package dependencies.
The Apache Configuration Files
Apache s configuration information is contained in a select bunch of configuration files:
-
The /etc/httpd/httpd.conf file is Apache s main configuration file.
-
The /etc/httpd/conf.d directory contains configuration files for any installed modules (such as PHP, SSL, and so on).
-
The /etc/httpd/logs directory is a symbolic link to /var/log/httpd directory, which contains all the Apache log files.
-
The /etc/httpd/modules directory is a symbolic link to /usr/lib/httpd/modules directory, which contains all the Apache modules configured as dynamic shared objects.
Note Dynamic shared objects (DSOs) are modules that are compiled separately from the Apache httpd binary. They can be loaded on demand. There s more information on DSOs at http://httpd.apache.org/docs-2.0/mod .
-
The /etc/httpd/run directory is a symbolic link to /var/run , which contains the process ID file ( httpd.pid ) of the httpd process.
-
/etc/rc.d/init.d/httpd is a shell script, used for starting and stopping the Apache Web server.
Starting Apache for the First Time
You can start Apache using the Fedora Service Configuration GUI dialog box, or via the command line. Here s how to start Apache from the Service Configuration dialog box:
-
First, you need to fire up the Service Configuration GUI. To do this, click Main Menu>System Settings>Server Settings>Services, or type the following at the command line:
$ system-config-servicesThe Service Configuration GUI will ask for root password if you started it as a normal user . When you do this, you get the Service Configuration dialog box, as shown in Figure 9-3.
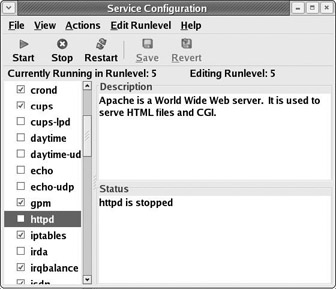
Figure 9-3This dialog box contains a list of all the services that are supported on your computer. The check boxes indicate which of these services are started automatically when the machine boots up (as part of the cron ). There are also Start, Stop, and Restart buttons so you can start and stop services manually.
-
Scroll down the list on the left of the dialog box, and select the entry for httpd . Check the status of the httpd service in the bottom-right of the dialog box; if it is stopped (as in the figure), click the Start button to start it.
If you want it to start automatically next time you reboot your machine, select the check box, too. Then select File>Save Changes to save the new settings. That s it; you can close the Service Configuration dialog box by selecting File>Quit.
To control the Apache Web server from the command line, you can use the service command to fire the httpd script. Here s how you use it to start the Web server:
# service httpd start Starting httpd: [ OK ] If there are difficulties in starting the Web server, you ll find out about it here. For example, if you attempt to do this without root privileges, you ll get a message telling you that permission is denied . And here s another example:
# service httpd start Starting httpd: httpd: Could not determine the server's fully qualified domain name, using 192.168.0.99 for ServerName [ OK ] Here, the message explains that the server s fully qualified domain name (FQDN) couldn t be determined, and that it s using the IP address ( 192.168.0.99 ) instead. If you get this message, it s because you have neither set up an FQDN for your Linux server, nor configured the ServerName configuration directive in the httpd.conf configuration file.
| Note | An FQDN is a unique name, consisting of a hostname and domain name that can be resolved to an IP address. For example, www.linux4biz.net is a fully qualified domain name. |
Returning to the httpd script itself, there are similar switches for stopping or restarting the service:
# service httpd restart Stopping httpd: [ OK ] Starting httpd: [ OK ] # service httpd stop Stopping httpd: [ OK ]
You can use a few other options with the httpd script. If you run the script without an option, the resulting usage message reveals all the available options:
# service httpd Usage: httpd {startstoprestartcondrestartreloadstatusfullstatusgraceful helpconfigtest} The configtest option is a particularly useful one. The configuration file is quite complex, so it s useful to check it for errors after you make changes to it. To do this, you use the configtest option:
# service httpd configtest Syntax OK Testing the Apache Web Server
Once you ve started the Apache Web server, you should test it to see if it s working properly. To do that, use a Web browser to request a Web page from your server. There s a page provided by default for this purpose, and you can request it via the URL http://localhost . So, launch a Web browser (Main Menu>Internet>Mozilla Web Browser), and type this URL into the address box, as shown in Figure 9-4.
Configuring Your Web Server
It s a good idea to configure your Web server. Red Hat does provide a GUI tool, apacheconf , for configuring Apache, but it does not format the configuration file very well. Webmin ( www.webmin.com ”see Chapter 15) is an alternative Web-based software that you can use to manage most of the Linux services, including the Apache Web server. However, the following Try it Out section shows you how to do some basic configuration by editing the httpd.conf Apache configuration file directly.
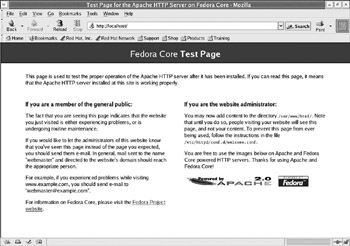
Figure 9-4
Try It Out Configuring Your Web Server
We re going to configure the Web server by adjusting a couple of the settings to suit our needs.
-
Launch the gedit text editor (by selecting Main Menu>Accessories>Text Editor), or your favorite text editor. Use it to open the file /etc/httpd/conf/httpd.conf .
-
Select Search>Find and use the resulting dialog box to find the word ServerAdmin in the file. The first occurrence should be the ServerAdmin directive, which looks like this:
# ServerAdmin: Your server address, where problems with the server should be # e-mailed. This address appears on some server-generated pages, such # as error documents. e.g. admin@your-domain.com ServerAdmin root@localhost
As you can see, the configuration file describes this directive very well. Change the e-mail address to your own e-mail address, or an address that you may have set up for Web site administration. For example:
# ServerAdmin: Your server address, where problems with the server should be # e-mailed. This address appears on some server-generated pages, such # as error documents. e.g. admin@your-domain.com ServerAdmin webmaster@linux4biz.net -
Now use the same technique to find the ServerName directive (you ll probably find that it s right after the ServerAdmin directive). Change this directive first by removing the leading hash ( #) character. Then, if you have a registered DNS name, add it here (in place of the DNS name test.linux4biz.net , which is used here to demonstrate ):
# ServerName gives the name and port that the server uses to identify itself. # ... ServerName test.linux4biz.netThe server name you specify should be an FQDN (because it will need to be resolved to an IP address by DNS). If you haven t set up a DNS, you can enter the IP address allocated to the Linux server instead, like this:
ServerName 192.168.0.99 -
Save the httpd.conf file, and close it.
-
Restart the httpd daemon to reflect the changes. To do this, use Red Hat Services Configuration GUI, or the httpd command line script, as described earlier in this chapter:
# service httpd restart Stopping httpd: [ OK ] Starting httpd: [ OK ]Now browse to http://localhost again, to check that the Web server is still serving Web pages. You should see the Apache Test Page that you saw earlier in this section.
There are many configuration settings that you can control via the httpd.conf configuration file. For more information, refer to the Apache Web server documentation at http://httpd.apache.org/docs-2.0/ .
Setting Up Your First Web Site
In the remainder of this section, we set up a simple Web site, which will be accessible on the network. This involves creating a simple HTML Web page, and saving it to a location on the hard disk that is used by the Web server to store published Web pages. Then, when a user requests the page, the Web server will be able to respond by retrieving it from this location and sending it to the requestor .
Try It Out Publishing Your First Web Page
-
Launch an editor (you can use a dedicated Web page editor such as Mozilla Composer if you have it installed; alternatively, gedit will do). Create a new file; call it index.html and save it in the directory /var/www/html .
-
Type some HTML into the file. For example:
<html> <head> <title>Beginning Fedora 2 - Apache Test Page</title> </head> <body> <center> <h1>Beginning Fedora 2 - Apache Test Page</h1> This is the first page of your web site! </center> </body> </html>
-
Now open a browser and browse to the page using your server s FQDN address or IP address. (For example, the URL http://test.linux4biz.net/index.html is used to match the DNS name, but you might use something like http://192.168.0.99/index.html .) Your browser sends this request to the Web server listening for connections on port 80 by default. The Web server will serve the default Web site pages. Figure 9-5 shows the output you should see.
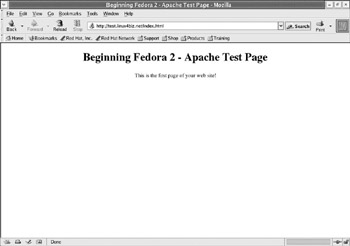
Figure 9-5
How it works
In this example, we set up a simple Web page under Apache Web server s default root directory, /var/www/html , and tested it on an internal network. You can add more pages and directories under the /var/www/html directory, as explained in the previous example.
If you want to make your Web site available on the Internet, you need to connect your Web server to the Internet and assign it a public IP address, so that external users send page requests to it. You can also register a DNS so your Web site has a memorable name (so users don t need to refer to your Web site by its IP address).
By default, your Apache Web server hosts just one Web site (whose root is at /var/www/html ). However, you can configure your Apache Web server to host as many Web sites as you like, and specify the root directory of each site to be whatever folder you wish.
If you want more information about acquiring and using Apache, try the URL http://httpd.apache.org/ .
Installing SSL-Aware Apache
In the previous section, we installed an Apache Web server and also published a Web page. Apache also provides the functionality to host secure sites with the help of the mod_ssl module that requires OpenSSL software.
OpenSSL is an open source toolkit for secure communication between machines. Openssl supports SSL and Transport Layer Security (TLS) protocols. Fedora Linux comes with a preinstalled openssl toolkit. Tocheck if the openssl is installed, use the RPM feature to check the installed packages, as shown in the following example:
# rpm qi openssl Name : openssl Relocations: (not relocatable) Version : 0.9.7a Vendor: Red Hat, Inc. Release : 35 Build Date: Thu 25 Mar 2004 15:38:19 GMT Install Date: Fri 14 May 2004 02:11:09 BST Build Host: tweety.devel.redhat.com Group : System Environment/Libraries Source RPM: openssl-0.9.7a-35.src.rpm Size : 2597003 License: BSDish Signature : DSA/SHA1, Thu 25 Mar 2004 20:11:22 GMT, Key ID da84cbd430c9ecf8 Packager : Red Hat, Inc. <http://bugzilla.redhat.com/bugzilla> URL : http://www.openssl.org/ Summary : The OpenSSL toolkit. Description : The OpenSSL toolkit provides support for secure communications between machines. OpenSSL includes a certificate management tool and shared libraries which provide various cryptographic algorithms and protocols.
To enable SSL in Apache Web server, we also require an Apache mod_ssl module. Once installed, Apache can be configured to serve secure pages on the HTTPS protocol. HTTPS is HTTP over SSL. HTTP and HTTPS have reserved ports of 80 and 443, respectively.
Now, let s install mod_ssl packages.
Installing the mod_ssl Package
This package (mod_ssl) provides an Apache interface to openssl to provide and enable the Apache Web server to support SSL. We will install this package now.
-
Start the RPM s graphical interface by selecting Main Menu>System Settings>Add/Remove Applications, or by executing system-config-packages on the command line as root user, like so:
# system-config-packages -
Browse through all the categories until you get to the Servers category.
-
Click the Web Server group to open the details screen.
-
Select the mod_ssl package from the Extra Packages section and click Close and Update to install this package on the system (see Figure 9-6).
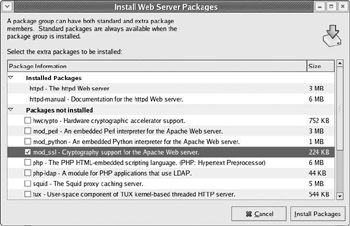
Figure 9-6
Follow all the instructions to install the mod_ssl package. After the mod_ssl module is installed, you have to configure Apache to use the SSL module.
Configuring Apache to Use SSL
You are halfway through making Apache SSL-aware by installing the mod_ssl package. We will now configure Apache to use SSL features.
Apache uses a configuration file ssl.conf for SSL, which is located under the directory /etc/httpd/conf.d . Apache s main configuration file httpd.conf includes the ssl.conf file by using an include directive in httpd.conf , as follows:
# # Load config files from the config directory "/etc/httpd/conf.d". # Include conf.d/*.conf
The line in the /etc/httpd/conf/httpd.conf file includes all the configuration files that have a suffix of .conf .
Now, let s look at the important configuration of the ssl.conf file. Apache listens on port 80 for a plain HTTP request (http). Apache needs a different port to listen on the HTTPS protocol. The default port to run as a secure server is 443, and it can be configured by using the Listen 443 configuration line in the /etc/httpd/conf/httpd.conf file.
Apache has to load a DSO module to enable the ssl feature. It can be done using the following line in the ssl configuration file.
LoadModule ssl_module modules/mod_ssl.so Listen 443
The following lines will add the MIME types for downloading certificates and Certificate Revocation Lists (CRLs):
AddType application/x-x509-ca-cert .crt AddType application/x-pkcs7-crl .crl
You can set error and transaction logs with the following lines:
ErrorLog logs/ssl_error_log TransferLog logs/ssl_access_log
The SSLEngine switch can be used to enabled or disable the SSL. The following line enables the SSL.
SSLEngine on One of the requirements of ssl functionality is the ssl certificate and private key. To enable ssl functionality, you need to specify the ssl certificate file and ssl certificate key stored on the system, like so:
SSLCertificateFile /etc/httpd/conf/ssl.crt/server.crt SSLCertificateKeyFile /etc/httpd/conf/ssl.key/server.key
The first line points the SSLCertificateFile to a /etc/httpd/conf/ssl.crt/server.crt certificate file. The second line points the SSLCertificateKeyFile to a private key for this certificate. SSLCertificateFile and SSLcertificateKeyFile can point to any ssl certificate and private key pair stored as a file on the system.
In the next section, we create a private key and certificate and configure it in Apache.
Generating Self-Signed Certificates
The first step in generating a certificate is creating a server s private key.
# openssl genrsa -des3 -out /etc/httpd/conf/ssl.key/testcert.key 1024 Generating RSA private key, 1024 bit long modulus ...................++++++ .++++++ e is 65537 (0x10001) Enter pass phrase for /etc/httpd/conf/ssl.key/testcert.key: Verifying - Enter pass phrase for /etc/httpd/conf/ssl.key/testcert.key:
Notice that the preceding command to generate a private key asks for the passphrase on the command line. A passphrase should not be easy to crack (avoid using your name or age, and so on), and should also be easy to remember. You will be required to provide the passphrase every time this private key is accessed. If you forget the passphrase, the private key will not be usable.
Here is the private key in Privacy Enhanced Mail (PEM) format, an encoding format that stores keys in a text format:
-----BEGIN RSA PRIVATE KEY----- Proc-Type: 4,ENCRYPTED DEK-Info: DES-EDE3-CBC,8174D67CB5871EDF KGnYbuQH+BS9PclINlUo6ox8Yy6TEatMtfle6Zo8f9AB+ooRGOeOwuW84FhYyE2E w7uXM/yxkyQ4jXHUD597SsqNdXcKX0YmQ5T+AqZ+mU1QmBRLJcT1JhkHrfFkdJ1W bpNrJJDFtVfbKroyq7/hZqSkS6+VeVmfE67EfLJ2sGTrCq+FZDYT2TTQO0Ch1spW kA0CX+zc+hEJudMxEDabQFmch+ueMt6dg7aCnE2IpF8Loqc1acvwtE8r7gXYumJe R2arw/PZ/zY5Z8WbNKSgkclf6EhpzKFNRfSClECfc+9Rw/4F/rDkzYVjFAyAWxcX uYiSVkAR3Pnlxj3BQtefMZbkVtsoPkIYpLQGlbn6wg/fzvWuPKvE635nyKsW68D7 ysTQn2V0pOFLy0wupuuSng2Hh5ZopD26XaCtk1425lRpORnyxTZfJF/DF8SmUqAJ YuCRCsqVKeAZujCW2IqtNZsT2RAo1KWS0yh+ddDha82fxrtxLtgiLp0dcBwp5G4n /9R6qAuMw/7gGym/NgerDjhVlwaJUPj+Dq2Ih4oqaQUhpfTm1LW3TRpx9pPe3fqy eTe/jqV6I8IIpLnwbofSx8NLGmUs8ujz8FcCRRaPNbIB01QT2qhcnm2mvyx4nPhs UTAF56/JRTJHxozOGwYuqFJpqeMxiJg4q5Ciw49n3Y0Do6O19m05hsvMzs6A7vr+ Whh5+ogYjEFQjsbuswCh9H6em8hqDXtXoGwv1fnzMUjzRZj8cUU4ffbtBuOs+SKG PfLeqMFN2d0eKgVKezrHdpFf0n9pps0U14lxvyBkRrOUbaGe/WI/Wg== -----END RSA PRIVATE KEY-----
The next step is to create a server s Certificate Signing Request (CSR). Before starting the certificate request creation process, you must have the following details ready:
-
Country Name (2 letter code)
-
State
-
Locality Name (city)
-
Organization Name
-
Common Name (fully qualified domain name)
The common name is the domain name for which the certificate is required, such as www.linux4biz.net . The Organization Unit Name and E-mail Address are optional.
Execute the following command on a command line to create a CSR:
# openssl req -new -key /etc/httpd/conf/ssl.key/testcert.key -out /etc/httpd/conf/ssl.csr/testcert.csr Enter pass phrase for /etc/httpd/conf/ssl.key/testcert.key: You are about to be asked to enter information that will be incorporated into your certificate request. What you are about to enter is what is called a Distinguished Name or a DN. There are quite a few fields but you can leave some blank For some fields there will be a default value, If you enter '.', the field will be left blank. ----- Country Name (2 letter code) [GB]:GB State or Province Name (full name) [Berkshire]:London Locality Name (eg, city) [Newbury]:London Organization Name (eg, company) [My Company Ltd]:Linux4biz Organizational Unit Name (eg, section) []:IT Common Name (eg, your name or your server's hostname) []:test.linux4biz.net Email Address []:hostmaster@linux4biz.net Please enter the following 'extra' attributes to be sent with your certificate request A challenge password []: An optional company name []:
You will be prompted for the private key s passphrase. The preceding command generates a CSR for the certificate, which can either be sent to the Certificate Authority, such as Verisign, or can be self-signed.
Following is the certificate request (CSR):
-----BEGIN CERTIFICATE REQUEST----- MIIB1zCCAUACAQAwgZYxCzAJBgNVBAYTAkdCMQ8wDQYDVQQIEwZMb25kb24xDzAN BgNVBAcTBkxvbmRvbjESMBAGA1UEChMJTGludXg0Yml6MQswCQYDVQQLEwJJVDEb MBkGA1UEAxMSdGVzdC5saW51eDRiaXoubmV0MScwJQYJKoZIhvcNAQkBFhhob3N0 bWFzdGVyQGxpbnV4NGJpei5uZXQwgZ8wDQYJKoZIhvcNAQEBBQADgY0AMIGJAoGB AK5ttW2rIFJicHu+xYkkX5CSXCfaVfnfBvSCtWcPEZ/zBBUAoHA9aHtmRZYWcmAf Qest6TmWiH8StvnzzeJLxd8JseYds8u3pV4NVZZPYnkKHqC1Bns44hNTvJM39aUg z2mFGlphECADkecEfqG94Xj+Vh2h3EtG8FJqjYSBzm+vAgMBAAGgADANBgkqhkiG 9w0BAQQFAAOBgQCbsi2Szxmyohz78S4KfhIVzwHRyxLPPXUu3AmJ9NWiP73Vg/nl ocLys5/s/EbW0htUfT0szxMonzZbBLBB+LDXjyGWiDKsc7Arq+D2TBivEXO/67eS l0dMthRnOaE3V8gOPMUGhBboR0muAzYgF0skwKs34pkZzFXvY1b61Y6hOg== -----END CERTIFICATE REQUEST-----
We will self-sign the CSR by executing the following command on the command line:
# openssl x509 -in /etc/httpd/conf/ssl.csr/testcert.csr -out /etc/httpd/conf/ssl.crt/testcert.crt -req -signkey /etc/httpd/conf/ssl.key/testcert.key -days 365 Signature ok subject=/C=GB/ST=London/L=London/O=Linux4biz/OU=IT/CN=test.linux4biz.net/emailAddress=hostmaster@linux4biz.net Getting Private key Enter pass phrase for /etc/httpd/conf/ssl.key/testcert.key:
Now, we will have a self-signed certificate in /etc/httpd/conf/ssl.crt/testcert.crt that looks like the following:
-----BEGIN CERTIFICATE----- MIICnTCCAgYCAQAwDQYJKoZIhvcNAQEEBQAwgZYxCzAJBgNVBAYTAkdCMQ8wDQYD VQQIEwZMb25kb24xDzANBgNVBAcTBkxvbmRvbjESMBAGA1UEChMJTGludXg0Yml6 MQswCQYDVQQLEwJJVDEbMBkGA1UEAxMSdGVzdC5saW51eDRiaXoubmV0MScwJQYJ KoZIhvcNAQkBFhhob3N0bWFzdGVyQGxpbnV4NGJpei5uZXQwHhcNMDQwMjAxMDIw NDExWhcNMDUwMTMxMDIwNDExWjCBljELMAkGA1UEBhMCR0IxDzANBgNVBAgTBkxv bmRvbjEPMA0GA1UEBxMGTG9uZG9uMRIwEAYDVQQKEwlMaW51eDRiaXoxCzAJBgNV BAsTAklUMRswGQYDVQQDExJ0ZXN0LmxpbnV4NGJpei5uZXQxJzAlBgkqhkiG9w0B CQEWGGhvc3RtYXN0ZXJAbGludXg0Yml6Lm5ldDCBnzANBgkqhkiG9w0BAQEFAAOB jQAwgYkCgYEArm21basgUmJwe77FiSRfkJJcJ9pV+d8G9IK1Zw8Rn/MEFQCgcD1o e2ZFlhZyYB9B6y3pOZaIfxK2+fPN4kvF3wmx5h2zy7elXg1Vlk9ieQoeoLUGezji E1O8kzf1pSDPaYUaWmEQIAOR5wR+ob3heP5WHaHcS0bwUmqNhIHOb68CAwEAATAN BgkqhkiG9w0BAQQFAAOBgQCMkdagnNiHz+xrGpV9dWbgcB4fqllxkQwLkD0kbsYu OixgHRNOWMl4GCxkrg3Jx/nVB6X0p6ayRIXbp2erxREK9hhIQBXo61sjmlzvc6Em 8/hGs9Xe+JD/TgNP2zsgXJMrdkhwvkAOJCsnMGNh6COJ3SkEc+L5jhYxmYfEVJkj kg== -----END CERTIFICATE-----
Installing Commercial Certificates
This section discusses how to get a commercial certificate and use it with Apache.
To get a commercial certificate from third-party Certificate Authorities, you follow the same procedure as used in generating a self-signed certificate.
Following are the tasks involved in getting a commercial certificate:
-
Create a server private key.
-
Generate a CSR using the private key, which can be sent to Certificate Authority to apply for as ssl certificate.
-
Receive and install a certificate from the Certificate Authority.
Creating a private key and generating a CSR are the same as discussed in the last section. After the CSR is generated, it can be sent to the third-party Certificate Authority (CA). The CSR can besent using a Web form on most of the CA s Web sites, such as Verisign and Thawte. The Certificate Authority will validate and verify all the certificate details and assign you a real certificate. Save this certificate in a file on the Apache Web server. In our case, save it in the /etc/httpd/conf/ssl.crt/testcert.crt file.
-
The last step is to install this certificate on Apache.
Make the following changes in the ssl.conf file to enable the newly received commercial ssl certificate. You have to follow the same procedure to use a self-signed certificate.
Change these lines in the ssl.conf file:
SSLCertificateFile /etc/httpd/conf/ssl.crt/server.crt SSLCertificateKeyFile /etc/httpd/conf/ssl.key/server.key
to the following lines to use the new private key and certificate:
SSLCertificateFile /etc/httpd/conf/ssl.crt/testcert.crt SSLCertificateKeyFile /etc/httpd/conf/ssl.key/testcert.key
Starting the Apache Web Server with ssl
After the ssl certificate is installed and configured on the system, you need to start or restart the Apache Web server with ssl.
We recommend that you check the Apache configuration file for errors using the configtest switch with the apachectl command, as follows:
# /usr/sbin/apachectl configtest Syntax OK
To start the Apache server with ssl, issue the following command. Note that Apache will ask for the passphrase associated with the server s private key:
# /usr/sbin/apachectl startssl Apache/2.0.49 mod_ssl/2.0.49 (Pass Phrase Dialog) Some of your private key files are encrypted for security reasons. In order to read them you have to provide us with the pass phrases. Server www01.linux4biz.net:443 (RSA) Enter pass phrase: Ok: Pass Phrase Dialog successful.
Now, your ssl-enabled Apache Web server is up and running. In the next section, you publish your first secure Web page.
Launch an editor (you can use a dedicated Web page editor such as Mozilla Composer if you have it installed; alternatively, gedit will do). Create a new file ”call it indexsecure.html and save it in the directory /var/www/html .
-
Type some HTML into the file. For example:
<html> <head> <title>Beginning Fedora Linux Secure Apache Test Page</title> </head> <body> <center> <h1>Beginning Fedora Linux Secure Apache Test Page</h1> This is the first secure page of your web site! </center> </body> </html>
-
Now open a browser and browse to the page using your server s FQDN address or IP address. (For example, the URL https://test.linux4biz.net/indexsecure.html is used here to match the DNS name, but you might use something like https://192.168.0.99/indexsecure.html .) Your browser will send this request to the Web server listening for connections on port 443 by default. The Web server will serve the default Web site pages. Figure 9-7 shows the output you should see:
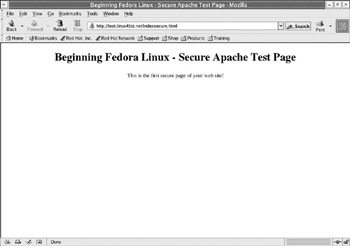
Figure 9-7
Notice the padlock in the bottom-right corner of the browser window. It is locked to show that the session between client browser and Web server is secure.
| Caution | For more information about Apache, openssl, and mod_ssl, refer to the following Web sites: www.modssl.org, www.openssl.org, and www.apache.org. |
EAN: 2147483647
Pages: 170