Users, Groups, and Filesystem Permissions
With the help of groups, it is possible to implement some very sophisticated access policies. You ll recall from Chapter 7 that every file or directory in the filesystem defines access rights for three different sets of users (the owner , the group , and others ) via a system of access modes that you can see when you use ls :
$ls -l drwxr-xr-x 4 eziodm eziodm 4096 Feb 12 17.40 backup_images -rw-r--r-- 4 eziodm eziodm 1037238 Feb 12 17.25 picture1.bmp -rw-r--r-- 4 eziodm eziodm 262314 Feb 12 17.29 picture2.bmp -rw-r--r-- 4 eziodm eziodm 58398 Feb 12 17.37 picture3.bmp When it comes to user groups, the behavior of Fedora Core is notably different from that of many other UNIX variants, including other Linux distributions. By default, every user belongs to his or her own private group , which is not shared with anyone else. Earlier in this chapter, you saw that whenever you create a new user account, the system tools also create a private group for that account that has the same name .
Together with this user/private group scheme, Fedora Core also ensures that the default creation mode for files (the umask ) grants write permissions to the group. Because the group (like the user account) is private, this does not compromise the security of files that are owned by the user. However, this mechanism becomes quite an advantage when sharing files among users.
In this section you ll see six examples of how to use file protection and file sharing. You can regard them as suggestions on how to set up several protection schemes that suit normal files, directories, or executable programs:
-
You can apply these techniques to files to control which documents can be accessed by which accounts and groups.
-
You can apply the techniques to directories to control which accounts can access that directory, add files to it, or list its contents.
-
You can apply the techniques to executable programs to control which accounts have the rights to execute certain pieces of software on your computer.
First Scenario: Private Files
In this scenario, a user wants to keep his or her files private. Groups are not really relevant here: it is sufficient to remove read, write, and execute permissions for others. The permissions for the group don t really matter because in Fedora Core the primary group is assigned to its primary user only. Thus, a directory with its permissions set as shown in Figure 7-17 guarantees privacy of its contents ”that is, the directory s content can t be read, written, or executed by users other than the owner.

Figure 7-17
Once again, it is important to note that group permissions (Read, Write, Execute) are safe because the group in question is the group called eziodm ”and the only member of this group is the user called eziodm.
Second Scenario: Public Read-Only Files
This scenario is quite simple to implement. Suppose you want to give public access to the file, and you want this public access to be read-only. Therefore, all you need to do is to ensure that the Write permission for Others is denied (see Figure 7-18).
The figure shows the permissions applied to a directory . You can tell this because the Text view starts with d (it s drwxrwxr-x here). When applied to a directory , the Execute permission refers to the user s authority to search files in that directory.

Figure 7-18
Third Scenario: Restricted Read-Only
In this scenario, you want to keep your files private, and open up the possibility of viewing the files to a limited number of users (see Figure 7-19). This is where groups start to make sense.

Figure 7-19
Figure 7-19 shows the permissions for a directory that belongs to the authors group. However, group members won t have Write access to the folder. All other users (that is, users who are not members of the authors group) are completely barred. To complete your access policy on this directory, all you need to do is add the appropriate users to the authors group. It is a good idea to repeat this for each file contained in the directory. It is a tedious task with the graphical tool, but it can be quickly achieved with the command line:
$ chmod -R u=rwx,g=rx,o-rwx restricted_files In this command, -R (remember that “R and “r are not the same thing) instructs chmod to update the restricted_files directory and its entire contents, as follows :
-
Setting the owner s permissions to Read, Write, Execute ( u=rwx )
-
Setting group permissions to Read, Execute ( g=rx )
-
Taking away Read, Write, Execute permissions for all others ( o-rwx )
For additional techniques for specifying permissions, you may want to review the chmod command syntax with man chmod in a terminal.
Fourth Scenario: Restricted Write
As you gain confidence in the members of the authors group, you might want to give them Write access to the directory and its contents. This is not as trivial as it seems: you have to remember that each user has a different, personal, primary group. If you don t set up the directory properly, you ll end up with a rather messy situation: each newly created file will be assigned to the user s primary group, not to authors. This makes file sharing a bit difficult, but still possible.
The solution is to add the Set GID Bit to the shared directory. The Set GID Bit is a special access right conceived exactly for this scenario: every file created in the directory will belong to the directory s group, not to the user s private group. To activate the Set GID Bit on a directory and fully benefit from it, the owner can create and initialize it with these commands:
$ mkdir restricted_directory $ chgrp authors restricted_directory $ chmod ug+rwx restricted_directory $ chmod o-rwx restricted_directory $ chmod g+s restricted_directory
The mkdir command creates a directory called restricted_directory , and then the chgrp command changes its group to authors. Then there are three chmod commands:
-
The first ( ug+rwx ) ensures that user and group have read, write, and execute permissions.
-
The second ( o-rwx ) clears all permissions for others.
-
The third ( g+s ) activates the Set GID Bit.
Now you can copy files into the directory, or create files directly in it. No matter what method is used, the group will always be correctly set. Figure 7-20 shows what the directory looks like in the file manager.
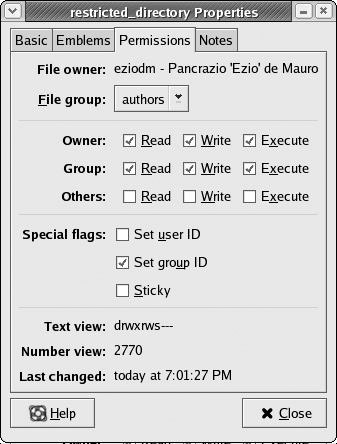
Figure 7-20
Note that the Text view field specifies the letter s (instead of x ) in the group permissions, and in the Number view field, the Set GID Bit appears as a 2 in front of the usual three digits.
Fifth Scenario: Restricted Write, Public Read
To achieve this result, and have a directory that is shared in read-write mode among a restricted group of users and viewable read-only for the public, you need only to add Read and Execute permissions for Others (see Figure 7-21).
Sixth Scenario: Restricted Write, Restricted Read
In this last scenario, you want the contents of the book directory to have different permissions for different groups:
-
You want to grant Read, Write, Execute for the authors group (they need to write the contents).
-
You want to grant Read, Execute rights to the lecturers group (they need to read the contents to prepare lectures).
-
You don t want any other accounts to be able to access the directory (for example, you don t want students to peek at exercises and solutions).
The difficulty here is that you can t set up different protections for different groups on the same directory because only one owner and group can be specified. On the other hand, you don t want to rely on Others for your protection scheme because that would include students as well.

Figure 7-21
Here s a possible way to get around it. You can create a group called course, which inherits all the users from authors and lecturers. Then proceed with creating a material directory that is Read, Write, Execute accessible by the owner (probably a lead author) and Read, Execute accessible by the course group. Other users must not have access to it. Here s a possible example:
drwxr-x--- 2 eziodm course 4096 Jan 19 11:03 material This means that everyone belonging to the course group, and who also belongs to authors or lecturers, will be able to access the material directory. No other accounts will be able to access the directory.
Now, create a book directory as a subdirectory of the material directory. The book directory will be Read, Write, Execute accessible by the owner and the authors group. Other users will have only Read, Execute access. This is exactly what you want, because the material folder at the immediately above level protects the book folder from unwanted access by students, so it is safe to leave Read and Execute access for others: in our case, others can be the lecturers group only. You must not forget to activate the Set GID Bit on the folder to allow your writers to cooperate nicely . So, these are the permissions for the book directory:
drwxrwsr-x 2 eziodm writers 4096 Jan 19 11:04 book | Note | Another way to decide fine-grained access rights is by setting up an Access Control List (ACL). ACLs are a relatively new feature in Linux and other UNIX variants, and therefore not discussed further here. You can find out more on this topic by looking at the manual pages for acl , chacl , getfacl and setfacl , installed with the acl package. |
EAN: 2147483647
Pages: 170