Configuring the Desktop
The workspace and the panel are all part of the desktop environment. The default desktop environment that you have used so far is the GNOME desktop environment. This environment controls the behavior of the panel and the application GUI windows , session management, and various other behavioral GUI functions. In Fedora 2, the default GNOME desktop has a new look called the Bluecurve theme .
| Caution | This theme covers all the color design in the menus , the panels, the desktop background, and the window decorations. Of course, this is not the only theme available for use on the desktop, but it is certainly the one on which the Red Hat design team has spent most of its effort. The result is a desktop whose look and feel is far superior to and more aesthetically pleasing than that of its predecessors. |
Using the Desktop Control Center
You can control a lot of the features of your desktop using the GNOME desktop control center . The control center program displays a number of options to configure the desktop (and if you re familiar with the Windows operating systems, you ll find that the control center is quite similar to the Windows Control Panel).
You can reach the control center by selecting Main Menu>Preferences>Control Center (see Figure 2-45).
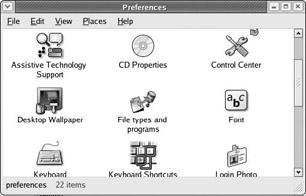
Figure 2-45
Let s look at the options in this configuration program in more detail:
-
About Myself: This allows you to put additional information about yourself into the system ”such as your name , office, and phone numbers . It also allows you to select a command shell . The command shell interpreter that is used by default in Fedora is bash . The bash shell is covered in greater detail in Chapter 6.
The information entered in this dialog box is stored in the user account database in /etc/passwd . You can also enter this information at the terminal by using the chfn command. You ll read more about /etc/passwd and the chfn command in Chapter 8.
-
Accessibility: This allows you to enter various accessibility options for users with disabilities . If you select the Enable keyboard accessibility checkbox in this dialog box, you reveal various options designed to ease the usability of the GUI. For example:
-
The Enable Mouse Keys option allows you to use the numeric keypad on the keyboard to control mouse movements. This is useful for users who have difficulty handling the mouse.
-
The Enable Bounce Keys option allows you to set the optimum key repeat rate. This is handy for users who have a tendency to hit a key repeatedly when they intend to hit it only once.
-
The Enable Slow Keys option allows one to set the keyboard key acceptance period (the time between the keystroke and its acceptance), for users who type successive keys after unusually long intervals.
-
The Enable Sticky Keys option allows you to configure the keyboard for users who have difficulties in making the simultaneous keystrokes (such as Alt+F1 ) that are required in many applications.
-
The Toggle keys option allows an audible indication to be made whenever a toggle key, such as Num Lock or Caps Lock, is toggled.
-
-
Desktop Wallpaper: This allows you to set the background of the desktop. You can set the background to an image file present in the system. Alternatively, you can specify the background to be a simple color or a gradient of two colors.
-
CD Properties: This allows you to configure the automatic CD detection program magicdev . You can ask magicdev to mount CD media automatically when the CD is inserted into the drive. You can also specify whether you want to have the file manager open with the CD contents in this case, or whether you want the autorun program in the CD to be executed automatically.
This dialog box also allows you to play audio CDs or DVDs automatically on insertion.
-
Control Center: This is just a link to the Preferences folder.
-
Menus & Toolbars : This allows you to change the behavior and appearance of menus and toolbars of windows on the desktop. For instance, you may hide the icons altogether, by selecting the Text Only option from the Toolbar Button Labels drop-down list.
-
File Types and Programs: This allows you to set program associations for different file types. You can categorize each file type according to its extension (the portion of the filename after the last period), and tell the operating system what application it should use to open files of each type when the user clicks a file of that type in the Nautilus file manager.
Note Unlike the Windows operating system, filename extensions don t matter in the Linux operating system. A program is considered executable according to the permissions set on the program file, not according to its filename extension. However, in GUI applications such as Nautilus, filename extensions are used not for executing programs, but rather for opening data files in appropriate applications.
-
Font: This allows you to set the different fonts for the desktop widgets. It also allows you to specify the rendering of fonts on the desktop.
-
Handheld PDA: For users with Palm or other handheld PDAs, this option allows you to set up synchronization of your local data with that of the PDA. The configuration is done using an easy wizard-like interface.
-
Keyboard: This allows you to set the behavior of a keyboard key when it s depressed for an extended period (in particular, the length of time that a key must be depressed before it generates repeat signals, and the rate at which a key will repeat). You can also control cursor blinks here.
-
Keyboard Shortcuts: This allows you to set the various keyboard shortcuts that you can use in the desktop (such as the Alt+F2 shortcut, which invokes the Run Program dialog box).
-
Login Photo: This allows you to select an image to be used instead of your name at the initial desktop GUI login screen. To see the effect of this, you also have to make changes in the configuration of the Gnome Desktop Manager (GDM) using the program gdmconfig . (In the General tab, you must change the local greeter to be the Standard Greeter rather than the default Graphical Greeter, and in the Standard Greeter tab, check the Show choosable user images checkbox.) The effect of these changes is visible the next time you start GDM. GDM is started at the beginning of each boot.
Note To be more accurate, GDM is started each time the run level 5 is entered ”run levels are further discussed later on in this chapter. You can change run levels to make GDM restart and show you the changes without rebooting. However, the standard greeting is not as attractive as the graphical login, which is endowed with the Bluecurve interface.
-
Menus & Toolbars: This allows you to specify the look of the menus and the button icons.
-
More Preferences: This icon opens up a dialog box with three suboptions:
-
CD Database: This suboption allows you to specify a CD database server for retrieving CD and track information when you play an audio CD in the computer.
-
Panel: This suboption configures the behavior of the panel in the desktop. You can opt to disable the animation of panels in the desktop or to change their animation speed.
-
Sessions: This suboption allows you to configure the behavior of the GNOME desktop for maintaining states between successive login sessions. The GNOME desktop can save the open applications and their current settings when you log out. When you log in later, these applications restart with their saved settings. Note that the feature of saving settings works only with applications that are compatible with the GNOME desktop environment.
-
-
Mouse: This allows you to control the mouse behavior in the desktop. You can change the mouse pointer, control its speed and double-click delay, and even set it for use for left-handed individuals, in which case the right and the left button functionalities are exchanged.
-
Network Proxy: For HTTP clients , this allows you to specify the HTTP proxy details and ( optionally ) the authentication information to use this proxy server.
-
Password: This allows the current user to change his or her login password. Note that you can also perform this action at the terminal using the passwd program.
-
Preferred applications: This suboption allows you to select preferred applications for opening Web pages and text documents. It also allows you to specify your default terminal emulator application (by default, you can set it to be gnome-terminal or xterm ).
Note The gnome-terminal is more feature-rich than xterm , but it s also heavy on memory requirements. When your system is low on RAM, it makes sense to use the xterm ”which has less memory overhead and also loads quickly. However, it can be beneficial to use gnome-terminal when you need multiple terminals. You can get multiple GNOME terminals with just a single launch of the gnome-terminal application, but for multiple xterm terminals you must run xterm once for each terminal.
-
Screensaver: This allows you to configure a screensaver for your desktop. You can set a single screensaver, set multiple screensavers, or disable the screensaver completely.
-
Sound: This allows you to associate sound events with desktop events, such as opening or closing of applications. By default, sound events are disabled. But if you enable them, you can set individual sound files to be played for each desktop event.
-
Theme: The GNOME desktop ships with the Red Hat Bluecurve theme. This dialog box enables you to change the theme of the desktop to others available in the menu. Many of these alternative themes are also very attractive and well worth a close look.
-
Window Focus: This option allows you to define the behavior for working with different windows in the desktop. You can opt to either click a window to work in it, or merely point the mouse pointer inside it to start working in the window.
EAN: 2147483647
Pages: 170