Shared Session State
Now that you better understand the problems associated with the .NET and Java platforms sharing session state, let's look at a sample implementation of a shared session. This sample illustrates how a stock portfolio (similar to the data types used in previous chapters) can be seamlessly passed between new session interfaces used by both ASP.NET and JSP.
The sample does require some installation and setup before proceeding. In addition to the prerequisites outlined in Chapter 1, this code relies on a local installation of Microsoft SQL Server 2000 and requires the Microsoft SQL Server Driver for JDBC to be installed. Installation of the JDBC driver was covered in Chapter 7.
The sample has three parts . First, a new database and series of tables are created in SQL Server. These tables are used to hold the session data that will be shared among the ASP.NET and JSP pages. Second, a new session API is installed for each platform. This new session API is used instead of the default to allow session objects to be written to the new database. Finally, an HTTP filter is used to create a registration process on each platform. This registration process joins an ASP.NET and JSP session running on a single machine, and it's used to correlate the shared session throughout the life cycle of the application.
Setting Up the Shared Session State Database
A precreated script is used to configure the new database that will run on SQL Server 2000. This scripts can be found in the C:\Interoperability\Samples\Advanced\Presentation\SQL directory.
To ensure that the sample runs correctly and to run this script, launch the Query Analyzer from the SQL Server Programs folder (Start\Programs\Microsoft SQL Server\Query Analyzer). Connect to the database by using either Windows Authentication or the sa password that you assigned when SQL Server was installed.
Open the script, dbscript.sql, in Query Analyzer, and press F5 (or select the Execute option from the Query menu) to run the script. This script will automatically create the database, tables, stored procedures, user accounts, and permissions required for the sample code to run correctly. Figure 12.4 shows the result.
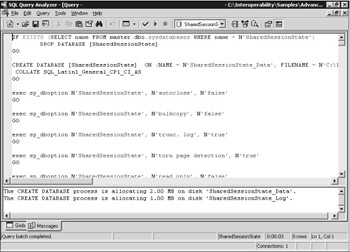
Figure 12.4: Using the Query Analyzer to configure the shared session state database.
This script creates a new database named SharedSessionState (which can be verified through SQL Server Enterprise Manager or the Query Analyzer tool). Upon successful creation of the database objects, the following message will be displayed in the Query Analyzer tool:
The CREATE DATABASE process is allocating 0.63 MB on disk 'SharedSessionState'. The CREATE DATABASE process is allocating 0.49 MB on disk 'SharedSessionState_log'. Granted database access to 'testuser'. 'testuser' added to role 'db_owner'.
This script also creates a new SQL Server login named testuser (if it doesn't already exist ”we used this same account in Chapter 7). The default password for this testuser account is StrongPassword . (The username and password can be easily modified if needed, but be sure to be consistent in both the SQL scripts and the sample code to prevent accidental logic errors.) This script will also assign the correct permissions to the newly created database so that the testuser account can correctly access the database.
This database is now set up and will act as the main repository for storing session information shared between the .NET and J2EE presentation tiers. You now need to install and configure the required components and sample code that will access this database. Before doing so, ensure that the MSSQLServer service is running and that the database can be accessed by using the testuser account. This can be done by closing and reopening Query Analyzer, logging in with the testuser credentials, and running SELECT statements against the SharedSessionState database. (For example, SELECT * FROM OBJECT should return zero rows.)
Installing the ASP.NET Sample Code
To install the sample code for ASP.NET, first navigate to the C:\Interoperability\Samples\Advanced\Presentation\dotNET directory. Within this directory are two subdirectories: Server and Web. The Server subdirectory contains the sample source code that will support a shared session. The Web subdirectory contains the source code for a test client. Despite their labels, the code in both subdirectories will run on the same machine in this sample.
Build the source in the Web subdirectory by typing nant at the command prompt. This will also build the source in the Server subdirectory. Once complete, you'll need a Microsoft Internet Information Services (IIS) virtual directory to host the pages. Launch the IIS Manager from Start/Programs/ Administrative Tools/Internet Information Services. Expand the Local Computer and Web Sites folder, and right-click the Default Web Site icon. Select the New/ Virtual Directory option from the submenu. Follow the Virtual Directory Creation Wizard to the second page, and enter SharedSessionStateClient as the alias for the Web site, as shown in Figure 12.5.
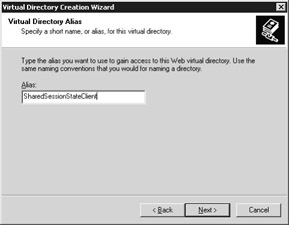
Figure 12.5: Creating a new virtual directory for the test client.
You must use this exact alias to ensure that the sample code works. Click the Next button to proceed. For the next step, enter (or use the Browse button to navigate to) the path of the virtual directory, C:\Interoperability\Samples\Advanced\Presentation\dotNET\Web , as shown in Figure 12.6.
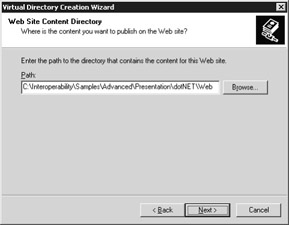
Figure 12.6: Specifying the directory for the shared session state test client.
Accept the defaults for the remainder of the wizard. The .NET implementation of the shared session code is complete, and a virtual directory now exists in IIS to host the test client. You now need to build and deploy the components that make up the Java side of the sample.
Installing the J2EE Sample Code
From the command prompt, navigate to the Java subdirectory (C:\Interoperability\Samples\Advanced\Presentation\Java). As with the .NET sample code, this directory contains a Server and a Web directory. These directories contain the source code for the shared session components and the Web sample application that will be used for the JSP and Servlet test client.
First, verify that JBoss is not running, and then, using Ant with the package target, build the sample code in the Web directory. Upon successful compilation, the same Ant script can be used to deploy the SharedSessionStateClient.war file to your local implementation of JBoss by using the deploy target. If you choose not to use JBoss, the Web Archive (WAR) file can be found in the Server\Deploy directory.
In addition to the sample code, a JDBC connection must be configured on the J2EE application server that will host the test JSP pages and Servlets. If you're using JBoss, you can automatically configure this by running the Ant script found in the C:\Interoperability\Samples\Advanced\Presentation\JBoss directory with the deploy target. This script copies a new MBean declaration (a JBoss managed bean) that configures JBoss to create a new JDBC connection. The script also ensures that the GLUE libraries are available in the lib directory of the JBoss installation.
If you're using an alternate J2EE Application Server, you'll need to consult the documentation that accompanies the product to set up this connection. The JDBC connection settings are shown in Table 12.1.
| Connection Setting | Value |
|---|---|
| JNDI name | java:/MSSQLSSDS |
| Connection URL | jdbc:microsoft:sqlserver://localhost:1433;DatabaseName= SharedSessionState |
| Driver class | com.microsoft.jdbc.sqlserver.SQLServerDriver |
| Username | testuser |
| Password | StrongPassword |
Once the sample code, JDBC connection files, and libraries have been deployed, you should start your application server. If your application server generates a series of error messages, you might need to undeploy applications from previous chapters and then relaunch the application server.
Now let's test the deployment.
Testing the Deployment
Once all the required components are deployed, you can test the installation of the shared session state example by navigating to the URL http://localhost:8080/SharedSessionStateClient/StockDisplay , which Figure 12.7 shows.
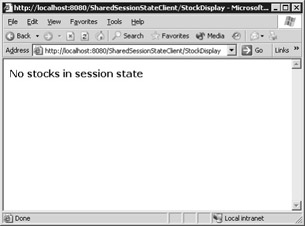
Figure 12.7: Viewing the Servlet standalone.
Calling this URL invokes a single Servlet named StockDisplay. When this Servlet executes, it reads two values from the session. The first value is a stock portfolio; the second value is an index to a single stock within the portfolio. When the Servlet is first run, neither of these values has been added to the session, so the page displays a "No stocks in session state" message.
To test the deployed shared session components, you can run this Servlet embedded within an ASP.NET page. To try this, in the same browser window, navigate to the URL http://localhost/SharedSessionStateClient/StockDisplay.aspx , shown in Figure 12.8.
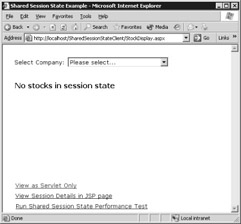
Figure 12.8: Viewing the Servlet, presented within an ASP.NET page.
The ASP.NET page shows a drop-down list of companies that can be selected. The component in the middle of the page should look familiar ”it's the Servlet that's running on the J2EE application server. An ASP.NET control known as an IFrame (think of this as a browser window within a browser) is used to display the Servlet within the Web page. Select one of the companies from the drop-down list. When a new selection occurs, the Servlet is updated based on the company that's written to shared session state.
As displayed in Figure 12.9, the Servlet shows some sample stock information for the Northwind Traders company (Last, Previous Close, Change, and so on). Try selecting other companies from the drop-down list to test some of the other values.
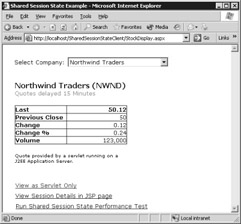
Figure 12.9: The Servlet displays additional information based on values in the shared session state for the Northwind Traders company.
Although on the surface this might seem like a simple example, the inner workings show shared session in action. When the ASP.NET page loads, the stock portfolio is written to shared session. As companies are selected from the drop-down list, an index value is written to the shared session, which is persisted in the database, and the page is reloaded. The Servlet that's presented through this ASP.NET page reads these values from the shared session to display the details of the selected stock (including performing a couple of simple calculations to show a change in stock price). Thus, the shared session state sample demonstrates the ability to read from and write to a session that can be shared among ASP.NET and JSP/Servlets.
To prove that the session remains with the Servlet outside the boundaries of the ASP.NET page, click the link that reads View As Servlet Only.
This link will display a Web page generated by the same Servlet that produced the Web page shown in Figure 12.7. However, the values in the session are no longer null; thus, the selected stock and its associated details are displayed by the Servlet, as shown in Figure 12.10.
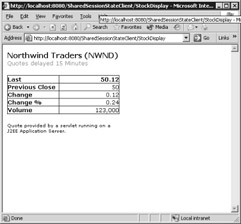
Figure 12.10: The Servlet running outside the ASP.NET page, but with the shared session context.
You can also interrogate the values stored in the shared session from within a JSP page. Return to the ASP.NET page (by pressing the Back button in the browser), and select the View Session Details In JSP Page option. A page similar to the one shown in Figure 12.11 will be displayed.
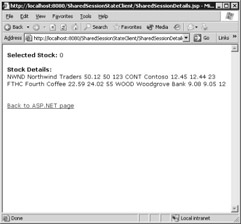
Figure 12.11: A JSP page that displays the values in shared session.
The JSP page displays the two objects stored in the shared session: the selected stock (this is a zero-based index) and the details of the stock portfolio that are held in the session.
What This Sample Shows
This example shows how you can store an object that can be shared among a number of JSP pages, Servlets, and ASP.NET pages. Using the serialization techniques described in Chapter 3 and the database access methods covered in Chapter 7, you can construct an object, store it in the shared session database, and update the object regardless of the platform that it's being accessed from.
To the user, this application looks as though it's being hosted using one platform only. However, the contents of the page actually originate from two platforms. The user shouldn't be aware that the page he's viewing is hosted by ASP.NET and has an IFrame that embeds a Servlet running on a different platform ” potentially a different server. Nor should he be aware that the two platforms have the ability to read objects from and write objects to a shared session. This seamlessness is also aided if the new ASP.NET pages have been created with a similar look and feel.
The sample stock object shown in this section is merely an extension of the samples used in the previous chapters. The object could also be a shopping cart (allowing pages of an online store to be split between a J2EE and an ASP.NET solution), authentication credentials (allowing a user to log on to one platform and be authenticated when accessing pages on the next), or any other scenario in which presentation resources are spread across two distinct platforms but deliver a single user experience.
The advantages of this seamless user experience are also clear when dealing with a migration scenario. Suppose that an organization is migrating a J2EE- based application involving a large number of JSP pages to ASP.NET. This might be a full migration over an extended period of time or just a pilot for adopting ASP.NET for a particular business use case. Either way, the use of a shared session allows the ASP.NET tier to be "phased in" over a period of time. It might not be feasible to convert all the JSP pages to ASP.NET at once. (When you perform such a sweeping conversion, you might only be able to convert a few JSP pages at a time.) If the pages that are migrated need to access session state from the existing platform, using a shared session design similar to the one in this section's sample might be an approach you'll benefit from.
Viewing the Data Stored in SQL
To see the type of data being written to the database, you can use the SQL Server Query Analyzer to issue ISQL commands in order to view the tables that have been set up. This is the same tool that was used to run the scripts and configure the database.
After the test client has been run, you can use the analyzer tool to issue commands that will show the type of data being stored. Select the SharedSessionState database (from the drop-down list in the toolbar) and issue the following SQL command:
SELECT * FROM REGISTRATION
The output, shown in Figure 12.12, lists the number of registrations within the shared session database. (Your identification values will be different, but the overall format is the same.) At this point, you have only one registered session state. The table shows a unique ID that's been created for the shared session, the ASPID (the base Session ID that ASP.NET uses), the JSPID (the base Session ID that JSP uses), and the time that this session was last modified.
Figure 12.12: Output from SELECT * FROM REGISTRATION .
To see what objects are associated with that session, you can perform the following SQL command:
SELECT * FROM OBJECT_LOOKUP
Figure 12.13 shows the registration-to-object relationships within the database. (Again, your ID values will be different.) Each entry in this table has a REGISTRATIONID and an OBJECTID to correlate the two.
Figure 12.13: Output from SELECT * FROM OBJECT_LOOKUP .
Finally, you can perform a lookup on the objects themselves by running a query against the OBJECT table:
SELECT * FROM OBJECT
In Figure 12.14, you can see the OBJECTID , the OBJECTKEY (the key that the object is referred to by either platform), the OBJECT itself (either a String value or the XML representation of the object after serialization), and the TYPE . The TYPE isn't used specifically by the sample code, but it's useful for extending the example to handle multiple types of objects.
Figure 12.14: Output from SELECT * FROM OBJECT .
How the Sample Works
By now, you should have a good idea of how the sample runs and the type of data that's being stored underneath it. As mentioned at the start of this section, there are typically three steps for designing and creating a system that demonstrates shared session state between the .NET and J2EE platforms:
-
Deciding where the shared data will live and how it will be managed
-
Creating a shared session interface for ASP.NET and JSP/Servlets to access
-
Creating a registration process for new shared sessions
Let's look at how these three steps are applied in the sample code.
Deciding Where to Store the Shared Session Data
As mentioned, both the .NET and J2EE platforms have a proprietary API for storing session state. Therefore, creating a system to read the existing session state each individual platform stores would be very difficult, if not impossible . You'd have to build interfaces to access the proprietary store and possibly versions of the code to run on each and every J2EE application server vendor. Thus, we have to concede that any session store that will allow session objects from .NET and J2EE to be persisted must be a custom implementation.
As you saw when setting up the sample code, a Microsoft SQL Server database is used as the store for all the shared session records. To enable this, a shared database was created that could be accessed by both the .NET and J2EE components. To facilitate this, we used a Data Access Object (DAO) pattern similar to the one shown in Chapter 7.
To store the session, the sample code uses three database tables and a number of stored procedures. Using a database to store a session isn't mandatory for enabling a solution to share sessions in this way ”you could easily use another type of service. But using a database will help us utilize some of the concepts highlighted in earlier chapters of the book and will provide a manageable store for the session information. The database schema used is shown in Figure 12.15.

Figure 12.15: Database schema used for the shared session state database table.
The schema is quite simple. The REGISTRATION table is used to correlate different Session IDs from JSP and ASP.NET. A unique identifier is given for each pair, and a timestamp indicating the last time the record was accessed is also created for each record.
| Note | A timestamp allows you to do some housekeeping for shared sessions that are no longer in use. One of the problems with sessions from browsers is that an application rarely knows when it has ended. (This problem affects both regular sessions and our shared session model.) Web sites might present users with a "logout" option, but frequently it's much more convenient (and therefore more likely) for users to just close the browser. The problem is that when a browser is closed, there's no way to notify the session that it has terminated . Because browsers are linked with these stateful sessions, you have to take a housekeeping approach and clean up unused sessions after a period of time. This section's example code keeps the timestamp up to date when objects are added or modified. This allows you to create housekeeping functionality at a later point in time. |
Each shared session registration can store a number of objects. To facilitate a one-to-many relationship (one shared session to many objects stored within that session), a lookup table named OBJECT_LOOKUP is used. The lookup table maps registrations with objects in the OBJECT table. The objects that are stored here contain an object key, a value, and a type. The key is used the same way as it is in a regular session: as an index to uniquely identify objects stored per session. The value is a string type and is used to store the serialized XML representation of the object. The type is a placeholder for storing the type of the object that has been serialized to the table.
In addition to this database schema, a number of stored procedures have been created:
-
Sp_CreateNewRegistration Creates a new registration for a shared session.
-
Sp_DeleteRegistration Deletes a registration (shared session) along with any associated objects.
-
Sp_AddObject Adds an object to shared session state. Also replaces an object in session state if an object with the same key exists.
-
Sp_GetObject Retrieves an object from shared session state.
-
Sp_DeleteObject Deletes an object from a registered session.
-
Sp_DeleteObjects Deletes all objects from a registered session.
-
Sp_GetRegistrationFromASP Returns the registration ID based on a passed ASP.NET Session ID.
-
Sp_GetRegistrationFromJSP Returns the registration ID based on a passed JSP Session ID.
-
Sp_UpdateTimestamp Used to update the timestamp for a registration when an object is added, modified, or removed.
The sample code uses stored procedures rather than using dynamic SQL (a number of SQL calls made from the middle tier to perform the same operation). By using stored procedures, we avoid having to write the database function code twice ”once for each platform. To access these SQL stored procedures, two DAOs are used: one that uses ADO.NET, and one that uses the Microsoft SQL Server 2000 Driver for JDBC. These DAOs are respectively located in the DAO.cs and DAO.java files, found in the Server directories in the sample code. The connection strings for the DAOs are held in the web.config file for the ASP.NET implementation and in the JDBC connection properties (sharedsessiondb-service.xml in JBoss) for the J2EE implementation.
Creating a Shared Session API for ASP.NET and JSP/Servlets
Once the database is configured, the second task in creating the shared session sample is to create a shared session API for both ASP.NET and JSP/Servlets. This is an API for each of the presentation tiers that allows the two platforms to add and retrieve session objects from the database, as shown in Figure 12.16.
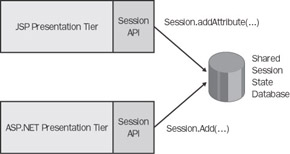
Figure 12.16: Using a shared session API for both the JSP and ASP.NET presentation tiers.
If you examine the native session components in both .NET and J2EE, you'll see that the two platforms handle their respective implementations of sessions by using a Session object. For example, to add an object using a regular session in ASP.NET, the following commands are used:
String tickerObject = "NWND"; Session.Add("ticker",tickerObject); You can then refer to the saved Session object later in the same session by indexing it with the key that was used:
String ticker = (String)Session["ticker"];
Notice how the Session object returns types of value System.Object . To reconstruct the original value, you need to cast the Session object to the same type that it was saved to.
If you now look at the Session object used within J2EE (as part of the javax.servlet.http package in the Servlet API), you'll see that it works in a similar way to the .NET Session object. To add an object using the Servlet API, you can use this code:
String tickerObject = "NWND"; Session.setAttribute("ticker",tickerObject); To refer to the saved object later in the session, use the getAttribute method in this way:
String ticker = (String)Session.getAttribute("ticker"); The sample code in this chapter loosely follows the functionality of these two APIs, creating a shared session object that can be used for data that needs to be accessed on both platforms. Because we've created similar functionality, you have the option ”without having to make significant modifications to the majority of the method calls ”of writing either to the native session state or to the custom shared implementation. This approach can also help when switching from existing implementations that use a regular session to this shared session concept.
The shared session API defines two new session objects that follow the functionality of the APIs described a moment ago. The two objects, SharedSessionState.SharedSession (for the ASP.NET tier) and com.microsoft.samples.SharedSession (for the JSP tier), can be found in the respective Server directories in the sample code.
Taking a closer look at these objects, you can see how they work. The SharedSession object for .NET declares two private variables . One is used to store the existing ASP.NET Session ID (used to pass to the database) and the implementation of the DAO itself. This code can be found in the SharedSession.cs (for ASP.NET) and SharedSession.java (for JSP) source files.
private String aspSessionID; private DAO _dao = new DAO(); public SharedSession(String SessionID) { aspSessionID = SessionID; } When the shared session interface is initialized , it's passed the Session ID for the existing ASP.NET session. The interface implements a subset of the methods typically found in the standard Session object. For this sample, we implement Add , Remove , Clear , Abandon , SessionID , and an index. These methods work by calling the respective DAO function calls, thereby passing the value of the current ASP.NET session:
public void Add(String name, String value) { dao.AddObject(aspSessionID,name,value,"String"); } public String this[String name] { get { return _dao.GetObjectXML(aspSessionID,name); } set { dao.AddObject(aspSessionID,name,value,"String"); } } public void Remove(String name) { dao.DeleteObject(aspSessionID,name); } public void Abandon() { dao.DeleteRegistration(aspSessionID); } public void Clear() { dao.DeleteObjects(aspSessionID); } public String SessionID { get { return _dao.GetRegistrationID(aspSessionID); } } Calling the shared session API from ASP.NET
The Java class also contains a similar set of methods. You call this shared session API slightly differently, depending on whether you're using ASP.NET, a Servlet, or a JSP.
To enable an ASP.NET page to use the SharedSession object, the following line of code is inserted as a local declaration for each page or control that requires use of the shared session:
using SharedSessionState; ... protected SharedSession SSession = new SharedSession(Session.SessionID);
In this declaration, you pass the existing Session.SessionID (from the original session that was created by ASP.NET) so that you can reference it against the database. To call the SharedSession object, the new SSession is then used:
SSession.Add("SelectedStock","2"); Calling the shared session API from a Servlet
The Servlet implementation of the shared session API is very similar to the ASP.NET call. Again, a reference to the SharedSession object is created by using the following statements:
import com.microsoft.samples.SharedSession; ... SharedSession SSession = new SharedSession(req.getSession().getId());
The shared session API again uses the SSession object, but this time, commands similar to the original Java HttpSession object are used to read and write values:
SSession.setAttribute("SelectedStock","3"); Calling the shared session API from a JSP
Unlike Servlets, JSP pages by default automatically define an object that implements the HttpSession interface (named session ) that can be called in a JSP scriptlet or scripting expression in any part of the page. This is demonstrated in the following command, where the default session object is automatically made available within a JSP scriptlet:
<% String value = session.getAttribute("myStocks"); %> Our shared session state model, however, no longer needs the default session object (because we want our objects to be read from and written to the shared session store). To create an alternate reference to the shared session store, use the following declaration at the top of a JSP:
<%@ page session="false" import="com.microsoft.samples" %> <% SharedSession session = new SharedSession(request.getSession().getId());%>
First the code instructs the JSP container to not provide support for the standard HTTP sessions, thereby preventing the inclusion of the default session object by setting the page directive's session attribute to false . Next the code defines a new session object for the shared store. Other calls within the JSP page use a similar set of calls to the original. For example:
<% out.write((String)session.getAttribute("selectedStock")); %> The three methods just discussed showed you how the shared session API can be accessed from each of the presentation tiers. A final step remains to complete the shared session implementation. We need a process that "links" the ASP.NET session to the JSP session on an individual machine. The two presentation tiers need to know that both the ASP.NET and JSP sessions for a particular individual user are related ”and cross-referenced ”in order to pass objects by using the tables in the shared session database.
Creating a Registration Process
As discussed, each of the presentation tier implementations uses its own cookie or method to track the active session for each platform. This is fine for the individual platforms themselves, but we face a challenge when we need to synchronize these two approaches to create a shared session. For example, when I open a regular ASP.NET page, a new Session ID is created and stored as a nonpersistent cookie in the browser. Suppose I then navigate to a second page that's on a J2EE system. As I open this page, a new session is also created for me (this time a JSP Session ID). Again, this Session ID is stored on my machine in the form of a cookie, albeit a new and different cookie.
So how do we synchronize these sessions to create a single shared session? And how do we synchronize these two values with the shared session store in SQL Server? How does the system know that the ASP.NET page I called first needs to share session data with the JSP page I plan to call directly after it, or vice versa?
One option might be to look at the IP address of the calling machine: if the IP address matches for subsequent requests , you could associate the address with a shared session state. One problem with this approach is that some firewalls and proxy servers mask the IP address of clients , especially when using Network Address Translation (NAT). On the Internet, certain ISPs use this masking to hide the IP address of their dial-up clients. Therefore, all connections coming from a certain ISP might appear to come from a single IP address, which would invalidate this approach. The alternative demonstrated in the sample code is to use a registration process.
When you use a registration process, a call is made to the ASP.NET page, as shown in Figure 12.17. A filter (known in .NET as an HttpModule ) is installed as part of the sample and intercepts the call.
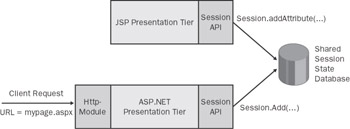
Figure 12.17: Incoming HTTP page request for the ASP.NET presentation tier.
The filter determines whether the call is a new ASP.NET session from the client. (You can find this out by looking at the real session object, which you still have access to.) The filter also determines that the user has requested mypage.aspx. If the call is a new session, the ASP.NET Session ID is retrieved from the ASP.NET page and a browser redirect to a nominated page on the J2EE server is performed. As part of the HTTP redirect, both the Session ID from the ASP.NET page and the URL of the original page that the user wanted to access are passed along as new request parameters. An example URL might be:
http://localhost:8080/SharedSessionStateClient/Register.jsp?aspid=1234&redir=
http://localhost/SharedSessionStateClient/StockDisplay.aspx
This URL refers to a registration process on the JSP tier to perform a registration. It also passes the Session ID from the ASP.NET page and the page you should be redirected to once registration is complete. The call is then made to the Register.jsp page. A second filter (of type javax.servlet.http.Filter , this time on the J2EE server) intercepts the redirected call, as shown in Figure 12.18.
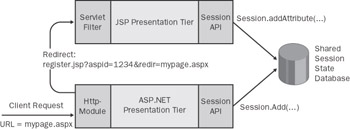
Figure 12.18: Incoming request is redirected to a registration JSP.
This filter determines that a registration request has been made from the ASP.NET page, collects the Session ID from the JSP session, and registers both the ASP.NET Session ID and the JSP Session ID with the shared session database. Figure 12.19 illustrates this.
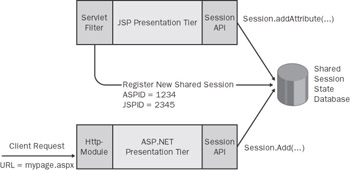
Figure 12.19: Intercepting Servlet filter creates a new session in the shared session database.
The browser is then redirected to the original ASP.NET page, and the original page is loaded for the user, as Figure 12.20 shows.
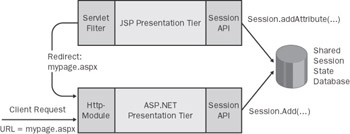
Figure 12.20: After registration, request is redirected to the original page.
Once this registration process is complete, subsequent calls to any of the presentation tiers (from the same browser session) are passed through without redirection, as shown in Figure 12.21. The shared session API uses the Session ID provided by the platform to cross-reference against the entry in the database.
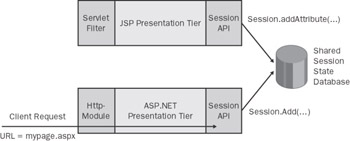
Figure 12.21: Once a shared session has been created, other requests are treated normally.
Such redirection clearly causes a performance hit. However, this redirection needs to happen only the first time a shared session is created. Regardless of which platform is used, future requests within the same session are passed with negligible performance impact.
This procedure also works in reverse. If the client first calls the presentation tier on the JSP server, a new JSP session state will be detected and a redirect to the ASP.NET page will be made, as highlighted in Figure 12.22. However, this redirect is made only if a shared session hasn't already been established.
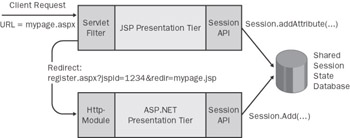
Figure 12.22: The registration process in the opposite direction.
The code for this redirection is implemented in SharedSessionFilter.cs on the ASP.NET tier and in SharedSessionFilter.java on the JSP tier. Both of the components work by matching the incoming URL to a registration page that must be present on both tiers. (For our sample code, this is Register.aspx on ASP.NET and Register.jsp for JSP.) The ASP.NET filter is configured via the web.config file, and the Servlet filter is configured by editing the J2EE deployment descriptor (web.xml). In the web.config file, which is located under the Web directory in the .NET sample, you can see the required declaration to load the HttpModule :
<httpModules> <add type ="SharedSessionState.SharedSessionFilter,SharedSessionState" name="SharedSessionState" /> </httpModules>
In addition, application keys have been added to configure the redirection to the J2EE tier:
<appSettings> <add key="IncomingRegistrationURL" value="/SharedSessionStateClient/Register.aspx"/> <add key="RedirectToURL" value= "http://localhost:8080/SharedSessionStateClient/Register.jsp"/> </appSettings>
The filter uses the IncomingRegistrationURL key to determine that requests sent to the Register.aspx page are redirection requests from the J2EE tier. The filter will intercept these requests, examine the URL (because it contains the JSP Session ID and redirect data), and take appropriate action to register the shared session. The RedirectToURL key is used by the filter to determine the URL to redirect to if a regular request for a Web page is received but a shared session currently isn't established. Notice that the http://localhost:8080 portion of the URL identifies the J2EE server running at this location.
The implementation for the J2EE version of the SharedSessionStateFilter works in a similar manner. The J2EE deployment descriptor, web.xml, contains the reference and parameters needed to perform the same operations in reverse:
<filter> <filter-name>Shared Session Filter</filter-name> <filter-class> com.microsoft.samples.SharedSessionFilter </filter-class> <init-param> <param-name>IncomingRegistrationURL</param-name> <param-value> /SharedSessionStateClient/Register.jsp </param-value> </init-param> <init-param> <param-name>RedirectToURL</param-name> <param-value> http://localhost/SharedSessionStateClient/Register.aspx </param-value> </init-param> </filter>
As seen in this deployment descriptor, corresponding IncomingRegistrationURL and RedirectToURL parameters are supplied.
Interoperability Performance Test ”Shared Session State
I've included a performance test for the shared session state sample code. The purpose of the test is show the time difference between writing to a regular session and writing to this chapter's custom shared session solution. (For the custom shared session solution, I have included two tests: a serialized and a nonserialized version.)
To run the performance test, click the Run Shared Session State Performance Test link toward the bottom of the StockDisplay.aspx page. This will take you to the performance test screen, shown in Figure 12.23.
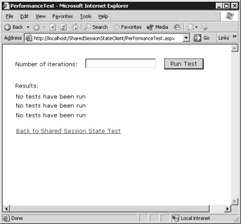
Figure 12.23: Running the shared session state performance test.
The test works by writing a stock portfolio to the platform-specific session and writing the same information to the new shared session. Running the test a number of times ensures a more accurate result. The test records show the time taken to read and write an object a number of times. When I ran the tests on my machine, I saw that serialization didn't seem to add that much time (maybe around 3 milliseconds [ms], which is in line with earlier test results in the book).
One thing that did stand out was the difference between writing to a regular session in ASP.NET and writing to the shared database implementation. Even when ASP.NET was configured to store its regular session information in SQL, it was still outperforming my sample solution by around 5 ms per call. My sample database code for persisting session information certainly wasn't written with optimization in mind, which brings up a valid point: when designing solutions that involve moving from a native platform technology to something that's more custom (to achieve interoperability), you must take into account the effort typically made to optimize and tune the native implementation. For any custom implementation to work well in production, a similar level of care must be taken to achieve the same results as the native implementation.
That said, you might find the results yielded by this example satisfactory for many applications. Despite the difference between the custom shared session solution and a native implementation, we've created a solution with an overhead of only a few milliseconds that enables interoperability at the presentation tier.
EAN: 2147483647
Pages: 132