Introduction to JMS
One of the first things to understand about Java Messaging Service, or JMS, is that it's a specification ”not a product. When laterally comparing the message queue products from various platforms, this is easily forgotten. Sun Microsystems defines the JMS specification and API as part of the J2EE specification ( http://java.sun.com/products/jms/index.html ), but it's left to third-party vendors to actually provide the implementation.
The first draft of the JMS specification was released in 1998 and was intended to unify all the message queue vendors at that time, who were starting to introduce their own Java libraries to the market. The goal of the JMS specification was to ensure a standard, programmatic interface for messaging.
Many message queue vendors (those with a Java background) write JMS providers for their products. By doing so, they provide the "glue" between the JMS API and the message queue product itself. For example, IBM's model looks similar to Figure 9.13.

Figure 9.13: A typical JMS model showing the specification and vendor integration.
The theory is that the JMS API can be used to switch vendors and provide portability, although the specification doesn't dictate this.
JMS Message Types and Concepts
JMS defines two types of messaging concepts: queue-based messaging and publish/subscribe. Queue-based messaging is where the JMS sender and receiver both agree on a predefined queue. A JMS object of type javax.jms.Queue is used to define a preexisting queue that's used to handle asynchronous messages. For example, a client will send a message to Queue1 and a receiver will receive the message from the same queue. This is very similar to the MSMQ model you saw in Chapter 8, "Asynchronous Interoperability, Part 1: Introduction and MSMQ."
Publish/subscribe (also known as pub/sub, as noted earlier) is a slightly different model. Here, queues are categorized as topics ( javax.jms.Topic is used). An application using JMS either can be a publisher or subscriber to a particular topic. As a publisher, the application is responsible for publishing new messages to the topic. A subscriber receives these messages if it is subscribed to that particular topic. Multiple subscribers can receive the same message for each topic, and options defined within the JMS specification control how durable the message is (whether the message is available after the time of publication).
Most message queue vendors that support pub/sub control the management of topics automatically. Because topics can be created and modified dynamically by clients , a fixed queue or service isn't always possible. The MA0C publish/subscribe SupportPac used by WebSphere MQ takes control of topic management by using predefined system queues and channels.
JMS supports five types of messages:
-
javax.jms.TextMessage Used for simple string messages.
-
javax.jms.BytesMessage Used for sending raw bytes as messages.
-
javax.jms.ObjectMessage Used to send a serializable Java object as a message.
-
javax.jms.MapMessage Used to send a message that can support name /value pairs (similar to a hash table).
-
javax.jms.StreamMessage Used to support the same types as MapMessage , but where the contents of the message need to be sent in order.
All of these message types implement the javax.jms.Message interface. We'll look at MapMessage and BytesMessage in more detail in the samples in this section.
| More Info | For additional information and research on JMS, you'll find a wealth of books and resources on the topic. For an enterprise perspective, I recommend Shaun Terry's Enterprise JMS Programming (John Wiley & Sons, 2002). |
JMS, WebSphere MQ, and Interoperability
Although not mandatory, the JMS specification ”and resources authoritative on the topic ”recommend using the Java Naming and Directory Interface (JNDI) to register objects in JMS. Accessing WebSphere MQ queues and topics by using JMS requires a registration process to create references to these objects in JNDI. Client access via JMS in the samples presented in this section must be performed by looking at queues and topics that are registered using JNDI. Figure 9.14 illustrates this.

Figure 9.14: Setup required for the sample code to show a JMS client accessing WebSphere MQ.
As shown in Figure 9.14, an instance of JNDI must be available to register the WebSphere MQ queues and topics and to provide lookup capability for clients that want to access these resources. This setup tends be unique for each type of J2EE application server.
This chapter and its samples will show how this can be achieved by using JBoss 3.0.7. All the samples that use JBoss assume that the application server is installed locally, to a directory of C:\JBoss. If this isn't the case, you can modify the jboss.properties and ejbdeploy.properties files in the C:\Interoperability\Samples\Config directory to suit your own environment.
Using JMSAdmin to Configure JNDI
To start configuring the JNDI context shown in Figure 9.14, we'll look at a tool named JMSAdmin. JMSAdmin is supplied with WebSphere MQ and enables the registration of WebSphere MQ “specific objects (for example, queues, topics, and factories) in a JNDI instance. The JMSAdmin tool can be found in the C:\Program Files\IBM\Websphere MQ\Java\bin directory ( assuming defaults were accepted during installation).
To connect to an application server, the tool uses settings that are stored in a configuration file in this directory, named JMSAdmin.config. This file specifies how the tool should connect, libraries that are required for connection, security information, and other details. To aid deploying to an instance of JBoss 3.0.7, a preconfigured Ant script has been supplied, which overwrites the default configuration with settings explicit to JBoss. This script (with some other supporting files) can be found in the C:\Interoperability\Samples\Resource\WMQ\Scripts directory. Run the provided Ant script with the deploy target from this directory. This will copy these files to the appropriate WebSphere MQ directory.
To access the application server, the JMSAdmin tool will use the following settings in the JMSAdmin.config file:
INITIAL_CONTEXT_FACTORY: org.jnp.interfaces.NamingContextFactory PROVIDER_URL: jnp://localhost:1099
These provide an initial context factory, which can be used to allow the JNDI tree to be traversed. If the JBoss implementation is on a different machine than the instance of WebSphere MQ, you'll need to change the PROVIDER_URL to reflect the relevant location.
You'll configure the JMS entries in JNDI by using a script. This will ensure accuracy for the remaining samples in this section and prevent a lot of retyping. This script is copied to the C:\Program Files\IBM\WebSphere MQ\Java\bin directory as part of the previous Ant deployment and is named JMSScript.txt. Open this file in Microsoft Notepad or another text editor.
This script defines a number of objects that will be created in JMS. These objects will be used by the JMS sample code in the remainder of this chapter. Moving through the file, the following is defined:
DEFINE QCF(StockQCF) QMGR(STQM) TRAN(CLIENT) HOST(LOCALHOST) PORT(1414) DEFINE TCF(StockTCF) QMGR(STQM) TRAN(CLIENT) HOST(LOCALHOST) PORT(1414)
QCF stands for QueueConnectionFactory . The QCF object in this script will link an instance of javax.jms.QueueConnectionFactory with the instance of the queue manager in WebSphere MQ. TCF stands for TopicConnectionFactory and will do the same for a pub/sub model. If you're running JBoss on a different machine to WebSphere MQ, you'll need to replace the HOST value with the name of the machine running WebSphere MQ.
After the QCF and TCF have been defined, the context is changed into a JNDI directory named queue . (This is where JBoss stores references to queues.) Within the script, you create two new queues. (These are queue objects within JMS that will point to the queues that you previously created in the WebSphere MQ administration console.)
CHANGE CTX(queue) DEFINE Q(StockPurchasesQueue) QMGR(STQM) QUEUE(LOCAL.STOCKPURCHASES) DEFINE Q(StockSalesQueue) QMGR(STQM) QUEUE(LOCAL.STOCKSALES)
Notice how the QMGR and QUEUE properties of the definition match the details on the WebSphere MQ implementation. Next , two topics are defined in a JNDI directory named topic. The two topics are HotStocks and NotSoHotStocks ” think of these as news feeds based on the recommendations example you've seen throughout the book. Once these are defined, the script ends.
CHANGE CTX(=UP) CHANGE CTX(topic) DEFINE T(HotStocks) DEFINE T(NotSoHotStocks) END
Before running the JMSAdmin tool, ensure that jnpserver.jar, jboss-common.jar, and log4j.jar are in the CLASSPATH . To aid this, a batch file named setenv .bat can be run. This file was copied to the WebSphere MQ directory when the Ant script was previously run with the deploy target. You might need to edit this batch file to reflect settings suitable for your environment.
Start the JBoss server and run the JMSAdmin tool, passing the script file as a parameter. The following command should be run:
jmsadmin t v < jmsscript.txt
This will take the line entries in the script and create the required JMS objects in JNDI. The JMSAdmin tool won't display these commands as it processes them. If you're not using JBoss, you might have to adjust the JMS script to include the creation of queue and topic contexts. These are noted as comments in the JMSScript.txt file, but you should also consult the documentation for your application server.
JNDI is now configured with JMS-aware objects that reference our implementation of WebSphere MQ.
| |
When using the JMSAdmin script, be aware of the persistence of the objects that are created. By default, using org.jnp.interfaces.NamingContextFactory generates "administered" objects in JMS. This means that when the JBoss server is restarted, this information is lost and the script has to be rerun. This can be useful in a test environment, where different permutations of queues and topics are being used, but it's not suitable for more stable environments.
All the sample code used in this chapter will use this nonpersistent mode. One option for making this code persistent is to use Sun's File System context service provider classes ( com.sun.jndi.fscontext.RefFSContextFactory ). To use these classes with the chapter's samples, uncomment the relevant lines within the jmsadmin.config file, rerun the jmsadmin script, and in the sample code, adjust the InitialContext calls to use this provider library and URL instead. I recommend following all the examples through once before making any persistent changes to JNDI stores.
| |
Using JMS to Access WebSphere MQ Queues
With JNDI configured, let's look at some sample client code that uses the JMS libraries to access WebSphere MQ. The sample code can be found in the C:\Interoperability\Samples\Resource\WMQ\JMS\Queue directory. The client (Client.java) works by first importing the required JMS and JNDI libraries:
import javax.jms.*; import javax.naming.Context; import javax.naming.InitialContext; import javax.naming.NamingException;
The first thing for the main method is to create the context for JNDI, which is done with the following code:
Hashtable ht = new Hashtable(); ht.put(Context.INITIAL_CONTEXT_FACTORY, "org.jnp.interfaces.NamingContextFactory"); ht.put(Context.PROVIDER_URL,"jnp://localhost:1099"); Context context = new InitialContext(ht);
Notice how the INITIAL_CONTEXT_FACTORY and PROVIDER_URL settings match the library and URL used by the JMSAdmin tool. To start using the defined queues, you must first access the QueueConnectionFactory . This was one of the first items created by our JMSAdmin script.
QueueConnectionFactory qcf = (QueueConnectionFactory)context.lookup("StockQCF"); QueueConnection qc = qcf.createQueueConnection(); QueueSession qs = qc.createQueueSession(false,Session.AUTO_ACKNOWLEDGE); After this, define the two queues that you'll use in the sample. Both the purchases and sales queues are prefixed with the JNDI queue path that was defined earlier.
Queue purchasesQ = (Queue)context.lookup("queue/StockPurchasesQueue"); Queue salesQ = (Queue)context.lookup("queue/StockSalesQueue"); To send a message, create a sender from the QueueSession , create the message to be sent, and call the send method. Notice that you're creating a message of type javax.jms.MapMessage .
QueueSender sender = qs.createSender(purchasesQ); sender.setDeliveryMode(DeliveryMode.PERSISTENT); MapMessage msg = qs.createMapMessage(); msg.setString("Body","This is a test JMS Stock purchase"); sender.send(msg); To receive incoming messages, you perform a similar process, but you use a QueueReceiver . A new QueueReceiver is created that points to the sales queue object in JNDI. You then use the receive method to collect the first message from the queue, waiting for 10 seconds before timing out.
QueueReceiver receiver = qs.createReceiver(salesQ); qc.start(); // required for receiving messages try { //wait for 10 secs, blocking thread Message incomingMsg = (Message)receiver.receive(10000); if (incomingMsg instanceof MapMessage) { System.out.println("JMS Map Message received: Body=" +((MapMessage)incomingMsg).getString("Body")); } If a message is available on the queue and is of type MapMessage , it's retrieved and the Body string of the message is displayed.
Ensure that the purchases and sales queues are clear of messages by using the WebSphere Explorer administration tool. Build and run the code using the provided Ant script. (You'll return to the rest of the code sample soon.) The JMS sample will place a JMS MapMessage on the queue, wait for 10 seconds, and then time out (because there's no message waiting to be collected):
Sending a test message to the stock purchase queue. Complete
From within the WebSphere MQ Explorer administration console, open the message that has been placed on the queue. You can see the contents of the JMS message by selecting the Data tab in the message itself, as shown in Figure 9.15. You have some header information, followed by a JMS message, the elements of which are described in XML. The elements of the MapMessage will follow this JMS header.
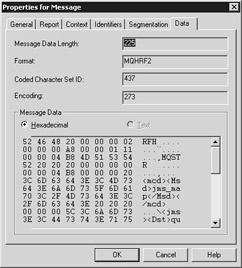
Figure 9.15: A JMS message, as shown in WebSphere MQ Explorer.
Given that you can now send JMS messages to WebSphere MQ, how feasible is it to interoperate with the WebSphere MQ classes for .NET?
Using the MA7P to Send a Message to a JMS Listener
As we've discussed, the JMS libraries aren't supported by or provided for .NET. However, as you saw earlier, you can still use the MA7P SupportPac to send and receive messages via a queue. With a little work on the Java client, you can determine this message type, and based upon that message type, you can take an alternate course of action for messages from .NET clients.
Reopen the sample code in the C:\Interoperability\Samples\Resource\WMQ\Simple\dotNET\Client directory. This sample showed using the IBM WebSphere MQ classes for .NET to access the queue. Run the sample code. You should observe output similar to the following. First of all, the client writes a message to the sales queue, which is successful.
Test message has been placed on the sales queue.
Next, the MA7P client tries to read the JMS message as a series of bytes. (Recall how the WebSphere MQ libraries treated each message as a stream of bytes.) Although the output contains the valid data of the JMS message, the .NET client can do very little with this. The .NET client doesn't have an understanding of the JMS schema or header in order to process the message in full.
Message: (leading binary characters) <mcd><Msd>jms_map</Msd></mcd> \ <jms> <Dst>queue://STQM/LOCAL.STOCKPURCHASES</Dst> <Tms>1049751767987</Tms> <Dlv>2</Dlv> </jms> <map><Body>This is a test JMS Stock purchase</Body></map>
Now return to the Java client in the C:\Interoperability\Samples\Resource\WMQ\JMS\Queue directory. Rerun the sample code from here using the Ant script. You'll observe that a JMS message is again placed on the purchase queue, but this time, the .NET message that's been waiting on the sales queue is picked up. The client reports the following:
Bytes Message received. Message details: JMS Message class: jms_bytes JMSType: null JMS_IBM_PutDate:20030407 Integer encoding: 2, Floating point encoding 512 54686973206973206120746573742073616c6521 Message = This is a test sale! Complete
The Java JMS client has successfully picked up the message from the .NET client by using the MA7P SupportPac. If you examine the second half of the Java client code, you can see how this works. The incoming message is received using the receive method from the receiver object:
Message incomingMsg = (Message)receiver.receive(10000);
After a message has been detected , a test is performed to see what type of message you're dealing with. Here, you test for MapMessage (which is the JMS map message you've been dealing with) and a BytesMessage :
if (incomingMsg instanceof MapMessage) {. . .} if (incomingMsg instanceof BytesMessage) {. . .} Using this test, you can see whether the incoming message has been generated by a regular JMS client or by a client using the IBM WebSphere MQ libraries (including the .NET libraries). If BytesMessage objects are also being sent by JMS clients in the enterprise, you can test some of the properties of the message to determine its origin.
So what does this all mean? Using what you've learned in the previous sample, clients in .NET can send messages to clients using JMS. Although this could be useful in a number of cases, it doesn't guarantee interoperability between the two platforms. In essence, I've found the following to be true: Using the methods described earlier, JMS clients can receive messages from the .NET client, providing that the message is cast to a javax.jms.BytesMessage . However, this doesn't work the other way. If a JMS client writes a message (of type javax.jms.BytesMessage or any other JMS type) to the queue without recognizing and decoupling the JMS header, it's still very difficult to read the message using the .NET client.
Using JMS Pub/Sub to Access WebSphere MQ Topics
Unfortunately, other aspects of JMS also provide for interoperability problems with .NET. One such aspect is using publish/subscribe (pub/sub) features. As you saw earlier, JMS supports a feature known as pub/sub, which enables clients, applications, and services to register to either publish or subscribe to a number of topics. For example, a topic named "Hot Stocks" could be created, and this topic could be used to list all the recommendations or tips to buy a particular stock. In JMS, a client would subscribe to this topic, meaning that it would receive any messages destined for this topic. Likewise, some server process (such as a stock- trading analyst) could act as a publisher. This analyst would publish the recommendations picked up by all the subscribers, as shown in Figure 9.16.
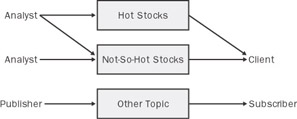
Figure 9.16: A pub/sub model showing publishers, topics, and subscribers.
Although we won't show it explicitly here, sample code demonstrating this publish and subscribe model can be found in the C:\Interoperability\Samples\Resource\WMQ\JMS\PubSub directory.
Because the pub/sub topics tend to be fluid (in other words, anyone can create a topic on the fly), WebSphere MQ doesn't automatically associate one queue per topic. Doing so might cause some restrictions on the number of topics allowed. Instead, the MA0C SupportPac (installed earlier) configures a number of channels and system queues to automatically handle the number of incoming requests .
Herein lies the problem of interoperability between JMS pub/sub topics and .NET clients. Today, the MA7P SupportPac doesn't provide support for accessing topics. Also, because the queues for each topic are handled by WebSphere MQ as system objects, a .NET client can do little to nothing to access the queues. Even if you use the MQQueueManager class, there's no way to associate a connection to a queue with a topic. This means that JMS topics, publishers, and subscribers remain solely for use by JMS clients. Interoperability using direct, client-access communication is very difficult to achieve.
Topic-Driven Interoperability with Message Driven Beans
Fortunately, you can apply some techniques to enable a .NET client to subscribe to a JMS topic. One such technique is to use Message Driven Beans, or MDBs. Enterprise JavaBeans (EJB) 2.0, a key component of Sun's J2EE v1.3 specification, introduced the concept of the Message Driven Bean. An MDB is an Enterprise JavaBean that derives from javax.ejb.MessageDrivenBean and is activated based upon a message being delivered to a JMS queue or topic.
For an MDB to be hosted using a J2EE application server, it must contain a deployment descriptor. This descriptor specifies the destination queue or topic that it should be invoked upon and any message filtering that should be applied. (For example, you might invoke the bean only for messages that start with xyz .) In addition to being based upon a topic in JNDI, a number of providers are required to link the MDB and container with the underlying JMS implementation, as shown in Figure 9.17.
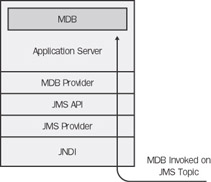
Figure 9.17: An EJB 2.0 MDB component, invoked by a JMS topic.
Once an appropriate message is received on the queue or topic, the container (application server) will run some EJB-specific methods ( ejbCreate and setMessageDrivenContext ) to invoke the MDB. Because MDBs are managed by the container, threading support is implicit. This means that multiple MDBs can be instantiated as needed to handle multiple messages in parallel as they're received. This pooling is normally configurable within the application server.
Each MDB must contain an onMessage method. This method is the first business logic method of the bean to be invoked and contains a parameter of the message that was received from the queue:
public void onMessage(Message msg)
Once it has this method, the MDB can process the request as it sees fit. This can include forwarding the message, invoking other beans, calling a Web service, writing to a database, and so on.
You now have the opportunity to take what you've learned about interoperability and apply it to this component. Because the MDB is invoked based on a message arriving for a particular topic, you can make a Web service call from the JMS MDB to a Web service in .NET. For example, you can activate a Stock MDB based on the HotStocks topic registered in JNDI.
Once activated, logic in the bean can determine the next course of action and whether a component running in .NET (via a Web service) should be notified, as shown in Figure 9.18.
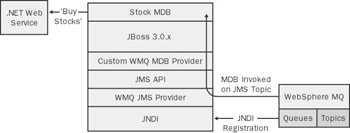
Figure 9.18: An EJB 2.0 MDB component, invoked by a JMS topic and calling a .NET Web service.
Sample code for this example is included in the C:\Interoperability\Samples\Resource\WMQ\MDB directory. Because we're using JBoss to show these samples, you need to perform some additional configuration to get the sample working.
Configuring MDB for JBoss and WebSphere MQ
JBoss ships with its own message queuing architecture, known as JBossMQ. This allows for an implementation of JMS that's based on a message queue internal to the JBoss product. Today, providing MDB support for connecting to other JMS providers through JBoss is possible, but it involves some extra work.
If you plan to run this sample code on another application server (for example, IBM's WebSphere Application Server), I recommend that you follow the instructions that accompany your application server. In addition, this approach is merely intended to demonstrate the samples in action; it's not supported and hasn't been tested for a production environment.
To start, you need to compile and install a WebSphere MQ provider for JBoss. This provides the necessary class for your MDB to access WebSphere MQ. The provider can be found in the C:\Interoperability\Samples\Resource\WMQ\MDB\JBoss directory, under the package org.jboss.jms.jndi . This class extends AbstractJMSProviderAdapter and contains the necessary code to return an initial context to the MDB:
public class WebsphereMQProvider extends AbstractJMSProviderAdapter { public WebsphereMQProvider() { } public Context getInitialContext() throws NamingException { Hashtable ht = new Hashtable(); ht.put(Context.INITIAL_CONTEXT_FACTORY, "org.jnp.interfaces.NamingContextFactory"); ht.put(Context.PROVIDER_URL,"jnp://localhost:1099"); return new InitialContext(ht); } } | Note | If you're using a persistent JNDI store (as described earlier in the "Persistent and Nonpersistent JNDI with JMSAdmin" sidebar), you'll need to change the INITIAL_CONTEXT_FACTORY and PROVIDER_URL to match the FSContext settings used in the jmsadmin.config file. |
Compile this class using the provided Ant script, and ensure that the JBoss server isn't running. When the Ant script is run with the deploy target, these classes will automatically be merged into the jboss.jar file, which can be found in the server\default\deploy directory of the JBoss server. A backup of the jboss.jar file will be made, named jboss.backup.
You now need to adjust some of the JBoss configuration settings to include a reference to this provider. Preconfigured files are supplied in the C:\Interoperability\Samples\Resource\WMQ\MDB\JBoss\Config directory for this purpose. Two files (jboss-service.xml and standardjboss.xml) are located in the conf subdirectory. One additional file (jms-service.xml) is located in the deploy subdirectory. These files need to be copied to the JBoss installation to activate the WebSphere MQ provider that has been installed.
To copy these files to a local instance of JBoss, use the supplied Ant script in this directory with the deploy target. The existing configuration files in the JBoss directory will be backed up (using the same name, appended with a .bak extension). If you've made any manual alterations to any of these files, you might need to merge the changes with the new files that are copied. In addition, the Ant script will copy some required WebSphere and GLUE libraries to the JBoss installation.
The modifications to standardjboss.xml replace the JMS Provider Adapter
<JMSProviderAdapterJNDI>DefaultJMSProvider</JMSProviderAdapterJNDI>
with this one:
<JMSProviderAdapterJNDI>WebsphereMQProvider</JMSProviderAdapterJNDI>
For the jboss-service.xml, the default JBossMQ provider is replaced with the custom one in the jboss.ejb:service=EJBDeployer MBean section:
<depends>jboss.mq:service=JMSProviderLoader, name=JBossMQProvider</depends> <depends>jboss.mq:service=JMSProviderLoader, name=WebsphereMQProvider</depends>
You'll find a final modification in the jms-service.xml file. The JMS provider loader is again replaced with the sample WebSphere MQ one:
<mbean code="org.jboss.jms.jndi.JMSProviderLoader" name ="jboss.mq:service=JMSProviderLoader,name=MQSeriesProvider"> <attribute name="ProviderName">DefaultJMSProvider</attribute> <attribute name="ProviderAdapterClass"> org.jboss.jms.jndi.JBossMQProvider </attribute> <attribute name="QueueFactoryRef"> java:/XAConnectionFactory</attribute> <attribute name="TopicFactoryRef"> java:/XAConnectionFactory</attribute> </mbean> <mbean code="org.jboss.jms.jndi.JMSProviderLoader" name ="jboss.mq:service=JMSProviderLoader,name=WebsphereMQProvider"> <attribute name="ProviderName">WebsphereMQProvider</attribute> <attribute name="ProviderAdapterClass"> org.jboss.jms.jndi.WebsphereMQProvider </attribute> <attribute name="QueueFactoryRef">StockQCF</attribute> <attribute name="TopicFactoryRef">StockTCF</attribute> </mbean>
With the new configuration files in place, go ahead and start JBoss.
| Note | Important If you're using nonpersistent JNDI ( org.jnp.interfaces.NamingContextFactory ), remember to rerun the previous JMSAdmin script to repopulate the JNDI tree once the server has started. This is extremely important because without this you'll receive an exception when the bean is deployed. |
Deploying the MDB
To deploy the MDB, first build the code using Ant in the C:\Interoperability\Samples\Resource\WMQ\MDB\Bean directory. Next, use the deploy target with the provided Ant script to deploy the bean to the JBoss server. If the bean was successfully deployed, you should observe the following output on the JBoss console:
INFO [EjbModule] Creating INFO [EjbModule] Deploying StockMDB INFO [JMSContainerInvoker] Creating INFO [JMSContainerInvoker] Created INFO [EjbModule] Created INFO [EjbModule] Starting INFO [JMSContainerInvoker] Starting INFO [DLQHandler] Creating INFO [DLQHandler] Created INFO [DLQHandler] Starting INFO [DLQHandler] Started INFO [JMSContainerInvoker] Started INFO [EjbModule] Started INFO [MainDeployer] Deployed package: file:/C:/jboss/server/default/deploy/StockMDB.jar
Configuring the .NET Web Service
The MDB will call a .NET Web service that we covered in Chapter 5, "Connectivity with XML Web Services, Part 1." In Chapter 5, you saw how to set up a Web service in .NET that illustrated many of that chapter's examples. This MDB code in this chapter will also use that Web service. If you haven't already, follow the setup instructions in the "Option 2: Creating the Web Service Using the NAnt Script" section (beginning on page 162) of Chapter 5 for configuring and deploying the Web service.
The Web service will be hosted at http://localhost/dotNETWebService/StockService.asmx , which is called by this MDB. Be sure to validate this URL in Microsoft Internet Explorer before running the sample.
Running the Sample
To test the sample, you'll use a client that publishes two messages to the HotStocks topic: a recommendation for a purchase, and a recommendation for a sale. This in turn will invoke the MDB that has just been deployed. The MDB will look at the message and determine whether it's a recommendation for a purchase or a sale. If it's a recommendation for a purchase, invoke the .NET Web service to purchase that particular stock.
Build and run the client using Ant, which can be found in the C:\Interoperability\Samples\Resource\WMQ\MDB\Client directory. You should see that the client generates the two messages, publishes them to the HotStocks JMS topic, and returns a confirmation:
Hot stock news for CONT and WING has been published to topic/HotStocks
This invokes the MDB, which will report output to the JBoss console that's similar to the following. Notice that each message invokes a separate MDB ” both of which run in a multithreaded model. Bear this in mind when debugging the sample code. First, the bean was created:
INFO [StockMDB] ctor called INFO [StockMDB] setMessageDrivenContext called INFO [StockMDB] ejbCreate called
A message was then received by the bean. This message was the client's request to sell some stocks, identified by the action string:
INFO [StockMDB] A message has been received by StockMDB INFO [StockMDB] MapMessage action String = sell INFO [StockMDB] This is a request to sell some stocks. INFO [StockMDB] This will be invoked locally...
The second message is then processed . This time, the request to purchase some stocks was issued:
INFO [StockMDB] A message has been received by StockMDB INFO [StockMDB] MapMessage action String = buy INFO [StockMDB] This is a request to buy some stocks. INFO [StockMDB] Invoking .NET Web Service to buy 500 of these...! INFO [StockAgent] ctor called INFO [StockAgent] Reading the mappings for the StockService INFO [StockAgent] Stock agent is binding to the .NET Web Service INFO [StockAgent] Calling Buy Stocks method INFO [StockMDB] Remote .NET Web Service purchase was successful
The latter half of this log shows the interaction with the .NET Web service. Here, a new message has been received, with an action (recommendation) to buy. The StockMDB realizes that this needs to be a call to the .NET Web service and invokes a StockAgent to handle the request. The StockAgent in turn uses the GLUE 4.0.1 libraries to make the Web service request from within the bean. Recall how in Chapter 5 the default .NET Web service wrote an entry into the event log when a request to purchase stocks was received.
If you now look at the event viewer, you'll see an entry for the purchase request from the MDB, as shown in Figure 9.19. This indicates that the .NET Web service successfully received and was able to work with the incoming request from the MDB.
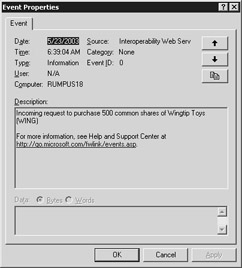
Figure 9.19: The .NET Web service confirms the purchase via the event log.
Key Elements of the Sample
In this section, you've seen how, with a little work, an MDB that's subscribing to a JMS topic ”which would normally be isolated from the .NET world ”can be made to forward incoming publications to Web services or any other listening service in .NET.
This approach suits organizations that have existing implementations of JMS MDBs and want to further extend this pub/sub model into .NET. As with the simple stock trade example, you can imagine how the MDB could be used to determine whether local processing should occur in the J2EE environment or whether the request should be extended to .NET. In addition, imagine a scenario in which this approach was combined with Universal Description, Discovery, and Integration (UDDI) to provide automatic lookups for the .NET Web services without having to hard-code the details in the bean. We covered UDDI in Chapter 6, "Connectivity with XML Web Services, Part 2."
In addition to using Web services as the transport, nothing is stopping you from using the Ja.NET libraries covered in Chapter 4, "Connectivity with .NET Remoting." The MDB would become the .NET Remoting client and could call a remote object running in .NET to pass across the message.
Most of the functionality of this sample can be found within the code of the MDB class. The MDB is deployed by using two deployment descriptors: ejb-jar.xml (which contains generic MDB configuration) and jboss.xml (which contains JBoss- related configuration).
The ejb-jar.xml deployment descriptor specifies the name, class, acknowledgment mode, and subscription durability of the bean itself. Notice that the destination type is a javax.jms.Topic; we also could have used a javax.jms.Queue type.
<message-driven> <ejb-name>StockMDB</ejb-name> <ejb-class>StockMDB</ejb-class> <transaction-type>Container</transaction-type> <acknowledge-mode>Auto-acknowledge</acknowledge-mode> <message-driven-destination> <destination-type>javax.jms.Topic</destination-type> <subscription-durability> NonDurable </subscription-durability> </message-driven-destination> </message-driven>
The jboss.xml deployment descriptor contains JBoss-specific configuration. This links the name of the MDB to the destination JNDI topic that's created with the JMSAdmin script:
<enterprise-beans> <message-driven> <ejb-name>StockMDB</ejb-name> <destination-jndi-name> topic/HotStocks </destination-jndi-name> <xa-connection>false</xa-connection> </message-driven> </enterprise-beans>
The code for the bean can be found in the StockMDB.java file. The MDB is invoked by the J2EE container with a call to the onMessage method. The container automatically passes a parameter of type javax.jms.Message .
public void onMessage(Message msg)
If the message is of type javax.jms.MapMessage , the action field is tested. This tells the bean whether the operation should be a sale or purchase.
String action = ((MapMessage)msg).getString("action"); If the action is indeed a purchase, a stock agent (following the agent-service pattern outlined in Chapter 6) is called:
StockAgent agent = new StockAgent(); Stock stockToBuy = convertToStock(((MapMessage)msg)); boolean result = agent.buyStocks(stockToBuy,STOCK_MDB_DEFAULT_QTY); logger.info("Remote .NET Web Service purchase was " +(result? "successful" : "unsuccessful")); This stock agent constructs a request to the .NET Web service much in the same way that the samples in Chapter 6 depicted. One important point about this agent example (which differs from the previous samples in this chapter) is the way that types in the Web service are mapped.
In previous samples in the book, when we ran the GLUE client against a .NET Web service, the types were based upon a map file. This map file was automatically generated by the WSDL2JAVA tool used to build the Java class. We still have a map file in the MDB version, but because we're never sure of the current path (because the bean is hosted in an application server), we need to explicitly load the file. The following command performs this:
Mappings.readMappings("StockService.map"); Once you've completed testing this sample code, be sure to undeploy this Web application. This can easily be done by running the Ant script with the undeploy target from the C:\Interoperability\Samples\Resource\WMQ\MDB\Bean directory.
EAN: 2147483647
Pages: 132
- Chapter I e-Search: A Conceptual Framework of Online Consumer Behavior
- Chapter III Two Models of Online Patronage: Why Do Consumers Shop on the Internet?
- Chapter IX Extrinsic Plus Intrinsic Human Factors Influencing the Web Usage
- Chapter XI User Satisfaction with Web Portals: An Empirical Study
- Chapter XV Customer Trust in Online Commerce