.NET Remoting Samples
So far, we've talked about .NET Remoting in the context of the .NET Framework as a whole. Because our focus is interoperability, let's look at how to use .NET Remoting to enable connectivity between .NET and J2EE.
Introducing Intrinsyc's Ja.NET
As mentioned in Chapter 1, "Microsoft .NET and J2EE Fundamentals," the book's sample code uses a product named Ja.NET from Intrinsyc. Ja.NET provides a two-way implementation of the .NET Remoting stack for Java. By using Ja.NET, we can generate Java proxies that have the ability to expose or consume components using the .NET Remoting protocol. Figure 4.3 shows an example of this, a JavaServer Pages (JSP) page consuming a .NET Serviced Component.
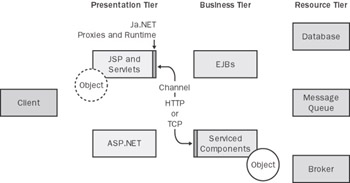
Figure 4.3: Using Ja.NET to call a remote .NET server object.
In addition, the Ja.NET tools can expand upon this functionality by hosting the generated Java proxies within a Web Archive (WAR) file to enable access to Enterprise Javabeans (EJBs) from .NET ”again, with all the communications based on .NET Remoting.
This chapter will cover five technical scenarios using .NET Remoting and the Ja.NET product, showing sample code for each. These scenarios range from a simple .NET component calling a simple Java component via .NET Remoting to a look at accessing components hosted in an EJB container and Component Services in Microsoft Windows Server 2003 to provide automatic transaction, security, and life-cycle management.
Ja.NET Tools
Six main parts make up the Ja.NET toolset. They are:
-
GenService Used by the GenNet and GenJava tools (discussed next ) to provide access to .NET assemblies for development. This tool is required only to generate the proxies, and installation isn't required to put the code into production.
-
GenNet Used to generate .NET proxies to access Java classes via the Ja.NET runtime.
-
GenJava Used to generate Java proxies to access .NET assemblies via the Ja.NET runtime.
-
Janetor Used to view and modify Ja.NET runtime configuration settings. This includes licensing for the Ja.NET product, as well as locally shared and remotely accessed objects.
-
Ja.NET TCP server Used to provide standalone hosting via the Ja.NET runtime for Java classes that aren't hosted on a J2EE server. This tool is included in the Ja.NET runtime.
-
Ja.NET runtime The main collection of classes (located in the janet.jar file) required to host the other tools in this list.
Ja.NET Installation
All the Ja.NET libraries, documentation, and tools are installed with the main installation via the accompanying CD. All these files are located in the C:\Interoperability\Tools\Ja.NET directory.
In addition to installing this directory, before running any of the samples, you'll need to install GenService as a Windows service. To install this tool, navigate to the C:\Interoperability\Tools\Ja.NET\Install directory and run the GenServiceSetup.msi file that's located in this directory.
Run through the wizard, accepting the defaults. For additional information, consult the documentation in C:\Interoperability\Tools\Ja.NET\doc. The GenService is required for all the samples listed in this chapter.
The Sample Code
The Stock and Portfolio sample types have undergone a slight face-lift since the last set of samples in Chapter 3. Previously, we had a Stock object that contained some fields to represent a stock ticker and a Portfolio object that contained an array of stocks, Stock[] .
The examples in this chapter replace the Portfolio object with the ArrayList object. (The .NET examples use a type named System.Collections.ArrayList , and the Java examples use a type named java.util.ArrayList .) The ArrayList objects provide some additional functionality over a regular array, including the ability to more easily add and remove members . Using this data type highlights how well the Ja.NET product converts objects between the two platforms.
The new Stock object in this chapter's samples now looks like this:
namespace SimpleRemoting { [Serializable()] public class Stock { public String Ticker=""; public String Name=""; public double Price; public double Previous; public int Volume; } } Any functions that return more than one Stock object will return them in an ArrayList (for either platform).
Java Client to .NET Remoted Object
The first sample shows a simple Java client consuming a server component hosted on .NET. This sample shows a simple two-way communication between the Java and .NET platforms. This sample code, which can be found in the C:\Interoperability\Samples\Point\Remoting\JavaTodotNet directory, is shown in Figure 4.4.
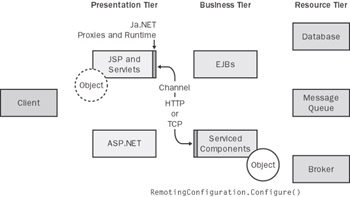
Figure 4.4: A Java client calling a .NET remoted object.
As shown in the figure, the Java client will directly call the .NET server application using .NET Remoting. Although Figure 4.4 shows the sample code running as both presentation- tier and business-tier components, the first two samples in this chapter will be run from the command prompt.
The .NET Server Sample Code
Take a look at the .NET code first, located in the Server subdirectory. You'll see two source files there. The first, DataTypes.cs, contains the new Stock class definition. The second, RemotingServer.cs, contains three classes.
The first class ( SampleData ) creates five sample stocks. (Imagine that these stocks are recommendations from an online stock broker.) SampleData then adds these sample stocks to an ArrayList and returns the result:
public class SampleData : MarshalByRefObject { public ArrayList getRecommendations() { Stock NWND = new Stock(); Stock CONT = new Stock(); Stock FTHC = new Stock(); Stock ASKI = new Stock(); Stock WOOD = new Stock(); NWND.Ticker = 'NWND"; NWND.Name = 'Northwind Traders"; NWND.Price = 50.12; NWND.Previous = 51.00; NWND.Volume = 123; // This is repeated for 4 other stocks ArrayList myStocks = new ArrayList(); myStocks.Add(NWND); myStocks.Add(CONT); myStocks.Add(FTHC); myStocks.Add(ASKI); myStocks.Add(WOOD); myStocks.TrimToSize(); // return the sample data return myStocks; } } Note that the SampleData class extends the MarshalByRefObject base class. MarshalByRefObject is used to enable access to objects across application domain boundaries in .NET. As we'll discuss later in the section, generating the automatic proxies for .NET using the tools that are supplied with Ja.NET is dependent on this base class being referenced. Only classes that derive from this class or classes that are tagged as being serializable have proxies generated for them by the GenJava tool.
The second class in the RemotingServer.cs file is named StockServer . This sample class is used to simulate the functionality of the server application:
public class StockServer : MarshalByRefObject { public bool BuyStocks(Stock stockToBuy, int quantity) { // Display to the console Console.WriteLine("Incoming request to purchase " +quantity+" common shares of "+stockToBuy.Name +" ("+stockToBuy.Ticker+")"); // do the real work here!... // Assume that the trade was committed return true; } } This code contains a single method named BuyStocks , which simulates a stock purchase, taking a Stock object and a quantity as two parameters. Once the method is called, it simply writes the result to the console. However, it's possible to imagine how, in a production system, this method could potentially commit a trade purchase on behalf of the user . Again, this class implements MarshalByRefObject , which indicates that we'll be exposing the method via .NET Remoting and passing this object to a Java client by reference (not by value).
The third class in the .NET Remoting sample is the main class. This class is used solely to host the server components within a console application:
public class RemotingServer { [STAThread] static void Main(string[] args) { RemotingConfiguration.Configure('remoting.config'); Console.WriteLine('.NET Remoting Server Sample is ' +"ready to process messages'); Console.WriteLine('Enter to Exit'); Console.In.Read(); } } The key line of code in this file is the RemotingConfiguration.Configure entry. This line instructs the remoting components to initialize with the values and settings found in the configuration file (remoting.config). These remoting components are valid for the lifetime of the application that they're configured within. We prevent the application from terminating by calling the Console.In.Read method, which pauses until the user presses the Enter key. If we hadn't prevented the application from terminating, the remoted components would immediately be lost when the main class completed.
As you've probably guessed, the final piece of the puzzle for the .NET server side is the configuration file. The configuration file for this sample, remoting.config, can be found in the same directory and contains the remoting instructions for hosting the components:
<configuration> <system.runtime.remoting> <application> <service> <activated type="SimpleRemoting.SampleData,Server"/> <activated type="SimpleRemoting.StockServer,Server"/> </service> <channels> <channel port="5656" ref="tcp"> <serverProviders> <formatter ref="binary" typeFilterLevel="Full"/> <formatter ref="soap" typeFilterLevel="Full"/> </serverProviders> </channel> </channels> </application> </system.runtime.remoting> </configuration>
The remoting.config file has two important elements. The first is the < activated > elements within the < service > element. These elements define which components are to be hosted and take this format: Namespace.Class, Assembly.
In this case, the namespace is SimpleRemoting , the class names are SampleData and StockServer , and the final assembly will be named Server.exe. Therefore, we have the values to create these entries. The channel is also defined in the remoting.config file within the < channel > element. For this sample, we've selected the TCP channel and will use IP port 5656.
| Warning | You must ensure the validity of the remoting.config file ” not only for this sample, but for all applications and solutions that you write using .NET Remoting. One simple error within the remoting.config file could mean that components you thought were being hosted are not. Also, no validation occurs when the remoting.config file is loaded, so incorrect entries are rarely detected . |
Before we look at the Java side of things, let's compile the .NET server source code, which is done by running NAnt from the command prompt in the sample directory (C:\Interoperability\Samples\Point\Remoting\JavaTodotNET\Server). The output will be a Server.exe executable file.
At this point, we'll also run the server code. Execute the server file that was generated by the build. To confirm that the server is running, the following message should be displayed:
.NET Remoting Server Sample is ready to process messages Enter to Exit
Because this code must run simultaneously with the Java sample that you'll see next, you should keep this process running in a separate command-prompt window. We did something similar with the SimpleSerializer sample that we ran in Chapter 3.
| Tip | If you enter start server from the command prompt instead of server , the process will automatically be launched in a separate console window. |
The Java Client Sample Code
Change to the directory containing the Java sample code, which can be found in C:\Interoperability\Samples\Point\Remoting\JavaTodotNet\Client. This directory contains only one class, Client.java, which contains the code to call the server component:
import SimpleRemoting.*; public class Client { public static void main(String[] args) { try { // Create the new remote object SampleData sd = new SampleData(); // Create the portfolio as an ArrayList java.util.ArrayList myStocks = new java.util.ArrayList(sd.getRecommendations()); // Display the header information... System.out.println("There are "+myStocks.size() +" stocks recommended for purchase."); // Display the detailed stock information... for (int f=0; f<myStocks.size(); f++) { Stock currentStock = (Stock)myStocks.get(f); System.out.println("-----------"); System.out.println("Ticker: " +currentStock.Ticker); System.out.println("Name: " +currentStock.Name); System.out.println("Price: " +currentStock.Price); System.out.println("Previous: " +currentStock.Previous); System.out.println("Volume: " +currentStock.Volume); } // Puchase the stocks for one of the stocks Stock stockToBuy = (Stock)myStocks.get(1); // Make request to purchase StockServer ss = new StockServer(); // buy a 100 of the second stock in the recommendations boolean successfulTrade = ss.BuyStocks(stockToBuy,100); // Display confirmation System.out.println("\nThe purchase " +(successfulTrade ? "completed" : "failed")); } catch (Exception e) { e.printStackTrace(System.out); } } } The client code is relatively simple. First, a new reference to the SampleData component is made and the getRecommendations method from this class is called, which returns a list of Stock objects contained within an ArrayList . The returned information is displayed on the screen, after which a new reference to StockServer is created, and then the BuyStocks method is called. The code passes a Stock in the returned recommendations as the first parameter and a quantity to purchase as the second parameter.
Looking through the code and the directory, you might have noticed something fundamental missing. Although we have the correct class and method names for the remote object within the client code, we don't reference the Ja.NET libraries directly and we don't have any other classes in the Java samples directory. To create this link between the Java client code and the .NET server components, we need to run two of the Ja.NET tools.
The first tool needed is GenJava, which generates the required Java proxies from a .NET assembly. From the command prompt, run genjava . The GenJava tool will be displayed, as shown in Figure 4.5.
| Note | GenJava is one of five batch files that can found in the C:\Interoperability\Samples\Point\Remoting\Utils directory. This directory should be added to your system PATH as part of the sample code installation. You should verify this setting, as we'll be using the batch- file versions of other tools within this chapter. 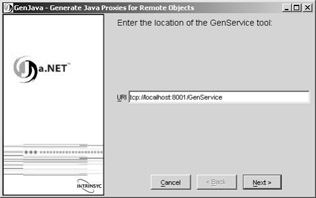 Figure 4.5: The GenJava wizard. |
The first step in the GenJava wizard is to locate the GenService tool. The GenService was the Windows service that we installed earlier in the chapter. Enter tcp://localhost:8001/GenService as the URL. Note that I'm using the same machine to host the .NET component; therefore, the URL is tcp://localhost:8001/GenService . If your GenService tool is installed on another machine, you'll need to change localhost to the name of that particular machine. Once you've entered this information, click the Next button.
The second step of the wizard, shown in Figure 4.6, sets the location of the .NET assembly and the output directory for the Java proxies. The GenJava tool reads the .NET assembly by using a process known as reflection . This process allows the tool to interrogate the methods and fields that are required to create a valid Java proxy file. Enter the following location for the .NET assembly created in the previous step (keeping in mind that your directories might differ slightly if you installed the sample code to a different location):
C:\Interoperability\Samples\Point\Remoting\JavaTodotNET\Server\Server.exe
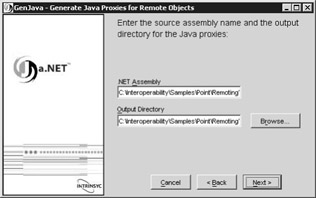
Figure 4.6: Setting the location and output directory.
For the Java output, we'll create the proxy code in the same directory as the client class, so enter the following location for the Output Directory: C:\Interoperability\Samples\Point\Remoting\JavaTodotNET\Client . Upon clicking the Next button, the Java proxies will be created in the Client directory and the wizard will display the confirmation, as shown in Figure 4.7.
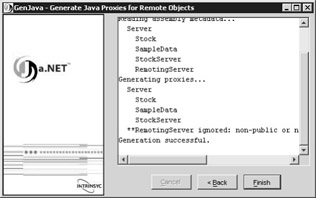
Figure 4.7: A successful generation of the proxies.
Click the Finish button. Now we can investigate exactly what's been created by the tool. First, the Client directory contains a genjava.xml file. This XML file contains the wizard settings that you've just used. Upon rerunning the GenJava tool, this file will be used to prepopulate the wizard with the choices that were made earlier to prevent you from having to re-enter all the data.
In addition to this XML file, a new subdirectory named SimpleRemoting was created. (This is the namespace of the .NET server component.) This directory contains three Java proxies representing the classes that were read from the .NET assembly: Stock.java (the Stock type), SampleData.java (a reference to the sample data object with the recommendations), and StockServer.java (a reference to the class that has the buyStocks method). Feel free to examine these generated proxies. This chapter won't cover the internals of these proxies because they contain only automatically generated code; however, the proxies offer insight into the workings of some of the Ja.NET classes.
You now have created the Java proxies, which contain the classes that were referenced in the Client.java file. The next step for getting the Java sample code running is to execute a second tool from the Ja.NET application, named Janetor. Janetor configures the client side and licensing for the Ja.NET proxy and must be run to complete the configuration. To run the tool, type janetor at the command prompt. (Again, ensure that your system PATH contains an entry for C:\Interoperability\Samples\Point\Remoting\Utils.)
After the Janetor tool has launched, as shown in Figure 4.8, the first step is to set the licensing correctly. To do this, place the janet_license.xml file that was sent to you by Intrinsyc (discussed in Chapter 1) in the C:\Interoperability\Tools\Ja.NET\lib directory. If your license file is installed elsewhere, right- click the Licensing entry and select Install License to open the Select A Ja.NET License file dialog box. Once you have selected your janet_license.xml file, click Open to return to the Janetor main window.
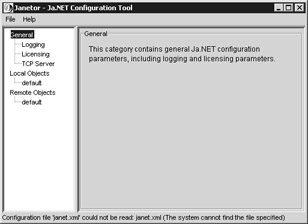
Figure 4.8: Using the Janetor configuration tool.
Next, click the default entry within the Remote Objects option. The dialog box shown in Figure 4.9 should appear.
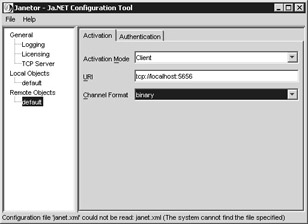
Figure 4.9: Configuring the activation mode, URI, and channel format.
You need to enter the Uniform Resource Indicator (URI) for the remotely hosted component and the channel format. In the remoting.config file that we used earlier in the .NET sample code, we configured the server to communicate on port 5656. Because we're also using the TCP channel on the same machine, our URI will be tcp://localhost:5656 .
The channel format is the option that determines which formatter to use and by default is either binary or SOAP. This option is always configured on the client, and there's no need to change anything in the remoting.config file on the server. For this test, select the binary channel format option.
Save the settings, and exit the Janetor tool. Now you're ready to build and test the Java client. The Janetor tool saves its configuration in a janet.xml file, again located in the Client directory.
Build and run the client sample code, using the run target with Ant. If all is successful, this is the output you should see:
There are 5 stocks recommended for purchase. ----------- Ticker: NWND Name: Northwind Traders Price: 50.12 Previous: 51.0 Volume: 123 ----------- Ticker: CONT Name: Contoso Price: 12.45 Previous: 12.01 Volume: 33 ----------- Ticker: FTHC Name: Fourth Coffee Price: 3.45 Previous: 3.6 Volume: 6 ----------- Ticker: ASKI Name: Alpine Ski House Price: 32.45 Previous: 32.09 Volume: 45 ----------- Ticker: WOOD Name: Woodgrove Bank Price: 14.45 Previous: 14.45 Volume: 50 The purchase completed
The Java client sample code will report back the five stock recommendations that were retrieved from the .NET server component. Toward the bottom of the recommendations listing, you should see a message that indicates that your purchase was made successfully.
If you switch to the .NET server component (which is running as Server.exe in a separate command-prompt window), you should see that it has received the incoming request from the Java client to purchase the stocks:
Incoming request to purchase 100 common shares of Fourth Coffee (FTHC)
So, what's happening under the covers here? The Client.java code makes two calls: one to display the recommendations, and the other to make the purchase. What's actually called is the Java proxy code that was generated by the GenJava tool we ran earlier. This proxy code is receiving the request and formatting a .NET Remoting call to the .NET server component, based on the channel and formatting parameters you entered in Janetor. Replies and return data are then passed back to the original Client.java class.
Before we move on to the sample that shows the .Net to Java version, let's look at the exception that occurs when the .NET server component isn't running. To test this, stop the Server.exe server component by pressing the Enter key in the appropriate command-prompt window. Rerun the client to execute the Java client sample code. You should observe the following exception:
com.intrinsyc.janet.RemoteException: Connection refused: connect
This exception indicates that the Java proxy could not establish communication by using the .NET Remoting protocol. If you're building code based on Ja.NET in your production application, it's recommended you trap for this exception to help detect when server failures occur or when the server component isn't available.
.NET Client to Java Object Hosted by Ja.NET TCP Server
The previous example generated Java proxies to access a .NET component via .NET Remoting. In this next example, we'll switch the roles so that the client is now .NET and the server object is hosted in Java. However, as Figure 4.10 shows, we'll still use .NET Remoting to access the remote object, and we'll have access to the same sets of parameters as in the previous example.
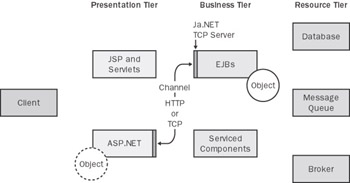
Figure 4.10: .NET client calling a Java object hosted by Ja.NET TCP server.
The Java Server Sample Code
The sample code for this second option is located in the C:\Interoperability\Samples\Point\Remoting\dotNETToJava directory. The Server subdirectory contains the three classes that will form the Java server component: Stock.java is the Java equivalent of the Stock object, SampleData.java returns the same five sample stocks (recommendations) as the .NET example, and StockServer.java contains a method named sellStocks that will be used the same way as the BuyStocks method was used in the previous example. Compile these classes in this directory before continuing, by running Ant.
Once you've compiled these Java classes, you need to run three Ja.NET tools in order to configure a .NET client that can consume them. The first tool, GenNet, is used to generate a .NET assembly that's referenced to create the client. Figure 4.11 shows this tool. To run the GenNet tool, enter gennet at the command prompt.
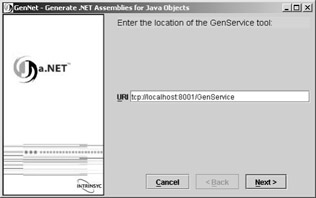
Figure 4.11: The GenNet tool.
As with the GenJava tool, the first stage of the GenNet wizard asks for the location of the GenService service. As with our previous example, this location is tcp://localhost:8001/GenService . The next stage of the wizard is to tell the GenNet tool the Java classes that it must generate .NET proxies for, as shown in Figure 4.12.

Figure 4.12: Adding classes to generate .NET proxies.
Click the Add button in the wizard. Enter the name of each Java class: StockServer , Stock , and SampleData .
| Tip | Because Stock is a valid class, the Add Java Class dialog box has a tendency to auto-detect the class name when you enter it. For this same reason, the dialog box tends to lose focus when you enter the StockServer class name. If this happens, simply click the text field where you are entering the class name and finish entering the remainder of the class name. |
Before clicking the Next button, highlight the Stock class and click the Options button. Select the Pass By Value check box, and click OK. Unlike the StockServer and SampleData classes, the Stock class is one that we need to pass by value between the client and server.
Once the classes have been defined (as shown in Figure 4.12), click the Next button to proceed. Now tell the GenNet wizard how the tool should name the generated .NET assembly and where to place it, as shown in Figure 4.13.
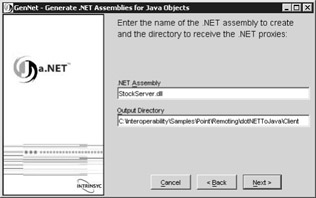
Figure 4.13: Entering the name and output directory for the .NET proxies.
As shown in Figure 4.13, name the assembly StockServer.dll and set the Output directory to C:\Interoperability\Samples\Point\Remoting\dotNETToJava\Client . This will generate the DLL in the same directory as the client.
Click the Next button to complete the wizard. The GenNet tool will generate the client proxy that you need, yielding a similar output to that shown in Figure 4.14. Click on the Finish button to close the GenNet tool.
The second tool you need to run is Janetor. In the previous sample, we ran the Janetor tool to configure the name of the machine and port to be used for the remote location of the server component. In this example, we'll use the same tool to configure the local hosting of this Java component. To run the Janetor tool, enter janetor at a command prompt.
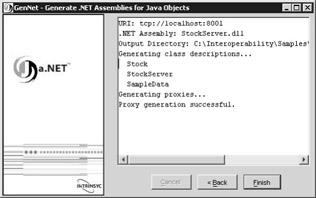
Figure 4.14: Successful generation of the .NET proxies.
As in the previous example, ensure that the licensing is correctly configured. To configure the server component, click the Default option in the Local Objects part of the tree, as shown in Figure 4.15. For the component, set the activation mode to Client, the URI to tcp://localhost:8888/StockServer , and the assembly name to StockServer . In the previous example, we configured the port number as 5656. The choice for this is entirely yours, but for this example, I've chosen a different port to ensure that no clashes occur.
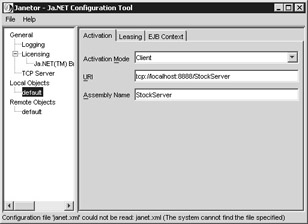
Figure 4.15: Setting the activation mode, URI, and assembly name.
Once this is set, save the configuration and exit the tool. The Java server component is ready to be hosted. In the previous example, we used the Remoting.Configure command from the .NET Remoting namespace to instruct the .NET server component to start listening for requests . Because we don't have access to the .NET Remoting classes in Java, we need to use an alternate method to host the component.
Fortunately, the Ja.NET tool comes with a TCP server that allows the component to be hosted. The TCP server creates a layer between the Java classes and the .NET Remoting channel, using the configuration information set with the Janetor tool to listen on a particular interface and port. To run the Ja.NET TCP server from the command prompt, type start janetserver . (As in the earlier example, this points to a batch file in the Utils directory.) This will launch the Ja.NET TCP server in a second command-prompt window, which is similar to the way we hosted the previous .NET component.
The .NET Client Sample Code
Navigate to the C:\Interoperability\Samples\Point\Remoting\dotNETToJava\Client directory. StockServer.dll is the assembly that was automatically generated by the GenNet tool in the previous step. To generate this assembly, the tool also created Client.cs, SampleData.cs, and StockData.cs. Although you can look in these files to see the code that was generated, a more interesting approach is to examine the assembly itself.
The .NET Framework SDK ships with a tool called ILDASM.EXE. ILDASM, which stands for Intermediate Language Disassembler , is a great tool to investigate assemblies within .NET. (Intermediate Language, or IL, is the language used for .NET assemblies just before they are compiled into native code.) Launch the tool by running ildasm from a command prompt. When the tool is launched, open the StockServer.dll assembly from within the Client directory of the sample.
You can see exactly what the assembly contains by using the ILDASM tool to expand through the types and methods, as shown in Figure 4.16. Remember that this assembly was automatically generated by the GenNet tool. Using ILDASM to interrogate the assembly is a great way to verify that the expected types and methods are available before you start coding the client. Everything in Figure 4.16 looks as expected, so we can continue building the client code.
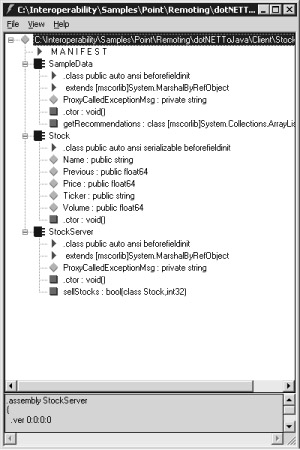
Figure 4.16: Using ILDASM to investigate the contents of the generated assembly.
The .NET client is located in Client.cs and looks very similar to the Client.java file we used in the previous example. Compile this now, using NAnt, to build the required client files.
Finally, before running the client, let's look at the remoting.config file that the .NET client will use. The configuration file, which follows , is located in the same directory:
<configuration> <system.runtime.remoting> <application> <client url="tcp://localhost:8888/StockServer"> <activated type="StockServer, StockServer"/> <activated type="SampleData, StockServer"/> </client> </application> </system.runtime.remoting> </configuration>
As you can see, the client URL matches the URI that we set in the Janetor tool. If you changed the port number in the last step of the previous example, be sure to change it to the same port number here as well. You need to include only the activated types that you call by reference: StockServer and SampleData . The Stock type returned is implicit to the call and does not need to be stated.
Run the client by executing Client.exe, ensuring that the Ja.NET TCP server is still running in a second command-prompt window. If all is successful, the client should list the five stock recommendations, as in the previous example. However, this time, the client will make a call to sell some stocks for the Java server component. This should be confirmed in the Ja.NET TCP server command prompt, with the following message:
Incoming request to sell 250 common shares of Fourth Coffee (FTHC)
To conclude this sample, let's take a look at the exception that's generated if the Ja.NET TCP server isn't running. (Performing this test is also a great way to prove that the communication really is happening!) Stop the Ja.NET TCP server by pressing Ctrl+C in the command prompt window in which the server is running, and rerun the .NET Client. You should observe a stack trace similar to the following:
System.Net.Sockets.SocketException: No connection could be made because the target machine actively refused it
When designing a more production-worthy version of this code, you can trap the SocketException and report a potential "Server is offline" message to the user.
EAN: 2147483647
Pages: 132