MIDI Track
| [ LiB ] |
MIDI Track
This class of track is for MIDI events. You can use MIDI tracks for any type of MIDI events. MIDI tracks contain MIDI note events, controllers such as velocity, modulation wheel, pitch bend, and so on. They also contain any type of MIDI automation information generated by the Channel Settings panel, such as automation for MIDI effects that might be assigned to a track. MIDI tracks can also contain MIDI filters and effects, such as MIDI compression, which is also discussed in the next sections. Recorded MIDI events are saved with the project file itself. When you associate a drum map to a MIDI track (this is explained later in the chapter), events in that track will become associated with the Drum Editor window rather than the Key Editor window.
When you record MIDI events, such as a musical performance, through your MIDI controller, these events are stored in a part, which appears on the MIDI track's Event Display area in the project window. You can have many parts containing MIDI events on your track, and parts can overlap each other on the track. Parts that are underneath other parts on the same track will still be active, and events inside them will still be heard when you play the track. You can compare a part to a container of MIDI events. In the case of MIDI, these containers can be stacked one on top of the other, playing either different drum instruments, different channels (if the MIDI track is set to play any MIDI channels), or simply as part of your working process.
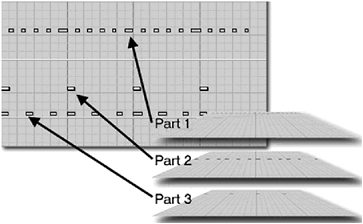
In the example in Figure 6.1, there are three different parts playing at the same time on the same track, creating a rhythmic pattern. These three parts could be playing over different channels or not. However, you should know that when parts are stacked one on top of the other in a MIDI track, the only visible part is the one on top of the others. If all the parts are of equal length, this might lead to confusion because you will hear the parts playing, but you won't see them unless you select all the parts by dragging your Selection tool over the visible part and opening your selection in the MIDI (Key or Drum) editor.
Figure 6.1. Overlapping MIDI parts on a MIDI track.
Setting Up a MIDI Track
To use a MIDI track, you must choose a MIDI input port and a MIDI output port. The MIDI input port records incoming MIDI events on the track. For example, if a controller keyboard is hooked up to your MIDI input port A, you can set your MIDI track to either All MIDI Inputs if you want any incoming MIDI ports to be recorded onto the selected track or set the track to MIDI input port A to record events only from your controller keyboard. This can be set as follows :
How To
To set your MIDI input port:
-
Make sure the MIDI Thru is active [File(PC)/Cubase(Mac) > Preferences > MIDI].
-
Select the MIDI track you want to set up for input.
-
Make the Inspector area visible.
-
Make the first panel in the Inspector area visible, as shown in Figure 6.2.
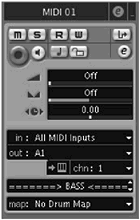
Figure 6.2. The basic track settings for a MIDI track in the Inspector area.
-
Click the arrow to the left of the MIDI Input Port field to reveal the available MIDI input ports.
-
Select the appropriate port.
Notice in Figure 6.2 that a MIDI port is already present because you can set a default MIDI port for your MIDI tracks. Whenever you create a MIDI track, it uses this default setting.
How To
To set a default MIDI port device for all projects:
-
Select Devices > Device Setup from the menu bar.
-
Make the Default MIDI Ports entry active by selecting it.
-
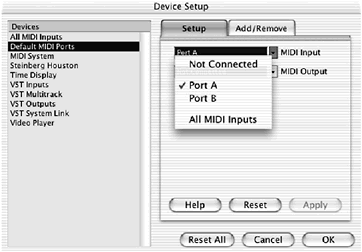
Click the MIDI Input drop-down menu (the field to the right of "MIDI Input") to select the appropriate default MIDI input port, as shown in Figure 6.3.
Figure 6.3. The Device Setup dialog box sets a default MIDI port.
-
Repeat this last step for the MIDI output port.
-
Click the Apply button and then click OK.
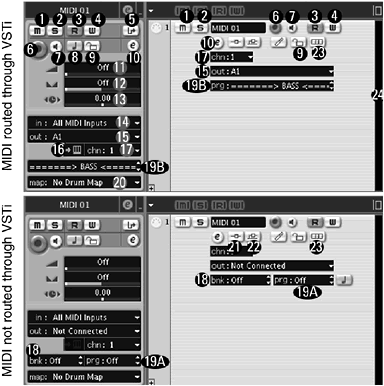
Let's take a look at each element found in both the Inspector's Track Setting area and the Track List area. Each number in Figure 6.4 corresponds to a number in the following numbered list. On the left you can see the inspector area when a physical MIDI port is selected, and on the right, the same area when a VSTi is assigned as a MIDI port output.
Figure 6.4. The MIDI track Inspector and the track list area for a MIDI track.
-
Mute: Mutes the track during playback.
-
Solo: Solos the track (mutes all other tracks).
-
Read Automation: Reads recorded automation on this track.
-
Write Automation: Writes automation on this track.
-
Input Transformer: Transforms MIDI messages between the MIDI input and output of this track. For example, you can use this to filter the MIDI input port's channels, allowing only the desired input channels to play through the MIDI output for this track.
-
Record Ready: Arms this track for recording. When you press the record button on the transport panel, incoming MIDI events will be recorded on this track.
-
Monitor button: Uses the MIDI Thru to hear MIDI messages coming in without recording these messages when in Record mode.
-
Timebase Format: Switches the track between linear time and musical tempo. When a track is displayed in musical tempo, changing the tempo of the song adjusts the events in the part according to the tempo setting. When a track is displayed in linear time, changing the tempo of the song does not affect the start position of the parts.
-
Lock button: Locks your track from editing.
-
Edit MIDI Channel Settings: Opens the Channel Settings panel to edit these settings.
-
Track Volume: Sets and monitors volume for the MIDI track. This uses the MIDI control change message number 7 and displays any volume automation for your track.
-
Track Pan: Sets and monitors pan for the MIDI track. This uses the MIDI control change message number 10 and displays any pan automation for your track. Any MIDI pan automation recorded will show up here.
-
Track Delay: Adds a positive or negative delay in milliseconds to your track. Events with a negative delay play earlier, whereas positive values change the timing of events to occur later in time. Track delays are great to offset a copy of a track that contains MIDI events. By assigning the copied track to another instrument and adding a slight delay, you can quickly get a thicker sounding part. Try it with strings parts or other parts that are not timing-sensitive.
-
MIDI Input Port: Sets the input port for the track. MIDI events coming through the input port can be recorded onto the track or monitored through the MIDI output port setting. Note that you can't select which MIDI input channel passes through a MIDI track, but usually, this is not a problem. If you do need to select which channel comes in, try the presets available for the Input Transformer (version 2.01 or better).
-
MIDI Output Port: Sets the output port for the track. MIDI events recorded on this track play through the device or software connected to this output port. You can also use the output port to monitor incoming MIDI events through a different port.
-
Edit VST Instrument: Brings up the VST Instrument panel, which allows you to edit the instrument's parameters and settings. Note that this button is only visible when a VSTi is assigned to this track. MIDI tracks assigned to a physical MIDI output, a non-VSTi compatible MIDI port, or Rewire MIDI output will not display this button.
-
MIDI Output Channel: Sets the MIDI channel used by the MIDI output port to play MIDI events on this track.
-
Bank: Sets a bank value associated with your MIDI device's preset structure. Typically, programs are grouped in banks of 128 sounds each (this is the maximum number of sounds MIDI can support). To access sounds above this value, banks are created. You can access up to 128 banks of 128 programs using this setting.
-
Program: Specifies a program number to the MIDI device or software instrument associated with this track.
-
Preset Selection: With some VSTi or MIDI devices that have been configured through the MIDI Device Manager panel, you can select the presets the instrument should play by using this drop-down menu. When this is possible, the preset selection menu will replace the bank and program settings field and the names for the instrument's presets will appear here.
-
Drum Map: Associates a drum map with the MIDI events on this track. This is useful when you record a drum part on this track. You can also use the Drum Map setting in the Track List area.
-
Insert State: Monitors the state of MIDI insert effects assigned to this track. The button is turquoise when an insert effect is assigned to the track, and a yellow rectangle will appear in the Sends title bar in the Inspector area. Pressing this button will cause the MIDI to bypass the inserts. When an insert is bypassed, the MIDI events do not go through the current inserts , but the insert settings remain untouched.
-
Sends State: Monitors the state of MIDI send effects assigned to this track. The button is turquoise when a send effect is assigned to the track, and a yellow rectangle will appear in the Sends title bar in the Inspector area. Pressing this button will prevent the MIDI on this track from going through the MIDI send effects, but the sends settings remain untouched.
-
Lane Display Type: Displays overlapping parts on several lanes inside the MIDI track. Clicking on this button will reveal a menu with different lane display options. When the lane display is set to Off, overlapping parts will go back to the usual display (for previous Cubase owners ). Fixed and Auto lane display will spread overlapping parts over the corresponding number of lanes .
-
Output Activity: Monitors event activity for the track. In MIDI tracks, this may be any MIDI messages (note, controllers, and sysEx if it is not filtered by Cubase). With audio tracks, this activity represents the playback level or the input level, depending on the track's Monitor state.
MIDI Track Parameters
MIDI track parameters allow you to change how the MIDI in a track is played in real time. In other words, it does not affect the recorded MIDI events, but rather transforms them on their way out to the MIDI output port. It's kind of like looking at yourself in a distorted mirror at the county fair. You do not actually have a big head, small neck, big belly, and small legs, as seen in the reflection. You simply appear like that in the mirror. MIDI track parameters are similar. They transform the data going out. Since they don't affect the MIDI data, the track parameters do not appear in the MIDI editors. Also, MIDI track parameters will affect all the parts on a track.
These parameters provide a convenient way to try things out without changing the original MIDI messages because you can bypass these parameters at any time by activating the Bypass button next to the track parameter name in the Inspector area (see Figure 6.5). When a track parameter is assigned, the upper-right corner of the Track Parameter section is purple. When you click the track parameter's Bypass button, a yellow rectangle appears next to the track parameter's activity settings indicator. Whenever you bypass the track parameter settings, the track will play the MIDI events on the track as if there were no track parameters applied to the track. This is very useful when you want to do a comparison listening of your events.
Figure 6.5. The Track Parameters section found in the Inspector area of a selected MIDI track.
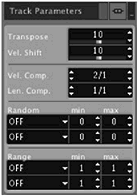
The Transpose field enables you to set a value between -127 to +127. Each value corresponds to a semitone below or above the current note. Positive values transpose notes higher; negative values transpose notes lower. This affects all the notes found on this track. If you want to try changing the pitch of a song to find out if you can sing it better in another key, this is a great tool to use.
The Velocity Shift field sets a value between -127 to +127 as well; however, in this case these values add or remove the value from the MIDI event's velocity for the selected track. For example, adding a value of "10" causes all MIDI events to play at their recorded velocity plus 10. When most of what you recorded is great, with the exception that the MIDI events were recorded slightly too soft (low velocity) or too loud (high velocity), use this to alter the overall velocity of your recorded events.
The Velocity Compression field uses a multiplication factor, which compresses or expands the velocity of MIDI events on a track by its corresponding multiplication factor. This factor is defined by a numerator (left value) and denominator (right value). The resulting fraction is applied to the track's velocity level. You can see an example of this in Table 6.1.
Table 6.1. How track parameters affect MIDI events
| Track Parameter | Note 1 | Note 2 | Note 3 | Note 4 | Comment |
|---|---|---|---|---|---|
| Before Filters | |||||
| Velocity Value | 50 | 70 | 35 | 100 | Recorded velocities |
| Vel. Comp. (1/2) | 25 | 35 | 17 | 50 | Velocities heard after compression |
| Vel. Shift (+50) | 50 | 50 | 50 | 50 | Added to the previous velocities when heard |
| After Filter | 75 | 85 | 67 | 100 | Resulting velocity that can be heard |
The Length Compression field also uses a multiplication factor, which compresses or expands the length of MIDI events on a track by its corresponding multiplication factor. This factor is defined by a numerator (left value) and denominator (right value). For example, a factor of 2:1 means that all notes will be of double length and a factor of 1:3 means that all notes will be one-third their original lengths. Note that this does not affect when the events play in time, only their length.
Below the Length Compression field, you will find two Random generators with their corresponding fields. These two fields act independently from one another and serve to introduce random values to the position, pitch, velocity, or length of MIDI events on this track. This can be useful with clear rhythmic or melodic parts rather than with tracks containing long sustained notes. In other words, the randomness is more obvious when events occur more often. Under each Random generator is a field that lets you choose what type of randomly generated value you want to add (position, pitch, velocity, or length). You can then set a minimum and maximum value for these random values. A wider range between the minimum and maximum value creates a more pronounced effect, whereas a smaller range creates a more subtle effect. With the position and length selections, you can set the minimum and maximum values from -500 ticks to +500 ticks , respectively. For the pitch and velocity, you can set these values between -120 and +120 (this corresponds to semitones when used with pitch). Note that you can't set your minimum value to a higher value than the maximum value.
At the bottom of the Track Parameters section are two Range fields with associated minimum and maximum values that work just like the random minimum and maximum fields. However, in this case, the Range fields, as the name suggests, are used to set a range for which events are included or excluded from processing. There are four Range modes:
-
Velocity Limit. Use this mode when you want all notes to play within a certain velocity range. Any note that plays at a velocity outside the range is either brought to the minimum value in the range if it is below this value or brought to the maximum value in the range if it is above this value. Any other velocity values (which are found within the defined range) play unchanged.
-
Velocity Filter. Use this mode when you want to isolate notes that play within a certain velocity range. Notes outside the range, either above or below, are simply not played back.
-
Note Limit. Use this mode when you want all notes to play within a range of notes. Note values that are below or above this range are transposed an octave up or down, respectively, in order to play within the range. If your range is too narrow and notes still don't reach the range after transposing an octave up or down, they are transposed to the center note value found within your range. For example, in a range between C4 and G4, A4 is transposed to an E4.
-
Note Filter. Use this mode when you want to isolate certain note pitches within a certain range. Notes with pitches outside the range are not played back.
About MIDI Effects
Before we discuss MIDI track inserts and sends, it is important that you understand the difference between a MIDI effect and an audio effect.
You may already know about audio effects and how you can use them to make your audio tracks sound better or different. In this respect, MIDI effects are similar to audio effects. However, the process is quite different with MIDI than it is for audio. When you apply a MIDI effect to a MIDI track, you are not processing the sound generated by the MIDI device (VST instrument or hardware sound module). In fact, you are using a process that adds or changes the MIDI events that are recorded on your track in real time. For example, when you are adding a MIDI delay to your MIDI track, Cubase generates additional MIDI messages to simulate an echo effect by using MIDI notes. Because these effects are playing in real time, just as audio effects, you can rest assured that your MIDI events on your track are not modified in any way, except at the output, where the MIDI effect actually takes place.
If you are using a VSTi, you can combine both types of effects: audio and MIDI. This gives you even more flexibility in your creative process. However, you cannot use audio effects on external MIDI devices because the audio of this device is not processed by Cubase until you record the audio from this external MIDI device onto an audio track inside your project. We'll get to this subject later, but for now, understand that a MIDI effect can be applied to any MIDI track in two ways: through a MIDI track insert and through a MIDI track send. Both methods instruct your MIDI sound module how to play the MIDI events according to the settings found in the MIDI effect.
You will find more information on what each MIDI effect does and how to use them in Appendix B.
MIDI Track Inserts
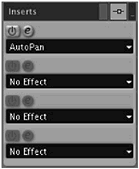
Below the Track Parameters section in the Inspector area, you will find the MIDI Track Inserts section, which adds a MIDI effect to your MIDI track (see Figure 6.6). When you are using an effect as an insert, you are sending the MIDI events recorded on this track into a selected effect. This effect then generates the necessary MIDI events through the MIDI output port of the track containing the effect. It is the device's (sound module) job to actually play the resulting MIDI effect along with the original recorded MIDI material. As you can see in Figure 6.6, you can have up to four MIDI insert effects assigned to each MIDI track. When a MIDI insert effect is selected from its drop-down menu, a panel opens up to reveal its settings. Once closed, you can access the insert's settings panel by clicking on the "e" button above the appropriate insert. You can also force Cubase to open the parameters of a MIDI effect in its own window if, by default, they open in the Track Inserts section. You can do so by Alt(PC)/Option(Mac)-clicking on the Edit MIDI Effect button. Here are some of the things you can do with MIDI inserts:
Figure 6.6. The MIDI Track Insert section in the Inspector area.
How To
To add a MIDI insert effect:
-
Select a MIDI effect from one of the four drop-down menus .
How To
To edit a MIDI insert effect's parameters:
-
Click the Edit MIDI Effect button (see Figure 6.6).
To bypass one or all MIDI inserts from playback:
-
If you want to bypass all effects, click the Insert Bypass button at the top of the MIDI Track Inserts section. The MIDI Track Insert section's top-left corner turns yellow, indicating that the effects are bypassed. Because you can always see the top part of the Track Inserts section, you can easily change the status (active or bypassed) of your inserts by using this bar.
-
If you want to bypass only one effect, click the Activate/Deactivate button above the effect you want to bypass. By default, an effect is activated as soon as you select it from the drop-down menu. By deactivating it, you can do a comparison listening without having to reset your effect each time.
As you can see in Figure 6.7, when you assign a MIDI insert to a track, it only affects the events on this track, and you can only use the track's MIDI output port to generate these effects. This said, if you want to use one device to play the original content and another to play the processed information, you can use a MIDI track send. If you want to maximize or minimize this section in the Inspector area, click the button found in the upper-right corner of the insert's title bar.
Figure 6.7. The signal path of a MIDI track insert.
![]()
MIDI Track Sends
When you want to send the result of a MIDI effect played through a different MIDI device, you can use the MIDI track sends instead of the MIDI track inserts because the track sends offer an additional setting for MIDI output ports and MIDI channels. As you can see in Figure 6.8, the signal can be routed to two different outputs. In other words, if you don't need the effect to play through the same MIDI port and channel, use the track insert. However, if you want your effect to play through another port and channel, or you want to send the MIDI events before or after the volume control setting of the MIDI track, use the track sends.
Figure 6.8. The signal path of a MIDI track send.

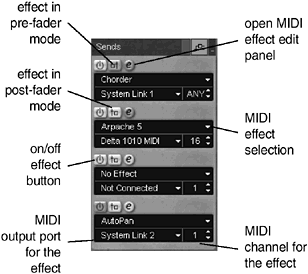
The options for the MIDI track sends are fairly similar to the ones found in the Track Inserts section (see Figure 6.9). In addition to the options explained earlier, below the MIDI Effect Selection, you will find a field that lets you choose the appropriate MIDI port for the MIDI events generated by the MIDI effect along with a MIDI channel setting. Found between the Activate/Deactivate MIDI Send FX button and the Edit MIDI Effect button is the Pre-/Post-fader toggle button. In its default Post-fader mode, the volume level of the channel will affect how the MIDI events are treated by the MIDI send effect. In the toggled Pre-fader mode (the button becomes yellow), the volume control level of your track has no effect on the MIDI events sent to the effect.
Figure 6.9. The MIDI Track Sends section in the Inspector area.
How To
To assign a MIDI track send:
-
Unfold the Sends section for the selected MIDI track (upper-right corner of the section).
-
From the MIDI Effect selection drop-down menu, choose an appropriate effect.
-
Under the selected MIDI Effect field, choose an appropriate MIDI port for the output of the MIDI effect. This affects where the MIDI events generated by the effect will be sent.
-
Next to the output port, select an appropriate MIDI channel for playback.
-
Select Pre- or Post-fader mode, according to your preference. Remember that in the default Post-fader mode, volume automation on your track may affect how the MIDI events are treated by the MIDI effect.
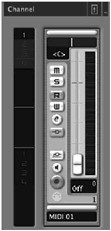
MIDI Channel
The MIDI Channel section (see Figure 6.10), found at the bottom of the Inspector area, offers many of the same options as you find in the MIDI Setting section of the Inspector area, as well as the Track List area for a MIDI track. It also mirrors the information you find in the Mixer panel for this specific track class, as well as most of the buttons that we have seen earlier in the Track List and Track Setting section of the Inspector area. You can use this section to set the pan and volume levels of the device associated with this track. You can also use this section to change or monitor which insert or send effects are active. Finally, below the volume fader is the track's name field, which you can use to rename the selected track.
Figure 6.10. The MIDI Track Channel section in the Inspector area.
Notepad
You can now add little bits of information with each track by using the Notepad section. Use it if you need to exit quickly and just want to keep some notes on the current state of your project, describe which device was used for this track, if it was changed from its original setup and so onanything you feel is worth writing down. If you save your file, only to reopen it in a few months, you might not remember what is what. The Notepad allows you to refresh your memory.
Simply type in the text field area. Any changes you make will be saved with the project file.
| [ LiB ] |