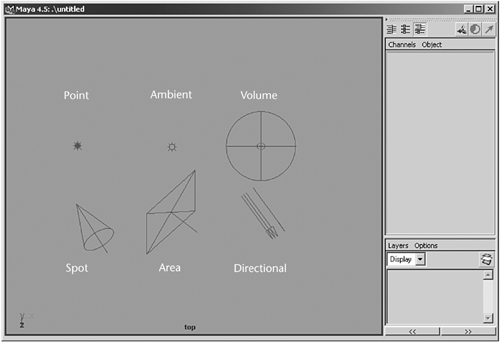
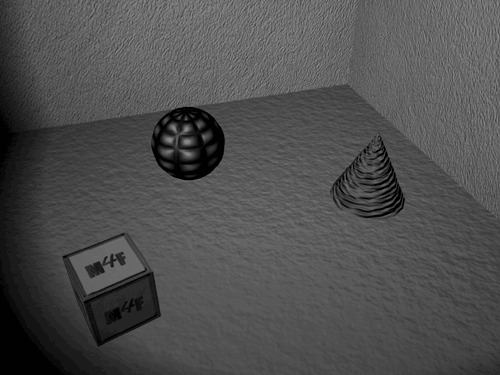
| Several different lights are available in Maya 4, each with its own properties and uses: Directional, Ambient, Point, Volume, Spot, and Area lights. Each one has its own icon to represent it in your scene (see Figure 9.1). Figure 9.1. Different icons identify the lights in your scene.  Tutorial: Spot Light and Attributes To learn to use lights, you need to work with them interactively. By using a simple scene with some NURBS primitives, you can create lights and render them to see the results of changes in attributes and other settings. The first light you'll work with is the Spot light, probably the most commonly used light, with a multitude of options to adjust the settings for the areas it illuminates. The Spot light's area of illumination is defined by a cone, and within the cone's specified range, light is cast evenly. Starting from an infinitely small point in space, a Spot light spreads as it moves farther from the origin. Spot lights are useful when you're trying to create conic beams of light from, for example, a prison watch tower, a lighthouse, and so forth. -
Start Maya, and open the scene file from the Maya Fundamentals CD-ROM (noted below the CD icon). You'll see three primitive objects, a wall, and some ground for the objects.   -
Switch to Four View mode. Open the Hotbox and click Create Lights Spot Light option box to open the Create Spot Light Options dialog box, which contains basic creation options for the Spot light. You can also access these attributes in the Attribute Editor. -
Reset the values to their defaults (Edit Reset Settings), and click the Create button. A Spot light named spotLight1 is created at the scene's origin point. If the Channel Box is not visible, open it (hotkey: Shift+C ). The area that a Spot light illuminates is based on its position and center of interest (where it's aimed), so having it located at the scene's origin isn't usually the best placement. The best way to work with a light in a scene is to switch to the Light Manipulator tool, which you can use to easily modify the light's location and center of interest. -
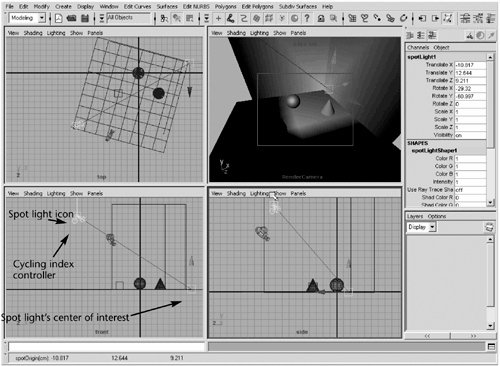
Activate the Light Manipulator tool (hotkey: t ). The Light Manipulator tool has a set of two manipulators: the pivot manipulator, located at the light's pivot (origin), and aim manipulator, located at the light's targetits center of interest. In the Top view, just as you would move an object, move the Spot light to the floor's lower-left corner by using its pivot manipulator. -
The light's aim is still off. Using the aim manipulator (shown in Figure 9.2), move the center of interest to the floor's upper-right corner. The idea is to position spotLight1 so that it aims at about a 45-degree angle from the floor toward the objects, as seen from above. Figure 9.2. Using the Light Manipulator tool to position your Spot light.  tip There are other manipulator options beside pivot and aim. When you're in manipulator mode, a light-blue manipulator called the Cycling Index controller (shaped like an upside-down "Q") is visible. This is a switch to toggle through the manipulator modes. You can get visual feedback and control over tilt, falloff, cone angle, and other parameters with these manipulator modes. -
Switch to the Side view and use the pivot manipulator to move it about 12.5 units in the Y direction. You should now have the Spot light positioned to illuminate the objects at about a 45-degree angle from the ground's horizontal line, as shown in Figure 9.2. Using the IPR Render for Tweaking The more you work with lights, the more you'll come to appreciate IPR render. Being able to immediately update the lighting as you make adjustments is an invaluable tool in the 3D artist's hands. Lighting also affects the materials in the scene. For instance, if a particular light worked in one scene with a Lambert material, you would have no specularity . If you tried to use the same lighting in a scene with a different material, such as Blinn, the results might be unacceptable. By using the IPR render, you can easily adjust the lights for different materials. Follow these steps to try out the IPR render: -
Open the Render View window from the Hotbox or menu bar (Window Rendering Editors Render View). First, you should determine the test resolution you'll use. It's currently set to 640x480. Depending on the speed of your machine, this value might be too high and can cause the IPR render to work more slowly than you would like. For this tutorial, reduce the test resolution by right-clicking in the Render View window, choosing Options Test Resolution, and then releasing the mouse button over the 320x240 value. -
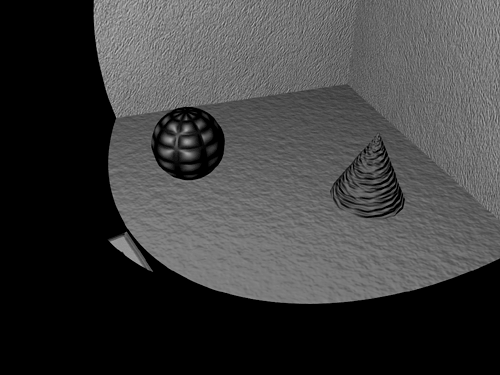
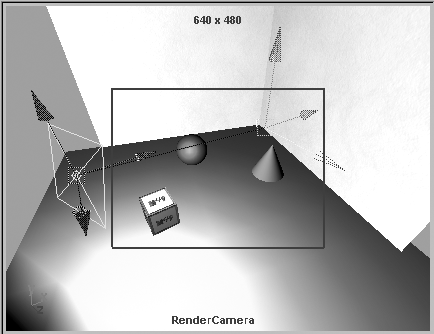
The Render Globals settings have already been configured to render from the RenderCamera view. Click the IPR Render button in the Render View window. When the IPR render is finished, click-drag to select the entire rendered image in the Render View window. The IPR render should update the pixels. You can then change various attributes for a Spot light and see how it affects the scene (see Figure 9.3). Figure 9.3. The Spot light illuminates objects only within the cone's specified area.  note If you notice a warning in the Command Line about IPR not supporting non-IFF format images, it relates to the save-to file type set in the Render Globals window. It will not cause a problem with IPR. -
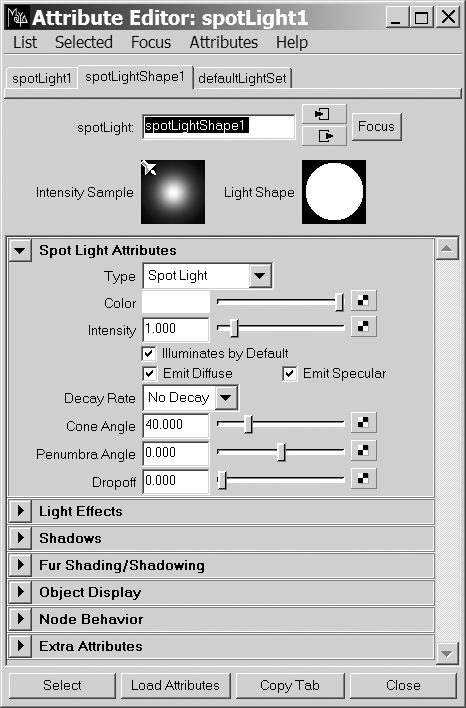
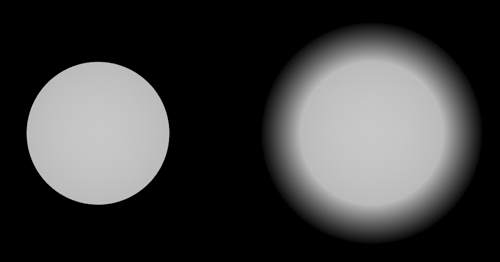
If spotLight1 is not selected, open the Outliner (hotkey: Shift+O ), and then click on spotLight1 to select it. Open the Attribute Editor, and click the spotLightShape1 tab. You now have access to the settings for a Spot light in Maya. Attributes for Spot Lights Each of the five light types works differently, and each one has attributes specific to its type. By understanding the attributes that differentiate the available lights in Maya, you can choose the correct light for a particular setup. Getting familiar with what these attributes do can save you some time while creating a scene, too. You should aim for being able to change a specific value and having a good idea of what the result should be. Take a look at Figure 9.4 to see the attributes for a Spot light. Figure 9.4. Using the Attribute Editor is the easiest way to view attributes for a light.  Tutorial: Working with Spot Light Attributes The first attribute you're going to modify is the Cone Angle, which specifies the cone's actual width and is defined in degrees from 0.006 to 179.994. By default, the Cone Angle is set to 40. If you decrease the angle of the cone, the circular area that's lit up will decrease (see Figure 9.5). You can continue from the previous tutorial, or load the scene file noted here. Figure 9.5. The area lit by downward-pointing Spot lights rendered from the Top view. A Cone Angle of 40 was used in the lit circle seen on the left; on the right, a Cone Angle of 25.  -
Change the value of the Cone Angle from 40 to 60 . Notice that the illuminated area increases because you increased the angle of the cone by 20 degrees.   -
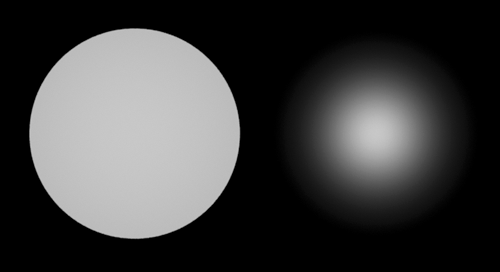
Look at the edge of the area being lit. To diminish the harsh line defining the edge where the light stops, you can use the Penumbra Angle attribute. In the Attribute Editor for spotLight1, change the Penumbra Angle to 5 . After the IPR updates, you can see that the edge has softened. The lighting results from the Spot light are starting to look much better. By changing a few simple settings, you now have completely different lighting. The Penumbra Angle can add or subtract from the Cone Angle. It softens the outer edge of the Spot light's cone. When specifying a Penumbra Angle, you're setting the angle at which the light falls off from the edge of the cone. If your Spot light has a Cone Angle of 40 and you set the Penumbra Angle to 10, the light's total spread angle will be 50 degrees (40 + 10). After the light has spread the first 40 degrees, it diminishes to darkness over the remaining 10 degrees. Simply put, the Penumbra Angle allows you to have an area intensely lit with light, but eliminates the harsh edge left by a default Spot light (see Figure 9.6). The Penumbra Angle can be set from -179.994 to 179.994 and has a default value of 0. Figure 9.6. By raising the Penumbra Angle, the circular lit area on the right has a softer edge than the default Spot light.  The Dropoff attribute of a Spot light is similar to the Penumbra Angle, but acts from the center of the light. Therefore, you can change the softness across the entire cone (see Figure 9.7). The light starts off very bright at the center and then fades linearly to the cone's original edges. With values ranging from 0 to infinity, you can change the Dropoff attribute when the edge of the light is too solid and creates unwanted contrast. With a softer edge, you can use a Spot light without giving away its location. This gives you an opportunity to use the Spot light for general lighting as well as lighting aimed at a specific area. Figure 9.7. By setting the Dropoff attribute to 10 in the lit circle on the right, you have a softer transition from the center lit area to the circle's edge.  -
In the Attribute Editor for spotLight1, change the Dropoff attribute to 5 . The center of interest is no longer illuminated as intensely and the area illumination seems to be more evenly distributed. -
Render the RenderCamera view. As you have experimented with the Spot light, you have probably noticed that you have a lot of control over aiming the light, thus allowing you to focus on a specific part of the scene. Figure 9.8 is a final render after all the attribute changes to the Spot light. Figure 9.8. The results of changing attributes for spotLight1.  Next , for the purposes of comparison, you'll make a layer for the Spot light: -
Create a layer for the Spot light and name it SpotLight_L . -
Assign spotLight1 to the layer. -
Take this opportunity to save the scene to your hard disk. Name the file LightExamples . Other Light Types The following tutorials walk you through the other available light types in Maya and demonstrate how to use their attributes to adjust the lighting in your scene. Tutorial: Directional Light The Directional light is the default light used when you create a new scene. Although this light has no special attributes, it's good for emulating the parallel rays of light coming from the sun, and does a good job of lighting the entire scene instead of just targeted areas. If you decided to skip over the first tutorial, or got lost, you can load the scene file noted next to the CD icon. -
Currently, there's a layer (SpotLight_L) with spotLight1 in it. If you hide the layer, Maya will still render the light by default, so to see the effect of the Directional light by itself, you need to somehow turn the Spot light off. To do that, in the Outliner, select spotLight1. Transformation values and attributes for the Spot light should now be loaded into the Channel Box (make the Channel Box visible with Shift+C ). In the Channel Box under Shapes, spotLightShape1, change the Visibility setting to , which switches it to "off" so that it doesn't illuminate the scene.   -
Create a Directional light (Hotbox Create Lights Directional Light). A default Directional light named directionalLight1 is placed at the scene's origin. -
Open the Render View window (Window Rendering Editors Render View), and IPR render the scene with the Directional light. tip Shaded views can display geometry lit by these three methods : default lighting, all scene lighting, or selected lighting. Normally, when you begin lighting, you set shaded views to use all scene lighting (hotkey: 7 ). These options appear on the Lighting menu item in each 3D panel. Remember that shaded view lighting is just a rough approximation of what the final rendered lighting will look like. The location of the Directional light in a scene doesn't affect how objects are lit. All that matters is the angle the light is set at. Position the Directional light icon in a convenient place, scale it to a size that makes it easy to select, and rotate it to set the direction of the incoming light. For example, if it's high noon, you want the Directional light to point directly down, perpendicular to the ground. -
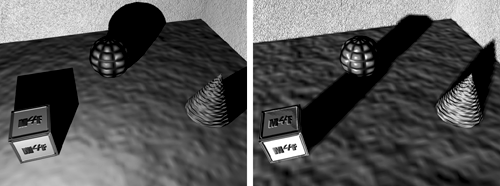
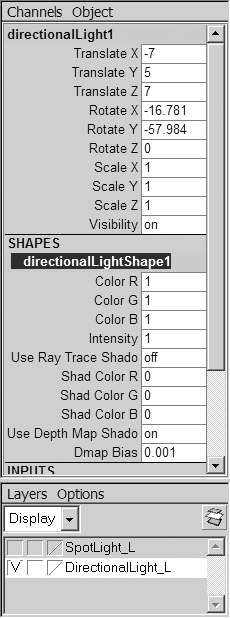
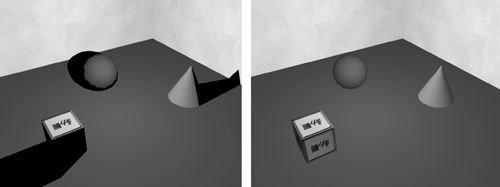
Position the Render View window in a location where you can see it but still be able to modify the light. It's not easy to see the light icon because of the scene's floor plane. Confirm that the Directional light is still selected, and in the Channel Box, change Translate X to 7 , Translate Y to 5 , and Translate Z to 7 . Rotating the light changes the angle that the light shines from, so it illuminates the scene differently. Switch to the Rotate tool (hotkey: e ) and rotate the Directional light until the corner of the room is lit: Set Rotate X to 17 and Rotate Y to 58 . tip Some people prefer to use the Light Manipulator tool to adjust the angle of rotation for a Directional light. Just press t and move the aim manipulator to change the rotation angle of the Directional light. Probably the most noticeable results of the Directional light have to do with the shadows it casts. Shadows cast by a light such as a Point light vary in their angle from the object. That's just fine if you have a light source that's nearby, such as a lamp, but it won't work if you need to simulate shadows from a distant light source, such as the sun. Shadows cast from a distant object should be parallel. This is where the Directional light comes in. As a result of the Directional light shining in one specified direction and emitting light rays that are parallel to one another, the shadows are also cast in parallel (see Figure 9.9). Figure 9.9. The image lit with a Point light (on the left) has shadows radiating from a common point. The image lit by a Directional light (on the right) has shadows that are parallel to each other.  -
Make sure the Directional light is selected. In the Channel Box under directionalLightShape1, change Use Depth Map Shadows setting to on (see Figure 9.10). The fast way is to type the number 1 and then press Enter, instead of typing the word on , but either method works. IPR will immediately attempt to update the addition of shadows, but will not show any. You need to IPR render again to collect data on the shadows. After IPR is set again, you'll see that the shadows the three objects cast are parallel. Figure 9.10. Enabling the Use Depth Map Shadows option in the Channel Box.  -
Create a new layer and name it DirectionalLight_L . Add the Directional light to the layer, and change its Visibility setting to (off) in the Channel Box. -
Save your scene again. Tutorial: Point Light Unlike the Directional light, which has light rays that are parallel to each other, a Point light casts rays of light evenly in every direction from a point. Point lights are used for general-purpose illumination and simulating omnidirectional light sources, such as light bulbs . You can continue from the previous tutorial, or load the scene file from the Maya Fundamentals CD-ROM (see the CD icon here). -
Create a Point light (Hotbox Create Lights Point Light), which has the default name pointLight1.   -
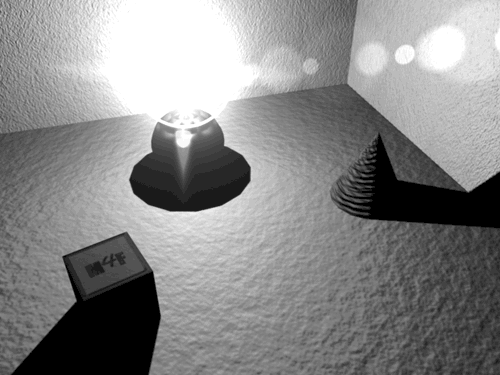
Position pointLight1 by changing Translate Y to 3 . In the Channel Box, under the pointLightShape parameters, enable the Use Depth Map Shadows option. Next, you'll add a light effect. Light sources have the option of having an opticalFX attribute added that can cause a particular effect to appear where the light is located. Typically, these effects are the sort that happen in cameras pointed at bright sources: lens flares, glows , and rings. When a light source is supposed to appear in the scene as a very intense object, an opticalFX flare can produce the effect convincingly. -
Open the Attribute Editor for the Point light (hotkey: Ctrl+a ). To add a light effect, in the PointLightShape1 tab under Light Effects, click the checkered button to the right of Light Glow. The Attribute Editor then displays a new tab called opticalFX2. Leave all the settings at their defaults for now, and keep the Attribute Editor open. -
Render the scene from RenderCamera, and you can see that the light's origin glows. Using IPR render, you can easily use the Attribute Editor to change values for the Light Glow. -
Experiment with the OpticalFX settings in the Attribute Editor to see their effect in the IPR render. For Figure 9.11, Glow and Halo types are set to Rim Halo, and the Lens Flare option is checked. All other values are set to default. Figure 9.11. A Point light with a Light Glow opticalFX has been positioned in the scene. Notice how the Point light emits light in every direction.  -
Create a layer named PointLight_L and assign pointLight1 to it. Set the light's Visibility to in the Channel Box, and hide the layer with the Point light. -
Save your scene. Tutorial: Area Light With the release of Maya 3.0 came support for the Area light. This exciting feature enables you to have a source of light that does not just come from an infinitely small point in space. The Area light emits rays from a rectangular area in space and can be scaled larger or smaller. This makes an Area light a great choice when you're looking for realistic lighting, but be forewarned that it takes longer to render. By using an Area light, you'll get shadows that soften as they're cast farther from the shadow-casting object. Maya uses only two-dimensional flat Area lights that are rectangular. You can continue from the previous tutorial, or load the scene file noted here. -
After you have opened the file, create an Area light (Create Lights Area Light) with the default name areaLight1. -
Set Translate Y to 5 to place the light icon in the viewport. Then set Translate X to 5.5 and Translate Z to 5.5 .   -
Switch to the Light Manipulator tool (hotkey: t ), and in the Top view, position the center of interest to the back corner of the room (see Figure 9.12). Note that the Area light is above the objects and horizontally aligned. Figure 9.12. Positioning areaLight1 with the center of interest at the back corner of the room.  -
Make sure the Render View window is open. With the Area light in position, make an IPR render (in the Hotbox, click Render IPR Render Current Frame). The RenderCamera view should now be IPR rendered in the Render View window. tip If you think the wrong view was rendered, you can check by right-clicking in the Render View window, and then choosing IPR IPR Render RenderCamera. When the IPR render is complete, you'll be prompted to draw a window in the IPR image for IPR rendering to update. Select the entire image for IPR updating by marquee-selecting it. After IPR rendering the scene, take a look at the lighting. You can see that the light starts off very strong and then decays with distance from the light. Area lights naturally give the effect of light decay, even when the Decay Rate attribute is set to the default of No Decay. As the Area light spreads with distance, the intensity drops off because a larger area is illuminated by the same amount of light. The way you aim the Area light also varies how your scene is lit, similarly to a Spot light. -
Using the Light Manipulator tool, with areaLight1 selected, move the center of interest to the middle of the group of objects and on the ground. The Render View window with the IPR image should quickly render again to show the moved light. The room will be more intensely lit near the front because of the angle of the light. -
Next, try uniformly scaling (hotkey: r ) the light smaller, to a value of about 0.5 (watch the Scale values in the Channel Box as you scale). The Area light icon in the viewport represents the light's scale. The IPR rendering will become much darker . Next, for comparison, scale the light larger, to around 2 , and the IPR render will update, with the larger Area light generating far more light. -
Again, set the Area light's Visibility to off, and then create a layer for areaLight1 with the name AreaLight_L . Add your Area light to it, and then save your scene. Area lights can be useful for simulating the diffuse reflection of light from surfaces. This is most useful for brightly lit broad surfaces (like a ceiling) or strongly colored surfaces that reflect and tint light (a red ball near a white wall, for example). Area lights are nearly always much slower to render than the other light types, so you should use them only when necessary and can live with the loss in rendering speed. The scene file noted below the CD-ROM icon is the finished version. You might want to compare it to your final version.  Tutorial: Volume Light Volume lights are new for Maya 4.5. This type of light has a visible range of influence that allows you to see exactly where the light dies out. By default, the light intensity falls off linearly from the center point of the light to the visible outer boundary. This type of light is ideal for interior lighting, because you will nearly always want lights to die with distance if they are primary sources of light. -
Create a volume light with the default name of volumeLight1.   -
Set the Translate Y to 6 and Translate Z to 8 in the Channel Box. This should bring the volume light to the right side of the camera. However, if you render now, the image will be black. The volume light falls off to darkness before it can strike anything. -
Switch to Scale mode (hotkey: r ), and scale the light so that the circle circumscribes the entire scene. A scale value of about 15 will suffice. -
Render the camera view with IPR: Hotbox Render IPR Render Current Frame. After the rendering completes, drag a square in the IPR render that covers the entire image. -
Adjust the scaling of the volume light in the top view, and you can quickly see the effect in the IPR render. Note the decay of the light with distance, as shown in Figure 9.12A. Figure 9.12A. Scaling the volume light to set its falloff range.  -
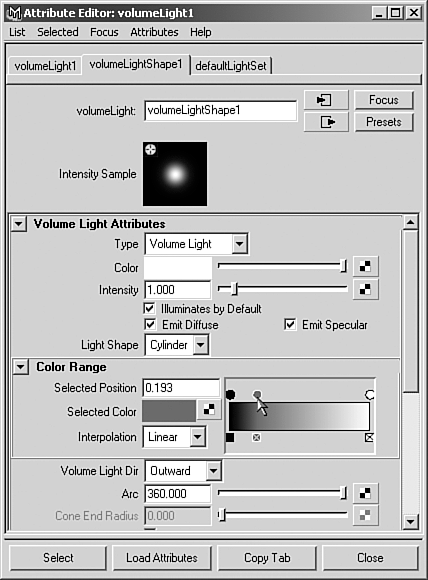
Bring up the Attribute Editor while the volume light is still selected. Here you can see a number of unique variables for this light type. Under the volume light attributes, set the Light Shape to cylinder, and note that the volume light icon in the scene is now cylindrical. -
Under color range, you'll see a gradient. The circled color dots that appear on top of the start and end of the gradient are the positioners, while the "x" boxes under the gradient allow deletion of the positioners. When a positioner is selected, the color swatch at the left of the gradient can be edited to change this point in the gradient. Clicking inside the gradient creates a new positioner. Try clicking in the center of the gradient to create a new positioner. The drag the positioner left to move this mid-gray point closer to the black end of the spectrum, as shown in Figure 9.12B. You'll see the result immediately in the IPR rendering. Figure 9.12B. Adjusting the gradient changes the light colors as they fall off.  -
Close IPR, set the volume light's visibility to off, and create a layer for the light named VolumeLight_L. Add your volume light to this layer and save your scene. Volume lights are excellent for simulating most man-made sources of light. You can also get a variety of bizarre and special effects by adjusting the Light Shape, the volume light direction, and the arc. Volume lights are no slower to render than point or spot lights; in most cases, you will want falloff and will therefore use the volume light in place of the point light, with the volume light shape set to spherical (to mimic the point light's omnidirectional illumination).  Ambient Light The Ambient light type creates light on all surfaces. It is in no way comparable to the real-world ambient light that creates the diffuse reflection of surfaces mentioned earlier in the chapter. Instead, it's a kind of autoself-illumination that brightens all parts of your scene equally. For this reason, this light type should be used sparingly or for special cases only, or it will give your scene a washed-out or flat appearance. Unique to Maya is the ability to use an Ambient light as you would a Point light. Maya's Ambient lights can also cast shadows (see Figure 9.13). In essence, these features allow you to use Ambient lights as though they were Point lights, with a variable " shine everywhere" setting. This setting is called Ambient Shade , and the light behaves more like a Point light as this value approaches 1. Figure 9.13. Ambient lights in Maya have the option to cast shadows, but these lights shine equally on all surfaces, yielding a flat look if the Ambient light is bright.   |
