Marking Menus and the User Interface
| |
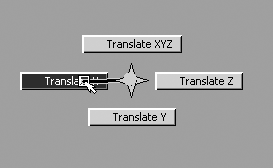
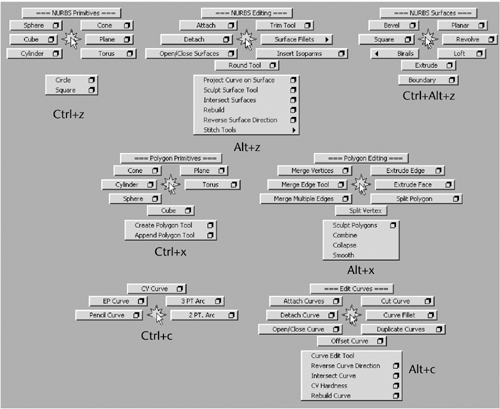
Marking Menus and the User InterfaceMaya has the potential for a quick and efficient workflow. Watching an experienced user interact with Maya looks like magic because good work takes shape quickly, with a minimum of keystrokes and mouse presses. The key to this efficiency is creating custom marking menus that increase productivity and speed. When you press and hold a key on the keyboard, and then left-click and hold on the mouse, a kind of compass appears onscreen. You can then drag with the mouse toward a command to execute it. If you perform the action a little faster, you'll see only a short drawn line onscreen and a brief flash of the command name (such as "Create Cube") as the command is executed. After a few weeks, you'll have memorized your marking menus and will be able to zip through creating and editing. Because the marking menu is a two-choice combination (first the hotkey, then the mouse selection), you can group related commands on a single hotkey. The mental relationship is very natural and fast if you assign your marking menu actions and hotkeys logically. For example, you might choose Alt+c as a hotkey for the Curve Editing marking menu, and assign the most frequently used menu items directly to the left and right (at the 9 o'clock and 3 o'clock positions ), as shown in Figure 5.2. Therefore, a simple Alt+c and LMB-drag to the left puts you in the correct edit modeergonomically efficient and, in time, blindingly fast. If you've ever learned to play a musical instrument, you know the power of internalizing motions through repetition. Figure 5.2. One of the built-in marking menus: Translate X is at the 9 o'clock position. For this chapter, and the rest of the book, we have constructed a set of marking menus specific to the tasks you're learning how to perform. They are available on the book's CD-ROM; by loading them before you start the tutorials, you'll get a good idea of the many ways marking menus can be used. These marking menus also give you a good starting point for building your own set. Learning Maya's hotkeys and adding new hotkeys will also add to your creation speed. We've included a few hotkeys in addition to the ones used for the custom marking menus. Let's load them now. Customizing the Interface and Loading the Marking MenusFirst, you need to import the marking menus and hotkeys for this chapter. Chapter 15 explains how to create your own marking menus and assign them to hotkeys, but to save time, we've put them on the CD-ROM for you to load in a few steps. Remember that when you see the little CD movie icon like the one listed here, that means you can load a movie from the book's CD-ROM that corresponds to the skill being presented. Note that the directions are for Maya users on Windows-based operating systems. If you are using Maya on Linux, Mac OS X, or IRIX, you'll find analogous folders and files on your hard drive. Consult your reference manual if in doubt.
tip Replacing all your Maya settings can point some parts of Maya to the wrong folderfor example, your Visor brushes for Paint Effects. If this happens, you can fix it easily by choosing Tabs Revert to Default Tabs in the Visor menu. Customizing the HotboxAt first, the Maya interface might seem intimidating, because hiding all those UI elements makes it seem as though you have less control over the software. However, you actually have access to every menu with the Hotbox. Follow these steps to customize the Hotbox so that all your options are showing:
trap You can't access the Hotbox with the spacebar unless one of the panels is active. When you have a dialog box open on top of the panels, none of the panels is considered active, so right-click on any panel to make it active. This activates the panel without selecting or deselecting any objects (left-clicking a panel activates it, too, but is a bad habit because it could cause accidental selects or deselects). Notice that the panel's border turns blue to indicate that it's active. You can then hold down the spacebar to open the Hotbox. Here are the marking menu hotkeys you've loaded:
You can test out your new hotkeys by pressing the key combination and then LMB-clicking on your viewport (see Figure 5.3). Keep the mouse button pressed, and suddenly a menu will pop up! Drag the mouse toward any of the menu options to take that action. Try each of the hotkeys for your marking menus. Figure 5.3. Your new custom marking menus. Here are the other hotkeys we've added or reassigned:
The hotkeys have been positioned so that they are more easily accessible to the left hand for right-handed mouse users. You can always reassign them to other keys if you choose. You would also want to move the translation hotkeys ( q , w , e , r ) because they too are on the left side of the keyboard. By keeping your hand in one area, you can work even more quickly. The objective is to be able to press the primary hotkeys without having to look at the keyboard. We'll add more hotkeys as you get further into the book, after you have memorized the ones just assigned. The first of the hotkeys you'll use and memorize in this chapter's tutorials are as follows :
trap If you accidentally press Alt+v , Maya begins playing the animation. This can be frustrating because you don't have the Time Slider visible, so you won't be aware that Maya has started playbackyou haven't created any keyframed animation yet. You lose the ability to create and edit most objects when the animation is playing. You can bring back the Time Slider in the Hotbox, using Display UI elements Time Slider to confirm that Maya is playing back. We have also mapped a hotkey that toggles display of the Time Slider: Alt+t . Pressing Alt+v or the Esc key stops the playback if Maya has started it. You can reprogram this default hotkey to some other key by using the Hotkey Editor. In the Assign New Hotkey section of the dialog box, enter v as the key, select the Alt check box, and click the Find button. Now you can easily reassign or unassign this hotkey. |
EAN: 2147483647
Pages: 201

