Differences in Creating and Editing Models
| |
| Modeling Maya offers both NURBS and polygonal modeling. Maya's NURBS are more complex and full-featured than max's. When using NURBS, take these factors into consideration:
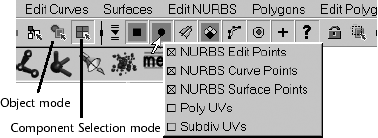
In earlier versions of Maya, some tools worked only on NURBS, such as Paint Effects and Artisan, but this is no longer the case. Keep in mind that UV mapping is inherent to NURBS, but it must be applied to polygonal surfaces. Editing subparts of a mesh Maya has no modifier stack, so it has no "subobject" mode. Instead, you right-click on a selected object to display its component modes in a context-sensitive menu. You can also enter the "subobject" mode with the F8 key or with the Component Selection mode button in the Status Line. When in Component Selection mode, the selection mask buttons change from object types to the appropriate component types. For polygons, they would include edges, faces, and vertices; for NURBS objects, isoparms, control vertices, and so on. You then make selections, edit the selections (with the Move, Rotate, or Scale tools), and exit the mode by right-clicking and choosing Select or by pressing the F8 key again. F8 acts as a subobject mode toggle. You can right-click on the Selection by Component Type buttons at the top of the interface to include or exclude certain types of entities, as shown in Figure A.12. Buttons are brown if the entities are disabled. Figure A.12. In Component Selection mode, the selection mask buttons change. Adding modifiers to a mesh Many of the typical max modifiers, such as bend, twist, and skin, are found in the Animation mode dialog boxes. In general, Maya divides the modes of editing and deforming an object between modeling and animation. However, Maya allows almost anything to be animated, just as max does. Object history and modifier stack Compared to max, Maya offers much more detailed object history; every edit is stored in the object's history, as opposed to max's quantum-style modifiers that contain all edits made by the modifier in the stack. Maya's Channel Box displays a stack-like list of tweaks and source object settings for the selected object. Just as you often collapse the modifier stack for objects in max to improve load speed and file size, you should delete the object history when you're done with primary editing (Edit Delete by Type History on the menu). Deleting selected parts of an object's history is usually called "baking history" because you're keeping the object as is and discarding all the construction records. |
EAN: 2147483647
Pages: 201
