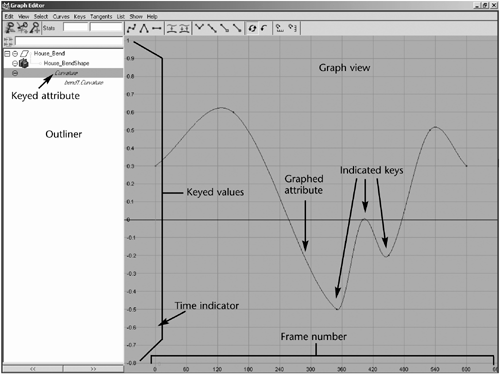
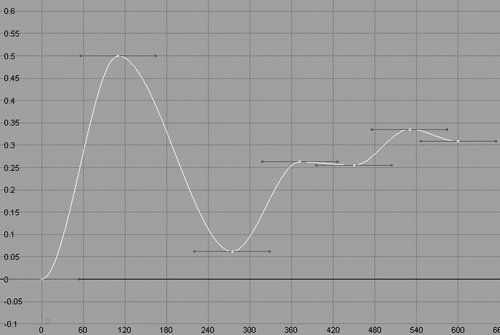
| The Graph Editor, shown in Figure 10.6, is a helpful tool for tweaking values for keys you have set. It gives you a visual representationa curved lineof the attributes that are animated. The animation time goes from left to right, and any keyed variable appears as a line that moves up or down to indicate its value over time. It can help you visualize how things are changing and how fast. You can pan and zoom this panel like any other. Figure 10.6. You can easily work with keys in the Graph Editor.  You can use the Graph Editor as a free-floating window or set it up as one of the viewports. To use it as a free-floating window, simply open it from the Hotbox (Window Animation Editors Graph Editor). To set it up in a viewport that displays the Perspective view and the Outliner, click Hotbox Panels Saved Layouts Persp/Outliner/Graph. As you go through the next tutorial, try both layouts to see which one works better for you. Let's take a brief tour through the Graph Editor's components in the following list: -
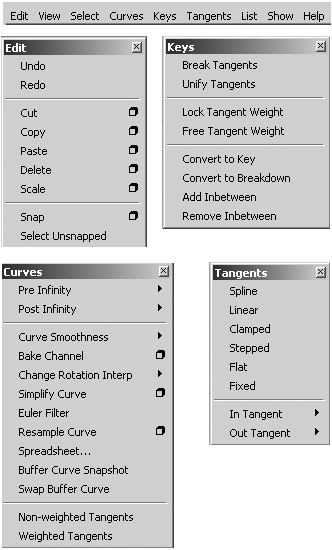
Menu bar The menu bar (see Figure 10.7) contains all the commands you typically need to work with the Graph Editor. The Edit menu is much like the one in text editors or word processors, except that you're working with keys instead of text. Figure 10.7. The Graph Editor's menus for basic edit functions, keys, animation curves, and tangents.  The Curves menu gives you control over how the curves are set up with the keys in your scene. For example, you can set certain keyframes to cycle over and over. To work directly with a specific key in the Graph view, you use the Keys menu. You use the Tangents menu to tell the keys how to react with the animation curve at specific keyframes. -
Toolbar The toolbar (see Figure 10.8) gives you quick access to functions for modifying animation curves and keys. Figure 10.8. The toolbar provides quick access to commonly used features of the Graph Editor.  -
Outliner The Graph Editor Outliner has the same basic function of the Outliner you have been using throughout the book. In the Graph Editor, you use it to select attributes for objects that have keys set. Keyed attributes are formatted in italics for easy identification. -
Graph view This section is used to display the keys, animation curves, and tangents. You can interactively adjust the displayed curves by using the typical manipulation tools (select, move, and scale). You can also use these tools to modify keys you have set. Curves are displayed with the frame number on the X axis and the numeric keyed value on the Y axis. tip The Dope Sheet is another animation editor in Maya that is similar to the Graph Editor. Instead of displaying curves, the Dope Sheet displays key times as colored rectangles and lets you edit event timing and sync motion to a sound file.
Tutorial: Tweaking Keys with the Graph Editor This tutorial gives you a chance to work with the Graph Editor. If you like, you can load the previous tutorial's scene file (see the file below the CD icon) to make sure everything's set up correctly. -
Click Hotbox Panels Saved Layouts Persp/Graph/Outliner to set up your layout. Make sure the current frame is set to 1 (the beginning of the animation) in the Time Slider. Hide the PorchL and ChimneyL layers in the Layer Editor. You don't need them now, and they'll just slow down the animation playback.   -
In the Outliner, select the Old_House group, and click the + to expand the group . House_Bend is automatically selected, and the Graph view in the Graph Editor changes to display the animation curves for the keys you set in the previous tutorial. -
Before editing the keys, make some changes to the Graph Editor so that it's easier to work with the curves. If needed, frame the entire curve in the Graph view by choosing View Frame All on the Graph Editor menu bar (hotkey: Shift+A ). -
Each key you set is represented by a small dot along the curve. The pointed curves indicate areas with sudden reversals in direction. Play your animation (hotkey: Alt+v ) and watch the Graph view. As the animation progresses, a red bar displaying the current frame slides across the Graph view. Play the animation again and watch the Perspective viewport and the Graph view to see how the house reacts at specific points on the curve. Checking both views is an efficient way to pinpoint problems with the animation. -
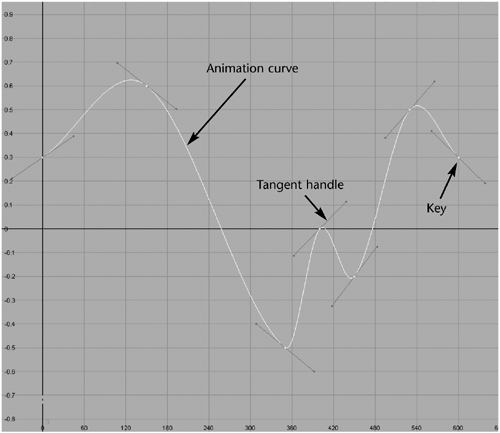
To make the house animate more smoothly, you'll use the Graph Editor to adjust the keys and change the tangents. Click anywhere on the curve. It turns white and displays handles attached to each keyframe. These handles represent the key's tangent in relation to the curve (see Figure 10.9). Figure 10.9. The Graph view with the animation curve selected.  -
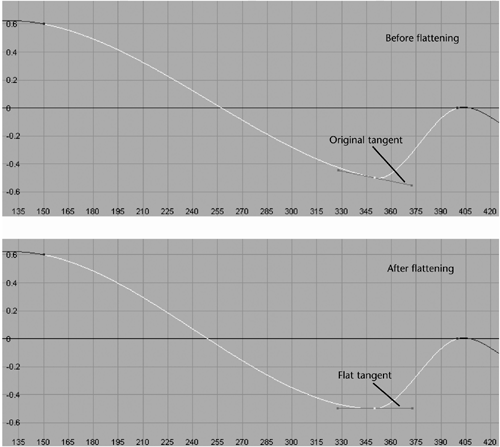
First, you'll change the tangent for one of the keys. Marquee-select the third key at frame 350. The frame and value for the selected key are displayed on the toolbar. The tangent handles are turned at an angle, but you'll get a smoother transition if you position them horizontally. To do this, click the Flat button (refer back to Figure 10.8) or choose Tangents Flat on the Graph Editor menu, and the handle rotates so that it's horizontal to the X axis. The animation curve changes in response, resulting in a smoother transition in and out of the key (see Figure 10.10). Figure 10.10. The animation curve and tangent handle before and after flattening.  note You might have expected to see a more dramatic change in the animation curve after adjusting the tangent. The change in the animation curve's line is subtle in the Graph Editor, but the effects on the animation will be noticeable. You can set several types of tangents for your keys. Feel free to experiment with them to see how they work. For example, you can click the Break Tangents button so that you can grab each side of the handle and move it independently. This creates a break, or cusp , in the line that equates to a sharp, jerky change in motion at the frame of that key. -
Flattening the tangent means that the curve won't exceed the value set for the keyframe. If you look back to the Before section of Figure 10.10, you can see the dot for the key and how the curve extends past this point by a small amount. However, we were animating with the idea that the keys were set to represent the extremes. Click anywhere on the curve and then click the Flat button again to make all the handles horizontal. Play the animation again, and notice that it runs more smoothly. -
To smooth the animation even more, you can adjust the keys with the standard manipulator tools. Use the Move tool (hotkey: w ) and MMB-drag the keys to change their positions so that they are spaced more evenly; this makes transitions in the animation less abrupt. Use Figure 10.11 as a guide to what your final curve should look like. When you are satisfied with the animation curve and your animation, save your scene. Figure 10.11. Tweaking the animation curve, tangents, and keys.  tip If you want to insert more keys to try smoothing the animation more, simply click the Insert Keys button on the Graph Editor's toolbar and MMB-click in the Graph view.
|
