| Here we present the basic steps needed to set up the single sign-on environment for Domino R6 and WebSphere V5. Recall that for SSO between Domino and WebSphere, a common LDAP directory (user registry) is required. For this procedure, we discuss setting up the user registry either as a Domino public name and address book or as an LDAP directory. -
Create a user ID for WebSphere administration. Before starting the configuration of the two servers, you must create an entry in the LDAP directory that will be used to access WAS administrative functions when WAS security is enabled. If using a Domino directory, you can create a Person document for the user "WebSphere Admin" with the User name field set to WebSphere Admin , the Short name/UID field set to wasadmin , and an Internet password. See Figure 12-1. Make sure you specify the User name field. If it is empty, WebSphere cannot look up this entry using LDAP even though you are specifying the short name. Note that the LDAP distinguished name for this entry will be "cn=WebSphere Admin, o=<domain>," where "<domain>" is set to the Notes domain of the Domino server. Figure 12-1. WebSphere administrator Person document in Domino.  If using a non-Domino directory, you can add an entry to the directory as follows ( expressed in the Lightweight Directory Interchange Format or LDIF): # Entry for WAS Administration dn: cn=wasadmin,o=MyOrg cn: wasadmin sn: wasadmin uid: wasadmin userPassword: secret objectclass: top objectclass: person objectclass: inetorgperson Note that the entry must have object class of inetOrgPerson since this object class defines the uid and userPassword attributes. This inetOrgPerson object class is also assumed by WAS for its default LDAP search filter. An LDAP search against the Domino directory shows that inetOrgPerson is also set by Domino: CN=WebSphere Admin,O=MyNotesDomain objectclass=dominoPerson objectclass=inetOrgPerson objectclass=organizationalPerson objectclass=person objectclass=top givenname=WebSphere sn=Admin cn=WebSphere Admin uid=wasdmin userpassword=(12AFB84B93AFDF87FAFD8D1C78591B36) -
Ensure that the LDAP directory is accessible. For a Domino LDAP directory, you can confirm that the Domino LDAP server task is running. For any LDAP directory, you can use the ldapsearch utility (which is supplied with Domino and usually with other directory software) to retrieve entries. For example, enter the following on a command line: ldapsearch -h localhost "uid=wasadmin" (Note that for LDAP directories, you may need to specify the search base, such as "-b o=MyOrg ." For LDAP directories that support SASL authentication, you may need to use the “x option to bypass SASL authentication where it has not been enabled.) We are now ready to configure SSO for WebSphere and then Domino. They must be configured in this order because the keys used to encrypt the LTPA token must be generated in WebSphere and then imported into Domino. -
Configure WebSphere Global Security for SSO . Using a browser, access the WebSphere Web administrative console (the WebSphere server must be running). First, we need to configure a user registry for WAS to use for user authentication. Since we are implementing SSO, we must configure an LDAP user registry. From the navigation frame on the left, select Security>User Registries>LDAP. In the Configuration form, specify the distinguished name (DN) of the directory entry that was created to represent the WAS administrator for Server User ID and specify the password, which was set in the directory entry for Server User Password. Note: once WAS global security is enabled, you will be required to supply this DN and password to access WAS administrative functions, including the Web console and server commands such as the stop server command. For the Host field, you specify the host name for the LDAP directory. The Port field is set to the TCP/IP port on which the LDAP directory responds to requests (default is 389). Note: The LDAP host name and port form the LDAP realm name that is stored in the LTPA tokens generated by both WAS and Domino ”the host name and port specified here must match the LDAP realm name specified in the Domino SSO configuration document (see step 4). Specify the directory tree root name (that is, the root suffix you defined for the directory tree) as Base Distinguished Name. (If Domino is used for the directory, you can leave this field blank.) The remaining fields on this form can be left as is. When complete, the form should look similar to that shown in Figure 12-2. Select the Apply button at the bottom of the form to record the settings. Figure 12-2. LDAP User Registry Settings for SSO.  Next, we need to configure the authentication mechanism for WAS to use. The only choice we have is the Lightweight Third-Party Authentication (LTPA) mechanism. Select Security>Authentication Mechanisms>LTPA in the console navigation frame. Specify a password in the field shown, and select the Apply button. This sets the password used for encrypting the LTPA server keys used to generate the LTPA tokens used for SSO. We will come back to this panel to export the keys after completing the security configuration. At the bottom of this panel, click on the Single Signon link to display the SSO configuration panel. In this panel, check the Enabled check box and, optionally , specify a domain name for the set of servers to which SSO will apply. Select the Apply button. Now we are ready to actually tell WAS to enable security using the user registry and authentication mechanism we have configured. From the navigation frame, select the Security>Global Security link. In the panel displayed, check the Enable checkbox and set the Active Authentication Mechanism and Active User Registry fields to LTPA and LDAP , respectively. Then select the Apply button. WAS verifies that the DN and password specified for the Server User ID exist and are valid in the directory specified for the user registry. If valid, you can then save this configuration and restart WAS to have the security configuration made active. Note that enabling security will force the use of SSL for the WAS administrative console login. If not explicitly configured, WAS uses a self-signed server certificate shipped with WAS for the SSL server authentication. For more information about SSL and how to configure it differently, see the WebSphere Info Center. Once WAS is restarted, the Web administrative console page requires login (over HTTPS) with the Server User ID and password as shown in Figure 12-3. You can use either the fully qualified DN or just the value of the uid attribute as the login User ID. Figure 12-3. WAS administrative console login. 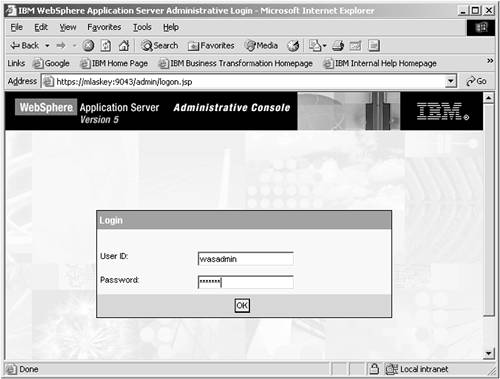 The final step in configuring WAS for SSO is to export the LTPA server keys so that they can be used by the Domino server. To do this, log in to the WAS Web administrative console and select Security>Authentication Mechanisms>LTPA in the console navigation frame. Specify a file name in the Key File Name field; then select the Export Keys button. If a path is not included in the specified file name, the file is created in the WAS install path . This file contains the LTPA server keys that you will need to import to Domino. -
Enabling SSO in Domino. Support for SSO in Domino is also referred to as " multi-server session-based authentication" in the Lotus help documentation. As we discussed earlier, it is a type of HTTP session-based authentication provided by the Domino Web server function. Here we present in detail the tasks involved in configuring your Domino servers for SSO. There are two required tasks for configuring SSO in Domino: -
Configure Domino Web SSO. This must be done once for a Domino domain. -
Configure Domino HTTP session-based authentication. This must be done for every Domino server in the domain that will support SSO. If you are using a non-Domino LDAP directory, there is a third task: configuring the Domino directory to reference the external LDAP directory. - 4.1. Configuring Domino Web SSO .
To configure Domino Web SSO, you must use either the Domino Notes or Administration client accessing a running Domino server because the configuration requires importing the LTPA keys, and this is not supported via a Web browser or via local access to the address book database. Also, you must ensure that the location document of your Domino client is pointing at a server in the domain for which you wish to configure SSO. This is necessary because the public keys of the participating Domino servers need to be accessed and used to encrypt the LTPA key imported from WebSphere.
Open the Domino server's address book database ( names .nsf) and display the Servers view. Select the Web...>Create Web SSO Configuration action. The form shown in Figure 12-4 is displayed. The Configuration Name field is preset to LtpaToken, which you can leave as is. If any of your Domino servers are at release 5, you must use this value for the name. The value for the Organization field should be left blank ”this is because we are creating the SSO configuration stand-alone and not as part of an Internet Site configuration. Set the DNS Domain field to the Internet domain name of the set of servers among which you want to use SSO. Choose the Domino servers to apply this SSO configuration to in the Domino Server Names field ( group names are not permitted).
Figure 12-4. Domino Web SSO configuration. 
Next, from the action bar at the top of the SSO Configuration form, select the Keys...>Import WebSphere LTPA Keys action, and then specify the file path and password of the LTPA keys file exported from WAS. If the import is successful, you will see a dialog message to this effect. You will also see that the LDAP Realm field is set by the import. Ensure that host name and port set in this field match the hostname and port of the LDAP directory (user registry) server you configured for WAS. Also ensure that there is a '\' (backslash) character preceding the colon between the hostname and port number. Save the SSO Configuration document.
Note that the DNS Domain field is required for SSO. Also note that once SSO is configured, a domain name will be required as part of a URL issued to a Domino or WebSphere server. The reason for this is that the browser (HTTP client) uses the domain name portion of a host address as a criteria for sharing cookies among a group of servers ”it only shares cookies among servers with a common domain name. Domino or WebSphere servers will not generate LTPA cookies for URLs containing just IP addresses or host names, so SSO will not work if the fully qualified URL host addresses are not used. However, this does not mean that you must set up a Domain Name System (DNS) server. For a test network, you can simply add fully qualified host names to your server's host name definition file (for example, the /etc/hosts file on Unix/Linux systems or the WINNT\system32\drivers\etc\ hosts file on Windows 2000 systems).
- 4.2. Configure Domino HTTP Session-Based Authentication.
For each Domino server that is to use SSO, you need to configure it for HTTP session-based authentication. (If you are using the Domino R6 Internet Site feature, you can do this configuration via a single Internet Site document. We will show only the per server approach.)
Edit the Server document for the Domino server and move to the Internet Protocols/Domino Web Engine notebook page. In the Session Authentication field, choose Multiple Servers (SSO) , then choose the LtpaToken configuration for the Web SSO Configuration field (see Figure 12-5).
Figure 12-5. Server HTTP session-based authentication. 
Note that the Web SSO Configuration field is a keyword list of the Web SSO Configuration document(s) you configured above. If the Organization field is not blank in the Web SSO Configuration document, you will not see it in this list. You should only specify the Organization field if using an Internet Site configuration.
Next, verify that at least basic (name and password) authentication is configured for the Domino server's HTTP port. Open the Ports>Internet Ports>Web notebook page in the Server document and check that at least the Name & password field is set to Yes under Authentication options for the HTTP port (80) and, if you are using SSL, the HTTPS port (443).
- 4.3. Configuring Domino Directory Assistance.
This task applies only if you are using a separate, non-Domino LDAP directory for the shared user registry between Domino and WebSphere. If so, you need to configure the Domino directory to make use of the LDAP directory. This is done by creating a Directory Assistance database and pointing the Domino server documents in the Domino directory to this database.
Create the Directory Assistance (DA) database from the da50.ntf database template. In this DA database, create a Directory Assistance document. On the Basics notebook page, select LDAP for Domain type. Choose any names for the Domain name and Company name fields, but make sure that the domain name specified here is different from your Domino domain name as it represents resources external to the Domino directory. Select at least the Notes Clients & Internet Authentication / Authorization option for the Make this domain available to setting. If you want to be able to specify LDAP group names in Domino ACLs, set Group Authorization to Yes. Finally, enable use of this DA document (see Figure 12-6).
Figure 12-6. Directory Assistance basics. 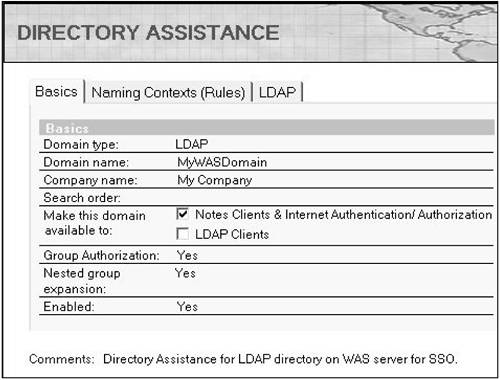
On the Naming Contexts (Rules) notebook page, ensure that the default rule is enabled and is set to allow authentication of Internet users based on credentials (name and password) found in the LDAP directory (see Figure 12-7). Leaving the rule with all asterisks for the name components results in the rule being applied to any LDAP (X.500) distinguished name.
Figure 12-7. Directory Assistance naming rules. 
On the LDAP notebook page, you configure the LDAP directory server access. You will need to set at least the Host name and Base DN for search fields. You may need to set the Authentication credential fields if you have configured your LDAP directory to require authenticated user access for searching.
The Type of search filter to use field tells Domino how to lookup users in the LDAP directory when doing authentication, authorization, or mail routing. You can leave it set to Standard LDAP if your LDAP directory entries are based on the inetOrgPerson object class (that is, contain the Common Name (cn), userid (uid), or mail attributes) or GroupOfUniqueNames class for groups. The search filter used for authentication in this case is as follows:
((cn=%*)(uid=%*)(mail=%*))
(Refer to the IETF RFCs 2251 and 2254 for a description of LDAP search filter syntax.) This filter says "look for a user entry with a common name or userid or e-mail ID equal to the entire value entered in the login dialog." You can customize the search filters if you want to do the user name lookup based on different attributes or portions of the login name, for example, if you want to use e-mail addresses for the login names. Keep in mind that your search filters must result in a unique user name being returned by the lookup. (Note: the search filter shown above is different from the default search filter published in the Domino Administrator Help documentation, but it was determined based on tracing the LDAP requests from Domino to the LDAP directory. You should either explicitly set the search filters or trace the LDAP requests to be sure of what your configuration will use.)
After creating and saving the Directory Assistance document, edit the Domino Server document(s) and specify the name of the DA database you created in the Directory Assistance database name field on the Basics notebook page.
After saving these changes, the Domino server is set up to use the common LDAP directory (user registry) for user authentication and to use LTPA token cookies for SSO between protected Domino and WAS resources.
-
Setting up WebSphere Application Security. Here we give the basic steps involved with protecting the components of a J2EE application running under WAS V5. We'll focus on how to set up a J2EE application for authentication and authorization of its Web users using the SSO mechanism, LTPA. Just to be clear, our focus here is on the "network" security aspects of J2EE applications versus the security aspects of how the application is running on the server operating system itself. As discussed in the introduction to this chapter, the J2EE network security model is role-based, where authorization to access application resources is granted to defined roles. The roles are mapped to users or groups in the user registry. A major benefit of this approach is that the component security function can be designed in terms of logical roles and then mapped to the user name space at deployment time, without having to modify component code. A J2EE application must be constructed and deployed as an Enterprise Application in order to apply security functions. The security related configuration settings are specified in the deployment descriptors at each component level, application, EJB, Web, etc. Much of a J2EE application's security can be specified in the deployment descriptors rather than having to write code. Access to any J2EE resource, servlets, JSPs, or EJBs can be specified as part of application assembly. We'll look at how to configure security function using WSAD, although the same could be done using the WAS Application Assembly Tool. - 5.1. Define security roles.
You define the set of security roles that are used by the application in the application deployment descriptor. Here you also define the mappings between security roles and the user registry. In WSAD, this is done by opening the Application Deployment Descriptor to the Security page and adding roles. For each role, you can assign it to a set of users or groups in the user registry (LDAP directory). You also can assign a role to the special groups Everyone or All authenticated users, which grant access as their names imply. Figure 12-8 shows the role BookAuthor assigned to the group cn=Group1, o=MyOrg in the user registry.
Figure 12-8. Application security role definition. 
- 5.2. Configure Web application security.
You configure security for Web components in the Web deployment descriptor. There are three sets of items that must be configured: the set of security roles, the security constraints for the Web component resources, and the type of login authentication. The security roles for the Web resources are usually the same as defined for the application, although this is not necessary. (If a different set of roles exist for a Web component, you can map these to the application roles via "security role references.")
The most important configuration items are the security constraints. The constraints govern how the application server decides that a Web resource needs to be protected, and, if so, which roles are allowed access and whether authentication is required. A constraint defines which roles are authorized to access which Web resources. The Web resources in a security constraint are specified as "Web resource collections" in terms of URL patterns and HTTP methods . When presented with a Web resource request URL, the WAS server goes through the set of security constraints and compares the URL to the Web resource collection definitions. If the URL matches a specified pattern and the request type matches one of the specified HTTP methods, the server ensures that the user is authenticated and belongs to one of the constraint roles.
To specify security roles and constraints in WSAD, open the Web Deployment Descriptor to the Security page. There are two tabs at the top of this page for the roles and constraints. The Roles page shows the set of roles defined to the application. The Constraints page allows the addition of constraints and the specification of Web resource collections and authorized roles for each constraint. Figure 12-9 shows an example of the Constraints page.
Figure 12-9. Web application security constraints. 
We have found that specifying the URL patterns for the Web resource collections can be tricky. The patterns apply to the portion of the URL after the context root. A single forward slash "/" indicates to apply the constraint as the default for the Web application. You can use an asterisk at the beginning or end of a pattern (but not both) to match any character. It may take some trial and error to get the pattern definition correct for the set of resources you want to protect. We also found that if you change the constraint definitions, you must restart WAS for the change take effect; you cannot just restart the Web application. Fortunately, you can test the constraints within WSAD via a WebSphere Test Environment (WTE) server. (It is even possible to configure the WTE server for LTPA and LDAP directory usage ”just enable the adminstrative console application under the WTE configuration page and access it to configure global security. It is also possible to turn on WAS tracing for the security functions. This is helpful to see how WAS is performing the URL pattern matching for the Web resource collections.)
The remaining configuration item for Web application security defines how WAS should perform user authentication. In WSAD, this configuration is done on the Pages page of the Web Deployment Descriptor notebook. The choices for login authentication types are Basic , Form , and Client-Cert . Basic and Form refer to HTTP basic authentication, where Basic indicates that the login is done via browser prompt and Form via custom HTML login forms. Client-Cert indicates that the authentication is done using SSL client certificate-based authentication.
-
Configuring Domino application security.
As mentioned in the first part of this chapter, Domino uses a resource-based model for providing access control to its resources. All Domino databases contain an ACL that specifies which users can do what to the database content. Since Domino applications consist of sets of Domino databases and the views, forms, documents, and agents within these databases, securing a Domino application consists of configuring the database ACLs.
The Domino server will require user authentication when access is requested to a database whose ACL restricts access to specific users ”that is, where the ACL has Default and Anonymous entries set to "No Access." To permit access for a user to a database, you add the name of that user or a group containing that user to the ACL along with the user/group access level. (It is much easier to manage access control using group names in ACLs.) Users requiring access to Domino and WebSphere resources via SSO must be defined in the shared user registry. Any groups to be used must also be defined in the shared user registry. Then these user or groups are added to ACLs using their distinguished names (DNs), which are unique in the user registry.
Since the user registry for SSO between Domino and WebSphere must be an LDAP (X.500) directory, the DNs consist of a set of attribute/value pairs such as, "cn=A. User,o=MyOrg,c=CC" or "cn=CustomerGroup,o=MyOrg,c=CC." DNs can be added to Domino ACLs by specifying the attribute/value format, except that "/"s must be used for the separators instead of commas ("cn=A. User/o=MyOrg/c=CC").
Note that Domino also provides server security, which controls access to the Domino server itself. If server security is used, the users and groups permitted for application access must also be permitted server access. This permission is configured in the Domino server document in the Domino directory (which is not required to be part of the user registry).
|