Working with Virtual Tours
| Many agents reserve video virtual tours for high-end properties and hire a service firm to create them because of the technical requirements. But slide show-type tours are much easier to put together, so you can make these available fairly easily. Note that there are services in many cities that will create virtual tours for youfrom slide shows to videosat a typical cost of a few hundred dollars. Because the term "virtual tour" can mean many thingscollections of photos, slide shows, panoramic images that users can pan, and videosbe sure you understand what kind of tour these companies actually create and what formats the tours will be in. I don't consider a collection of photos to be a virtual tour, but some people do.
Creating Slide Show ToursTo create slide show virtual tours, you have several choices:
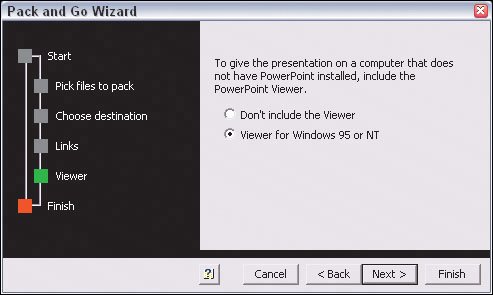
You'll also need a digital camera to take the photos (or a film camera whose pictures were loaded on a CD at the photo finisher or whose prints you scanned in). You also may want software to add an audio presentation, as covered later in this chapter, although in slide shows it's easy to add textual descriptions instead in the presentation software. No matter which program you use to create the slide shows, be sure that your virtual tour is logically arranged. For example, consider starting with an exterior front photo, then follow with a photo of the entry way, the kitchen, the family or living room, the bedrooms, the bathrooms, the basement and/or attic, the garage, and finally the frontyard, backyard, and side yards. This order is one that many prospective buyers use when they go to open houses. Whichever order you pick, be sure to keep related photos togetherall kitchen photographs should be on the same slide or on consecutive slides, not interrupted by photos of other areas. Microsoft's PowerPoint lets you package a slide show on a CD by copying all the required files including a free viewer.For maximum compatibility and the ability to deliver your presentation on the Web and on CDs, PowerPoint also has an option to save the slide show as a set of Web pages. Using Microsoft PowerPointIn Microsoft PowerPoint, you insert photos into a slide by choosing Insert > Picture > From Filethe same sequence that most Microsoft Office programs use. For a virtual tour presentation, you should have one or two photos per slide and descriptive text in the Notes section (choose View > Notes Page to see the slide and its notes together). When you're finished, you have three ways to distribute the slide show: on a disc, on the Web as a link on a Web page, or on both:
If you use PowerPoint, I recommend providing HTML and either PowerPoint or QuickTime versions of your slide show virtual tours. Users can then use either the universal Web interface or the single-file PowerPoint or QuickTime. Single-file formats like PowerPoint and QuickTime are easy for users to download for repeat viewings on their computer. Microsoft's PowerPoint can save a slide show as a set of Web pages, as shown here, so anyone can view the virtual tour from a Web site or a CD. 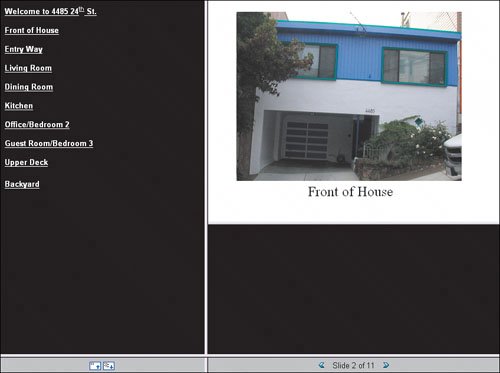 Using Adobe PhotoshopAnother method is to create an animated slide show graphic, using an image-editing program like Adobe's Photoshop. The process is a bit tricky, so I don't recommend it for beginning users. In Photoshop, you create a layer for each photo in your Photoshop documentthis is easy, since each image you copy into a Photoshop document is automatically placed on its own layer. (Be sure that all your images have the same dimensions.You can use Photoshop's Crop feature to make them all the same size simultaneously, or you can individually resize each layer's contents.) Essentially, you'll end up with a virtual stack of photos in the same file. After you've created this virtual stack of photos in Photoshop, you then switch to the companion ImageReady application (File > Edit in ImageReady). In ImageReady, open the Animation and Layers panes (using the Window menu). You should have a separate frame for each photo, which you create by choosing New Frame in the Animation pane's palette menu. (The palette menu is the triangle icon in the upper-right corner of the pane.) For each frame, go to the Layers pane and make sure that only one layer is visible (only that layer should have the eye icon visible in the leftmost column). After you've created all the frames for your photos, select all the frames by clicking the first frame and Shift-clicking on the last one. Now click any of the small arrow characters under the frames to open a menu that lets you set how long each image will display. (This is also a good time to save your file.) You can now create two kinds of animation files for use on the Web: an animated GIF file and a Macromedia Flash file.
Note that you can place a Flash file inside a PDF file created by Adobe InDesign, so anyone who opens the PDF file will see the animation. InDesign will convert the Flash file to the QuickTime movie format when it creates the PDF file. Your recipients need the free QuickTime Player, which their Web browser usually offers to download if they don't already have it. Adobe's Photoshop lets you create animated GIF files, which play a set of images in a recipient's Web browser. You can also export these as Flash animation files for use in a PDF file, as stand-alone files on a CD, or on the Web. 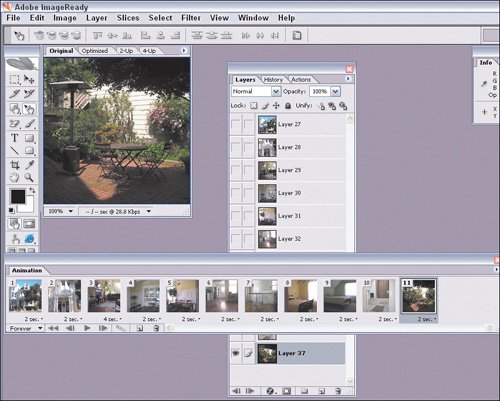 No matter which program you use to create animation files, I recommend you use the animated GIF format in files accessed through a Web browser, whether from a Website or a CD. That provides the broadest level of compatibility. If you decide to offer an animation in another format, I strongly recommend that you include a link to the required player software from the PDF file or Web page that contains the animation. This provides a safety valve in case the user's computer doesn't have the required software and her browser doesn't ask to install it automatically. The CD accompanying this book includes code snippets that provide the necessary links for Adobe's Macromedia Flash Player and Apple's QuickTime Move Player. This PDF flyer includes an embedded QuickTime slide show movie that readers can play. (The slider bar below the image shows the movie's progress.)  Using Google PicasaIn Windows, a simple way to create slide show virtual tours for both Mac and Windows users is by using the free Picasa program that is available from Google. After you import your files and move the ones you want to display into their own folder within the Picasa software, just choose Folder > Export as Web Page to open the Export as Web Page dialog box in which you choose the size for each photo. Then click Next> to open the Select a WebPage Template, where you have a choice of a half-dozen layouts for your Web presentation. After selecting a template, click Finish. Picasa will then generate the Web page and convert the photos to a Web format, for use on the Web or on a disc. The free Google Picasa software lets you export a folder of photos as a Web page for access by both Windows and Mac users. 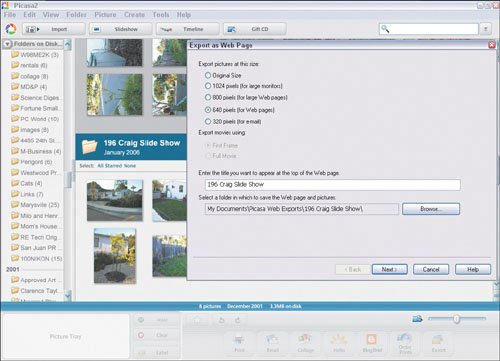 Picasa also has an option called Create a Gift CD in its View menu that will write the folder's images to a disc (if you have a burner drive on your computer) and include the necessary software for recipients to play back the photos on their PC. Note that this playback software works only on Windows PCs. Using Apple iPhotoOn the Mac, a really simple way to create slide show virtual tours for both Mac and Windows users is by using the iPhoto program that comes with Mac OS X. After you import your files and move them to an album with in the iPhoto software, just choose File > Export to open a dialog box in which you choose whether to save the slide show as a Web page or as a QuickTime movie. You can even choose to include a music file to play as part of the QuickTime presentation. The iPhoto software that comes with Mac OS X lets you export a set of photos as a QuickTime movie or as a Web page for access by both Windows and Mac users. 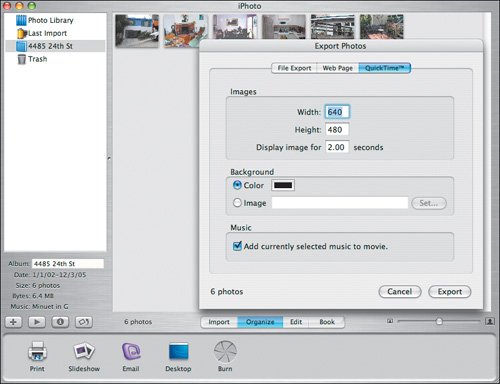 Using Panoramic-Image SoftwareIf you really want to get fancy, you can create panoramic presentations. You can take several photos from the center of a room, providing a set of overlapping images that you stitch together into one file using special software. You can then export either Flash or QuickTime files that a recipient can pan through, as if they were in the room turning around. Typically, you need a fish-eye lens on your camera to create the rounded effect that lets the stitched-together images maintain perspective as your recipient pans through them. There are several programs you can use including Easypano's Panoweaver and Tourweaver, IPIX's Real Estate Wizard, 3DVista's Real Estate, and 360 Degrees of Freedom's virtual marketing suites. But you need a knack for working with photography to use them effectively. (Of these, only Panoweaver is Mac-compatible.) The less technically inclined you are, the less capable you'll be at producing good tours with these programs. But you never know until you try, so I recommend that you take advantage of the 30-day trial versions that most of these companies offer so you can see how much you can accomplish with them. You may surprise yourself!
Creating Video ToursA more sophisticated form of virtual tours uses video shot at the property, like you see in those "houses of the stars" TV shows. These virtual tours require skills in video photography, video editing, and video productionbeyond the abilities of most real estate agents. If you decide to offer such video virtual tours, I strongly encourage you to hire a professional videographer to create the tour for you. Since the cost can easily surpass $1,000, I'd reserve this option for exclusive, high-end properties that need the extra marketing effort, such as because of a slow market. But, if you're a savvy auteur of home movies, you might try to make your own video virtual tours. Ideally, you have a digital video camera, so you can download the movie files directly to your computer in a format such as MPEG. And you'll need video-editing tools like Adobe's Premiere or Apple's Final Cut Pro(for professionals), or Adobe's Windows-only Premiere Elements(for home-based auteurs). While you may be tempted to use the built-in Windows Movie Maker software for Windows, it save sits files to a proprietary format that requires the Windows-only Windows Media Player program to play. Be sure to save your movies in either the QuickTime or MPEG formats so anyone can play them. Both formats can be played using Apple's QuickTime Player and Real's RealPlayer, which are both available for Mac OS and Windows. Macs come with QuickTime already installed. Windows PCs come with Windows Media Player already installed; Media Player can play MPEG files as well as its own proprietary format. Most Web browsers offer to download the required software to display QuickTime and MPEG videos on the Web if the recipients'computers don't have the necessary software installed.
|
EAN: 2147483647
Pages: 100