Implementing the Project
|
The online store application in this chapter consists of two parts. The first part is available for everyone on the Internet and allows users to do the following things:
-
Search for certain products based on product names or descriptions
-
Browse the list of products by category
-
View a product's details
-
Put a product into the shopping cart
-
View and edit the shopping cart
-
Check out and place an order
The second part of the application is the administration section that is password-protected and restricted to the administrator of the application, normally the store manager. This part allows the administrator to add, modify, and delete categories and products.
This section has the following subsections:
-
The database: Discusses the data structure and the tables used in this application as well as the script to create the database
-
The directory structure: Shows the application directory structure as well as explains all the files used in the application
-
The page design: Explains the common design used in every page
-
The ShoppingItem class: Discusses the class that represents a shopping item
-
Accessing the database: Discusses the DbObject class, the class that encapsulates the functionality to access and manipulate data in the database regardless the database server used
-
The user controls: Covers the three user controls used in the application
-
The ASP.NET pages: Discusses all the ASP.NET pages used in the first part of the application
-
The Admin section: Explains all the pages and code-behind files used by the administration section
The Database
A relational database stores data in the application. You can use a database server from any vendor for which a data provider is available. This includes Microsoft SQL Server, Oracle, Sybase, Access, and so on. The downloadable file accompanying this chapter contains an Access database and a script file to generate the database tables and populate them with data. You can use the Access database to quickly test the application. However, for deployment, you are encouraged to use an SQL Server or another scalable and powerful database engine. For this, you need to run the script file to create the database and tables. The script also populates some of the tables with data so that you can work with it instantly. You can find both the Access database file and the script file in the project's db directory.
There are four tables used: Categories, Products, Orders, and OrderDetails. The following sections give the structure of each table.
The Categories Table
The Categories table stores product categories (see Table 6-4).
| COLUMN NAME | DATA TYPE |
|---|---|
| CategoryId | AutoNumber |
| Category | Text |
The Products Table
The Products table stores the details of every product (see Table 6-5). Note that the table has a CategoryId column used to categorize the products.
| COLUMN NAME | DATA TYPE |
|---|---|
| ProductId | AutoNumber |
| CategoryId | Number |
| Name | Text |
| Description | Text |
| Price | Number |
The Orders Table
The Orders table holds order information, including delivery addresses, credit card details, and contact names (see Table 6-6). There is a unique identifier for each order to link all shopping items in that order. These shopping items are stored in the OrderDetails table.
| COLUMN NAME | DATA TYPE |
|---|---|
| OrderId | Number |
| ContactName | Text |
| DeliveryAddress | Text |
| CCName | Text |
| CCNumber | Text |
| CCExpiryDate | Text |
The OrderDetails Table
The OrderDetails table stores all shopping items for each order (see Table 6-7).
| COLUMN NAME | DATA TYPE |
|---|---|
| Id | AutoNumber |
| OrderId | Number |
| ProductId | Number |
| Quantity | Number |
| Price | Number |
Directory Structure
Figure 6-15 shows the directory structure. Note that the root, App, represents the application directory.
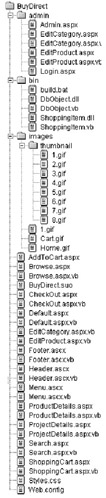
Figure 6-15: The directory structure
The following are the types of files in the directory structure:
-
The .aspx files under the application directory are the ASP.NET pages for the first part of the application. The .vb files are code-behind files.
-
The Styles.css file in the application directory is the Cascading Style Sheets (CSS) file that determines the look of all ASP.NET pages in the application directory.
-
The web.config file is the application configuration file.
-
The four .aspx files under App/Admin are the ASP.NET pages for the Admin section of the application.
-
The bin directory contains supporting classes (in DLL files) for the first part of the application.
-
The images directory contains the image files used by the first part of the application.
-
The images/thumbnail directory contains small images for the products.
Page Design
For consistency in the look and feel of the application, each ASP.NET page uses the same design. There is a header on top of each page and a menu on the left, as shown in Figure 6-16.
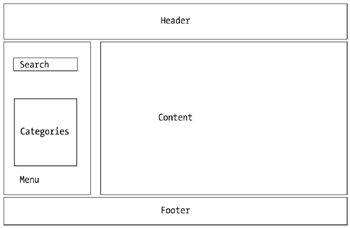
Figure 6-16: The page design
You achieve this look using the following HTML page template:
<html> <head> <title><!-- The title --></title> </head> <body> <table> <tr> <td colspan="2"> <!-- The header --> </td> </tr> <tr> <td valign="top"> <!-- The menu --> </td> <td valign="top"> <!-- Content --> </td> </tr> <tr> <td colspan="2"> <!-- The footer --> </td> </tr> </table> </body> </html>
| Note | A cascading style sheets file (style.css) residing in the application directory, gives each ASP.NET page its look. It is linked from each page using the following tag: <link rel=stylesheet type="text/css" href=style.css>. |
The ShoppingItem Class
The small ShoppingItem class represents a shopping item. You can find it in the ShoppingItem.vb file in the bin directory (see Listing 6-33).
Listing 6-33: The ShoppingItem Class
Namespace BuyDirect Public Class ShoppingItem Public ProductId As String Public Name As String ' the name of the product Public Description As String Public Price As String Public Quantity As String End Class End Namespace
A shopping item has a product identifier, a product name, a description, a price, and a quantity.
Accessing the Database
As discussed in the earlier "Understanding ADO.NET" section, .NET applications can access a relational database and manipulate data using ADO.NET. As shown, ADO.NET makes these tasks easy to achieve. However, note that there are various database servers on the market, including Oracle, Microsoft SQL Server, Sybase SQL Server, IBM DB2, and so on.
When developing an application that uses a database, sometimes you want to make sure your application is flexible enough to access different databases. This is because you cannot guarantee your client will use a certain brand. There are cases where one client has invested in a certain database and another client has bought a different database. Wanting to cater to these clients without having to create many different variants of your applications requires you to use a certain strategy.
This ASP.NET application is designed to use many different types of databases without requiring too many changes. In fact, there is only one class, DbObject, which handles all database connections and manipulations. The DbObject is an abstract class that defines all the abstract methods that will be used by the ASP.NET application. You support a certain database server by creating a subclass of DbObject that provides implementation of the abstract methods. Adding a support for a new database server does not change the application or affect the support for the existing databases.
DbObject acts as an interface between the ASP.NET application and the implementation for connecting to and manipulating the database. It has a shared method, GetDbObject, which returns an instance of the correct subclass. At the moment, two subclasses are provided: AccessDbObject and MsSqlDbObject. Figure 6-17 shows the class diagram.
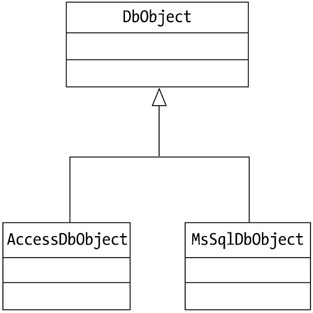
Figure 6-17: The DbObject class and its subclasses
| Note | You can find the DbObject class and its subclasses in the DbObject.vb file under the bin directory. |
Therefore, if the application uses an Access database, the DbObject class's GetDbObject method returns an instance of AccessDbObject. If Microsoft SQL Server 7 or later is used, the same method returns an instance of MsSqlDbObject. The information about the database server used is stored as an application setting in the web.config file. If the key db has a value of MsSQL, MS SQL Server 7 or later is used. If the key db is Access, a Microsoft Access database is used. Another key, connectionString, defines the connection string. The following is the fragment of the web.config file that holds the database information:
<appSettings> <add key="db" value="MsSQL"/> <add key="connectionString" value="Integrated Security=False;Data Source=localhost;  Initial Catalog=BuyDirect;User ID=sa;Password=password"/> </appSettings>
 The db value is read from the configuration file when the application starts:
Private Shared db As String = ConfigurationSettings.AppSettings("db") And the connectionString value is read when an instance of DbObject is created:
Protected connectionString As String = _ ConfigurationSettings.AppSettings("connectionString") Note that the connectionString variable has a Protected access modifier so that it is accessible from subclasses.
The GetDbObject method is as follows:
Public Shared Function GetDbObject() As DbObject If db.ToUpper().Equals("ACCESS") Then Return (New AccessDbObject()) ElseIf db.ToUpper().Equals("MSSQL") Then Return (New MsSqlDbObject()) End If End Function If you want to add support for a different database, you just add another ElseIf statement to the If block in the GetDbObject method.
The DbObject class also has a utility method called FixFieldValue that accepts a string and adds a single quote character for each occurrence of single quote character in the given string. This method is used to "fix" a value used as part of an SQL statement that may contain a single quote character. The FixFieldValue method is as follows:
Public Shared Function FixFieldValue(ByVal value As String) As String If value Is Nothing Then Return Nothing Else Return value.Replace("'", "''") End If End Function The abstract methods that must be implemented in subclasses are as follows:
Public MustOverride Function GetCategories() As DataSet Public MustOverride Function GetSearchResult(ByVal searchKey As String) As DataSet Public MustOverride Function GetBrowseResult(ByVal categoryId As String) As DataSet ' pass a product id, return a ShoppingItem object populated ' with the product details Public MustOverride Function GetShoppingItem(ByVal productId As String) As _ ShoppingItem Public MustOverride Function ProcessPurchase( _ ByVal contactName As String, _ ByVal deliveryAddress As String, _ ByVal ccName As String, _ ByVal ccNumber As String, _ ByVal ccExpiryDate As String, _ ByVal cart As HashTable) As Boolean Public MustOverride Function GetAllProducts() As DataSet Public MustOverride Function GetAllCategoriesAsString() As String Public MustOverride Sub InsertProduct( _ ByVal categoryId As String, _ ByVal newProductName As String, _ ByVal newProductDescription As String, _ ByVal newProductPrice As String) Public MustOverride Sub EditProduct( _ ByVal productId As String, _ ByVal productName As String, _ ByVal productDescription As String, _ ByVal productPrice As String) Public MustOverride Sub DeleteProduct(ByVal productId As String) Public MustOverride Function GetAllCategories() As DataSet Public MustOverride Sub InsertCategory(ByVal category As String) Public MustOverride Sub EditCategory( _ ByVal categoryId As String, _ ByVal category As String) Public MustOverride Sub DeleteCategory(ByVal categoryId As String)
User Controls
Three user controls are used: the Header, the Footer, and Menu user controls. These user controls are given in Listings 6-34, 6-35, and 6-36, respectively. The header is saved as the Header.ascx file, the footer as the Footer.ascx file, and the menu as the Menu.ascx file. These files reside in the application directory.
Listing 6-34: The Header User Control
<%@ Control Language="VB" %> <table border="0" width="100%" cellpadding="5" cellspacing="0" > <tr> <td align="left"> <div >Buy Direct</div> <br> <div >Lowest prices today!!!</div> </td> <td align="right"> <a href=Default.aspx><img border="0" src="/books/1/578/1/html/2/images/Home.gif" width="30" alt="Home"></a> <a href=ShoppingCart.aspx>  <img border="0" src="/books/1/578/1/html/2/images/Cart.gif" alt="Shopping Cart"> </a> </td> </table>
 The Header user control cannot be simpler. It consists of a table with two cells, one displaying some text and the other containing the home and shopping cart image files.
Listing 6-35: The Footer User Control
<%@ Control Language="VB" %> <center> <div >©2003 Buy Direct</div> </center>
The footer simply contains a copyright logo.
Listing 6-36: The Menu User Control
<%@ Control Language="vb" AutoEventWireup="false" src="/books/1/578/1/html/2/Menu.ascx.vb" Inherits="BuyDirect.Menu" %> <%@ OutputCache Duration="86400" VaryByParam="None" %> <!-- the main table containing two other tables: Search table and Browse table --> <table border="0" cellpadding="0" cellspacing="0" width="<%=ConfigurationSettings.AppSettings("menuWidth")%>"> <tr> <td> <!-- the Search table --> <table cellspacing="0" cellpadding="1" width="100%" border="0" > <tr> <td> <table cellspacing="0" cellpadding="5" width="100%" border="0" > <tr> <td >Search</td> </tr> <tr valign="middle"> <td rowspan="2"> <form method="post" action="Search.aspx"> <input type="text" name="searchKey" size="13"> <input type="submit" value="Go"> </form> </td> </tr> </table> </td> </tr> </table> </td> </tr> <!-- space between the Search table and Browse table --> <tr> <td height="7"></td> </tr> <!-- the Browse table --> <tr> <td> <table cellspacing="0" cellpadding="1" width="100%" border="0" > <tr> <td> <table cellspacing="0" cellpadding="5" width="100%"  border="0" > <tr> <td >Browse</td> </tr> <tr valign="top"> <td> <asp:DataList runat="server" cellpadding="3" cellspacing="0" width="145" SelectedItemStyle-BackColor="dimgray" EnableViewState="false"> <ItemTemplate> <asp:HyperLink runat="server" Font-Name="Verdana" Css Text='<%# DataBinder.Eval(Container.DataItem, "Category") %>' NavigateUrl='<%# "Browse.aspx?CategoryCategoryID") %>' /> </ItemTemplate> </asp:DataList> </td> </tr> </table> </td> </tr> </table> </td> </tr> </table>
 Note that the Menu.ascx file uses a code-behind file called Menu.ascx.vb. This file contains the Menu class that extends the System.Web.UI.UserControl class. Listing 6-37 gives the Menu class.
Listing 6-37: The Menu Class
Imports System Imports System.Web Imports System.Web.UI Imports System.Web.UI.WebControls Imports System.Data Namespace BuyDirect Public Class Menu : Inherits UserControl Public CategoryList As DataList Sub Page_Load(ByVal sender As Object, ByVal e As EventArgs) Dim dbo As DbObject = DbObject.GetDbObject() Dim ds As DataSet = dbo.GetCategories categoryList.DataSource = ds.Tables("Categories").DefaultView categoryList.DataBind() End Sub End Class End Namespace The Menu user control pulls all records from the Categories table and binds the data to a DataList control. The control's <ItemTemplate> contains a Hyperlink control that displays a clickable link with the following navigate URL:
Browse.aspx?CategoryID=categoryID
where categoryID comes from the CategoryID column of the Categories table.
The text for a hyperlink is the name of the category itself, coming from the Category column in the Categories table.
The ASP.NET Pages
Now it is time to present all the ASP.NET pages in the first part of the application. There are seven pages in total in the first part of the application, but one (AddToCart.aspx) does not have a user interface.
Each page links to a code-behind file located in the application directory having the same name plus the .vb extension. The following sections discuss the ASP.NET pages. To save space, none of the pages' code is printed here.
The Default Page
The Default page is the main page the user will see when they first visit the Web site (see Figure 6-18). In essence, it embeds the Header, Footer, and Menu user controls and displays a welcome message.
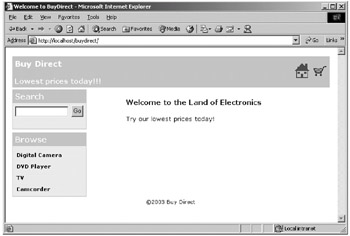
Figure 6-18: The Default page
From this page, the user can use the search form in the Menu user control to search for a product or browse the category by clicking one of the categories on the menu. If the user uses the search form, the search will be handled by the Search page. Clicking a category will bring them to the Browse page.
The Search Page
The Search page handles user searches for a product and supports automatic paging, as discussed in the section "Data Binding" earlier in this chapter (see Figure 6-19). This page can receive requests from either the Search form on the menu in other pages or from the Search page itself when the user moves to another page of records.
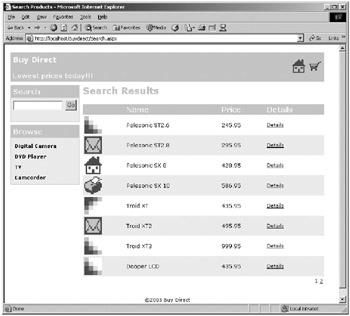
Figure 6-19: The Search page
Also, requests from the Search form must be checked to determine whether or not the requests contain a keyword. A search is only performed when a keyword exists. Otherwise, the user could click the Go button in the Search form without typing in any keyword and make the Search page display everything in the Products table.
Therefore, three types of cases need to be handled separately:
-
When the request comes from the Search form and carries a keyword
-
When the request comes from the Search form without a keyword
-
When the request comes from the SearchResults page itself as a result of the user navigating to another page
To process each type of request accordingly, the Page_Load event handler contains the following code snippet:
Sub Page_Load(sender As Object, e As EventArgs) If Not IsPostBack Then searchKey = Request.Params("searchKey") If Not searchKey Is Nothing Then ' request coming from the Search form If searchKey.Trim().Equals("") Then message.Text = "Please enter a search key." SearchResultGrid.DataSource = Nothing Else ' search key is not empty ViewState.Add("searchKey", searchKey) BindGrid() End If Else ' request did not come from the Search form Server.Transfer("Default.aspx") End If End If End Sub The Page_Load event handler first retrieves the search key using the Request object's Params property, passing the string searchKey. If it finds the searchKey parameter in the Request object, the request must come from the Search form. In this case, it tests the value of the search key. If the search key is empty, then it displays the message Please enter a search key and assigns nothing to the DataSource property of the DataGrid.
If the search key is not empty, the Page_Load handler does the following:
-
It saves the search key in the ViewState object so that different pages in the DataGrid can be displayed correctly.
-
It calls the BindGrid subroutine to prepare the data display in the DataGrid. You will examine the BindGrid subroutine shortly.
When the user navigates to a different page, the DataGrid control's PageIndexChanged event triggers. As a result, its event handler, SearchResultDataGrid_PageIndexChanged, executes:
Sub SearchResultGrid_PageIndexChanged(sender As Object, _ e As DataGridPageChangedEventArgs) searchKey = ViewState("searchKey").ToString() SearchResultGrid.CurrentPageIndex = e.NewPageIndex BindGrid() End Sub The SearchResultGrid_PageIndexChanged event handler first retrieves the search key from the StateBag and assigns the value to the searchKey variable. Then it assigns the value of the DataGrid control's CurrentPageIndex property with the NewPageIndex property of the DataGridPageChangedEventArgs object and calls the BindGrid method.
The BindGrid method is responsible for binding the data to the DataGrid control:
Sub BindGrid() Dim dbo As DbObject = DbObject.GetDbObject() Dim ds As DataSet = dbo.GetSearchResult(searchKey) SearchResultGrid.DataSource = ds.Tables("Products").DefaultView SearchResultGrid.DataBind() End Sub The BindGrid method does the following:
-
It obtains a DbObject object.
-
It calls the DbObject class's GetSearchResult method to retrieve all the records that match the search key and packages them in a DataSet object.
-
It assigns the Products table in the DataSet object to the DataSource property of the DataGrid control.
-
It calls the DataGrid control's DataBind method to bind the data.
If you look at the SQL statement used in the GetSearchResult methods in both the AccessDbObject class and the MsSqlDbObject class method, you will find that instead of a simple SELECT statement, the code uses a much more complicated one. In the AccessDbObject class, the following code composes the SQL statement in the GetSearchResult method:
sql.Append("SELECT '<img src=images/thumbnail/' & ProductId") sql.Append(" & '.gif width=40 height=40>' As [ ],") sql.Append(" Name, Price,") sql.Append(" '<a href=ProductDetails.aspx?productId=' " & _ "& ProductId & '>Details</a>' As Details") sql.Append(" FROM Products") sql.Append(" WHERE Name LIKE '%" & searchKey & "%'") sql.Append(" OR Description LIKE '%" & searchKey & "%'") And the following code composes the SQL statement in the same method in the MsSqlDbObject class:
sql.Append("SELECT '<img src=images/thumbnail/' + CONVERT(varchar(5), ProductId)") sql.Append(" + '.gif width=40 height=40>' As [ ],") sql.Append(" Name, Price,") sql.Append(" '<a href=ProductDetails.aspx?productId=' " & _ "+ CONVERT(varchar(5), ProductId) + '>Details</a>' As Details") sql.Append(" FROM Products") sql.Append(" WHERE Name LIKE '%" & searchKey & "%'") sql.Append(" OR Description LIKE '%" & searchKey & "%'") This has to do with the fact that you use automatic column generation of the DataGrid by setting its AutoGenerateColumns property to True. In other words, by enabling the automatic column generation in a DataGrid control, you do not need to specify each individual column for the DataGrid manually. In fact, you do not use the DataGrid control's Columns property at all. With automatic column generation, a DataGrid control displays the headers and rows of a bound data source as they are.
Even though automatic column generation simplifies the user interface of the DataGrid control, this also means that the source table must contain the exact headers and data. In most cases, this is fine. However, in your case, because you want to include a thumbnail image for each product, you have to tweak the SQL statement to produce a column that contains a hyperlink to the image.
The Browse Page
The Browse page is invoked when the user clicks one of the categories on the menu (see Figure 6-20). The way this page works is similar to the Search page. Instead of a search key, the Browse page receives a category identifier. Therefore, you save a category identifier in the StateBag, not a search key.
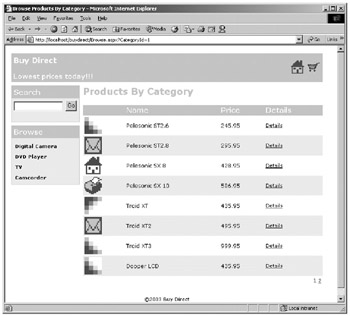
Figure 6-20: The Browse page
The ProductDetails Page
The ProductDetails page displays the details of a product (see Figure 6-21).
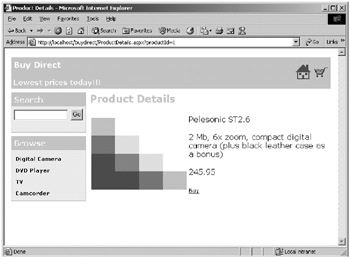
Figure 6-21: The ProductDetails page
This page is invoked from either the Search page or the Browse page. Each call to this page should carry the identifier of the product whose details are to be displayed. This is the Page_Load event handler of the ProductDetails page:
productId = Request.Params("productId") If productId Is Nothing Then Response.Redirect("Default.aspx") Else DisplayDetails() addToCart.NavigateUrl = "AddToCart.aspx?Productpara">It first checks if there is a product identifier. If a product identifier is not found, the user is redirected to the Default page. If a product identifier is found, the Page_Load event handler calls the DisplayDetails method and populates the addToCart hyperlink's NavigateUrl property with the following: AddToCart.aspx?ProductId=productId
This is the DisplayDetails method:
Sub DisplayDetails() Dim dbo As DbObject = DbObject.GetDbObject() Dim item As ShoppingItem = dbo.GetShoppingItem(productId) productImage.ImageUrl = "images/" & productId & ".gif" name.Text = item.name description.Text = item.description price.Text = item.price End Sub
The DisplayDetails method obtains an instance of a DbObject object and calls its GetShoppingItem method. From the ShoppingItem object it received, the DisplayDetails method populates the properties of these controls: productImage, name, description, price.
The AddToCart Page
From the ProductDetails page, the user can add a product into the shopping cart by calling the AddToCart page. This page does not have a user interface, and upon performing its task redirects the user to the ShoppingCart page.
In a nutshell, the AddToCart page has one event handler, Page_Load:
Sub Page_Load(ByVal sender As Object, ByVal e As EventArgs) Dim productId As String = Request.Params("productId") If productId Is Nothing Then Server.Transfer("Default.aspx") Else Dim dbo As DbObject = DbObject.GetDbObject() Dim shoppingItem As ShoppingItem = dbo.GetShoppingItem(productId) Dim cart As Hashtable = CType(Session("cart"), Hashtable) If cart Is Nothing Then cart = new Hashtable() End If ' Before adding an item, check if the key (productId) exists Dim obj As Object = cart.Item(productId) If Not obj Is Nothing Then cart.Remove(productId) End If cart.Add(productId, shoppingItem) Session.Add("cart", cart) Server.Transfer("ShoppingCart.aspx") End If End Sub The Page_Load event handler transfers the user to the Default page if no product identifier is found in the Request object. If a product identifier is found, it does the following:
-
It gets an instance of the DbObject object and calls its GetShoppingItem. This method returns a ShoppingItem object.
-
It attempts to obtain a Hashtable object identified with the key "cart" from the Session object. If Nothing is returned, it creates a new Hashtable object and assigns it to the cart variable.
-
It removes the ShoppingItem object identified with the same product identifier from the cart, if one exists.
-
It adds the ShoppingItem object to the cart. This ShoppingItem object is linked to the product identifier.
-
It inserts the cart to the Session object.
-
It transfers the user to the ShoppingCart page.
The ShoppingCart Page
The user can view the ShoppingCart page after adding an item into the shopping cart or by clicking the cart logo on the header of every page (see Figure 6-22). Either way, the ShoppingCart page will be displayed.
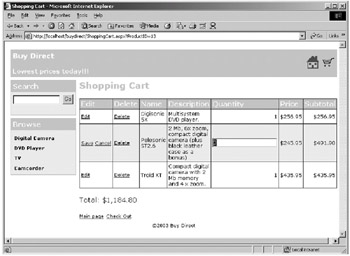
Figure 6-22: The ShoppingCart page
Let's start the discussion of this page by examining the DataGrid control in the user interface. Of particular interest are the four following events in the control:
OnEditCommand="MyDataGrid_Edit" OnCancelCommand="MyDataGrid_Cancel" OnUpdateCommand="MyDataGrid_Update" OnDeleteCommand="MyDataGrid_Delete"
These events trigger when an item in the DataGrid control is edited (MyDataGrid_Edit), when the change is updated (MyDataGrid_Update) or cancelled (MyDataGrid_Cancel), or when a row is deleted (MyDataGrid_Delete).
The construction of the columns in the DataGrid is not automatic; you construct the columns by declaring each individual column as follows:
<Columns> <asp:EditCommandColumn EditText="Edit" CancelText="Cancel" UpdateText="Save" HeaderText="Edit"> <ItemStyle Wrap="false"/> <HeaderStyle Wrap="false"/> </asp:EditCommandColumn> <asp:ButtonColumn HeaderText="Delete" ButtonType="LinkButton" Text="Delete" CommandName="Delete" /> <asp:BoundColumn HeaderText="Name" ReadOnly="True" DataField="Name"/> <asp:BoundColumn HeaderText="Description" ReadOnly="True" DataField="Description"/> <asp:BoundColumn HeaderText="Quantity" DataField="Quantity"> <ItemStyle HorizontalAlign="Right"/> </asp:BoundColumn> <asp:BoundColumn HeaderText="Price" ReadOnly="True" DataField="Price"> <ItemStyle HorizontalAlign="Right"/> </asp:BoundColumn> <asp:BoundColumn HeaderText="Subtotal" ReadOnly="True" DataField="Subtotal"> <ItemStyle HorizontalAlign="Right"/> </asp:BoundColumn> <asp:BoundColumn HeaderText="ProductId" ReadOnly="True" Visible="False" DataField="ProductId"/> </Columns>
Now, let's move on to the code in the ShoppingCart.aspx.vb file.
For starters, you define and instantiate a DataTable and a DataView object. The DataTable object stores all the shopping items from the shopping cart, and the DataView object is a view to the data:
Public dataTable As New DataTable Public cartView As DataView
Now, look at the Page_Load event handler:
Sub Page_Load(sender As Object, e As EventArgs) If Not Session("cart") Is Nothing Then Dim cart As Hashtable = CType(Session("cart"), Hashtable) dataTable.Columns.Add( _ New DataColumn("Name", GetType(String))) dataTable.Columns.Add( _ New DataColumn("Description", GetType(String))) dataTable.Columns.Add( _ New DataColumn("Quantity", GetType(String))) dataTable.Columns.Add( _ New DataColumn("Price", GetType(String))) dataTable.Columns.Add( _ New DataColumn("Subtotal", GetType(String))) dataTable.Columns.Add( _ New DataColumn("ProductId", GetType(String))) ' Make some rows and put some sample data in Dim enumerator As IEnumerator = cart.GetEnumerator() While (enumerator.MoveNext()) 'enumerator.Current returns a DictionaryEntry object, so use 'its Value property to obtain the ShoppingItem Dim shoppingItem As ShoppingItem = _ CType(enumerator.Current.Value, ShoppingItem) Dim dr As DataRow = CreateNewDataRow(shoppingItem) dataTable.Rows.Add(dr) End While CartView = New DataView(dataTable) CartView.Sort = "Name" If Not IsPostBack Then BindGrid() End If End If UpdateTotal() End Sub 'Page_Load The first thing the Page_Load event handler does is retrieve the shopping cart from the Session object and add six columns to the DataTable object:
Dim cart As Hashtable = CType(Session("cart"), Hashtable) dataTable.Columns.Add( _ New DataColumn("Name", GetType(String))) dataTable.Columns.Add( _ New DataColumn("Description", GetType(String))) dataTable.Columns.Add( _ New DataColumn("Quantity", GetType(String))) dataTable.Columns.Add( _ New DataColumn("Price", GetType(String))) dataTable.Columns.Add( _ New DataColumn("Subtotal", GetType(String))) dataTable.Columns.Add( _ New DataColumn("ProductId", GetType(String))) And then, the Page_Load event handler iterates the shopping items in the shopping cart Hashtable object and populates the data table with its content inside a While loop:
' Make some rows and put some sample data in Dim enumerator As IEnumerator = cart.GetEnumerator() While (enumerator.MoveNext()) 'enumerator.Current returns a DictionaryEntry object, so use 'its Value property to obtain the ShoppingItem Dim shoppingItem As ShoppingItem = _ CType(enumerator.Current.Value, ShoppingItem) Dim dr As DataRow = CreateNewDataRow(shoppingItem) dataTable.Rows.Add(dr) End While
Afterward, it instantiates a DataView object, passing the data table as the argument:
CartView = New DataView(dataTable)
The DataView is a view to the shopping cart. The records are sorted by the name of the product:
CartView.Sort = "Name"
For the first call to the ShoppingCart page, the Page_Load event handler calls the BindGrid method (you will examine the BindGrid method shortly):
If Not IsPostBack Then BindGrid() End If
Finally, it calls the UpdateTotal method that in turn calls the GetTotal function and displays it in the totalLabel Label control:
Sub UpdateTotal() totalLabel.Text = "Total: " & GetTotal().ToString("C") End Sub The GetTotal function itself returns a Decimal as a result of the total of the purchase in the shopping cart. It does so by iterating the shopping cart Hashtable object obtained from the Session object and keeps adding the Price field of each ShoppingItem object.
The BindGrid method is simple enough, consisting only of two lines of code. It assigns the DataView object to the DataSource property of the DataGrid control and calls its DataBind method:
MyDataGrid.DataSource = CartView MyDataGrid.DataBind()
The four event handlers are more complex than the DataBind method. The MyDataGrid_Edit is the simplest, consisting of two lines of code:
Sub MyDataGrid_Edit(sender As Object, e As DataGridCommandEventArgs) MyDataGrid.EditItemIndex = e.Item.ItemIndex BindGrid() End Sub 'MyDataGrid_Edit
This event handler receives a DataGridCommandEventArgs as the second argument from which the index of the edited item can be retrieved and set to the EditItemIndex property of the DataGrid control. As a result, the edited item is displayed in a different color.
An edited item can either be cancelled or updated. If it is cancelled, the MyDataGrid_Cancel event handler is invoked. If it is updated, the MyDataGrid_Update event handler is called.
The MyDataGrid_Cancel event handler sets the EditItemIndex property of the DataGrid control to −1, effectively unselecting the previously edited item:
Sub MyDataGrid_Cancel(sender As Object, _ e As DataGridCommandEventArgs) MyDataGrid.EditItemIndex = - 1 BindGrid() End Sub 'MyDataGrid_Cancel
The MyDataGrid_Update event handler is more complex than the previous two. First, it retrieves the corresponding ShoppingItem object from the Session object whose key matches the product identifier of the item being updated and updates the quantity of the shopping item:
shoppingItem = CType(cart.Item(productId), ShoppingItem) If Not shoppingItem Is Nothing Then shoppingItem.Quantity = quantity End If
Then, it updates the DataTable object by removing an old row and adds a new one:
' Now update the DataTable ' We'll delete the old row and replace it with a new one. If Not shoppingItem Is Nothing Then ' Remove old entry. CartView.RowFilter = "ProductId='" & _ shoppingItem.ProductId & "'" If CartView.Count > 0 Then CartView.Delete(0) End If CartView.RowFilter = "" ' Add new entry. Dim dr As DataRow = CreateNewDataRow(shoppingItem) dataTable.Rows.Add(dr) End If
Note that you create a new row by calling the CreateNewDataRow method, passing the shopping item. The CreateNewDataRow method creates a new DataRow object by calling the NewRow method of the DataTable class and populates its column with the field values of the shopping item:
Function CreateNewDataRow(ByVal ShoppingItem As ShoppingItem) As DataRow Dim dr As DataRow = dataTable.NewRow() dr(0) = shoppingItem.Name dr(1) = shoppingItem.Description dr(2) = shoppingItem.Quantity dr(3) = CDec(shoppingItem.Price).ToString("C") 'Calculating subtotal dim subtotal As Decimal Try subtotal = CInt(shoppingItem.quantity) * _ CDec(shoppingItem.price) Catch ex As InvalidCastException ' do nothing, but subtotal will be 0 End Try dr(4) = subtotal.ToString("C") dr(5) = shoppingItem.ProductId Return dr End Function The last event handler, MyDataGrid_Delete, removes the deleted item from the DataTable object as well as from the shopping cart object:
Sub MyDataGrid_Delete(sender As Object, _ e As DataGridCommandEventArgs) Dim productId As String = e.Item.Cells(7).Text ' Update the shopping item in the Session object Dim cart As Hashtable = CType(Session("cart"), Hashtable) If Not cart Is Nothing Then cart.Remove(productId) End If ' Now delete the row from DataTable CartView.RowFilter = "ProductId='" & productId & "'" If CartView.Count > 0 Then CartView.Delete(0) End If CartView.RowFilter = "" MyDataGrid.EditItemIndex = - 1 BindGrid() UpdateTotal() End Sub 'MyDataGrid_Delete
The CheckOut Page
When shopping is completed, the user can check out using the CheckOut page (see Figure 6-23).
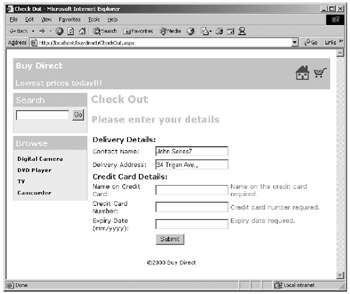
Figure 6-23: The CheckOut page
This page contains a form that accepts the user details (contact name and delivery address) and credit card details (name on the credit card, credit card number, and expiry date). Each entry box is a TextBox control that is "watched" by a validator. The validators make sure that all TextBox controls are filled in and the input is valid. The Button control in the form is wired to the following ProcessPurchase event handler, which is invoked when the user submits the form:
Sub ProcessPurchase(sender As Object, e As EventArgs) 'Check input If contactNameValidator.IsValid() AndAlso _ deliveryAddressValidator.IsValid() AndAlso _ ccNameValidator.IsValid() AndAlso _ ccNumberValidator.IsValid() AndAlso _ ccExpiryDateValidator1.IsValid() AndAlso _ ccExpiryDateValidator2.IsValid() Then myTable.Visible = False ' process purchase header2.Text = "" If ProcessPurchase() Then ' Empty shopping cart Session("cart") = Nothing header1.Text = "Transaction completed successfully." Else header1.Text = "Transaction failed." End If End If End Sub The ProcessPurchase event handler first checks the validity of each TextBox control, and if all are OK, it calls the ProcessPurchase function that does the processing. The latter returns True if the processing is successful, and False otherwise. The event handler then prints a message notifying the user of the purchase process result.
The ProcessPurchase function is as follows:
Public Function ProcessPurchase As Boolean Dim dbo As DbObject = DbObject.GetDbObject() Return dbo.ProcessPurchase(contactName.Text, _ deliveryAddress.Text, _ ccName.Text, _ ccNumber.Text, _ ccExpiryDate.Text, _ CType(Session("cart"), Hashtable)) End Function The function creates an instance of the DbObject class and calls its ProcessPurchase method.
The Admin Section
The Admin section comprises the second part of the BuyDirect application. This part is only accessible to authorized users, and it administers the Categories and Products tables. However, based on the example in the following sections, it is easy to extend the application to cover other administration tasks. The following sections discuss the four pages in the Admin section.
You can access the Admin section using the following link:
http://domain/buydirect/admin/Admin.aspx
The user will then be redirected to the Login page. Upon a successful login, the user will be brought to the main menu, from which they can choose one of the two links. The first link brings the user to the EditCategory page, and the second to the EditProduct page.
The Login Page
Only authorized users registered in the Users table can access the Admin section. Therefore, the first page of this part is a Login form. Upon successful login, the user will be presented with two hyperlinks: one to the EditCategory page and the other to the EditProduct page. Figure 6-24 shows the Login page.
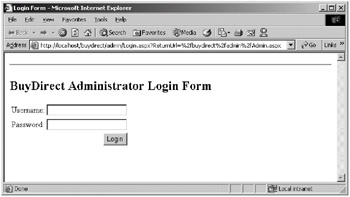
Figure 6-24: The Admin Login page
The Login page's user interface has a form with two TextBox controls, userName and password, and a Button control whose Click event is wired to the Login event handler. The earlier section "Securing ASP.NET Applications" explains how this Login event handler works.
The Main Menu Page
Upon a successful login, the user is redirected to the main menu (the Admin.aspx file), as shown in Figure 6-25.
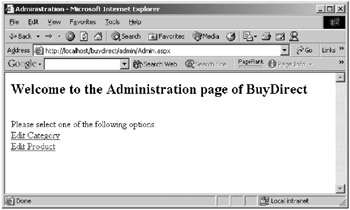
Figure 6-25: The Admin main menu page
The EditCategory Page
The EditCategory page allows you to manipulate the data in the Categories table. The form in this page has a TextBox control and a Button control to add a new category and a DataGrid control that displays all the categories and edits and deletes existing categories.
The Button control's Click event is wired with the AddCategory event handler:
Sub AddCategory(source As Object, e As EventArgs) Dim newCat As String = newCategory.Text.Trim() If Not newCat.Equals("") Then Dim dbo As DbObject = DbObject.GetDbObject() dbo.InsertCategory(newCat) newCategory.Text = "" PopulateDataSet() BindGrid() End If The AddCategory event handler creates an instance of the DbObject class and calls its InsertCategory method, passing the new category supplied by the user. It then assigns a blank string to the newCategory TextBox control and calls the PopulateDataSet and BindGrid methods.
The PopulateDataSet method consists of four lines of code:
Sub PopulateDataSet() Dim dbo As DbObject = DbObject.GetDbObject() Dim ds As DataSet = dbo.GetCategories() dataTable = ds.Tables("Categories") dataView = New DataView(dataTable) End Sub It instantiates the DbObject class and calls its GetCategories method to obtain all the records in the Categories table. The DataSet returned by the GetCategories method, ds, creates a DataTable object that then can be used to construct a DataView object. This DataView object is assigned to the DataSource property of the DataGrid in the BindGrid method:
Sub BindGrid() MyDataGrid.DataSource = dataView MyDataGrid.DataBind() End Sub 'BindGrid
The event handlers that handle the events of the DataGrid control work similarly to the DataGrid's event handlers discussed in the ShoppingCart page. You should refer to "The ShoppingCart Page" section if you find difficulty in understanding how they work.
Figure 6-26 shows the EditCategory page.
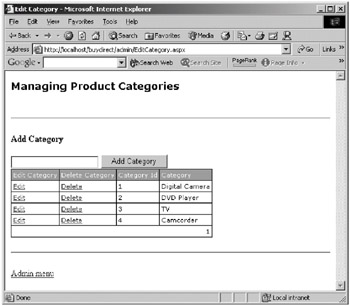
Figure 6-26: The EditCategory page
The EditProduct Page
The EditProduct page allows the user to administer the Products table by adding a new product, editing a product, and deleting an existing product. The way it works is similar to the EditCategory page. There are two forms in the EditProduct page. The first form adds a product and is handled by the Page_Load event handler. The second form contains a DataGrid that displays all the available products and lets the user edit and delete an existing product.
Figure 6-27 shows the EditProduct page.
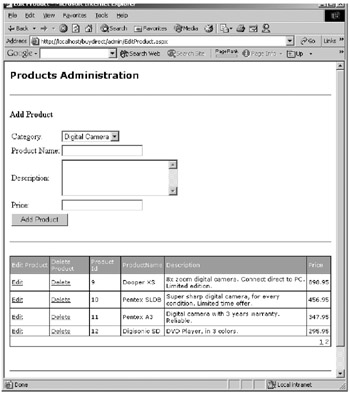
Figure 6-27: The EditProduct page
|
EAN: 2147483647
Pages: 82