| There are many for good logical security. Many of the easiest ones to implement are often overlooked because they are not completely obvious. Because many attacks on a network's security system come from inside the organization and can come from people who have help-desk “level authority (that is, authority to change passwords), it is important to protect against that sort of attack. Figure 15.3 shows a basic structure for granting administrative rights that is used throughout the rest of this chapter. The idea behind this particular architecture is to remove the security administration from the main part of the tree and lock it away where only a few people can make changes ”that way, you increase your accountability without compromising flexibility. Figure 15.3. An administrative container structure. 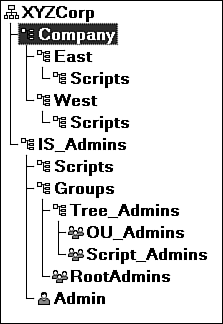
NOTE There are many other ways to structure security, but experience has shown that the model discussed here provides a high degree of flexibility and security because the groups used to assign rights are contained in a separate container (tree branch) that only a few people have access to.
As shown in Figure 15.3, the Admin ID is located in the security administration container. We recommended that you make this branch not browsable by [Public] . You can accomplish this by granting [Public] an explicit object right of "nothing." This helps to limit not-logged-in stations from being able to browse for Admin. TIP Do not use the Admin ID for daily administrative tasks; use it for emergency situations only. By not using it for daily administrative tasks , you increase accountability for various changes made to the tree.
Another good idea is to generate a long password for the Admin account and store it in a safe, secure place. In one production environment we have worked with, the Admin account is protected with a 40-character randomly generated password. Only two people in the organization ”an organization of over 100,000 people ”know where that password is stored. Note that if this organization did not implement proper physical security access controls, it would be only a matter of time before that password was compromised. When creating additional tree administrators, it is generally considered good practice to assign these users explicit rights to the [Root] object in the tree rather than grant them security equivalence to Admin. If something should happen to the Admin account that results in object corruption or deletion, any accounts that are the security equivalent to Admin will lose their rights to the tree. Protecting Administrative Accounts The first level of providing good logical security is to protect administrative accounts. This might seem fairly obvious as a need, but the how-to aspect is something that many administrators do not give thought to. Protecting administrative accounts is quite easy to do. First, you should try to limit the number of partitions that contain administrative accounts and make sure the replicas that hold those objects are on servers that have an extra degree of physical and console security. As discussed earlier in this chapter, if someone can gain access to a server console, he or she can grab the DIB files and attack them offline. Second, containers where there are administrative accounts should have intruder detection turned on. You can turn this on in NetWare Administrator, for example, by selecting the details of the container and then selecting the Intruder Detection tab. By default, this feature is turned off, and when it's turned off, someone trying to break into your system can try as many passwords as he or she wants in an online brute-force attack. Figure 15.4 shows how to set up this feature. Figure 15.4. Enabling intruder detection through NetWare Administrator. 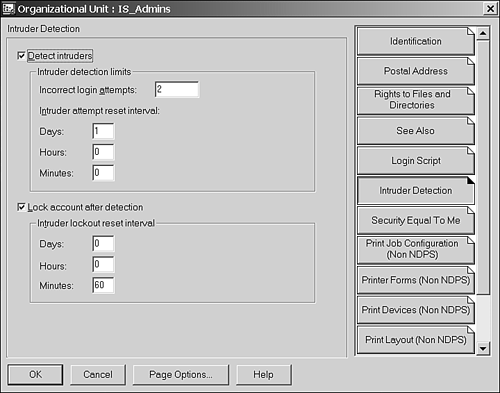
TIP If you use ConsoleOne to configure intruder detection, the setting is under the General tab and not under the Restrictions tab, as you might expect.
Third, you want to limit the number of workstations the administrative accounts can log in at simultaneously . You may elect to enable administrators to only log in from certain workstations; you can also do this by using a network address restriction. As shown in Figure 15.5, you can enable network address restrictions based on IPX or IP addresses. Although Figure 15.5 also show a number of other address types ”Ethernet/Token Ring, AppleTalk, and so on, these entries may be used by custom-developed applications, but they are not used by the Novell Client software to restrict user logins. Figure 15.5. Specifying network address restrictions. 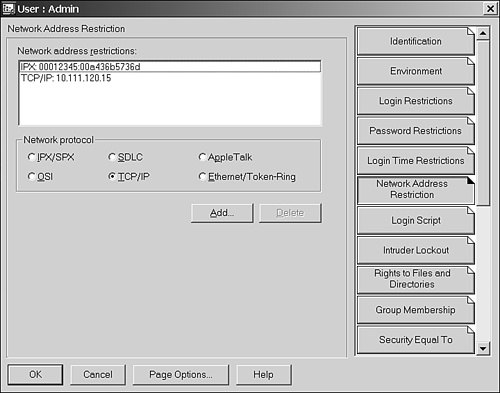
TIP You can set an address range for the network address restriction instead of entering each node into the list. For instance, to restrict a user to any node on a given IPX segment, you can specify 12 F 's for the node address. For IP , on the other hand, the trick is to set the host address to 0. For example, if you have an IP subnet with an address range from 192.168.1.1 through 192.168.1.254 (a Class C subnet mask of 255.255.255.0), you enter 192.168.1.0 as the address restriction. If you have a nondefault subnet mask (say, 255.255.255.192), you enter the address 192.168.1.64 because IP address restriction will allow login from all computers (192.168.1.64 through 192.168.1.127) in the subnet. Refer to TID #10065373 for additional information about network address restrictions.
Novell Client software prefers to use IP instead of IPX to connect to NetWare 5.x or higher servers. Therefore, if you have an address restriction set only for IPX, it will not allow the IP connectivity, and this results in the user not being able to log in. NOTE Enabling some of the additional security options, such as concurrent login restriction and network address restriction, may require you to limit administrators' access to modify their own accounts. If you choose to restrict the number of simultaneous workstations the administrator can use, you might want to prevent administrators from changing that value on their own.
In DS, it is possible to block Supervisor rights to an object or a branch of the tree. The only caveat is that Supervisor rights must be explicitly assigned to at least one user object that is being protected with an Inherited Rights Filter (IRF). Otherwise , you will end up with an unmanageable object. WARNING Checks are performed by Novell-supplied management utilities, such as NetWare Administrator and ConsoleOne, to validate that at least one user has Supervisor access to a container before an IRF is set. The safety checks are not performed by DS , therefore, when you're using a third-party utility. Therefore, you need to take care when assigning IRFs as NDS may not perform such checks, and you could lock yourself out of a container or from managing an object.
Figure 15.6 shows the Inherited Rights Filter dialog box in its default state. To block a particular right, you simply uncheck it. The arrow next to the check box reflects the state of the filter; when blocked, the arrow icon changes to indicate that a right is blocked. For protecting an administrative account, we recommend blocking all object rights except Browse rights and all property rights except Read and Compare. This prevents someone from deleting the account and re-creating it without the IRF, and it also prevents people from making other changes to the account. Figure 15.6. The Inherited Rights Filter dialog box in NetWare Administrator. 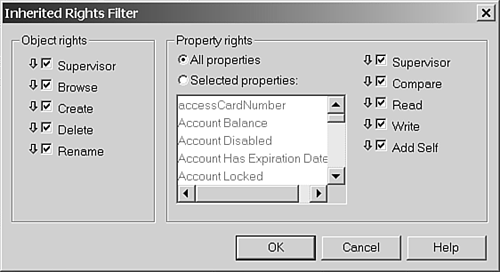
NOTE ConsoleOne shows only the attributes that have an IRF set, which makes checking for IRFs a little easier in ConsoleOne than in NetWare Administrator.
NOTE You access the Inherited Rights Filter dialog box through the Trustees of this Object context menu option.
With the Property Rights portion of the Inherited Rights Filter dialog box, you can block rights to specific attributes, such as password management, or to all attributes. The default is to set up the IRF for all properties. By selecting a specific attribute, though, you can be very granular in what you revoke rights to, just as you can when granting rights. When you're protecting an administrative account, we recommend that in addition to giving a user explicit Supervisor rights to his or her own object, you give another user or group of users rights as well. For example, in Figure 15.3 we have a group called RootAdmins located in the Groups.IS_Admins container that would be ideal for this type of role. The idea behind doing this is that if an administrative user gets locked out of his or her account, somebody else should be able to unlock the account or change the password. Remember that by applying an IRF to an object, you remove some degree of administrative access to that object. You might wonder why a special group called RootAdmins exists in this example. After all, Admin has explicit rights to [Root] , and the discussion thus far has suggested granting explicit rights to [Root] for objects that need Admin equivalence. In a large environment, it might make sense to use a group to house administrative accounts other than Admin and possibly one other account; that way, at least one person can get back in if something happens to both the Admin user and the RootAdmins group. Using a group membership is somewhat easier to manage if you have a few people with that level of access. It is also strongly recommended that administrative users change their passwords on a regular basis (perhaps more frequently than the typical end users); it is very easy for administrators to make exceptions for themselves with their own administrative accounts and remove otherwise standard password restrictions and length limitations. If anything, administrative accounts should have their passwords changed more frequently, have longer minimum password lengths than standard user accounts, and be used only for performing administrative tasks. Any other work the administrator does should be performed through a separate account set up as a typical user account. TIP Administrative accounts should have strong passwords. A strong password is a password with at least a certain number of numeric digits and alphabet characters so that it is not a word that can be found in a dictionary. You can add strong password support to NetWare 6 by purchasing NMAS , Enterprise Edition. NetWare 4 and 5, on the other hand, do not ship with an option for strong passwords. However, there are third-party solutions available that work with all versions of NDS and eDirectory and do not rely on NetWare servers. One example is Password Policy Manager (PPM) for NDS , from Connectotel Ltd. ( www.connectotel.com/ppm ). For more information, refer to the Novell August 2002 AppNote at http://developer.novell.com/research/appnotes/2000/august/02/a000802.htm.
Also suggested in our tree structure example is a special group called OU_Admins . As the name implies, this group is used for granting rights to all organizational unit (OU) objects and all objects under those containers. The only exception to this is the IS_Admins container itself; only Admin and members of RootAdmins should have rights to the IS_Admins container because these users determine what administrative groups should exist, what rights these groups should have within the tree, and who the group members are. Protecting the Schema Having Supervisor rights to the [Root] object grants you another special right: the capability to make changes in the schema partition on all servers. Extending the schema is one of the things that make NDS and eDirectory so versatile. At the same time, you need to control changes to the schema, or you might run into problems due to schema definition clashes . This is a real danger if you have programmers who write programs using the Novell Developer Kit for eDirectory. In most cases, extensions added to the schema can be very difficult to remove, and in some cases, they cannot be removed after they're added. ConsoleOne includes the Schema Manager (accessed from the Tools pull-down menu; see Figure 15.7) that has the capability of adding extensions to a schema. Administrators who are learning may have a tendency to play with this feature and create new object classes and attribute definitions. If you or another part of the administrative staff want to experiment with this functionality, it is best to test it on a nonproduction tree. For this reason, we recommend using a group for rights at [Root] (the RootAdmins group in the preceding example) and a second group that has rights to all objects under [Root] (the OU_Admins group). Figure 15.7. Creating new class and attribute definitions with Schema Manager. 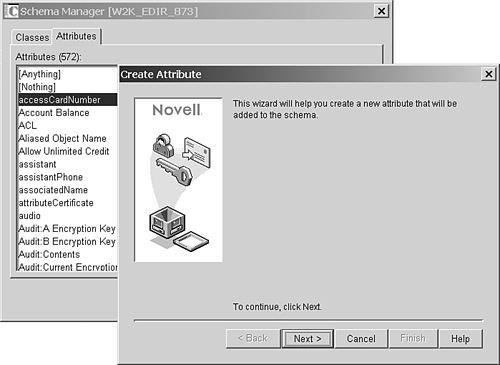
Limiting the access to [Root] also limits the possibility of someone who is trying to break into your system causing damage. If the administrative accounts are few and are relatively difficult to locate, and if the accounts that are found do not have rights to [Root] , the ability for a would-be hacker to extend the schema and create a special class object to be a backdoor into the system is limited. Protecting Login Scripts Another aspect of DS that should be closely controlled is the capability to modify login scripts. Refer to Figure 15.3, where another special group is called Script_Admins . The idea behind the Script_Admins group is that only members of the Script_Admins group can change the majority of login scripts. One large company has implemented this on a rather large scale. Each of the OUs in the tree contains a subcontainer called Scripts . The Scripts container contains profile objects that make up the login scripts for that container. The container script itself contains only one line: INCLUDE ".Main.Scripts.East.Company.XYZCorp"
The main script indicated in the INCLUDE statement contains all the standard script components ”validation of network address for dial-up accounts (to abort the script and not run programs in the script over a dial-up connection) and execution of an operating system “specific login script. The operating system “specific script is called with the following line: INCLUDE ".%OS.Scripts.East.Company.XYZCorp"
The client performing the login request fills in the %OS portion of the command with the name of the operating system. The Scripts container then contains the following scripts to be included: -
MSDOS -
PCDOS -
DRDOS -
WIN95 -
WIN98 -
WINNT These are all created as profile objects and contain commands specific to the operating system in question. The reason this is done is because as the Novell Client has evolved, its login script interpreter has come to include capabilities that are not supported in the old LOGIN.EXE DOS program. REAL WORLD: Checking for Operating System Type in a Login Script Depending on the version of Windows and the login script variable you use, you might not be able to tell the difference between a Windows XP workstation and a Windows Server 2003 workstation. You can use the following table to determine what is the best login script variable to use when you need to determine the operating system version of the Windows system: | OPERATING SYSTEM VERSION | PLATFORM | OPERATING SYSTEM | OS_VERSION | WINVER | | DOS/ Windows 3.11 | WIN | MSDOS (or PCDOS or DRDOS ) | 6.22 (depends on version of DOS used) | N/A | | Windows 95 | W95 | WIN95 | V4.00 | 4.00.950 x | | Windows 98 | W98 | WIN98 | V4.10 | 4.10.1998 | | Windows NT | WNT | WINNT | V3.51 / V4.00 | 4.0.1381 Service Pack x | | Windows Me | W98 | WIN98 | V4.90 | 4.90.3000 | | Windows 2000 | WNT | WINNT | V5.00 | 5.0.2195 | | Windows 2000 SP x | WNT | WINNT | V5.00 | 5.0.2195 Service Pack x | | Windows XP | WNT | WINNT | V5.01 | 5.1.2600 | | Windows codename Longhorn (values subject to change) | WNT | WINNT | 6. x | 6.0.4051 |
The OS_VERSION variable returns a value of V5.01 instead of the V5.10 you would expect for Windows XP. The value returned by Windows XP in binary is 5.01 , but it is formatted differently in ASCII. |
On 32-bit Windows platforms, the @ command executes an external program and immediately continues the script. It is very similar to the # command (which these interpreters also support), except for the fact that it does not wait for the program that was run to return control back to the interpreter. Unfortunately, the LOGIN.EXE script interpreter does not understand the @ command, and even if you attempt to check for the operating system in the login script as shown here, the script interpreter still interprets the line and returns an error: IF "%OS" = "WINNT" BEGIN @NALEXPLD END
You might notice that the list of different script names includes three DOS names and both WIN95 and WIN98 . This is because the %OS variable actually returns these values, depending on the workstation's operating system. In the case of DOS workstations, however, the scripts for MSDOS , PCDOS , and DRDOS are really the same. Rather than copy the script and have to maintain three copies, you can simply work with one ( MSDOS is what we use) and then include that script in the others, using the login script INCLUDE command. The same holds true for Windows 98, which is frequently considered by software to be an upgraded Windows 95 ”the client is the same, the environment is the same, so the script probably should be the same as well. Protecting login scripts really serves two purposes: -
It prevents accidental errors (such as deleting the wrong file from the workstations) in login scripts from causing widespread problems. -
It prevents a hacker from inserting commands in the login script to capture passwords or other information or to cause harm to work stations. When a script change is made and causes problems, it can be difficult to determine what change was made and who made the change. By limiting editing access to the login scripts, you reduce the number of people who might have caused the problem. A good side effect of this is that you can more easily create an environment where script changes are thought out and discussed before implementation. To limit access to edit the scripts, you need to secure the container. First, you grant Admin and the Script_Admins group explicit Supervisor rights to the Scripts container, as shown in Figure 15.8. Figure 15.8. Granting Supervisor rights to the Scripts container. 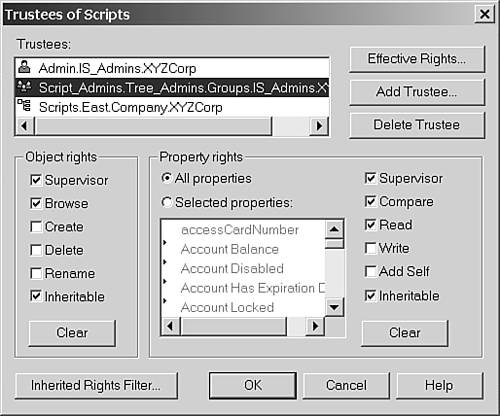
Next, you block all rights to the container except for Browse object rights and Read and Compare rights to all properties. TIP In addition to the container rights, the users need to have Read rights assigned to the Login Script property of the profile objects; otherwise, the users will not be able to read the scripts in order to run them when they log in.
Protecting Logical Portions of the Tree In some environments where tree administration is decentralized, it may be necessary to set up regional administration ”possibly even site-level administration. If you have administrative groups in Salt Lake City and Toronto, for example, you may not want the administrative group in Toronto to be able to make changes to the users in the Salt Lake City container. Setting up administrative authority to do this is easy. Using the base model shown in Figure 15.3, you add two groups to the Groups.Admin container ”one called TorontoAdmins and another called SaltLakeAdmins. For the high-level container in the tree for Salt Lake City, you grant the SaltLakeAdmins group Supervisor object rights. Similarly, for the Toronto high-level container, you grant the TorontoAdmins group Supervisor object rights. If multiple sites within a location have their own administration, you can take this a step further. In Salt Lake City, you may have a regional office but also several branch offices with their own IT staff, in Murray, Provo, and Logan. Assuming that these containers are listed under Salt Lake City's container, you would create a container in Groups.Admin called Salt Lake City and under that container create the groups MurrayAdmins , ProvoAdmins , and LoganAdmins . The reason for this setup is that you might want to design a hierarchy for adding people to these groups. Putting the branch office administrators in a container named after the region means that you can grant the regional Admins groups Supervisor rights to the container. The regional Admins groups can add people to those groups, but without having the capability to add people to the regional group. This type of design is very scalable and easy to manage, and at the same time, it provides a foundation for smaller organizations that will not have to change as the organization grows. Evaluating Security Equivalences You should do security equivalence checks from time to time. It never hurts to make sure security is set up the way you think it is. The first thing you need to understand is how security equivalence works. Figure 15.9 shows three users ”AmyP, JimH, and PeterK ”and how security equivalence works. Figure 15.9. Security equivalences between three users. 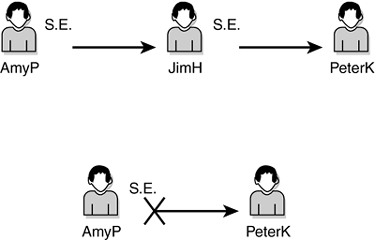
In this figure, JimH is assigned a security equivalence to PeterK, and AmyP is assigned a security equivalence to JimH. In some environments, the result might be that AmyP receives security equivalence to PeterK, but in DS or the bindery, that is not the case. Security equivalences are not transitive ”they are evaluated only to a single level. This makes the evaluation of security equivalence much simpler. NetWare 5 introduced a new feature called an Inheritable Access Control List value. As you will see in the section "Setting Up eDirectory Security Access for a Help Desk," later in this chapter, the capability to set this up simplifies administration greatly, but it introduces an additional complexity to evaluating security equivalence ”also commonly referred to as the effective rights of an object. Fortunately, NetWare Administrator and ConsoleOne have the capability to perform the evaluation for you, even with the changes that became effective with NetWare 5. Figure 15.10 shows the Effective Rights window in NetWare Administrator. Figure 15.10. Using NetWare Administrator to evaluate effective rights. 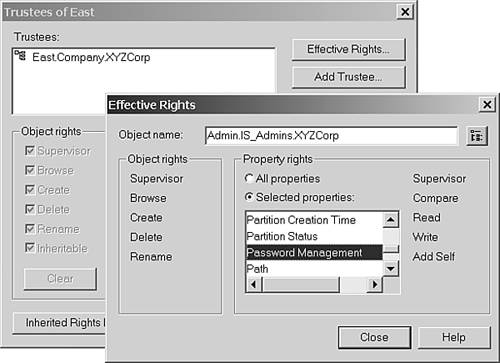
The evaluation of one object's effective rights to another object's attributes includes several checks: -
The trustees of the object being examined (the target object) -
Rights granted to parent containers for the target object -
Security equivalences of the source object -
Rights flagged as Inheritable for the parent container objects to the target object You might notice that group membership is not one of the things tested . Group membership itself does not grant rights to another object. However, because members of a Group object are also security equivalents to the Group object, each member will have whatever rights the Group object has. Accountability and Auditing Starting with the release of NetWare 4, Novell has included a feature for providing an audit trail. The original auditing in NetWare 4.0, and even as late as NetWare 4.10, was not very easy to use. The utility used for manipulating auditing, AUDITCON.EXE , was fairly cryptic, and its reports contained too much information to determine who was doing what. In short, it was difficult to find specific information you might look for because the reports were so difficult to read. In NetWare 4.11, the Auditcon utility became more robust. Gone were the auditing passwords, and in their place was an object placed in the tree to control access to various features of auditing. Auditing in NetWare 5.x is still handled through Auditcon, shown in Figure 15.11. The utility still maintains its somewhat cryptic interface, but the tool has been greatly improved. Because this is a largely unfamiliar utility for administrators, we examine it in some detail. A brief discussion about Novell Nsure Audit (NNA) is presented after the discussion of Auditcon. Figure 15.11. The Auditcon main menu. 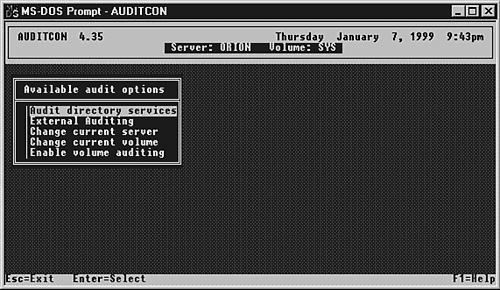
NOTE Although NetWare 6 no longer ships with Auditcon ”NetWare 6.0 ships with Novell Advanced Audit Service (NAAS) and NetWare 6.5 ships with NNA ”you can still use Auditcon against eDirectory running on NetWare 5.1 platforms to perform some basic tracking. However, Auditcon only works in a NetWare environment.
Using Auditcon Auditcon is capable of auditing a large number of events ”both file system and DS events. The following are the audited DS events: Abort join partitions Abort partition Add attribute to schema Add class to schema Add entry Add member to group property Add partition Add replica Add subordinate reference to partition Backup entry Change ACL Change bindery object security Change bindery property security Change password Change replica type Change security also equals Change security equivalence Change station restriction Clear NDS statistics Close bindery Close stream Compare attribute value Create backlink Create bindery property Disable user account Enable user account End replica update End schema update Inspect entry Intruder lockout change Join partitions List containable classes List partitions List subordinates Login user Logout user Merge entries Merge trees Modify class definition Modify entry Move entry Move tree Mutate entry New schema epoch Open bindery Open stream Read entry Read references Receive replica update Reload NDS software Remove attribute from schema Remove backlink Remove bindery property Remove class from schema Remove entry Remove entry directory Remove member from group property Remove partition Remove replica Rename object Rename tree Repair time stamps Resend entry Restore entry Send replica update Send/receive NDS fragmented request/reply Split partition Start partition join Start replica update Start schema update Synchronize partitions Synchronize schema Update replica Update schema User locked User unlocked Verify console operator Verify password Auditing is a good way to keep track of what changes are made on a network and who makes them. Auditing can be a very powerful tool, but if it is overused , Auditcon data can become burdensome to maintain and evaluate. Auditing all events is generally not a good idea because of the space needed on all servers and because of the amount of information returned. As you can see, there are many events that can be audited, and many of those events happen very frequently. You should use auditing when you want to figure out why something is happening. For example, you might want to audit the container objects, but you only see changes in the access control list; this would indicate that someone is granting rights or removing rights in a way that you do not want them to. You might also want to audit changes to passwords or resets of intruder lockouts. In conjunction with a help-desk setup, this is a way to provide checks to verify that only the people you want to be able to make the changes are actually the ones making the changes. Another use for auditing is to record changes in the DS partitioning and replication scheme. In the Directory Services Auditing dialog box events, there are items to audit partition split/join operations as well as replica additions, deletions, and changes of replica types. Because an object in the DS tree controls auditing, you can block access to even see the object, thus making the auditing operation transparent to the users and other administrators on the system. When you have Auditcon running, you can select Audit Directory Services and then select a container to audit by pressing F10. If the container does not have auditing enabled, you see a menu like the one in Figure 15.12. Figure 15.12. Enabling container auditing with Auditcon. 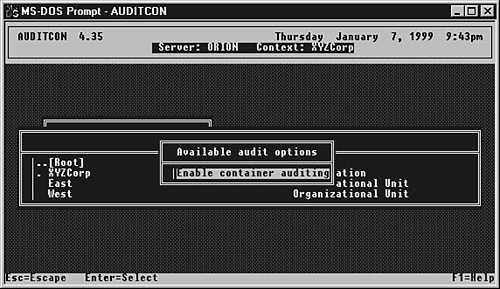
When auditing is enabled, the menu in Figure 15.13 is displayed. Figure 15.13. Menu choices that are available when container auditing is enabled. 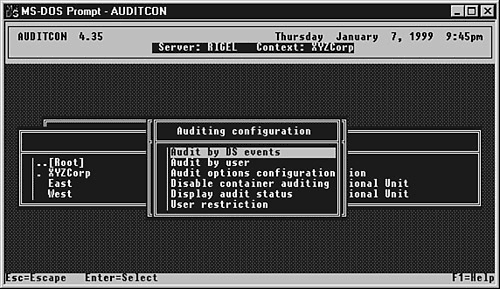
The first option in the menu, Change Replica, enables you to select the replica you want to view. DS auditing is stored along with the directory itself and is a part of the partition. Therefore, its information is replicated along with the rest of the partition. WARNING Because DS auditing is replicated with the rest of the information in DS , you need to ensure that you have sufficient space on the SYS: volume for the servers that hold replicas of audited containers. If there is insufficient space, you will encounter problems with server utilization and potentially have issues with DS corruption due to insufficient space.
When you're setting up auditing, the menu item you want next is Auditing Configuration. The menu that appears when you select this item, shown in Figure 15.14, is where you select what you want to audit and which objects in the tree you want auditing enabled for. Figure 15.14. The Auditing Configuration menu in Auditcon. 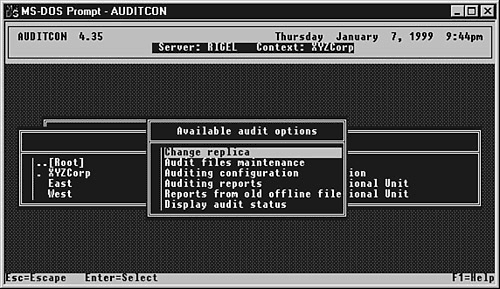
The first item on this menu, Audit by DS Events, enables you to toggle specific events by highlighting the event and pressing F10 (see Figure 15.15). When you have auditing enabled and have selected the events and users you want to audit, you can extract the auditing information from the audit logs. Selecting the Auditing Reports option from the Available Audit Options menu shown in Figure 15.13 brings up the Auditing Reports menu, shown in Figure 15.16. Figure 15.15. Selecting which DS events to audit. 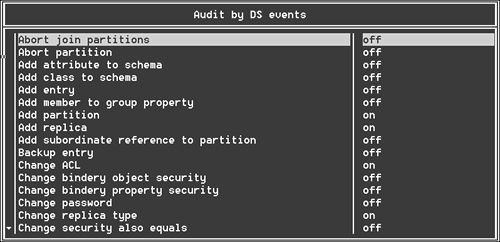
Figure 15.16. The Auditing Reports menu. 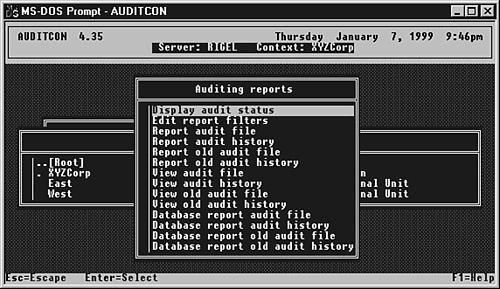
There are several options in the Auditing Reports menu; these options create a readable file that can be browsed offline. If you have few events enabled, browsing offline can be a fast way to see what has been happening on the system. The second type of report is viewed onscreen; this is similar to the report options, except that the information is displayed directly to the screen. NOTE Each audit record has an event number and a short description associated with it, as in the following example: 23:48:34 Active connection, event 58, address 0000E100:0001803750E2, status 0 user .CN=admin.O=XYZCorp, replica 1 If the description text is absent, you can refer to TID #10054493, where many of the event numbers are defined.
The most useful of the different reporting methods is the database report. This creates a comma-delimited file that can be imported into a database or spreadsheet for more detailed analysis. This file format does not lend itself to easy visual examination, but if you are attempting to keep a history of old audit files to establish trends in certain events, this is the best format to use. The Auditing Reports menu contains the option Edit Report Filters. You can edit these filters either from the menu or after selecting a reporting method. Figure 15.17 shows the options available for creating reporting filters. Figure 15.17. Edit Report Filter menu options. 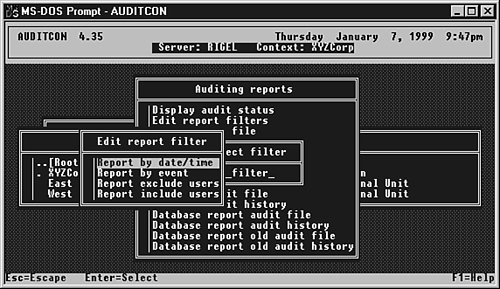
In addition to performing DS auditing, you can audit a number of other services. By returning to the main Auditcon menu and enabling volume auditing, you can select the other types of events that can be audited. The information recorded for all the volume-specific auditing events is stored on the volume being audited in the _NETWARE directory on that volume. All the different types of auditing include the capability to control the configuration of auditing. We mentioned earlier in this chapter that auditing can cause disk space problems if you are not careful with how you use it. The Audit Configuration menu, shown in Figure 15.18, enables you to limit the use of disk space and define what should happen when the audit log is full. Figure 15.18. Audit Configuration menu options. 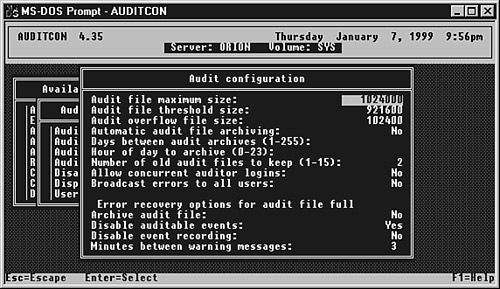
The Audit Configuration menu options are set on a per-volume or per-container basis. Another configuration option is the capability to audit not-logged-in users or to enable auditing of specified users as opposed to all users. The User Restriction menu options are shown in Figure 15.19. Figure 15.19. Special user restriction configuration options. 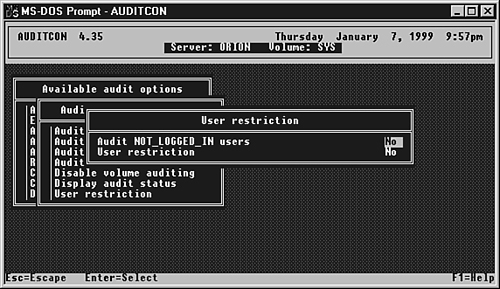
The other option on the User Restriction menu, also called User restriction, allows you to specify whether all users are audited (value set to NO ) or just the specified users selected from the Audit Configuration menu (value set to YES ). This is useful if you have containers with a large number of users in them and do not want to have to enable auditing for every user manually or figure out when users are created so you can enable auditing for them. TIP The user interface to Auditcon is not one of the friendliest around. If you work for an educational-type establishment, you will probably have to create a number of OUs for new students every semester and then start up Auditcon, enable auditing, and get all the settings right. A utility called SETAUD.EXE (see www.caledonia.net/setaud.html ) may be of help to you. First, you create a template file with the events to audit, and then you simply invoke SETAUD , directly or from an automated procedure that creates the users, to enable and configure the necessary auditing settings. As an added bonus, SETAUD can also disable auditing and clear out the log files before you delete an OU . It can export the auditing logs in a format suitable for importing into Excel for further reporting and analysis.
NOTE Auditcon works with IPX only. If your NetWare servers are IP only, you need to use the SETAUD utility to enable, disable, and configure auditing.
Because managing auditing requires a fair amount of time and energy, you should not turn on auditing frivolously. Rather, you should use it as a preventive tool. There are two differing philosophies when using auditing: There are advantages to both options. With the first option, people know you are watching what is happening on the network and know that they will be held accountable for the changes they make. This tends to make people think more before they make a change because they know you will find out if something goes wrong. On the other hand, by not telling people you are using auditing, they do not feel that Big Brother is watching everything they do. Used in this way, auditing can be a tool for helping you learn what shortcomings other administrators have in their education, and you can teach them how to properly do things. With the second option, if you are not careful, people will find out that you are watching every move they make. It is important when dealing with people that they be at ease and not fearful that you are going to make life difficult for them when they make mistakes. A big part of successfully implementing auditing without letting people know you are auditing them is making sure they cannot see the Audit:File objects in the DS tree. If those objects are not blocked, people will likely know that something is up, particularly if they are familiar with how auditing works. While no method is completely effective for keeping people from knowing auditing is going on, it is possible to make it more difficult to detect. Using an IRF to block rights to the object is a starting place. NNA NetWare 6.0 shipped with NAAS, but NAAS is no longer supported as of January 1, 2004. NNA, included with NetWare 6.5, supercedes NAAS. NNA is a centralized, cross-platform, client/server-based auditing service. It can collect event data from multiple applications across multiple platforms; it writes the data to a single data store, using a common data structure; and it includes tools for reporting the logged data. It also provides real-time event information for notification and monitoring. NOTE NNA's installation extends the eDirectory schema and includes Novell iManager 2.0 plug-ins for administration and management. You can configure and manage the various NNA components ”including Logging Applications but not Platform Agents ”by using Novell iManager or, in environments where eDirectory is not present, by using Novell WebAdmin (see Figure 15.20). Figure 15.20. Managing NNA components using WebAdmin. 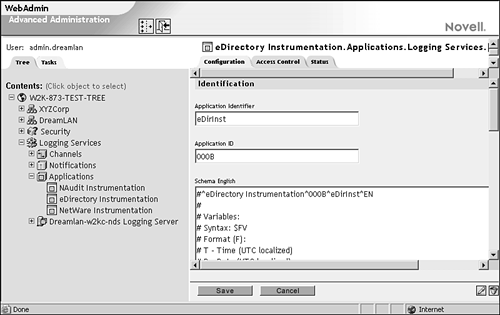
NNA is composed of four primary components (see Figure 15.21): -
Logging applications -
Platform agents -
Secure logging server -
Data store Figure 15.21. NNA architecture overview. 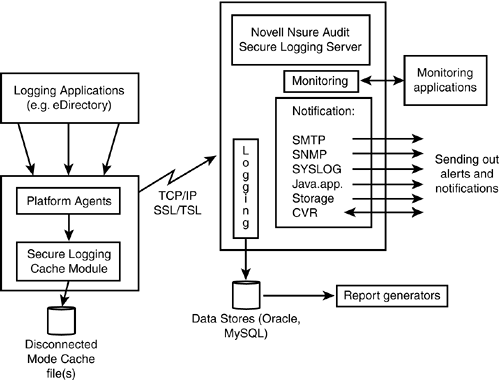
Logging applications, also called reporting applications, are software that reports events to platform agents, using the NNA SDK. Novell has already instrumented many of its systems to log to NNA, including all currently supported versions of NDS and eDirectory; NetWare 4.2, 5.1, and 6.x; BorderManager 3.8; and NetMail 3.5. You can add the instrumentation (that is, event reporting) to your own applications by using the NNA SDK that is freely downloadable from Novell DeveloperNet (http://developer.novell.com). A platform agent is a shared library that collects events from all logging applications on the platform on which it runs and forwards the data to the logging server. One platform agent must reside on every platform that has one or more logging applications. When the platform agent cannot communicate with a secure logging server ”due to a downed link, for instance ”the collected events are sent to the secure logging cache module, which stores them in a local disconnected mode cache file(s). When the link is reestablished, the contents of these files are transmitted. Similarly, if the platform agent receives a flood of events that might cause network congestion if immediately transmitted, it buffers the events in the secure logging module and trickles the data flow until the traffic lightens. NOTE Unlike other components in NNA, platform agents are not configured through eDirectory. Instead, they use a simple, plain-text configuration file. This makes platform agents small and self-contained and permits them to run on platforms that do not have eDirectory installed.
The communication links between platform agents and the secure logging server can be encrypted using SSL/TLS to ensure the privacy of the events. In addition, platform agents employ two methods ”event signing and event chaining ”to ensure that the logged events are not otherwise modified by any intervening third parties. In event signing , the platform agent (or the logging application, in some cases) embeds a digital signature to each event before the platform agent forwards the event data to the secure logging server. This signature enables the secure logging server to verify the integrity of the event data it receives, ensuring that the data has not been modified. In event chaining , the platform agent establishes a sequential, tamper-evident link of all events. The platform agent (or the logging application, in some cases) includes with each new event from a given logging application a hash of the previous event from the same logging application. The platform agent signs the hash, along with the data from the current event, before sending it on to the secure logging server. The hash enables you to inspect logs to ensure that all events that have occurred are contained in the log in the sequence in which they occurred and that no events are missing. The secure logging server is a centralized and secure server that aggregates the logging entries received from the various platform agents that it serves. The secure logging server event manager receives the data and forwards it immediately to the logging, notification, and monitoring services provided by the secure logging server. The logging service records the events in the data store. The notification service alerts the appropriate people or systems of particular events or absence of events via one or more of the defined means, such as SNMP and SMTP. The monitoring service sends values in realtime to monitoring applications. TIP The Critical Value Reset (CVR) channel in the notification service allows you to automatically and immediately reset particular eDirectory attributes' values ”but eDirectory attributes only ”in the event that those attributes are changed. For instance, say you have a policy that dictates that no user can be the security equivalent to Admin. To enforce this policy, you can create a notification filter object that routes notifications to the CVR handler through a CVR channel object each time a user object is granted security equivalency to Admin. In the CVR channel object, you define a rule that the CVR handler should delete the Security Equals entry by setting the value to NULL .
The secure logging server records all events in a centralized data store, using a format that is similar to the syslog packet format. The data store can be kept in a number of different database formats, such as MySQL or Oracle, depending on your selection during NNA installation; if MySQL or Oracle is not already installed, a flat-file database is used instead. NNA is also capable of creating filtered data stores. Based on criteria you define, NNA captures specific types of events and writes those events to secondary data stores. You can query the data stores by using included custom reports and log drivers that support MySQL database, Oracle database, flat-file database, and syslog . Novell has planned support for other databases, including DB2 and Sybase. You can also develop your own custom log drivers by using the NNA SDK. NOTE Originally developed for Unix systems, the syslog protocol, now an Internet standard (see RFC 3164), provides a transport to allow a machine to send event notification messages across IP networks (using UDP with a destination port of 514) to event message collectors ”known as syslog servers. Because each process, application, and operating system was written somewhat independently, there is little uniformity to the content of syslog messages. For this reason, no assumption is made upon the formatting or contents of the messages. The protocol is simply designed to transport these event messages. In all cases, there is one device that originates the message. The syslog process on that machine may send the message to a collector. No acknowledgement of the receipt is made.
The NDS/eDirectory Instrumentation application (or agent ) for NNA, called auditDS , allows NNA to log eDirectory events. To log replicated eDirectory events (such as object creation and deletion) on NetWare, Windows, and Linux/Unix systems, auditDS should be loaded on one server per DS replica. To log nonreplicated events (such as those associated with DirXML), it must be installed on each individual server for which you want to log nonreplicated events. NOTE When auditDS is loaded on more than one server per DS replica, duplicate entries for replicated events will be recorded in the data stores.
NOTE You can find a list of NDS /eDirectory events that can be logged by NNA at www.novell.com/documentation/lg/nsureaudit/html/edirectory_events.htm.
The following are two excerpts from the NNA eDirectory event log (in flat-file format) ”with the timestamps removed ”showing the events associated with Admin logging in and the creation of a new Group object: [eDirInst\Object]: User .Admin.XYZCorp has been allowed to login (Flags: 0) by .[Public]. [eDirInst\Object]: User .Admin.XYZCorp (using null password: No) logged in (NDS Login: 1). [eDirInst\Attribute]: A value has been removed by .VEGA-W2KC- NDS.XYZCorp from the attribute Last Login Time on the object .Admin.XYZCorp [eDirInst\Attribute]: A value has been added by .VEGA-W2KC- NDS.XYZCorp to the attribute Last Login Time on the object .Admin.XYZCorp [eDirInst\Attribute]: A value has been removed by .VEGA-W2KC- NDS.XYZCorp from the attribute Login Time on the object .Admin.XYZCorp [eDirInst\Attribute]: A value has been added by .VEGA-W2KC- NDS.XYZCorp to the attribute Login Time on the object .Admin.XYZCorp [eDirInst\Attribute]: A value has been added by .VEGA-W2KC- NDS.XYZCorp to the attribute Network Address on the object .Admin.XYZCorp [eDirInst\Attribute]: A value has been added by .VEGA-W2KC- NDS.XYZCorp to the attribute monitoredConnection on the object [eDirInst\Attribute]: Attribute Object Class was added on object .new_group.XYZCorp by .Admin.XYZCorp [eDirInst\Object]: A new eDirectory object called .new_group.XYZCorp (Class: ) was created by .Admin.XYZCorp [eDirInst\Attribute]: A value has been added by .Admin.XYZCorp to the attribute Object Class on the object .new_group.XYZCorp [eDirInst\Attribute]: A value has been added by .Admin.XYZCorp to the attribute modifiersName on the object .new_group.XYZCorp [eDirInst\Attribute]: A value has been added by .Admin.XYZCorp to the attribute creatorsName on the object .new_group.XYZCorp [eDirInst\Attribute]: A value has been added by .Admin.XYZCorp to the attribute Object Class on the object .new_group.XYZCorp [eDirInst\Attribute]: A value has been added by .Admin.XYZCorp to the attribute CN on the object .new_group.XYZCorp [eDirInst\Attribute]: A value has been added by .Admin.XYZCorp to the attribute GUID on the object .new_group.XYZCorp [eDirInst\Meta]: Access Control List modified on object .new_group.XYZCorp by .Admin.XYZCorp [eDirInst\Attribute]: A value has been added by .Admin.XYZCorp to the attribute ACL on the object .new_group.XYZCorp [eDirInst\Attribute]: A value has been removed by .Admin.XYZCorp from the attribute modifiersName on the object .new_group.XYZCorp [eDirInst\Attribute]: A value has been added by .Admin.XYZCorp to the attribute modifiersName on the object .new_group.XYZCorp
As you can see, each event generates a fair number of entries in the log. Therefore, you need to spend some time considering, deciding, and selecting the types of events to track. NOTE The version of NNA that is included with NetWare 6.5 is the NNA Starter Pack. The Starter Pack allows you to run one logging server (with limited functionality) and one platform agent; the agent must be on the NetWare 6.5 server. In order to monitor other non-NetWare 6.5 servers, you must purchase additional platform agents. For more information about NNA, visit www.novell.com/products/nsureaudit.
TIP Those of you who have tried to set up NAAS and NNA may have found that these products are not straightforward in their configuration or that they do too much (as they provide full-blown event auditing services). Blue Lance, Inc. ( www.bluelance.com ) has been a vendor of NetWare auditing applications since NetWare 3 was introduced. Its new LT Auditor+ suite of applications, which identify eDirectory/ NDS vulnerabilities, among other features, may be of interest to you.
|