| The health check process involves a detailed list of tasks for ensuring and maintaining a healthy DS tree. We break down these tasks into three sections: -
"Tree Health Check Procedures" ” This section provides information on how to determine the overall health of the tree. These steps should be performed on a fairly regular basis, perhaps monthly. -
"Partition Health Check Procedures" ” This section provides information on procedures that should be performed before you do any major partition operations. -
"Server Health Check Procedures" ” This section describes the steps necessary to identify the health of replicas on a server. The concepts and procedures discussed in this chapter are applicable equally to all operating system platforms supported by eDirectory: NetWare, Windows, Sun Solaris, and other Unix/Linux platforms. NOTE Although NDS iMonitor makes health checking an easier task, we feel it is important to understand the underlying fundamental steps necessary for a health check. Therefore, the procedures given in the following sections are in the "long format," using traditional tools such as DSRepair and DSTrace , instead of NDS iMonitor. Furthermore, sometimes it is simply much more efficient or convenient (say, when you are standing right in front of the server console) to use non-HTTP “based tools.
Tree Health Check Procedures The following sections discuss the 13 major health check steps for the NDS/eDirectory tree. You don't need to perform all 13 of these steps at all times. You should perform the following 7 of these health check procedures on a regular basis: -
Verifying DS versions -
Checking time synchronization -
Checking server-to-server synchronization -
Checking replica synchronization -
Checking external references (exrefs) -
Checking replica states -
Checking schema synchronization TIP For a proper and complete health check, the tasks listed in this section need to be performed on every server in the tree that holds a replica. However, this is not practical for large trees or when there are a large number of partitions and servers. Therefore, although it is advisable to perform all tasks on every server, for an abbreviated version, you can perform the steps on the servers that hold the Master replica for each partition. You should start with the server hosting the Master of [Root] and work down the tree.
The DS Version Check Ideally, you should run the same version of the DS module throughout a tree. However, this is not always possible, especially if you have mixed versions of NetWare and other operating system platforms running eDirectory. Therefore, the second best thing you can do is ensure that all NDS/eDirectory versions are at the latest version on their respective operating system platforms. In Unix/Linux and Windows environments you can verify all DS versions that exist in a tree by using the DSRepair utility to perform the following checks: | OPERATING SYSTEM | PROCEDURE | | NetWare | Load DSREPAIR.NLM at the server console and select the Time Synchronization option. | | Windows | Start dsrepair.dlm from within NDSCons and select the Time Synchronization option from the Repair menu. | | Unix/Linux | Execute ndsrepair -T , where the time synchronization report also shows the DS version on all the servers in the tree. If not all servers in the tree are displayed, you have to run this command on those servers separately. On individual servers, you can also execute ndsrepair -E , and the DS version is shown at the beginning of the replica synchronization information; or you can execute ndsstat on those servers to see the version of eDirectory. |
NOTE NDS -aware CD servers are exceptions to this requirement because the version of DS running on them generally cannot easily be updated unless the servers allow flash updates.
This check should be performed on a server holding a replica of [Root] ”not necessarily the Master ”because that server knows about all the servers in the tree. If it is not run on such a server, the report may be incomplete. The Time Synchronization Check Correct time synchronization is important because NDS/eDirectory partitions are replicated and need to be concurrent with one another. Each event that occurs in DS is marked with a timestamp. The timestamps are used to order the processing of events or changes that occur on multiple servers. Time-stamping of events keeps all DS changes in proper order. A time synchronization check must be done regularly to ensure that DS functions correctly. For example, if time is out of synchronization when you perform a change replica type partition operation, the operation will become stuck and not complete. NOTE It is not critical that the servers show a correct local time, but all servers within the tree must be time synchronized to each other.
The time synchronization check is performed using the DSRepair utility and should be performed on a server that holds a replica of [Root] ”not necessarily the Master ”because such a server knows about all the servers in the tree. Otherwise , the report may be incomplete. Here's how you complete this check: | OPERATING SYSTEM | PROCEDURE | | NetWare | Load DSREPAIR.NLM at the server console and select the Time Synchronization option. | | Windows | Start dsrepair.dlm from within NDSCons and select the Time Synchronization option from the Repair menu. | | Unix/Linux | Execute ndsrepair -T , which reports time synchronization status on all the servers in the tree. If not all servers in the tree are displayed, you have to run this command separately on the servers. |
All non-NetWare servers will report a time server type of Secondary. Therefore, it would be normal for a pure-Linux eDirectory tree, for instance, to list all servers as secondary time servers and show no single-reference time servers as being present (see Figure 13.1). Figure 13.1. Timeservers in pure Windows are secondary time servers. 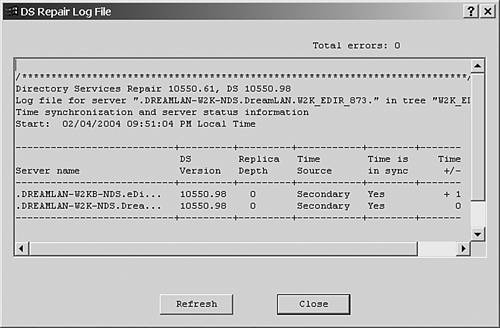
WARNING NetWare 5 and higher tend to report that time is in sync even when it is not. Therefore, when you run this check on a NetWare 5 or higher server, you should pay special attention to the Time +/- column. If any of the numbers in this column is greater than 2, you are most likely outside the default synchronization radius (which is 2 seconds).
REAL WORLD: Replica Depth? The output from the time synchronization check includes a field called Replica Depth. The replica depth is an indicator of what replica is on the server. It is reported as -1 if no replicas are stored on the server, 0 if the server contains a replica of the [Root] partition, or a positive integer that indicates how many (container) objects away from [Root] the first replica is on the reporting server. For instance, if the server holds a replica whose partition root object is OU=Test.O=XYZCorp , the reported replica depth is 2. There is a cosmetic bug in DSRepair for some versions of eDirectory 8.7.x (such as 8.7.1) that reports an erroneous replica depth value (for example, a value of 2 where a [Root] replica exists). This bug is fixed in eDirectory 8.7.3. |
The DS (Server-to-Server) Synchronization Status Check The DS (server-to-server) synchronization status check ensures that the servers within a given replica ring are communicating correctly. However, it does not necessarily guarantee that the replicas are synchronized ”a partition continuity check is required to verify replica synchronization status, as discussed later in this section. The check can be performed using the DSTrace facility, as follows : | OPERATING SYSTEM | PRO | | NetWare | At the server console, issue the following commands: | | | | SET TTF=ON | Sends the DSTrace screen output to DSTRACE.DBG | | | | SET DSTRACE=*R | Resets the file to 0 bytes | | | | SET DSTRACE=ON | Activates the DSTrace screen | | | | SET DSTRACE=NODEBUG | Turns off all preset filters | | | | SET DSTRACE=+S | Enables synchronization messages | | | | SET DSTRACE=*H | Initiates a heartbeat | | | After you have collected sufficient information, enter SET TTF=OFF to close the DSTRACE.DBG file and then enter SET DSTRACE=OFF to stop further display. | | Windows | Start dstrace.dlm from within NDSCons, select Edit, Options, and then clear all settings by clicking Clear All. Check the Partition, Inbound Sync Detail, and Outbound Sync Detail boxes and click OK. | | Select ds.dlm from the main NDSCons screen and click Configure. Select the Triggers tab and then click the Replica Sync button. This forces partition synchronization with other servers. | | You can view the synchronization activity by going to the eDirectory Server Trace Utility screen and scrolling through the synchronization process. You can also copy and paste the information from the Trace screen to a text file to make it easier to search for error codes. | | Unix/Linux | Run ndstrace and from within the ndstrace utility enter the following: | | | | Set dstrace=on | Enables tracing | | | | set dstrace=nodebug | Turns off all preset filters | | | | set dstrace=+sklk | Enables synchronization messages | | | | set dstrace=+sync | Enables inbound sync messages | | | | set dstrace=*h | Initiates a heartbeat | | | The displayed information is saved automatically in the /var/nds/ndstrace.log file, which can be viewed through a text editor. |
NOTE The server must have at least one replica in order to display any DSTrace information.
You can examine the DSTrace log file by using a text editor and search for -6 and -7 to find any DS errors encountered during synchronization (such as -625 or -746). Or you can search for YES or Process succeeded (see Figure 13.2), which reflect successful synchronization for a partition. You need to perform this procedure on each server that holds a replica. Figure 13.2. DSTrace, showing a successful replica sync. 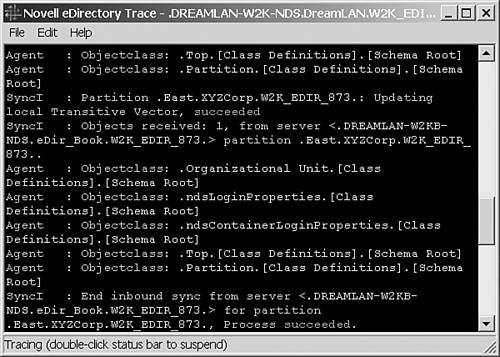
TIP -625 is a Transport error and -746 is a Zero Creation Time error. NDS 7 and later do not allow an object to have a zero creation timestamp, but earlier versions of DS.NLM do.
The Replica Synchronization (Partition Continuity) Check The replica synchronization (partition continuity) check operation helps you identify whether any of a partition's replicas are experiencing synchronization errors. This check displays the time of the last successful synchronization to all servers, along with any errors that have occurred since the last synchronization. This operation is also known as "walking the replica ring." DSRepair can report replica synchronization status for every partition that has a replica on the current server. It reads the Synchronization Status attribute from the Replica Root object on each server that holds replicas of the partitions. It then displays the time of the last successful synchronization to all servers (see Figure 13.3) and any errors that have occurred since the last synchronization. DSRepair will display a WARNING message if synchronization has not completed within a 12- hour timeframe. Figure 13.3. DSRepair, showing no replica synchronization errors. 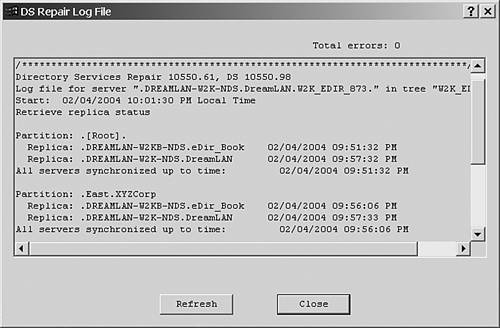
Here's how you perform a replica synchronization (partition continuity) check: | OPERATING SYSTEM | PROCEDURE | | NetWare | Load DSREPAIR.NLM at the server console and select the Report Synchronization Status option. | | Windows | Start dsrepair.dlm from within NDSCons and select the Report Synchronization Status option from the Repair menu. | | Unix/Linux | Execute ndsrepair -E at the command line. |
TIP You can also perform this check by using NDS Manager.
The External References, Backlink, and Obituaries Check When a server references an object that it does not have locally, an exref to that object is created, and the object will have a backlink to the server that holds its exref (with eDirectory, the backlink is replaced by a distributed reference link [DRL]). It is a good idea to know how many exrefs a server holds. If there are many, the server should often hold a copy of the replica. This check will also display obituaries and show you the states of all servers in the backlink list for the obituaries. Here's how you perform an exref, backlink, and obituaries check: | OPERATING SYSTEM | PROCEDURE | | NetWare | Load DSREPAIR.NLM at the server console and select Advanced Options, Check External References. (Specify the -A command-line option to include obits reporting.) | | Windows | Start dsrepair.dlm from within NDSCons and select Repair, Check External References. (Specify the -A command-line option to include obits reporting.) | | Unix/Linux | Execute ndsrepair -C at the command line. (Specify the -Ad command-line option to include obits reporting.) |
NOTE If the server is having problems walking the tree, it will display errors such as -626 (All Referrals Failed) and -634 (No Referrals).
After you run this option, the log file shows exrefs that are backlinked (see Figure 13.4) and lists any backlinked obituaries that have not yet completed. Of primary concern are the obituaries that have not completed. For example, problems can emerge if the obituary flag remains in the same state and is never purged. This condition indicates a possible communication problem between servers or that a server may have been removed improperly (because servers in the tree still reference the removed server). Figure 13.4. DSRepair, showing that the server has one exref but no stuck obits. 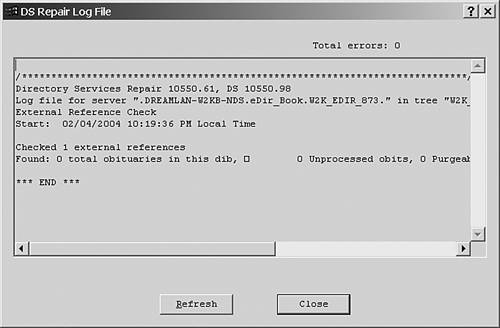
TIP The Janitor process is in charge of obituary cleanup and will not run until the setting All processed = YES occurs. However, you can try to force Janitor to run by forcing Flat Cleaner to run, using the *F switch in DSTrace.
You can also check for backlink, exref, and obit problems by using DSTrace, as follows: | OPERATING SYSTEM | PROCEDURE | | NetWare | At the server console, issue the following commands: | | | | SET TTF=ON | Sends the DSTrace screen output to DSTRACE.DBG | | | | SET DSTRACE=*R | Resets the file to 0 bytes | | | | SET DSTRACE=ON | Activates the DSTrace screen | | | | SET DSTRACE=NODEBUG | Turns off all preset filters | | | | SET DSTRACE=+BLINK | Enables backlink messages | | | | SET DSTRACE=+J | Enables Janitor messages | | | | SET DSTRACE=*B | Forces Backlink to run | | | | SET DSTRACE=*F | Forces Flat Cleaner to run | | | When you have collected sufficient information, enter SET TTF=OFF to close the DSTRACE.DBG file and then enter SET DSTRACE=OFF to stop further display. | | Windows | Start dstrace.dlm from within NDSCons, select the Edit menu, and clear all settings by clicking Clear All. Check the Partition, Inbound Synchronization, Outbound Synchronization, and Sync Detail boxes and click OK. | | Select ds.dlm from the main NDSCons screen and click Configure. Select the Triggers tab and then click the Replica Sync button. This will force partition synchronization with other servers. | | You can view the synchronization activity by going to the eDirectory Server Trace Utility screen and scrolling through the synchronization process. You can also copy and paste the information from the Trace screen to a text file to make it easier to search for error codes. | | Unix/Linux | Run ndstrace and from within the ndstrace utility enter the following: | | | | set dstrace=on | Enables tracing | | | | set dstrace=nodebug | Turns off all preset filters | | | | set dstrace=+blnk | Enables backlink messages | | | | set dstrace=+bldt | Enables detailed backlink messages | | | | set dstrace=+jntr | Enables Janitor messages | | | | set dstrace=*b | Forces Backlink to run | | | | set dstrace=*f | Forces Flat Cleaner to run | | | The displayed information is saved automatically in the /var/nds/ndstrace.log file, which can be viewed through a text editor. |
TIP You should perform the Backlink and Janitor checks as two separate runs so their messages are not intermixed in the same log file.
You can examine the DSTrace log file by using any text editor and search for the error messages. The Replica State Check The replica state check lists partitions and the states of the replicas stored in the current server's Directory Information Base (DIB). Although not likely to happen "spontaneously," it is a good idea to periodically check to ensure that the replica states have not suddenly changed from On to some other undesirable states, such as Dying. Here's how you complete this check: | OPERATING SYSTEM | PROCEDURE | | NetWare | Load DSREPAIR.NLM at the server console and select Advanced Options, Replica and Partition Operations. | | Windows | Start dsrepair.dlm from within NDSCons and expand the Partitions tree in the left pane to list each of the partitions. Highlight each partition to see the states of the replicas, which are shown in the right window (see Figure 13.5). Figure 13.5. The Master replica of [Root] , in the On state. 
| | Unix/Linux | Execute ndsrepair -P at the command line. Select each partition in turn and check its synchronization status (option 6 in the menu). |
The Replica Ring Consistency Check You should occasionally check that each partition's replica ring is consistent; that is, the replica ring list on every server holding the same partition should be the same. For example, say that the partition TEST is replicated onto three servers, A, B, and C. The replica ring list for partition TEST on Server A should show Servers A, B, and C; the same should be true for Servers B and C. To check for replica ring consistency, you first run DSRepair on the server holding the Master replica of each partition. Then you run DSRepair on the other servers in the replica ring to check for possible mismatches . Here's how: | OPERATING SYSTEM | PROCEDURE | | NetWare | Load DSREPAIR.NLM at the server console and select the Advanced Options menu. From the Replica and Partition Operations option, highlight each partition in turn, press Return, and then select View Replica Ring. | | Windows | Start dsrepair.dlm from within NDSCons and expand the Partitions tree in the left pane to list each of the partitions. For each partition, further expand its listing to reveal the list of servers in the replica ring (see Figure 13.6). Figure 13.6. The [Root] partition, replicated to two servers. 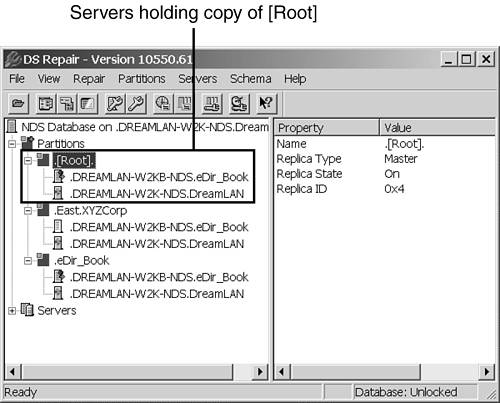
| | Unix/Linux | Execute ndsrepair -P at the command line. Select each partition in turn and view its replica ring (option 10 in the menu). |
From the listings, you need to cross-check that the servers holding replicas of that partition are consistent. The Schema Synchronization and Status Check Every server in the NDS/eDirectory tree has a copy of the schema, even if the server does not hold any replicas. The schema information on all servers must be identical. When schema changes are made to the tree, they are first applied on the server holding the Master of [Root] . From there, the updates are propagated from one server to another, in a trickle-down manner, based on the NCP Server object's location within the tree. Because the NDS schema synchronization process is event driven, changes are scheduled to be synchronized 10 seconds after a schema change is made. You use DSTrace to check whether the schemas in a tree are in synchronization: | OPERATING SYSTEM | PROCEDURE | | NetWare | At the server console, issue the following commands: | | | | SET TTF=ON | Sends the DSTrace screen output to DSTRACE.DBG | | | | SET DSTRACE=*R | Resets the file to 0 bytes | | | | SET DSTRACE=ON | Activates the DSTrace screen | | | | SET DSTRACE=NODEBUG | Turns off all preset filters | | | | SET DSTRACE=+SCHEMA | Enables schema messages | | | | SET DSTRACE=*SS | Forces Schema Sync to run | | | When you have collected sufficient information, enter SET TTF=OFF to close the DSTRACE.DBG file and then enter SET DSTRACE=OFF to stop further display. | | Windows | Start dstrace.dlm from within NDSCons and select Edit, Options. Clear all settings by clicking Clear All. Check the Schema box and click OK. | | Select ds.dlm from the main NDSCons screen and click Configure. Select the Triggers tab and then click the Schema Sync button. This will force schema synchronization with other servers. | | You can view the synchronization activity by going to the eDirectory Server Trace Utility screen and scrolling through the synchronization process. You can also copy and paste the information from the Trace screen to a text file to make it easier to search for error codes. | | Unix/Linux | Run ndstrace and from within the ndstrace utility enter the following: | | | | set dstrace=on | Enables tracing | | | | set dstrace=nodebug | Turns off all preset filters | | | | set dstrace=+scma | Enables schema sync messages | | | | set dstrace=+scmd | Enables detail schema messages | | | | set dstrace=*ss | Forces Schema Sync to run | | | The displayed information is saved automatically in the /var/nds/ndstrace.log file, which can be viewed through a text editor. |
You need to check for the message SCHEMA: All Processed = YES in the log file (see Figure 13.7). Figure 13.7. The schemas being synchronized without error. 
WARNING The DSTrace commands only indicate whether the schema is being synchronized between the servers. They do not provide information that verifies whether the servers indeed have identical schema. A good check would be to compare the schema information between the server holding the Master replica of [Root] and one of the servers that is located lower in the tree structure, using Novell's SCHCMP.EXE utility (see TID #2931699).
The Partition Size and Special Object Check The partition size and special object check provides you with information about the number of objects in each partition and in the whole tree. This check is useful in determining whether the DS tree is within Novell's recommended partitioning guidelines. For NDS 6 and 7, Novell recommends that for best performance, partitions should not exceed 2,000 objects each. Of course, this is simply a guideline and not a hard limit. The key question is "Is DS access performance satisfactory?" You can obtain object counts by using a number of different utilities. Here are some examples: -
SCANTREE.EXE ” This utility is from Novell Research. (Refer to "Understanding SCANTREE.EXE 's Statistics," Novell AppNotes, March 1996, for more information; http://developer.novell.com/research/appnotes/1996/ march /06/index.htm). You can find a copy of SCANTREE.EXE at ftp.dreamlan.com/Freeware/scands.zip. -
NDSCount ” For information on this utility, see www.dreamlan.com/ndscount.htm. With this utility, you can report object counts based on container or partition. In addition, you can selectively report based on object type. -
NLIST.EXE ” This utility is included with NetWare. The following command lists all objects in the tree and provides a total count at the end of the output: NLIST * /R /S /C . You should also check for the existence of two special types of objects in the tree: -
Unknown objects ” These objects have lost one or more of their mandatory attributes. For example, a Volume object will become Unknown if it loses the Host Server attribute value. -
Rename objects ” These objects have been renamed due to "name collisions" within NDS/eDirectory. Name collisions occur during the synchronization when the same object is found on different servers, with different creation timestamps. Rename objects take on names such as 1_1 , 22_4 , and so on. REAL WORLD: Tuned Name We have discussed the importance of time synchronization to DS in a number of chapters previously. We have also talked about how timestamps are used to identify DS events. Among the various timestamps, creation timestamps (CTS) are of particular importance. The CTS is a component in the tuned name, which is composed of the object's FDN ( cn.ou.o ) as well as the CTS for each level of the DN ( cn CTS, ou CTS, o CTS ). DS uses the tuned name in the process of resolving names to identify more completely an object in the DS tree. If the tuned name does not match from replica to replica of a particular partition, the object is identified as a unique object, and an object rename (for example, 1_1 , 22_4 ) will occur. This happens regardless of whether the DN or the CTS is mismatched. |
If you use Scantree or NDSCount to report on object counts, any Unknown objects in the tree are revealed. Otherwise, you can check for Unknown objects by using NList, NetWare Administrator, ConsoleOne, or similar management tools: -
From a workstation command prompt, execute the following and then review the resulting file: NLIST unknown /S /C /R > unknown.txt
-
Using NetWare Administrator or ConsoleOne, turn off the display of all other object types except for containers and Unknown and then browse the tree. TIP As discussed in the "Time Synchronization" section in Chapter 2, " eDirectory Basics ," objects having auxiliary class attributes will show up as Unknown objects on servers running NDS 6 and NDS 7 due to these servers' inability to recognize the auxiliary class attributes. Therefore, if you discover the presence of Unknown objects, you should check whether these objects also exist on servers running NDS 8 or higher before raising an alarm.
Finding renamed objects can be quite complex. This is because renamed objects are valid objects with names that take the form #_# . If your object naming convention also includes that format, the determination of collision-renamed objects will require you to inspect each such object manually. You can use NList to generate a list of renamed objects and then review the resulting file: NLIST * = *_* /S /C /R > n_n.txt
The Duplicate Tree Name Check In a properly managed and controlled NDS environment, duplicate tree names should not be an issue. However, if they ever do occur, keep in mind that symptoms of duplicate tree names include -672 errors during a replica synchronization, a sudden appearance of renamed objects, and users losing rights for no apparent reason. A duplicate tree name can confuse the Backlink process and, thus, lead to DS data corruption or synchronization errors. The Backlink process runs every 13 hours to check on data consistency. During the check, the process resolves exrefs to make sure there is a real entry, and for real entries, the process makes sure that the exrefs are still valid. To accomplish this, the Backlink process uses the resolve name process to walk the tree. Walking the tree involves finding the physical location of an entry ID and obtaining that object's (entry) ID. However, the name/address resolution process does not know what is being requested (trees, servers, or objects); all it knows is a name or an address ”there is no context information with it. Duplicate tree names can cause backlinks to be partly resolved to a server in the wrong tree. As a result, exrefs may be wrongfully expired or created, attribute information may be retrieved from the wrong object, or wrong objects may be modified or deleted. The Backlink process may cross-associate backlinks/DRLs with objects in different trees, and this can result in replica ring confusion, where a server in one tree will try to synchronize with a server in a different tree. But because the RSA key pairs on the NCP Server objects are different, you will encounter -672 errors during replica synchronization and will be unable to authenticate the replicas with each other. In addition, the cross-association may lead DS to think that the tree has two identically named objects that have different CTS values. This results in objects being renamed. Duplicate tree names can also cause DS rights to become corrupted. When a resolve name operation takes place to determine rights and the desired object does not exist, the object making the query will remove the rights because the object it was supposed to inherit from is nonexistent. Furthermore, this breaks objects that have links to and from other objects. To illustrate , assume that a Group object has an attribute ” Members ”that links the Group object to the User objects. In return, a User object has a Group Membership attribute that links the groups the user belongs to. When duplicate tree names occur, these two-way links often become one-way links, resulting in the users losing rights intermittently. In summary, trees created with the same name as an existing production tree will not be given rights to the production tree, nor will they create security holes. However, duplicate tree names can cause significant havoc to otherwise healthy trees. TIP A duplicate tree name usually occurs when a tree was created in an isolated lab environment with the same name as the production tree for testing purposes. At some point, the isolated network was connected to the production network, thus causing a conflict.
Duplicate tree names are easier to identify in an IPX environment than in other environments because you can use the DSDiag NLM. However, in an IP environment, unless there are also duplicate IP addresses, the existence of duplicates may not be readily apparent. To check for duplicate tree names by using DSDiag, you do the following: - Load DSDIAG.NLM from the console prompt on a server that receives the 0x0278 SAP packets for the tree name being checked.
- From the main menu, select Generate Report.
- Select Check NDS Versions.
- From the General Options screen change Retrieve Server List Using from NDS (the default) to SAP. This will allow the following settings to be made:
SAP Type: Change from Bindery (default) to Directory Name Filter: treename Report File: Enabled
- Press F8 to access the Display Options screen. Change the following display settings:
Server's Tree SAP Name: Off (default) to On Server's Tree Name: Off (default) to On
- Press F10 to create the report.
Using the report generated from DSDIAG.NLM (the default report name is SYS:SYSTEM\DVERS000.RPT ), you can check each server listed to verify that it has the correct server's NDS name. If one or more server NDS names do not belong to the selected tree, a duplicate tree name exists. TIP Although not publicized, the DSDiag NLM is shipped with NetWare 5 and higher, including NetWare 6.0. If you do not have it, you can download DSDiag from Novell's Web site (it is included in the NetWare support packs ). Refer to TID #2944552 for details on its options. However, be aware that DSDiag is no longer supported by Novell, which suggests that you instead use NDS iMonitor.
NOTE You can use the DSMerge utility to rename any identified duplicate trees.
The best, but also the most time intensive , way to determine whether you have duplicate tree names is to compare the CTS values of the [Root] objects on all servers and see whether they were created at the same time. You can use DSVIEW.NLM , DSBrowse, or NDS iMonitor for this purpose; you cannot use the standard management tools such as ConsoleOne for this because CTS is not stored in an object attribute. However, because DSBrowse does not exist for the Unix/Linux platforms, NDS iMonitor would be the best tool to use for cross-platform applicability. Here's how you use it: - Access NDS iMonitor's Summary screen.
- Browse to the T= ( [Root] ) object.
- Select the Entry Information link.
- Note the Creation TimeStamp information that is displayed (see Figure 13.8).
Figure 13.8. Creation TimeStamp information. 
If there is a server whose CTS for [Root] does not match within a few minutes with the CTS found on other servers, you most likely have a duplicate tree. WARNING When you detect duplicate tree names and locate the servers hosting the duplicate trees, you need to remove them from the production environment as soon as possible in order to prevent (further) DS data corruption. The replica rings (and potentially other corrupt data) have to be cleaned up. You might need assistance from Novell Technical Support.
REAL WORLD: Unique Tree, Server, and Organization Object Names Other than the facts that all your DS tree names should be unique, you also need to keep server and Organization object names unique. As previously discussed, the name/address resolution process does not know whether it is resolving a tree name or a server name because there is no context information associated. For example, say that a client attempts to resolve the server name, but the resolution process resolves a tree name instead. When the client uses that entry ID to request server information, such as a list of mounted volumes , tree information or an error is returned instead. In older DS environments, the tree name could technically be the same as the Organization object name. However, the newer DS modules, especially those of eDirectory, and management tools (such as ConsoleOne) do not tolerate this combination well. Also, such combinations can cause problems with digital certificates. As a general rule, you should do the following: -
Ensure that all tree names in the network are unique -
Ensure that all server names (regardless of operating system platform) are unique -
Ensure that no DS trees and servers share the same name -
Ensure that the top-level O= names are not the same as the names of the trees they are in |
The DS Tunable Parameter Check You can change a number of tunable DS performance- related parameters by using the DSTrace command; for Windows servers, this is done via ds.dlm 's configuration tabs. You should leave these parameters at the default values unless you are instructed by Novell Technical Support to address a specific issue. NOTE Note that Novell's DSTrace output uses the spelling TUNEABLE instead of TUNABLE .
The NDS tunable parameter check is useful to verify that a server's parameters have not been changed or have not be changed to different values than you set for them previously. This is a server-specific check, requiring each server in the tree to be checked. On a NetWare server, some of these parameters can be changed through Novell's Servman (NetWare 4.x) or Monitor NLM (NetWare 5.0 and above) utility; others can be changed only with SET DSTRACE commands. To check the current DS tunable parameter settings, you run DSTrace as follows on the server: | OPERATING SYSTEM | PROCEDURE | | NetWare | At the server console, issue the following commands: | | | SET TTF=ON | Sends the DSTrace screen output to DSTRACE.DBG | | | SET DSTRACE=*R | Resets the file to 0 bytes | | | SET DSTRACE=ON | Activates the DSTRACE screen | | | SET DSTRACE=*P | Displays the parameters | | | When you have collected sufficient information, enter SET TTF=OFF to close the DSTRACE.DBG file and then enter SET DSTRACE=OFF to stop further display. | | Windows | Select ds.dlm from the main NDSCons screen and click Configure. The different settings can be found under the Intervals, Directory Client, and Server States tabs (see Figures 13.9 through 13.11). Figure 13.9. The Intervals tab, which contains settings for the background processes. 
Figure 13.11. The Server States tab, which contains the Server "Up" Threshold setting. 
| | You can determine the inbound and outbound synchronization status by clicking the Tuneables button on the Trace tab. This sends the status information to the DSTrace screen. | | Unix /Linux | Run ndstrace and from within the ndstrace utility enter the following: | | | set dstrace=on | Enables tracing | | | set dstrace=*p | Displays the parameters | | | The displayed information is saved automatically in the /var/nds/ndstrace.log file, which can be viewed through a text editor. |
Figure 13.10. The Directory Client tab, which contains communications-related settings. 
The following are the default tunable parameter values for the different types of DS servers:
NOTE The tunable parameters output from NetWare 5 and later servers does not include status of inbound and outbound synchronization.
NOTE The default cache and threads settings are different from server to server because these values depend on the version of DS and the amount of RAM available to DS after all other services are loaded. The SMI Max Cache value reflects the upper limit of RAM to be allocated for NDS caching.
The eDirectory Cache Statistics Check Although eDirectory cache statistics do not directly reflect or even impact the health of a tree, they do provide some indication of where the problem lies in the case of slow DS response. For example, imagine that one day you find that searching DS for a list of User objects is taking twice as long as it did the day before. Is this due to a DS problem (such as the local replica not being available and you are searching across a WAN link)? Or did some server RAM configuration change and DS is "disk thrashing," which has resulted in the slow response? It is easy to check on the statistics by using NDS iMonitor. Refer to the section "Monitoring the Cache Statistics" in Chapter 16, "Tuning eDirectory," for more information. Periodic review of cache statistics and settings helps to keep your eDirectory at peak performance. TIP By keeping tabs on the DIB size (available in NDS iMonitor) you can get some indication of a tree's health. For instance, a sudden increase in DIB size may be normal (due to addition of new objects), but it may also be due to DIB file corruption resulting from (gradual) hardware failure ”in which case corrupted DS data will be replicated to other servers in the tree.
The eDirectory Agent Statistics Check The last, but not least important, tree health check procedure is the eDirectory agent statistics check. Similar to eDirectory cache statistics, the agent usage statistics can act as good indicators of where a problem may be in the case of slow DS response. NDS iMonitor's Verb Statistics page provides information about what types of request the eDirectory agent has been processing. The Agent Verbs Activity page (see Figure 13.12) provides information that can help you analyze system usage and gauge potential performance bottlenecks. It provides two pieces of data simultaneously . The upper table (DIB Writer Info ) shows any process or request currently being written to the DIB or that is waiting to be written (up to five writers may be in a waiting state) and how long they have been in each state. Because any writer must wait until a (DIB) lock is available in order to write to the database, consistently large numbers of concurrent writers with long wait times can signal a performance bottleneck ”perhaps in the disk I/O channel. Figure 13.12. eDirectory agent statistics. 
The second table on the page (Verb/Process Statistics) shows all processes or requests ”whether they are writers or not ”that are currently being handled by the DS agent (DSA). Although eDirectory is designed to handle large workloads, large amounts of agent activity at what should be quieter periods could signal an unnecessarily taxed system that needs to be adjusted to properly distribute the workload or an application that is improperly configured or is a resource hog. Consider this scenario: You have two identically configured servers holding replicas of the same partitions, but one is shown to be consistently busier than the other server. Because the Master replica is responsible for certain background processes, such as obituary processing, distributing the Master replicas more evenly between the servers may help to spread the load. You can also track down the source of any extra traffic and see whether load-balancing it between the servers helps to achieve more optimal system performance, especially for user-interactive applications. NOTE Even if the DSA is not processing any requests when you access the Verb Statistics page, the Statistics verb will still show up as active because the Statistics verb is one of the requests that NDS iMonitor uses to generate the displayed data.
Like the Agent Activity page, the agent Verbs Statistics page (see Figure 13.13) helps you analyze system usage and profile the performance of requests made to the DSA. Older versions of NDS simply show a cumulative count of all the requests for all verbs that have been processed since the specified DSA was last initialized . eDirectory 8.5 and later versions also show, in milliseconds , the minimum, maximum, and exponential averages (that is, last 10ms, last 100ms, and so on) that eDirectory requires to process each type of request. This page and the Agent Activity page track background process, bindery, and standard eDirectory requests. You can use this information to find the busier DSAs and attempt to better load-balance between the servers. Figure 13.13. eDirectory verb/process statistics. 
Also available from the Agent Activity page are activity and statistics information for inbound/outbound synchronization processes and various events, such as Add Value and Rename Entry. The event statistics can provide you with data on whether the DS traffic load on the server is read intensive or write intensive. Using this information, you can further tune the cache or disk I/O settings for optimal performance. Partition Health Check Procedures As part of DS tree management, various partition operations are performed as needed. In order for the operations to be error free, you should perform some checks before starting any partition-related processes. The following sections outline what checks you should perform, before and after a partition operation, to ensure your tree's health. However, before we look at the various partition operations, we should look at TTS settings in case you are running NDS 6 or NDS 7. TTS Considerations Novell's TTS is required for NDS 6 and 7 to function correctly. A NetWare server experiencing a TTS shutdown (a -621 error) indicates that the operating system is not able to track and write the transactions at the maximum transaction level set on the server. This problem may be a temporary problem related to a partition operation that generates a large number of transactions. Or the server might be unable to handle the peak transaction requests generated on a regular basis. NOTE As discussed in Chapter 3, " The Directory Information Base ," NDS 6 and 7 use a record-oriented database called Record Manager (RECMAN) that requires TTS to provide transaction protection. NDS 8 and higher, however, use Flexible Adaptive Information Manager (FLAIM) and do not require TTS; FLAIM has it own transaction tracking and rollback mechanism.
Some NDS partition operations, such as removing a replica from the server, require the server to track and write a large number of transactions. When the operating system is unable to manage these requests, errors such as "Growing TTS memory tables" are generated at the console. This particular error indicates that the TTS file will not accept any new transactions, and this usually results in TTS shutdown ”which stops NDS from functioning. Reducing the Maximum Transactions parameter can help the server track and write TTS transactions without overburdening the server. You can set this parameter through the Servman (NetWare 4.x) or Monitor (NetWare 5.x and higher) NLM utility. To change the Maximum Transactions setting, you do the following: - Load the Servman or Monitor NLM at the server console.
- Select Server Parameters.
- Select the Transaction Tracking category; on NetWare 6 and higher, select the Common File System category instead.
- The default setting for Maximum Transactions is 10,000 . If TTS shutdown has occurred, try reducing the maximum number of transactions to half that value, 5,000 .
- If the shutdown condition persists, reduce the setting to 1,000 to resolve most TTS problems.
- If TTS shutdown continues to occur with changes made to the Maximum Transactions parameter, reduce the TTS UnWritten Cache Wait Time parameter from its default setting of 1 Min 5.9 sec to 11 sec .
TIP When you are removing a large replica, setting Maximum Transactions to 1,000 and TTS UnWritten Cache Wait Time to 11 sec can help prevent TTS shutdown for this partition operation.
Backing Up a Server's DS Database Before you perform any major DS partitioning operation, it is generally a good idea to first make a backup of the DIB on the servers that will be affected by the operation. The DIB backup provides you with a point in time to which you can backtrack. NOTE The method discussed here works for all versions of NDS and eDirectory. However, for an eDirectory-only tree, you can also use the eDirectory Backup eMTool utility, which is discussed in Chapter 8, " eDirectory Data Recovery Tools ."
Current backup software only backs up objects in the tree. It does not back up partition boundaries. A feature of DSRepair (for NetWare and Windows) allows for backup of the NDS database on a server into a single file, known as the (DIB) "dump file." This file is a snapshot of all the replicas on that server at that moment in time. This information provides for disaster recovery at the server level. Depending on your server's operating system, you can use one of the following methods to make a backup of the DIB: | OPERATING SYSTEM | PROCEDURE | | NetWare | At the server console, enter LOAD DSREPAIR -RC . No dialog box will be displayed. DSREPAIR.NLM will create a DIB dump file, silently, and then exit. For NDS 6 and NDS 7, the file is named DSREPAIR.DIB and is located in the SYS:SYSTEM directory. For NDS 8 and higher, the file is located in SYS:SYSTEM\DSR_DIB and is called xxxxxxxx .$DU where xxxxxxxx is a hex value for the file. The first 100MB of the DIB is copied to 00000000.$DU , the next 100MB is copied to 00000001.$DU , and so on. | | Windows | Shut down eDirectory by using NDSCons. Make a copy of all files in drive :\Novell\NDS\DIBFiles and its subdirectories. | | Unix/Linux | Shut down eDirectory by using ndsd stop . Make a copy of all files in /var/nds/dib and its subdirectories. |
TIP You can use DSREPAIR -RC on Windows servers. If you do that, dsrepair.dlm will not display its dialog box after you click Start. Instead, it will quietly create the DIB dump file, xxxxxxxx .$DU , in drive :\Novell\NDS\DIBFiles , and then exit.
NOTE For NetWare servers, you can use tools such as Novell's Tool Box NLM to make a copy of the files from the SYS:_NETWARE directory. However, Novell does not support this method if you require assistance in restoring the files.
You will require assistance (via remote dial-in) from Novell Support to restore a dump file created using DSREPAIR -RC because it is in a compressed format. In the case of Windows and Unix servers, however, you can restore to the previous state by first shutting down eDirectory and then overwriting the current DIB, using files from your backup. WARNING Do not casually restore your current DIB set with a backup copy because that could result in data loss.
Adding a Replica If the partition where the target server will receive a replica has child partitions, you should always run a synchronization and continuity check of the partition and its child partitions before starting the Add Replica operation. If you do not, then when all servers in the replica ring reply to the Master server update request, the replica state cannot advance. All servers involved in this partition operation must be in the Up state until the operation completes. To verify that the partition operation has completed successfully, you need to repeat the synchronization ( All processed = YES ) and replica ring continuity checks on the parent partition and all its child partitions. Removing a Replica You should not use DSRepair to remove replicas from servers unless all other "safer" methods have failed. Instead, you should use NDS Manager, ConsoleOne, or the Install/NWConfig NLM (which removes servers from the tree). Before you begin, you should check the synchronization status of the replica to be deleted and all replicas of its child partitions. You should verify the synchronization ( All processed = YES ). You should also check the partition continuity status and verify that the replica ring is consistent on all servers in the partition. To verify that the operation has completed successfully, you should repeat the synchronization ( All processed = YES ) and replica ring continuity checks. Changing Replica Type The replica type change sequence is usually where problems occur in the partition health check process. You should be sure to run a continuity check to verify that the process has completed correctly. Before starting the replica type change process, you should check the time synchronization of the tree. (This is the only partition operation that requires the target server time to be in sync with the network.) You should check the synchronization of the partition where the replica type change is being made and all its child partitions. You should verify the synchronization ( All processed = YES ), and you should also check the replica ring consistency of the replica. To verify that the partition operation has completed successfully, you should repeat the synchronization ( All processed = YES ) and replica ring continuity checks. NOTE If the Master replica is not available, this operation cannot be performed. You need to first use DSRepair to promote a Read/Write or Read-Only replica to Master.
WARNING Never promote a Subordinate Reference (SubRef) or a Filtered replica ”unless for the purpose of disaster recovery and only then as a last resort ”to Master because SubRef and Filtered replicas are not full replicas and such an operation would lead to data loss.
Splitting a Partition Before you begin splitting a partition, you should check the synchronization of the partition involved and verify the synchronization ( All processed = YES ). You should also check the replica ring continuity for the partition. To verify that the partition operation has completed successfully, you should repeat the synchronization and continuity checks. You should check the status of the parent and the new child partition involved in the operation and verify the synchronization ( All processed = YES ). You should also check the partition continuity of the parent and new child partition. Finally, you need to verify that the replica ring list is correct on all servers in the partition. Joining Two Partitions Before you make any modifications to the replica ring, you need to make sure the partitions involved are synchronized and that continuity is correct. The Master servers of the parent partition and child partition being joined are responsible for the operation and, thus, must be available for the operation to succeed. Before you begin joining two partitions, check the partition synchronization of the parent and child partitions. Verify the synchronization ( All processed = YES ) and also check the continuity of the partitions. You should also verify that the replica ring is consistent on all servers in the partition. To verify that the partition operation has completed successfully, you need to repeat the synchronization ( All processed = YES ) and replica ring continuity checks. Moving a Subtree For a move partition operation to complete correctly, the original parent partition, the subtree partition, and the new parent partition must be synchronized, and replica rings must be correct on all servers. Before you perform the operation, you need to check the partition synchronization status of each partition involved in the operation (original parent partition, source partition, and destination partition). You need to verify the synchronization ( All processed = YES ) and also check the continuity status of each partition involved in the operation (original parent partition, source partition, and destination partition). Finally, you need to verify that the replica ring is correct on all servers in each partition. WARNING This particular partition operation can generate a lot of network traffic, depending on the number of entries in the partition and the parent partition servers involved. This partition operation requires obituary functions to complete their tasks. (Refer to the section "The Move Partition Operation" in Chapter 6, " Understanding Common eDirectory Processes ," for details.) If there is a problem with obituaries not cleaning up in the partition, the operation may not complete. Alternatively, if this operation completes but leaves OBIT_MOVE_INHIBIT obituaries, the next partition operation involving these partitions will not start.
TIP It is recommended that before you start the actual partition operation, you first add replicas of the new parent partition to the servers that hold replicas of the partition being moved. The servers that hold replicas of the (old) subtree will still hold replicas after the operation completes. The servers in the parent partition where the subtree will be moved will have subordinate replicas added, and servers in the original parent partition will have their replicas demoted to subordinate replicas.
To verify that the operation has completed successfully, you need to repeat the synchronization ( All processed = YES ) and replica ring continuity checks on each partition involved in the operation. Server Health Check Procedures The following sections provide systematic instructions for DS health checks that should be performed when servers are being installed into or removed from a DS tree. When servers are introduced into or removed from the DS tree, replica rings may be modified due to automatic addition or removal of replicas to these servers. Therefore, it is essential that you ensure that the tree is healthy before you add or remove servers from the tree. Reintroducing a Server into a DS Tree The following is the recommended procedure for reintroducing a server into the tree; similar health check steps should be taken when installing a new server into the tree: The installation process will install DS on the server. If there are fewer than three replicas of the partition into which the NCP Server object is being added, a Read/Write replica will automatically be created on the server. If there are child partitions, the necessary SubRef replicas will also be added to the server. NOTE If the partition into which the NCP Server object is being added is large, it can take some time to put a copy of the replica on it and advance the replica state to On.
WARNING When you install a NetWare 5 or later server into a partition and if this is the first NetWare 5 or NetWare 6 server in the replica ring, a replica may be automatically placed on it, even if three or more replicas of the partition exist. This may also happen if the new server runs NDS 8/eDirectory while the servers in the replica ring are not running this version.
Permanently Removing a Server from the DS Tree There are number of methods for removing a server from a DS tree. The cleanest and preferred method of removing a server is to use the Novell-supplied tools, such as the NWConfig NLM in NetWare, ndsconfig in Unix/Linux, or the Install DLM in Windows. NOTE If you have difficulties uninstalling eDirectory from a Windows server, refer to TID #10058219. For Unix servers, see TID #10080511.
When you uninstall, or remove a server from the tree, the utility you use does the following: -
Checks for the presence of Master replicas stored on the server being removed. If any are found, you are prompted about whether you want to reassign them to another server manually or automatically. If this is the only replica that currently exists, a replica will be created on another server. -
Checks all stored replicas to make sure they are all in the On state and that all servers in the replica rings are up. -
Checks all stored replicas for the NCP Server object that is being removed to ensure that it exists either as an actual object or as a backlinked externally referenced object on every server in the replica ring. -
(NetWare only) Creates a "switch file" (named SYS:_NETWARE\UNINSTAL.DS for NetWare 4.x; NetWare 5 and higher create SYS:_NETWARE\UNINSTAL.INS and SYS:_NETWARE\VOLUME.INS ). This file contains a matrix consisting of the entry ID, entry type, and entry name (DN) for every real object and exref. -
(NetWare only) Checks for Volume objects associated with the NCP Server object and deletes them (that is, uses the volume ID stored in the root entry of the directory entry table). -
Deletes the NCP Server object from every replica it can attach to. -
Clears inbound connections. -
Removes DS by deleting the DS database files. Although this procedure is used to remove a server from the tree permanently, it also allows for reinstallation of the NCP Server object by retaining all NetWare file system trustee assignments (using the information stored in the switch file). However, if the server is reinstalled at a later time, replica information will not be restored, nor will references to the NCP Server object. Objects that had referred to the NCP Server object through values such as Default Server , Home Directory , or Print Queues , or through objects such as Directory Maps and Print Servers , will not reestablish the reference to the new NCP Server object if it is reinstalled. If the server is to be re-introduced into the tree later, you should see the next section, "Temporarily Removing a Server from the DS Tree," for details. You follow these steps to remove a server from an DS tree permanently: - Make sure time is synchronized within the DS tree.
- Check the DS synchronization and continuity status of the partition in which the NCP Server object exists. If any errors are found, resolve them before proceeding.
- Uninstall DS from the server by using the Install or NWConfig NLM in NetWare, the Install DLM in Windows, or ndsconfig in Unix systems.
- Set the following DSTrace parameters on the server that holds the Master replica of the partition from which the NCP Server object is being deleted:
| OPERATING SYSTEM | PROCEDURE | | NetWare | At the server console, issue the following commands: | | | SET TTF=ON | Sends the DSTrace screen output to DSTRACE.DBG | | | SET DSTRACE=*R | Resets the file to 0 bytes | | | SET DSTRACE=ON | Activates the DSTrace screen | | | SET DSTRACE=NODEBUG | Turns off all preset filters | | | SET DSTRACE=+LIMBER | Enables Limber messages | | | SET DSTRACE=*L | Forces the Limber process to run | | | When you have collected sufficient information, enter SET TTF=OFF to close the DSTRACE.DBG file and then enter SET DSTRACE=OFF to stop further display. | | Windows | Start dstrace.dlm from within NDSCons and select Edit, Options. Clear all settings by clicking Clear All. Check the Limber box and click OK | | Select ds.dlm from the main NDSCons screen and click Configure. Select the Triggers tab and then click the Limber button. This will force the Limber process to run. | | You can view the activity by going to the eDirectory Server Trace Utility screen and scrolling through the Limber process. You can also copy and paste the information from the Trace screen to a text file to make it easier to search for error codes. | | Unix/Linux | Run ndstrace and from within the ndstrace utility enter the following: | | | set dstrace=on | Enables tracing | | | set dstrace=nodebug | Turns off all preset filters | | | set dstrace=+lmbr | Enables schema sync messages | | | set dstrace=*l | Forces Schema Sync to run | | | The displayed information is saved automatically in the /var/nds/ndstrace.log file, which can be viewed through a text editor. |
NOTE The Limber process will show the server being removed from the replicas of each server in the replica ring. - When all partitions on the server have completed the synchronization process, turn off DSTrace and examine the log file for errors.
- Use ConsoleOne to verify that the NCP Server object has been removed from the tree and that the server has been removed from all replica rings it previously belonged to.
Temporarily Removing a Server from the DS Tree There are situations when it is necessary to uninstall or remove a server from the DS tree only for a brief period of time. For example, in the case of an NCP Server authentication key becoming corrupted, it is necessary to bring the server down and reinstall DS on the server (or you will need a dial-in from Novell) to fix it. During the uninstallation process, the NCP Server object is removed from the DS tree. When the NCP Server object is removed, objects that reference that server in their mandatory attributes can become Unknown objects, and other objects that reference that server in their optional attributes (such as Home Directory ) will have the attribute values deleted because they are no longer valid. For NetWare 4, Novell provides the DSMAINT.NLM utility to help you avoid the formation of Unknown objects and maintain data references during a server uninstallation. DSMaint replaces references to the server with references to another object that you create or that already exists in the tree. After you install DS on the server again, you can use DSMaint to restore the changed references back to the server in other objects' Host Server , Host Device , or Message (Default) Server attributes. The DSMaint function of server reference replacement is built into the NWConfig NLM for NetWare 5 and later, but it is not implemented for eDirectory on non-NetWare platforms. However, you can use the following steps to remove a server from an NDS/eDirectory tree temporarily and use SrvRef to maintain server references even for non-NetWare platforms: - Make sure time is synchronized within the DS tree.
- Check the DS synchronization and continuity status of the partition in which the NCP Server object exists. Resolve any errors before proceeding.
- Create a Computer object to act as the placeholder for the server that will be removed.
- Download a copy of SrvRef from ftp://ftp.dreamlan.com/srvref.zip.
NOTE By design, SrvRef uses a Computer object as the placeholder object because it does not contain any references to servers or server-related objects. - Run SrvRef on a Windows workstation (see Figure 13.14).
Figure 13.14. Using SrvRef to replace and restore server references. 
- Select Replace Reference from the drop-down list.
- Select the NCP Server object to be replaced.
- Select the placeholder object.
- Select the context from which to start the search.
- Check the Scan Subtree check box.
- Click Start.
- Remove the server from the tree by using the appropriate utility: the Install or NWConfig NLM in NetWare, the Install DLM in Windows, or ndsconfig in Unix.
- Use DSTrace to force the Limber process to run (see the previous section).
- When you are ready to reintroduce the server into the tree, use the appropriate tool to install the server.
- When DS is operational on the server, repeat steps 4 through 10 but select Restore Reference in step 6 instead.
- Use ConsoleOne to perform some random checks on objects to ensure that the restoration was successful.
- Use DSTrace to ensure that the replicas are synchronizing without error.
- Use ConsoleOne to reestablish any replicas that existed previously on the server, if needed.
- When everything is done, delete the placeholder Computer object.
NOTE Novell has available an NDS XBrowse utility (see TID #2960653) that can replace server references. However, it does not restore server references. Therefore, it is useful only when NetWare servers are involved (because the option to restore server references is only found in the DSMaint and NWConfig NLMs).
Automating Health Checks Many of the health check procedures described in this chapter can be automated so they are performed periodically, without manual intervention. Novell provides two free NLM utilities (see http://support.novell.com/produpdate/patchlist.html#tools) that you can use: -
CRON.NLM ” This utility schedules commands to be executed on a NetWare server at specified dates and times. (This utility is included with NetWare 5 and higher, so you may already have it in your SYS:SYSTEM directory.) -
STUFFKEY.NLM ” This utility allows you to send keystrokes to any NLM screen, giving you the ability to automate processes that require user input. You can use a text editor to create a Stuffkey script that outlines the keystrokes to be sent. To use the script, you simply supply the filename as a command-line parameter (for example, LOAD STUFFKEY script.txt ). The following is an example of a Stuffkey script file for collecting time synchronization and DS version information using the DSRepair NLM: # Collect Timesync and DS version info <screen=System Console> cls<cr> load dsrepair<cr> <waitfor screen=DSRepair Status Screen> Advanced Options<cr> Log File And Login Configuration<cr> <dn>Yes<cr> SYS:/SYSTEM/COLLECT.TIM<cr> Overwrite existing file<cr> <esc> <esc> Time<cr> <waitfor text=Exit the editor> <esc> <esc> <cr>
TIP If you require a better and more powerful scripting facility than what Stuffkey can offer, two excellent options are TaskMaster and TaskMaster Lite from avanti technology, inc. (see www.avanti-tech.com ). You can find a sample DS Health Check task script called DSHEALTH.TSK at avanti's Web site; this script not only automatically generates DSTrace and DSRepair logs but also parses them for errors into a formatted final report, eliminating the need to check the various logs manually. When you couple this with an SMTP NLM agent (such as SMTPMAIL.NLM , found at ftp://ftp.dreamlan.com/Freeware/smtp.zip ), you can have the final report automatically emailed to you daily.
When you run eDirectory, especially on non-NetWare platforms, NDS iMonitor can help you with health checks. You can use the following steps to set up automated reports: - Access NDS iMonitor.
- Click the Reports icon at the top of the screen.
- Click the Report Config link.
- A Runable Report List screen appears (see Figure 13.15). The number of reports varies, depending on the version of eDirectory running on the server.
Figure 13.15. Available DS health reports. 
- Click the Configure Report icon for your desired server information.
- A Server Information Report screen appears. Use this report to select the desired options. (The options in this screen are eDirectory version-dependent. For example, eDirectory 8.5 does not have the Health Sub-report option that is shown in Figure 13.16.)
Figure 13.16. Report options. 
- To run the report at specified intervals, select the desired options in the Schedule Report section of the Data frame (see Figure 13.17).
Figure 13.17. Report scheduling options. 
WARNING If you run a scheduled report, it will run as [Public] and might not be able to gather as much information as it would if you ran it as an authenticated user, such as Admin.
|