Automation Examples
The remainder of this chapter presents five sample programs. The first three programs are Automation components—an EXE component with no user interface, a DLL component, and a multi-instance SDI EXE component. Each of these component programs comes with a Microsoft Excel driver workbook file. The fourth sample program is an MFC Automation client program that drives the three components and also runs Excel using the COleDispatchDriver class. The last sample is a client program that uses the C++ #import directive instead of the MFC COleDispatchDriver class.
The EX25A Automation Component
EXE Example—No User Interface
The Visual C++ Autoclik example is a good demonstration of an MDI framework application with the document object as the Automation component. (To find the Autoclik example, look in the online documentation under Visual C++ Documentation/Samples/MFC Samples/Tutorial Samples.) The EX25A example is different from the Autoclik example because EX25A has no user interface. There is one Automation-aware class, and in the first version of the program, a single process supports the construction of multiple Automation component objects. In the second version, a new process starts up each time an Automation client creates an object.
The EX25A example represents a typical use of Automation. A C++ component implements financial transactions. VBA programmers can write User-interface-intensive applications that rely on the audit rules imposed by the Automation component. A production component program would probably use a database, but EX25A is simpler. It implements a bank account with two methods, Deposit and Withdrawal, and one read-only property, Balance. Obviously, Withdrawal can't permit withdrawals that make the balance negative. You can use Excel to control the component, as shown in Figure 25-3.
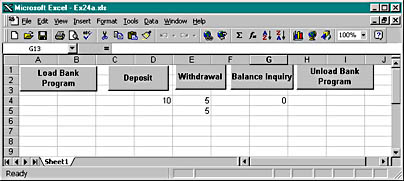
Figure 25-3. This Excel workbook is controlling the EX25A component.
Here are the steps for creating the program from scratch:
- Run AppWizard to create the EX25A project in the \vcpp32\ex25a directory. Select the Dialog Based option (Step 1). Deselect all options in Step 2, and accept the remaining default settings. This is the simplest application that AppWizard can generate.
- Eliminate the dialog class from the project. Using Windows Explorer or the command-line prompt, delete the files ex25aDlg.cpp and ex25aDlg.h. Remove ex25aDlg.cpp and ex25aDlg.h from the project by deleting them from the project's Workspace window (FileView). Edit ex25a.cpp. Remove the dialog #include, and remove all dialog-related code from the InitInstance function. In ResourceView, delete the IDD_EX25A_DIALOG dialog resource template.
- Add code to enable Automation. Add this line in StdAfx.h:
#include <afxdisp.h>
Edit the InitInstance function (in Ex25a.cpp) to look like this:
BOOL CEx25aApp::InitInstance() { AfxOleInit(); if(RunEmbedded() || RunAutomated()) { // component started by COM COleTemplateServer::RegisterAll(); return TRUE; } // Component is being run directly by the user COleObjectFactory::UpdateRegistryAll(); AfxMessageBox("Bank server is registered"); return FALSE; } - Use ClassWizard to add a new class, CBank, as shown here.

Be sure to select the Createable By Type ID option.
- Use ClassWizard to add two methods and a property. Click on the Automation tab, and then add a Withdrawal method, as shown here.
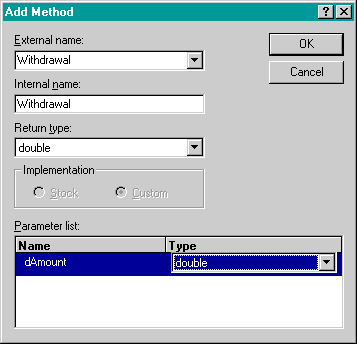
The dAmount parameter is the amount to be withdrawn, and the return value is the actual amount withdrawn. If you try to withdraw $100 from an account that contains $60, the amount withdrawn is $60.
Add a similar Deposit method that returns void, and then add the Balance property, as shown here.

We could have chosen direct access to a component data member, but then we wouldn't have read-only access. We choose Get/Set Methods so that we can code the SetBalance function to do nothing.
- Add a public m_dBalance data member of type double to the CBank class. Because we've chosen the Get/Set Methods option for the Balance property, ClassWizard doesn't generate a data member for us. You should declare m_dBalance in the Bank.h file and initialize m_dBalance to 0.0 in the CBank constructor located in the bank.cpp file.
- Edit the generated method and property functions. Add the following boldface code:
double CBank::Withdrawal(double dAmount) { if (dAmount < 0.0) { return 0.0; } if (dAmount <= m_dBalance) { m_dBalance -= dAmount; return dAmount } double dTemp = m_dBalance; m_dBalance = 0.0; return dTemp; } void CBank::Deposit(double dAmount) { if (dAmount < 0.0) { return; } m_dBalance += dAmount; } double CBank::GetBalance( ) { return m_dBalance; } void CBank::SetBalance(double newValue) { TRACE("Sorry, Dave, I can't do that!\n"); } - Build the EX25A program; run it once to register the component.
- Set up five Excel macros in a new workbook file, ex25a.xls. Add the following code:
Dim Bank As Object Sub LoadBank() Set Bank = CreateObject("Ex25a.Bank") End Sub Sub UnloadBank() Set Bank = Nothing End Sub Sub DoDeposit() Range("D4").Select Bank.Deposit (ActiveCell.Value) End Sub Sub DoWithdrawal() Range("E4").Select Dim Amt Amt = Bank.Withdrawal(ActiveCell.Value) Range("E5").Select ActiveCell.Value = Amt End Sub Sub DoInquiry() Dim Amt Amt = Bank.Balance() Range("G4").Select ActiveCell.Value = Amt End Sub - Arrange an Excel worksheet as shown in Figure 25-3. Attach the macros to the pushbuttons (by right-clicking the pushbuttons).
- Test the EX25A bank component. Click the Load Bank Program button, and then enter a deposit value in cell D4 and click the Deposit button. Click the Balance Inquiry button, and watch the balance appear in cell G4. Enter a withdrawal value in cell E4, and click the Withdrawal button. To see the balance, click the Balance Inquiry button.
Sometimes you need to click the buttons twice. The first click switches the focus to the worksheet, and the second click runs the macro. The hourglass pointer tells you the macro is working.
What's happening in this program? Look closely at the CEx25aApp::InitInstance function. When you run the program directly from Windows, it displays a message box and then quits, but not before it updates the Registry. The COleObjectFactory::UpdateRegistryAll function hunts for global class factory objects, and the CBank class's IMPLEMENT_OLECREATE macro invocation defines such an object. (The IMPLEMENT_OLECREATE line was generated because you checked ClassWizard's Createable By Type ID check box when you added the CBank class.) The unique class ID and the program ID, EX25A.BANK, are added to the Registry.
When Excel now calls CreateObject, COM loads the EX25A program, which contains the global factory for CBank objects; COM then calls the factory object's CreateInstance function to construct the CBank object and return an IDispatch pointer. Here's the CBank class declaration that ClassWizard generated in the bank.h file, with unnecessary detail (and the method and property functions you've already seen) omitted:
class CBank : public CCmdTarget { DECLARE_DYNCREATE(CBank) public: double m_dBalance; CBank(); // protected constructor used by dynamic creation // Attributes public: // Operations public: // Overrides // ClassWizard generated virtual function overrides //{{AFX_VIRTUAL(CBank) public: virtual void OnFinalRelease(); //}}AFX_VIRTUAL // Implementation protected: virtual ~CBank(); // Generated message map functions //{{AFX_MSG(CBank) // NOTE - the ClassWizard will add and remove member // functions here. //}}AFX_MSG DECLARE_MESSAGE_MAP() DECLARE_OLECREATE(CBank) // Generated OLE dispatch map functions //{{AFX_DISPATCH(CBank) afx_msg double GetBalance(); afx_msg void SetBalance(double newValue); afx_msg double Withdrawal(double dAmount); afx_msg void Deposit(double dAmount); //}}AFX_DISPATCH DECLARE_DISPATCH_MAP() DECLARE_INTERFACE_MAP() }; Here is the code automatically generated by ClassWizard in bank.cpp:
IMPLEMENT_DYNCREATE(CBank, CCmdTarget) CBank::CBank() { EnableAutomation(); // To keep the application running as long as an OLE automation // object is active, the constructor calls AfxOleLockApp. AfxOleLockApp(); } CBank::~CBank() { // To terminate the application when all objects created with // OLE automation, the destructor calls AfxOleUnlockApp. AfxOleUnlockApp(); } void CBank::OnFinalRelease() { // When the last reference for an automation object is released, // OnFinalRelease is called. This implementation deletes the // object. Add additional cleanup required for your object // before deleting it from memory. CCmdTarget::OnFinalRelease } BEGIN_MESSAGE_MAP(CBank, CCmdTarget) //{{AFX_MSG_MAP(CBank) // NOTE - the ClassWizard will add and remove // mapping macros here. //}}AFX_MSG_MAP END_MESSAGE_MAP() BEGIN_DISPATCH_MAP(CBank, CCmdTarget) //{{AFX_DISPATCH_MAP(CBank) DISP_PROPERTY_EX(CBank, "Balance", GetBalance, SetBalance, VT_R8) DISP_FUNCTION(CBank, "Withdrawal", Withdrawal, VT_R8, VTS_R8) DISP_FUNCTION(CBank, "Deposit", Deposit, VT_EMPTY, VTS_R8) //}}AFX_DISPATCH_MAP END_DISPATCH_MAP() // Note: we add support for IID_IBank to support typesafe binding // from VBA. This IID must match the GUID that is attached to the // dispinterface in the .ODL file. // {A9515AB6-5B85-11D0-848F-00400526305B} static const IID IID_IBank = { 0xa9515ab6, 0x5b85, 0x11d0, { 0x84, 0x8f, 0x0, 0x40, 0x5, 0x26, 0x30, 0x5b } }; BEGIN_INTERFACE_MAP(CBank, CCmdTarget) INTERFACE_PART(CBank, IID_IBank, Dispatch) END_INTERFACE_MAP() // {632B1E4C-F287-11CE-B5E3-00AA005B1574} IMPLEMENT_OLECREATE2(CBank, "EX25A.BANK", 0x632b1e4c, 0xf287, 0x11ce, 0xb5, 0xe3, 0x0, 0xaa, 0x0, 0x5b, 0x15, 0x74) This first version of the EX25A program runs in single-process mode, as does the Autoclik program. If a second Automation client asks for a new CBank object, COM calls the class factory CreateInstance function again and the existing process constructs another CBank object on the heap. You can verify this by making a copy of the ex25a.xls workbook (under a different name) and loading both the original and the copy. Click the Load Bank Program button in each workbook, and watch the Debug window. InitInstance should be called only once.
A small change in the EX25A program makes it behave differently. To have a new EX25A process start up each time a new component object is requested, follow these steps.
- Add the following macro in bank.h:
#define IMPLEMENT_OLECREATE2(class_name, external_name, \ l, w1, w2, b1, b2, b3, b4, b5, b6, b7, b8) \ AFX_DATADEF COleObjectFactory class_name::factory(class_name::guid, \ RUNTIME_CLASS(class_name), TRUE, _T(external_name)); \ const AFX_DATADEF GUID class_name::guid = \ { l, w1, w2, { b1, b2, b3, b4, b5, b6, b7, b8 } };This macro is the same as the standard MFC IMPLEMENT_OLECREATE macro except that the original FALSE parameter (after the RUNTIME_CLASS parameter) has been changed to TRUE.
- In bank.cpp, change the IMPLEMENT_OLECREATE macro invocation to IMPLEMENT_OLECREATE2.
- Build the program and test it using Excel. Start two Excel processes and then load the bank program from each. Use the Microsoft Windows NT Task Manager or PVIEW95 to verify that two EX25A processes are running.

The EX25A program on the companion CD-ROM uses the IMPLEMENT_OLECREATE2 macro.
Debugging an EXE Component Program
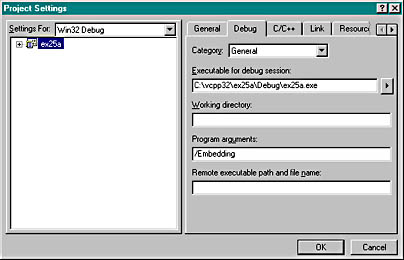
When an Automation client launches an EXE component program, it sets the /Embedding command-line parameter. If you want to debug your component, you must do the same. Choose Settings from the Visual C++ Project menu, and then enter /Embedding in the Program Arguments box on the Debug page, as shown here.
When you click the Go button on the Debug toolbar, your program will start and then wait for a client to activate it. At this point, you should start the client program from Windows (if it is not already running) and then use it to create a component object. Your component program in the debugger should then construct its object. It might be a good idea to include a TRACE statement in the component object's constructor.
Don't forget that your component program must be registered before the client can find it. That means you have to run it once without the /Embedding flag. Many clients don't synchronize with Registry changes. If your client is running when you register the component, you may have to restart the client.
The EX25B Automation Component DLL Example
You could easily convert EX25A from an EXE to a DLL. The CBank class would be exactly the same, and the Excel driver would be similar. It's more interesting, though, to write a new application—this time with a minimal user interface (UI). We'll use a modal dialog box because it's the most complex UI we can conveniently use in an Automation DLL.
| Parameters Passed by Reference So far, you've seen VBA parameters passed by value. VBA has pretty strange rules for calling methods. If the method has one parameter, you can use parentheses; if it has more than one, you can't (unless you're using the function's return value, in which case you must use parentheses). Here is some sample VBA code that passes the string parameter by value: Object.Method1 parm1, "text" Object.Method2("text") Dim s as String s = "text" Object.Method2(s) Sometimes, though, VBA passes the address of a parameter (a reference). In this example, the string is passed by reference: Dim s as String s = "text" Object.Method1 parm1, s You can override VBA's default behavior by prefixing a parameter with ByVal or ByRef. Your component can't predict if it's getting a value or a reference—it must prepare for both. The trick is to test vt to see whether its VT_BYREF bit is set. Here's a sample method implementation that accepts a string (in a VARIANT) passed either by reference or value: void CMyComponent::Method(long nParm1, const VARIANT& vaParm2) { CString str; if ((vaParm2.vt & 0x7f) == VT_BSTR) { if ((vaParm2.vt & VT_BYREF) != 0) str = *(vaParm2.pbstrVal); // byref else str = vaParm2.bstrVal; // byval } AfxMessageBox(str); } If you declare a BSTR parameter, the MFC library does the conversion for you. Suppose your client program passed a BSTR reference to an out-of-process component and the component program changed the value. Because the component can't access the memory of the client process, COM must copy the string to the component and then copy it back to the client after the function returns. So before you declare reference parameters, remember that passing references through IDispatch is not like passing references in C++. |
The EX25B program is fairly simple. An Automation component class, identified by the registered name Ex25b.Auto, has the following properties and method:
| LongData | Long integer property |
| TextData | VARIANT property |
| DisplayDialog | Method—no parameters, BOOL return |
DisplayDialog displays the EX25B data gathering dialog box shown in Figure 25-4. An Excel macro passes two cell values to the DLL and then updates the same cells with the updated values.

Figure 25-4. The EX25B DLL dialog in action.
The example was first generated as an MFC AppWizard DLL with the Regular DLL Using Shared MFC DLL option and the Automation option selected. Here are the steps for building and testing the EX25B component DLL from the code installed from the companion CD-ROM:
- From Visual C++, open the \vcpp32\ex25b\ex25b.dsw workspace. Build the project.
- Register the DLL with the RegComp utility. You can use the RegComp program in the \vcpp32\RegComp\Release directory on the companion CD-ROM; a file dialog makes it easy to select the DLL file.
- Start Excel, and then load the \vcpp32\ex25b\ex25b.xls workbook file. Type an integer in cell C3, and type some text in cell D3.
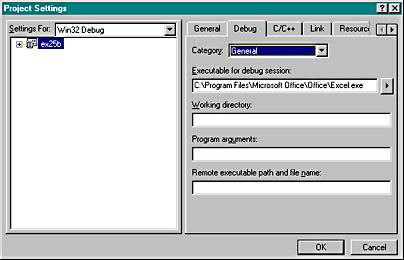
| Debugging a DLL Component To debug a DLL, you must tell the debugger which EXE file to load. Choose Settings from Visual C++'s Project menu, and then enter the controller's full pathname (including the EXE extension) in the Executable For Debug Session box on the Debug page. When you click the Go button on the Debug toolbar, your controller will start (loading the DLL as part of its process) and then wait for you to activate the component. When you activate the component, your DLL in the debugger should then construct its component object. It might be a good idea to include a TRACE statement in the component object's constructor. Don't forget that your DLL must be registered before the client can load it. Here's another option. If you have the source code for the client program, you can start the client program in the debugger. When the client loads the component DLL, you can see the output from the component program's TRACE statements. |
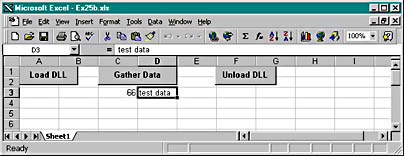
Click the Load DLL button, and then click the Gather Data button. Edit the data, click OK, and watch the new values appear in the spreadsheet.
- Click the Unload DLL button.If you've started the DLL (and Excel) from the debugger, you can watch the Debug window to be sure the DLL's ExitInstance function is called.
Now let's look at the EX25B code. Like an MFC EXE, an MFC regular DLL has an application class (derived from CWinApp) and a global application object. The overridden InitInstance member function in ex25b.cpp looks like this:
BOOL CEx25bApp::InitInstance() { TRACE("CEx25bApp::InitInstance\n"); // Register all OLE server (factories) as running. This // enables the OLE libraries to create objects from other // applications. COleObjectFactory::RegisterAll(); return TRUE; } There's also an ExitInstance function for diagnostic purposes only, as well as the following code for the three standard COM DLL exported functions:
STDAPI DllGetClassObject(REFCLSID rclsid, REFIID riid, LPVOID* ppv) { AFX_MANAGE_STATE(AfxGetStaticModuleState()); return AfxDllGetClassObject(rclsid, riid, ppv); } STDAPI DllCanUnloadNow(void) { AFX_MANAGE_STATE(AfxGetStaticModuleState()); return AfxDllCanUnloadNow(); } STDAPI DllRegisterServer(void) { AFX_MANAGE_STATE(AfxGetStaticModuleState()); COleObjectFactory::UpdateRegistryAll(); VERIFY(AfxOleRegisterTypeLib(AfxGetInstanceHandle(), theTypeLibGUID, "ex25b.tlb")); return S_OK; } The PromptDl.cpp file contains code for the CPromptDlg class, but that class is a standard class derived from CDialog. The file PromptDl.h contains the CPromptDlg class header.
The CEx25bAuto class, the Automation component class initially generated by ClassWizard (with the Createable By Type ID option), is more interesting. This class is exposed to COM under the program ID ex25b.Auto. Figure 25-5 below shows the header file ex25bAuto.h.
| EX25BAUTO.H class CEx25bAuto : public CCmdTarget { DECLARE_DYNCREATE(CEx25bAuto) CEx25bAuto(); // protected constructor used by dynamic creation // Attributes public: // Operations public: // Overrides // ClassWizard generated virtual function overrides //{{AFX_VIRTUAL(CEx25bAuto) public: virtual void OnFinalRelease(); //}}AFX_VIRTUAL // Implementation protected: virtual ~CEx25bAuto(); // Generated message map functions //{{AFX_MSG(CEx25bAuto) // NOTE - the ClassWizard will add and remove member // functions here. //}}AFX_MSG DECLARE_MESSAGE_MAP() DECLARE_OLECREATE(CEx25bAuto) // Generated OLE dispatch map functions //{{AFX_DISPATCH(CEx25bAuto) long m_lData; afx_msg void OnLongDataChanged(); VARIANT m_vaTextData; afx_msg void OnTextDataChanged(); afx_msg BOOL DisplayDialog(); //}}AFX_DISPATCH DECLARE_DISPATCH_MAP() DECLARE_INTERFACE_MAP() }; |
Figure 25-5. Excerpt from the ex25bAuto.h header file.
Figure 25-6 shows the implementation file ex25bAuto.cpp.
| EX25BAUTO.CPP #include "stdafx.h" #include "ex25b.h" #include "Ex25bAuto.h" #include "PromptDl.h" #ifdef _DEBUG #define new DEBUG_NEW #undef THIS_FILE static char THIS_FILE[] = __FILE __; #endif //////////////////////////////////////////////////////////////////// // CEx25bAuto IMPLEMENT_DYNCREATE(CEx25bAuto, CCmdTarget) CEx25bAuto::CEx25bAuto() { EnableAutomation(); // To keep the application running as long as an OLE automation // object is active, the constructor calls AfxOleLockApp. ::VariantInit(&m_vaTextData); // necessary initialization m_lData = 0; AfxOleLockApp(); } CEx25bAuto::~CEx25bAuto() { // To terminate the application when all objects created with // with OLE automation, the destructor calls AfxOleUnlockApp. AfxOleUnlockApp(); } void CEx25bAuto::OnFinalRelease() { // When the last reference for an automation object is released, // OnFinalRelease is called. The base class will automatically // delete the object. Add additional cleanup required for your // object before calling the base class. CCmdTarget::OnFinalRelease(); } BEGIN_MESSAGE_MAP(CEx25bAuto, CCmdTarget) //{{AFX_MSG_MAP(CEx25bAuto) // NOTE - the ClassWizard will add and remove mapping // macros here. //}}AFX_MSG_MAP END_MESSAGE_MAP() BEGIN_DISPATCH_MAP(CEx25bAuto, CCmdTarget) //{{AFX_DISPATCH_MAP(CEx25bAuto) DISP_PROPERTY_NOTIFY(CEx25bAuto, "LongData", m_lData, OnLongDataChanged, VT_I4) DISP_PROPERTY_NOTIFY(CEx25bAuto, "TextData", m_vaTextData, Figure 25-6.continued OnTextDataChanged, VT_VARIANT) DISP_FUNCTION(CEx25bAuto, "DisplayDialog", DisplayDialog, VT_BOOL, VTS_NONE) //}}AFX_DISPATCH_MAP END_DISPATCH_MAP() // Note: we add support for IID_IEx25bAuto to support typesafe // binding from VBA. This IID must match the GUID that is attached // to the dispinterface in the .ODL file. // {A9515AD7-5B85-11D0-848F-00400526305B} static const IID IID_IEx25bAuto = { 0xa9515ad7, 0x5b85, 0x11d0, { 0x84, 0x8f, 0x0, 0x40, 0x5, 0x26, 0x30, 0x5b } }; BEGIN_INTERFACE_MAP(CEx25bAuto, CCmdTarget) INTERFACE_PART(CEx25bAuto, IID_IEx25bAuto, Dispatch) END_INTERFACE_MAP() // {A9515AD8-5B85-11D0-848F-00400526305B} IMPLEMENT_OLECREATE(CEx25bAuto, "ex25b.Auto", 0xa9515ad8, 0x5b85, 0x11d0, 0x84, 0x8f, 0x0, 0x40, 0x5, 0x26, 0x30, 0x5b) //////////////////////////////////////////////////////////////////// // CEx25bAuto message handlers void CEx25bAuto::OnLongDataChanged() { TRACE("CEx25bAuto::OnLongDataChanged\n"); } void CEx25bAuto::OnTextDataChanged() { TRACE("CEx25bAuto::OnTextDataChanged\n"); } BOOL CEx25bAuto::DisplayDialog() { TRACE("Entering CEx25bAuto::DisplayDialog %p\n", this); BOOL bRet = TRUE; AfxLockTempMaps(); // See MFC Tech Note #3 CWnd* pTopWnd = CWnd::FromHandle(::GetTopWindow(NULL)); try { CPromptDlg dlg /*(pTopWnd)*/; if ( m_vaTextData.vt == VT_BSTR){ dlg. m_strData = m_vaTextData.bstrVal; // converts // double-byte // character to // single-byte // character } dlg. m_lData = m_lData; if (dlg.DoModal() == IDOK) { m_vaTextData = COleVariant(dlg.m_strData).Detach(); m_lData = dlg.m_lData; bRet = TRUE; } else { bRet = FALSE; } } catch (CException* pe) { TRACE("Exception: failure to display dialog\n"); bRet = FALSE; pe->Delete(); } AfxUnlockTempMaps(); return bRet; } |
Figure 25-6. The ex25bAuto.cpp implementation file.
The two properties, LongData and TextData, are represented by class data members m_lData and m_vaTextData, both initialized in the constructor. When the LongData property was added in ClassWizard, a notification function, OnLongDataChanged, was specified. This function is called whenever the controller changes the property value. Notification functions apply only to properties that are represented by data members. Don't confuse this notification with the notifications that ActiveX controls give their container when a bound property changes.
The DisplayDialog member function, which is the DisplayDialog method, is ordinary except that the AfxLockTempMaps and AfxUnlockTempMaps functions are necessary for cleaning up temporary object pointers that would normally be deleted in an EXE program's idle loop.
What about the Excel VBA code? Here are the three macros and the global declarations:
Dim Dllcomp As Object Private Declare Sub CoFreeUnusedLibraries Lib "OLE32" () Sub LoadDllComp() Set Dllcomp = CreateObject("Ex25b.Auto") Range("C3").Select Dllcomp.LongData = Selection.Value Range("D3").Select Dllcomp.TextData = Selection.Value End Sub Sub RefreshDllComp() `Gather Data button Range("C3").Select Dllcomp.LongData = Selection.Value Range("D3").Select Dllcomp.TextData = Selection.Value Dllcomp.DisplayDialog Range("C3").Select Selection.Value = Dllcomp.LongData Range("D3").Select Selection.Value = Dllcomp.TextData End Sub Sub UnloadDllComp() Set Dllcomp = Nothing Call CoFreeUnusedLibraries End Sub The first line in LoadDllComp creates a component object as identified by the registered name Ex25b.Auto. The RefreshDllComp macro accesses the component object's LongData and TextData properties. The first time you run LoadDllComp, it loads the DLL and constructs an Ex25b.Auto object. The second time you run LoadDllComp, something curious happens: a second object is constructed, and the original object is destroyed. If you run LoadDllComp from another copy of the workbook, you get two separate Ex25b.Auto objects. Of course, there's only one mapping of ex25b.dll in memory at any time unless you're running more than one Excel process.
Look closely at the UnloadDllComp macro. When the "Set Dllcomp = Nothing" statement is executed, the DLL is disconnected, but it's not unmapped from Excel's address space, which means the component's ExitInstance function is not called. The CoFreeUnusedLibraries function calls the exported DllCanUnloadNow function for each component DLL and, if that function returns TRUE, CoFreeUnusedLibraries frees the DLL. MFC programs call CoFreeUnusedLibraries in the idle loop (after a one-minute delay), but Excel doesn't. That's why UnloadDllComp must call CoFreeUnusedLibraries after disconnecting the component.
The CoFreeUnusedLibraries function doesn't do anything in Windows NT 3.51 unless you have Service Pack 2 (SP2) installed.
The EX25C SDI Automation Component
EXE Example—with User Interface
This Automation component example illustrates the use of a document component class in an SDI application in which a new process is started for each object. This component program demonstrates an indexed property plus a method that constructs a new COM object.
The first Automation component example you saw, EX25A, didn't have a user interface. The global class factory constructed a CBank object that did the component's work. What if you want your EXE component to have a window? If you've bought into the MFC document_view architecture, you'll want the document, view, and frame, with all the benefits they provide.
Suppose you created a regular MFC application and then added a COM-creatable class such as CBank. How do you attach the CBank object to the document and view? From a CBank class member function, you could navigate through the application object and main frame to the current document or view, but you'd have a tough time in an MDI application if you encountered several component objects and several documents. There is a better way. You make the document class the creatable class, and you have the full support of AppWizard for this task. This is true for both MDI and SDI applications.
The MDI Autoclik example demonstrates how COM triggers the construction of new document, view, and child frame objects each time an Automation client creates a new component object. Because the EX25C example is an SDI program, Windows starts a new process each time the client creates an object. Immediately after the program starts, COM, with the help of the MFC application framework, constructs not only the Automation-aware document but also the view and the main frame window.
Now is a good time to experiment with the EX25C application, which was first generated by AppWizard with the Automation option checked. It's a Windows-based alarm clock program designed to be manipulated from an Automation client such as Excel. EX25C has the following properties and methods.
| Name | Description |
| Time | DATE property that holds a COM DATE (m_vaTime) |
| Figure | Indexed VARIANT property for the four figures on the clockface (m_strFigure[]) |
| RefreshWin | Method that invalidates the view window and brings the main frame window to the top (Refresh) |
| ShowWin | Method that displays the application's main window (ShowWin) |
| CreateAlarm | Method that creates a CAlarm object and returns its IDispatch pointer (CreateAlarm) |
Here are the steps for building and running EX25C from the companion CD-ROM:
- From Visual C++, open the workspace \vcpp32\ex25c\ex25c.dsw. Build the project to produce the ex25c.exe file in the project's Debug subdirectory.
- Run the program once to register it. The program is designed to be executed either as a stand-alone application or as an Automation component. When you run it from Windows or from Visual C++, it updates the Registry and displays the face of a clock with the characters XII, III, VI, and IX at the 12, 3, 6, and 9 o'clock positions. Exit the program.
- Load the Excel workbook file \vcpp32\ex25c\ex25c.xls. The worksheet should look like the one shown here.
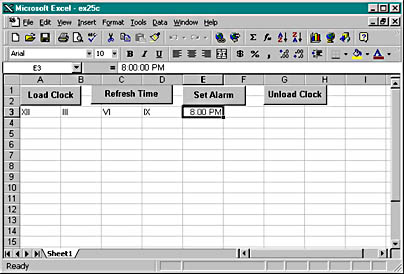
Click the Load Clock button, and then double-click the Set Alarm button. (There could be a long delay after you click the Load Clock button, depending on your system.) The clock should appear as shown below, with the letter A indicating the alarm setting.

If you've started the component program from the debugger, you can watch the Debug window to see when InitInstance is called and when the document object is constructed.
If you're wondering why there's no menu, it's because of the following statement in the CMainFrame::PreCreateWindow function:
cs.hMenu = NULL;
- Close the Clock program and then click the Unload Clock button. If you've started the component program from the debugger, you can watch the Debug window for a message box that indicates that the ExitInstance function is called.
AppWizard did most of the work of setting up the document as an Automation component. In the derived application class CEx25cApp, it generated a data member for the component, as shown here:
public: COleTemplateServer m_server;
The MFC COleTemplateServer class is derived from COleObjectFactory. It is designed to create a COM document object when a client calls IClassFactory::CreateInstance. The class ID comes from the global clsid variable defined in ex25c.cpp. The human-readable program ID (Ex25c.Document) comes from the IDR_MAINFRAME string resource.
In the InitInstance function (in ex25c.cpp), AppWizard generated the code below, which connects the component object (the document) to the application's document template.
CSingleDocTemplate* pDocTemplate; pDocTemplate = new CSingleDocTemplate( IDR_MAINFRAME, RUNTIME_CLASS(CEx25cDoc), RUNTIME_CLASS(CMainFrame), // main SDI frame window RUNTIME_CLASS(CEx25cView)); AddDocTemplate(pDocTemplate); . . . m_server.ConnectTemplate(clsid, pDocTemplate, TRUE);
Now all the plumbing is in place for COM and the framework to construct the document, together with the view and frame. When the objects are constructed, however, the main window is not made visible. That's your job. You must write a method that shows the window.
The following UpdateRegistry call from the InitInstance function updates the Windows Registry with the contents of the project's IDR_MAINFRAME string resource:
m_server.UpdateRegistry(OAT_DISPATCH_OBJECT);
The following dispatch map in the ex25cDoc.cpp file shows the properties and methods for the CEx25cDoc class. Note that the Figure property is an indexed property that ClassWizard can generate if you specify a parameter. Later you'll see the code you have to write for the GetFigure and SetFigure functions.
BEGIN_DISPATCH_MAP(CEx25cDoc, CDocument) //{{AFX_DISPATCH_MAP(CEx25cDoc) DISP_PROPERTY_NOTIFY(CEx25cDoc, "Time", m_time, OnTimeChanged, VT_DATE) DISP_FUNCTION(CEx25cDoc, "ShowWin", ShowWin, VT_EMPTY, VTS_NONE) DISP_FUNCTION(CEx25cDoc, "CreateAlarm", CreateAlarm, VT_DISPATCH, VTS_DATE) DISP_FUNCTION(CEx25cDoc, "RefreshWin", Refresh, VT_EMPTY, VTS_NONE) DISP_PROPERTY_PARAM(CEx25cDoc, "Figure", GetFigure, SetFigure, VT_VARIANT, VTS_I2) //}}AFX_DISPATCH_MAP END_DISPATCH_MAP() The ShowWin and RefreshWin member functions aren't very interesting, but the CreateAlarm method is worth a close look. Here's the corresponding CreateAlarm member function:
LPDISPATCH CEx25cDoc::CreateAlarm(DATE time) { TRACE("Entering CEx25cDoc::CreateAlarm, time = %f\n", time); // OLE deletes any prior CAlarm object m_pAlarm = new CAlarm(time); return m_pAlarm->GetIDispatch(FALSE); // no AddRef here } We've chosen to have the component create an alarm object when a controller calls CreateAlarm. CAlarm is an Automation component class that we've generated with ClassWizard. It is not COM-creatable, which means there's no IMPLEMENT_OLECREATE macro and no class factory. The CreateAlarm function constructs a CAlarm object and returns an IDispatch pointer. (The FALSE parameter for CCmdTarget::GetIDispatch means that the reference count is not incremented; the CAlarm object already has a reference count of 1 when it is constructed.)
The CAlarm class is declared in alarm.h as follows:
class CAlarm : public CCmdTarget { DECLARE_DYNAMIC(CAlarm) public: CAlarm(DATE time); // Attributes public: // Operations public: // Overrides // ClassWizard generated virtual function overrides //{{AFX_VIRTUAL(CAlarm) public: virtual void OnFinalRelease(); //}}AFX_VIRTUAL // Implementation protected: virtual ~CAlarm(); // Generated message map functions //{{AFX_MSG(CAlarm) // NOTE - the ClassWizard will add and remove member // functions here. //}}AFX_MSG DECLARE_MESSAGE_MAP() // Generated OLE dispatch map functions public: //{{AFX_DISPATCH(CAlarm) DATE m_time; //}}AFX_DISPATCH DECLARE_DISPATCH_MAP() DECLARE_INTERFACE_MAP() }; Notice the absence of the DECLARE_DYNCREATE macro.
Alarm.cpp contains a dispatch map, as follows:
BEGIN_DISPATCH_MAP(CAlarm, CCmdTarget) //{{AFX_DISPATCH_MAP(CAlarm) DISP_PROPERTY(CAlarm, "Time", m_time, VT_DATE) //}}AFX_DISPATCH_MAP END_DISPATCH_MAP() Why do we have a CAlarm class? We could have added an AlarmTime property in the CEx25cDoc class instead, but then we would have needed another property or method to turn the alarm on and off. By using the CAlarm class, what we're really doing is setting ourselves up to support multiple alarms—a collection of alarms.
To implement an Automation collection, we would write another class, CAlarms, that would contain the methods Add, Remove, and Item. Add and Remove are self-explanatory; Item returns an IDispatch pointer for a collection element identified by an index, numeric, or some other key. We would also implement a read-only Count property that returned the number of elements. The document class (which owns the collection) would have an Alarms method with an optional VARIANT parameter. If the parameter were omitted, the method would return the IDispatch pointer for the collection. If the parameter specified an index, the method would return an IDispatch pointer for the selected alarm.
If we wanted our collection to support the VBA "For Each" syntax, we'd have some more work to do. We'd add an IEnum VARIANT interface to the CAlarms class to enumerate the collection of variants and implement the Next member function of this interface to step through the collection. Then we'd add a CAlarms method named _NewEnum that returned an IEnumVARIANT interface pointer. If we wanted the collection to be general, we'd allow separate enumerator objects (with an IEnum VARIANT interface) and we'd implement the other IEnumVARIANT functions—Skip, Reset, and Clone.
The Figure property is an indexed property, which makes it interesting. The Figure property represents the four figures on the clock face—XII, III, VI, and IX. It's a CString array, so we can use Roman numerals. Here's the declaration in ex25cDoc.h:
public: CString m_strFigure[4];
And here are the GetFigure and SetFigure functions in ex25cDoc.cpp:
VARIANT CEx25cDoc::GetFigure(short n) { TRACE("Entering CEx25cDoc::GetFigure - - n = %d m_strFigure[n] = %s\n", n, m_strFigure[n]); return COleVariant(m_strFigure[n]).Detach(); } void CEx25cDoc::SetFigure(short n, const VARIANT FAR& newValue) { TRACE("Entering CEx25cDoc::SetFigure -- n = %d, vt = %d\n", n, newValue.vt); COleVariant vaTemp; vaTemp.ChangeType(VT_BSTR, (COleVariant*) &newValue); m_strFigure[n] = vaTemp.bstrVal; // converts double-to-single } These functions tie back to the DISP_PROPERTY_PARAM macro in the CEx25cDoc dispatch map. The first parameter is the index number, specified as a short integer by the last macro parameter. Property indexes don't have to be integers, and the index can have several components (row and column numbers, for example). The ChangeType call in SetFigure is necessary because the controller might otherwise pass numbers instead of strings.
You've just seen collection properties and indexed properties. What's the difference? A controller can't add or delete elements of an indexed property, but it can add elements to a collection and it can delete elements from a collection.
What draws the clock face? As you might expect, it's the OnDraw member function of the view class. This function uses GetDocument to get a pointer to the document object, and then it accesses the document's property data members and method member functions.
The Excel macro code appears below.
Dim Clock As Object Dim Alarm As Object Sub LoadClock() Set Clock = CreateObject("ex25c.Document") Range("A3").Select n = 0 Do Until n = 4 Clock.figure(n) = Selection.Value Selection.Offset(0, 1).Range("A1").Select n = n + 1 Loop RefreshClock Clock.ShowWin End Sub Sub RefreshClock() Clock.Time = Now() Clock.RefreshWin End Sub Sub CreateAlarm() Range("E3").Select Set Alarm = Clock.CreateAlarm(Selection.Value) RefreshClock End Sub Sub UnloadClock() Set Clock = Nothing End Sub Notice the Set Alarm statement in the CreateAlarm macro. It calls the CreateAlarm method to return an IDispatch pointer, which is stored in an object variable. If the macro is run a second time, a new alarm is created, but the original one is destroyed because its reference count goes to 0.
You've seen a modal dialog in a DLL (EX25B) and you've seen a main frame window in an EXE (EX25C). Be careful with modal dialogs in EXEs. It's fine to have an About dialog that is invoked directly by the component program, but it isn't a good idea to invoke a modal dialog in an out-of-process component method function. The problem is that once the modal dialog is on the screen, the user can switch back to the client program. MFC clients handle this situation with a special "Server Busy" message box, which appears right away. Excel does something similar, but it waits 30 seconds, and this could confuse the user.
The EX25D Automation Client Example
So far, you've seen C++ Automation component programs. Now you'll see a C++ Automation client program that runs all the previous components and also controls Microsoft Excel 97. The EX25D program was originally generated by AppWizard, but without any COM options. It was easier to add the COM code than it would have been to rip out the component-specific code. If you do use AppWizard to build such an Automation controller, add the following line at the end of StdAfx.h:
#include <afxdisp.h>
Then add this call at the beginning of the application's InitInstance function:
AfxOleInit();
To prepare EX25D, open the \vcpp32\ex25d\ex25d project and do the build. Run the application from the debugger, and you'll see a standard SDI application with a menu structure similar to that shown in Figure 25-7.
If you have built and registered all the components, you can test them from EX25D. Notice that the DLL doesn't have to be copied to the \Winnt\System32 directory because Windows finds it through the Registry. For some components, you'll have to watch the Debug window to verify that the test results are correct. The program is reasonably modular. Menu commands and update command UI events are mapped to the view class. Each component object has its own C++ controller class and an embedded data member in ex25dView.h. We'll look at each part separately after we delve into type libraries.

Figure 25-7. A sample menu structure for a standard SDI application.
Type Libraries and ODL Files
We've told you that type libraries aren't necessary for the MFC IDispatch implementation, but Visual C++ has been quietly generating and updating type libraries for all your components. What good are these type libraries? VBA can use a type library to browse your component's methods and properties, and it can use the type library for improved access to properties and methods, a process called early binding described later in this chapter. But we're building a C++ client program here, not a VBA program. It so happens that ClassWizard can read a component's type library and use the information to generate C++ code for the client to use to "drive" an Automation component.
AppWizard initializes a project's Object Description Language (ODL) file when you first create it. ClassWizard edits this file each time you generate a new Automation component class or add properties and methods to an existing class. Unlike it does with the ClassWizard (CLW) file, ClassWizard can't rebuild an ODL file from the contents of your source files. If you mess up your ODL file, you'll have to re-create it manually.
When you were adding properties and methods to your component classes, ClassWizard was updating the project's ODL file. This file is a text file that describes the component in an ODL. (Your GUID will be different if you used AppWizard to generate this project.) Here's the ODL file for the bank component:
// ex25a.odl : type library source for ex25a.exe // This file will be processed by the MIDL compiler to produce the // type library (ex25a.tlb). [ uuid(85D56DE4-789D-11D0-92E1-D74D1B9CCD32), version(1.0) ] library Ex25a { importlib("stdole32.tlb"); // Primary dispatch interface for CBank [ uuid(99EA95E1-78A1-11D0-92E1-D74D1B9CCD32) ] dispinterface IBank { properties: // NOTE - ClassWizard will maintain property information // here. // Use extreme caution when editing this section. //{{AFX_ODL_PROP(CBank) [id(1)] double Balance; //}}AFX_ODL_PROP methods: // NOTE - ClassWizard will maintain method information here. // Use extreme caution when editing this section. //{{AFX_ODL_METHOD(CBank) [id(2)] double Withdrawal(double dAmount); [id(3)] void Deposit(double dAmount); //}}AFX_ODL_METHOD }; // Class information for CBank [ uuid(99EA95E2-78A1-11D0-92E1-D74D1B9CCD32) ] coclass Bank { [default] dispinterface IBank; }; // {{AFX_APPEND_ODL}} }; The ODL file has a unique GUID type library identifier, 85D56DE4-789D-11D0-92E1-D74D1B9CCD32, and it completely describes the bank component's properties and methods under a dispinterface named IBank. In addition, it specifies the dispinterface GUID, 99EA95E1-78A1-11D0-92E1-D74D1B9CCD32, which is the same GUID that's in the interface map of the CBank class. You'll see the significance of this GUID when you read the "VBA Early Binding" section near the end of this chapter. The CLSID, 99EA95E2-78A1-11D0-92E1-D74D1B9CCD32, is what a VBA browser can actually use to load your component.
Anyway, when you build your component project, Visual C++ invokes the MIDL utility, which reads the ODL file and generates a binary TLB file in your project's debug or release subdirectory. Now when you develop a C++ client program, you can ask ClassWizard to generate a driver class from the component project's TLB file.
The MIDL utility generates the type library in a stand-alone TLB file, and that's what Automation controllers such as Excel look for. ActiveX controls have their type libraries bound into their resources.
To actually do this, you click the ClassWizard Add Class button and then select From A Type Library from the drop-down list. You navigate to the component project's TLB file, and then ClassWizard shows you a dialog similar to the illustration below.

IBank is the dispinterface specified in the ODL file. You can keep this name for the class if you want, and you can specify the H and CPP filenames. If a type library contains several interfaces you can make multiple selections. You'll see the generated controller classes in the sections that follow.
The Controller Class for ex25a.exe
ClassWizard generated the IBank class (derived from COleDispatchDriver) listed in Figure 25-8. Look closely at the member function implementations. Note the first parameters of the GetProperty, SetProperty, and InvokeHelper function calls. These are hard-coded DISPIDs for the component's properties and methods, as determined by the component's dispatch map sequence.
If you use ClassWizard to delete a property and then add the property back, you'll probably change the component's dispatch IDs. That means that you'll have to regenerate or edit the controller class so that the IDs match.
| BANKDRIVER.H class IBank : public COleDispatchDriver { public: IBank() {} // calls COleDispatchDriver default constructor IBank(LPDISPATCH pDispatch) : COleDispatchDriver(pDispatch) {} IBank(const IBank& dispatchSrc) : COleDispatchDriver(dispatchSrc) {} // Attributes public: double GetBalance(); void SetBalance(double); // Operations public: double Withdrawal(double dAmount); void Deposit(double dAmount); }; BANKDRIVER.CPP #include "StdAfx.h" #include "BankDriver.h" #ifdef _DEBUG #define new DEBUG_NEW #undef THIS_FILE static char THIS_FILE[] = __FILE __; #endif //////////////////////////////////////////////////////////////////// // IBank properties double IBank::GetBalance() { double result; GetProperty(0x1, VT_R8, (void*)&result); return result; } void IBank::SetBalance(double propVal) { SetProperty(0x1, VT_R8, propVal); } //////////////////////////////////////////////////////////////////// // IBank operations double IBank::Withdrawal(double dAmount) { double result; static BYTE parms[] = VTS_R8; InvokeHelper(0x2, DISPATCH_METHOD, VT_R8, (void*)&result, parms, dAmount); return result; } void IBank::Deposit(double dAmount) { static BYTE parms[] = VTS_R8; InvokeHelper(0x3, DISPATCH_METHOD, VT_EMPTY, NULL, parms, dAmount); } |
Figure 25-8. The IBank class listing.
The CEx25dView class has a data member m_bank of class IBank. The CEx25dView member functions for the Ex25a.Bank component are listed below. They are hooked up to options on the EX25D main menu. Of particular interest is the OnBankoleLoad function. The COleDispatchDriver::CreateDispatch function loads the component program (by calling CoGetClassObject and IClassFactory::CreateInstance) and then calls QueryInterface to get an IDispatch pointer, which it stores in the object's m_lpDispatch data member. The COleDispatchDriver::ReleaseDispatch function, called in OnBankoleUnload, calls Release on the pointer.
void CEx25dView::OnBankoleLoad() { if(!m_bank.CreateDispatch("Ex25a.Bank")) { AfxMessageBox("Ex25a.Bank component not found"); return; } } void CEx25dView::OnUpdateBankoleLoad(CCmdUI* pCmdUI) { pCmdUI->Enable(m_bank.m_lpDispatch == NULL); } void CEx25dView::OnBankoleTest() { m_bank.Deposit(20.0); m_bank.Withdrawal(15.0); TRACE("new balance = %f\n", m_bank.GetBalance()); } void CEx25dView::OnUpdateBankoleTest(CCmdUI* pCmdUI) { pCmdUI->Enable(m_bank.m_lpDispatch != NULL); } void CEx25dView::OnBankoleUnload() { m_bank.ReleaseDispatch(); } void CEx25dView::OnUpdateBankoleUnload(CCmdUI* pCmdUI) { pCmdUI->Enable(m_bank.m_lpDispatch != NULL); } The Controller Class for ex25b.dll
Figure 25-9 shows the class header file generated by ClassWizard.
| AUTODRIVER.H class IEx25bAuto : public COleDispatchDriver { public: IEx25bAuto() {} // calls COleDispatchDriver default constructor IEx25bAuto(LPDISPATCH pDispatch) : COleDispatchDriver(pDispatch) {} IEx25bAuto(const IEx25bAuto& dispatchSrc) : COleDispatchDriver(dispatchSrc) {} // Attributes public: long GetLongData(); void SetLongData(long); VARIANT GetTextData(); void SetTextData(const VARIANT&); // Operations public: BOOL DisplayDialog(); }; |
Figure 25-9. The Ex25bAuto class header file.
Notice that each property requires separate Get and Set functions in the client class, even though a data member in the component represents the property.
The view class header has a data member m_auto of class IEx25bAuto. Here are some DLL-related command handler member functions from ex25dView.cpp:
void CEx25dView::OnDlloleGetdata() { m_auto.DisplayDialog(); COleVariant vaData = m_auto.GetTextData(); ASSERT(vaData.vt == VT_BSTR); CString strTextData = vaData.bstrVal; long lData = m_auto.GetLongData(); TRACE("CEx25dView::OnDlloleGetdata — long = %ld, text = %s\n", lData, strTextData); } void CEx25dView::OnUpdateDlloleGetdata(CCmdUI* pCmdUI) { pCmdUI->Enable(m_auto.m_lpDispatch != NULL); } void CEx25dView::OnDlloleLoad() { if(!m_auto.CreateDispatch("Ex25b.Auto")) { AfxMessageBox("Ex25b.Auto component not found"); return; } m_auto.SetTextData(COleVariant("test")); // testing m_auto.SetLongData(79); // testing // verify dispatch interface // {A9515AD7-5B85-11D0-848F-00400526305B} static const IID IID_IEx25bAuto = { 0xa9515ad7, 0x5b85, 0x11d0, { 0x84, 0x8f, 0x0, 0x40, 0x5, 0x26, 0x30, 0x5b } }; LPDISPATCH p; HRESULT hr = m_auto.m_lpDispatch->QueryInterface(IID_IEx25bAuto, (void**) &p); TRACE("OnDlloleLoad — QueryInterface result = %x\n", hr); p->Release(); } void CEx25dView::OnUpdateDlloleLoad(CCmdUI* pCmdUI) { pCmdUI->Enable(m_auto.m_lpDispatch == NULL); } void CEx25dView::OnDlloleUnload() { m_auto.ReleaseDispatch(); } void CEx25dView::OnUpdateDlloleUnload(CCmdUI* pCmdUI) { pCmdUI->Enable(m_auto.m_lpDispatch != NULL); } The Controller Class for ex25c.exe
Figure 25-10 shows the headers for the IEx25c and IAlarm classes, which drive the EX25C Automation component.
| CLOCKDRIVER.H class IEx25c : public COleDispatchDriver { public: IEx25c() {} // calls COleDispatchDriver default constructor IEx25c(LPDISPATCH pDispatch) : COleDispatchDriver(pDispatch) {} IEx25c(const IEx25c& dispatchSrc) : COleDispatchDriver(dispatchSrc) {} // Attributes public: DATE GetTime(); void SetTime(DATE); // Operations public: void ShowWin(); LPDISPATCH CreateAlarm(DATE time); void RefreshWin(); void SetFigure(short n, const VARIANT& newValue); VARIANT GetFigure(short n); }; class IAlarm : public COleDispatchDriver { public: IAlarm() {} // calls COleDispatchDriver default constructor IAlarm(LPDISPATCH pDispatch) : COleDispatchDriver(pDispatch) {} IAlarm(const IAlarm& dispatchSrc) : COleDispatchDriver(dispatchSrc) {} // Attributes public: DATE GetTime(); void SetTime(DATE); // Operations public: }; |
Figure 25-10. The IEx25c and IAlarm class header files.
Of particular interest is the IEx25c::CreateAlarm member function in ClockDriver.cpp:
LPDISPATCH IEx25c::CreateAlarm(DATE time) { LPDISPATCH result; static BYTE parms[] = VTS_DATE; InvokeHelper(0x3, DISPATCH_METHOD, VT_DISPATCH, (void*)&result, parms, time); return result; } This function can be called only after the clock object (document) has been constructed. It causes the EX25C component to construct an alarm object and return an IDispatch pointer with a reference count of 1. The COleDispatchDriver::AttachDispatch function connects that pointer to the client's m_alarm object, but if that object already has a dispatch pointer, the old pointer is released. That's why, if you watch the Debug window, you'll see that the old EX25C instance exits immediately after you ask for a new instance. You'll have to test this behavior with the Excel driver because EX25D disables the Load menu option when the clock is running.
The view class has the data members m_clock and m_alarm. Here are the view class command handlers:
void CEx25dView::OnClockoleCreatealarm() { CAlarmDialog dlg; if (dlg.DoModal() == IDOK) { COleDateTime dt(1995, 12, 23, dlg. m_nHours, dlg.m_nMinutes, dlg. m_nSeconds); LPDISPATCH pAlarm = m_clock.CreateAlarm(dt); m_alarm.AttachDispatch(pAlarm); // releases prior object! m_clock.RefreshWin(); } } void CEx25dView::OnUpdateClockoleCreatealarm(CCmdUI* pCmdUI) { pCmdUI->Enable(m_clock.m _lpDispatch != NULL); } void CEx25dView::OnClockoleLoad() { if(!m_clock.CreateDispatch("Ex25c.Document")) { AfxMessageBox("Ex25c.Document component not found"); return; } m_clock.SetFigure(0, COleVariant("XII")); m_clock.SetFigure(1, COleVariant("III")); m_clock.SetFigure(2, COleVariant("VI")); m_clock.SetFigure(3, COleVariant("IX")); OnClockoleRefreshtime(); m_clock.ShowWin(); } void CEx25dView::OnUpdateClockoleLoad(CCmdUI* pCmdUI) { pCmdUI->Enable(m_clock.m _lpDispatch == NULL); } void CEx25dView::OnClockoleRefreshtime() { COleDateTime now = COleDateTime::GetCurrentTime(); m_clock.SetTime(now); m_clock.RefreshWin(); } void CEx25dView::OnUpdateClockoleRefreshtime(CCmdUI* pCmdUI) { pCmdUI->Enable(m_clock.m_lpDispatch != NULL); } void CEx25dView::OnClockoleUnload() { m_clock.ReleaseDispatch(); } void CEx25dView::OnUpdateClockoleUnload(CCmdUI* pCmdUI) { pCmdUI->Enable(m_clock.m _lpDispatch != NULL); } Controlling Microsoft Excel
The EX25D program contains code that loads Excel, creates a workbook, and reads from and writes to cells from the active worksheet. Controlling Excel is exactly like controlling an MFC Automation component, but you need to know about a few Excel peculiarities.
If you study Excel VBA, you'll notice that you can use more than 100 "objects" in your programs. All of these objects are accessible through Automation, but if you write an MFC Automation client program, you'll need to know about the objects' properties and methods. Ideally, you'd like a C++ class for each object, with member functions coded to the proper dispatch IDs.
Excel has its own type library, found in the file Excel8.olb, usually in the \Program Files\Microsoft Office\Office directory. ClassWizard can read this file—exactly as it reads TLB files—to create C++ driver classes for individual Excel objects. It makes sense to select the objects you need and then combine the classes into a single pair of files, as shown in Figure 25-11.

Figure 25-11. ClassWizard can create C++ classes for the Excel objects listed in Excel8.olb.
You might need to edit the generated code to suit your needs. Let's look at an example. If you use ClassWizard to generate a driver class for the Worksheet object, you get a GetRange member function, as shown here:
LPDISPATCH _Worksheet::GetRange(const VARIANT& Cell1, const VARIANT& Cell2) { LPDISPATCH result; static BYTE parms[] = VTS_VARIANT VTS_VARIANT; InvokeHelper(0xc5, DISPATCH_PROPERTYGET, VT_DISPATCH, (void*)&result, parms, &Cell1, &Cell2); return result; } You know (from the Excel VBA documentation) that you can call the method with either a single cell (one parameter) or a rectangular area specified by two cells (two parameters). Remember: you can omit optional parameters in a call to InvokeHelper. Now it makes sense to add a second overloaded GetRange function with a single cell parameter like this:
LPDISPATCH _Worksheet::GetRange(const VARIANT& Cell1) // added { LPDISPATCH result; static BYTE parms[] = VTS_VARIANT; InvokeHelper(0xc5, DISPATCH_PROPERTYGET, VT_DISPATCH, (void*)&result, parms, &Cell1); return result; } How do you know which functions to fix up? They're the functions you decide to use in your program. You'll have to read the Excel VBA reference manual to figure out the required parameters and return values. Perhaps someday soon someone will write a set of C++ Excel controller classes.
The EX25D program uses the Excel objects and contains the corresponding classes shown in the table below. All the code for these objects is contained in the files excel8.h and excel8.cpp.
| Object/Class | View Class Data Member |
| _Application | m_app |
| Range | m_range[5] |
| _Worksheet | m_worksheet |
| Workbooks | m_workbooks |
| Worksheets | m_worksheets |
The following view member function, OnExceloleLoad, handles the Excel Comp Load menu command. This function must work if the user already has Excel running on the desktop. The COM GetActiveObject function tries to return an IUnknown pointer for Excel. GetActiveObject requires a class ID, so we must first call CLSIDFromProgID. If GetActiveObject is successful, we call QueryInterface to get an IDispatch pointer and we attach it to the view's m_app controller object of class _Application. If GetActiveObject is unsuccessful, we call COleDispatchDriver::CreateDispatch, as we did for the other components.
void CEx25dView::OnExceloleLoad() { // If Excel is already running, attach to it; otherwise, start it LPDISPATCH pDisp; LPUNKNOWN pUnk; CLSID clsid; TRACE("Entering CEx25dView::OnExcelLoad\n"); BeginWaitCursor(); ::CLSIDFromProgID(L"Excel.Application.8", &clsid); // from Registry if(::GetActiveObject(clsid, NULL, &pUnk) == S_OK) { VERIFY(pUnk->QueryInterface(IID_IDispatch, (void**) &pDisp) == S_OK); m_app.AttachDispatch(pDisp); pUnk->Release(); TRACE(" attach complete\n"); } else { if(!m_app.CreateDispatch("Excel.Application.8")) { AfxMessageBox("Excel 97 program not found"); } TRACE(" create complete\n"); } EndWaitCursor(); } OnExceloleExecute is the command handler for the Execute item in the Excel Comp menu. Its first task is to find the Excel main window and bring it to the top. We must write some Windows code here because a method for this purpose couldn't be found. We must also create a workbook if no workbook is currently open.
We have to watch our method return values closely. The Workbooks Add method, for example, returns an IDispatch pointer for a Workbook object and, of course, increments the reference count. If we generated a class for Workbook, we could call COleDispatchDriver::AttachDispatch so that Release would be called when the Workbook object was destroyed. Because we don't need a Workbook class, we'll simply release the pointer at the end of the function. If we don't properly clean up our pointers, we might get memory-leak messages from the Debug version of MFC.
The rest of the OnExceloleExecute function accesses the cells in the worksheet. It's easy to get and set numbers, dates, strings, and formulas. The C++code is similar to the VBA code you would write to do the same job.
void CEx25dView::OnExceloleExecute() { LPDISPATCH pRange, pWorkbooks; CWnd* pWnd = CWnd::FindWindow("XLMAIN", NULL); if (pWnd != NULL) { TRACE("Excel window found\n"); pWnd->ShowWindow(SW_SHOWNORMAL); pWnd->UpdateWindow(); pWnd->BringWindowToTop(); } m_app.SetSheetsInNewWorkbook(1); VERIFY(pWorkbooks = m_app.GetWorkbooks()); m_workbooks.AttachDispatch(pWorkbooks); LPDISPATCH pWorkbook = NULL; if (m_workbooks.GetCount() == 0) { // Add returns a Workbook pointer, but we // don't have a Workbook class pWorkbook = m_workbooks.Add(); // Save the pointer for // later release } LPDISPATCH pWorksheets = m_app.GetWorksheets(); ASSERT(pWorksheets != NULL); m_worksheets.AttachDispatch(pWorksheets); LPDISPATCH pWorksheet = m_worksheets.GetItem(COleVariant((short) 1)); m_worksheet.AttachDispatch(pWorksheet); m_worksheet.Select(); VERIFY(pRange = m_worksheet.GetRange(COleVariant("A1"))); m_range[0].AttachDispatch(pRange); VERIFY(pRange = m_worksheet.GetRange(COleVariant("A2"))); m_range[1].AttachDispatch(pRange); VERIFY(pRange = m_worksheet.GetRange(COleVariant("A3"))); m_range[2].AttachDispatch(pRange); VERIFY(pRange = m_worksheet.GetRange(COleVariant("A3"), COleVariant("C5"))); m_range[3].AttachDispatch(pRange); VERIFY(pRange = m_worksheet.GetRange(COleVariant("A6"))); m_range[4].AttachDispatch(pRange); m_range[4].SetValue(COleVariant(COleDateTime (1998, 4, 24, 15, 47, 8))); // Retrieve the stored date and print it as a string COleVariant vaTimeDate = m_range[4].GetValue(); TRACE("returned date type = %d\n", vaTimeDate.vt); COleVariant vaTemp; vaTemp.ChangeType(VT_BSTR, &vaTimeDate); CString str = vaTemp.bstrVal; TRACE("date = %s\n", (const char*) str); m_range[0].SetValue(COleVariant("test string")); COleVariant vaResult0 = m_range[0].GetValue(); if (vaResult0.vt == VT_BSTR) { CString str = vaResult0.bstrVal; TRACE("vaResult0 = %s\n", (const char*) str); } m_range[1].SetValue(COleVariant(3.14159)); COleVariant vaResult1 = m_range[1].GetValue(); if (vaResult1.vt == VT_R8) { TRACE("vaResult1 = %f\n", vaResult1.dblVal); } m_range[2].SetFormula(COleVariant("=$A2*2.0")); COleVariant vaResult2 = m_range[2].GetValue(); if (vaResult2.vt == VT_R8) { TRACE("vaResult2 = %f\n", vaResult2.dblVal); } COleVariant vaResult2a = m_range[2].GetFormula(); if (vaResult2a.vt == VT_BSTR) { CString str = vaResult2a.bstrVal; TRACE("vaResult2a = %s\n", (const char*) str); } m_range[3].FillRight(); m_range[3].FillDown(); // cleanup if (pWorkbook != NULL) { pWorkbook->Release(); } } The EX25E Automation Client Example
This program uses the new #import directive to generate smart pointers. It behaves just like EX25D except that it doesn't run Excel. The #import statements are in the StdAfx.h file to minimize the number of times the compiler has to generate the driver classes. Here is the added code:
#include <afxdisp.h> #import "..\ex25a\debug\ex25a.tlb" rename_namespace("BankDriv") using namespace BankDriv; #import "..\ex25b\debug\ex25b.tlb" rename_namespace("Ex25bDriv") using namespace Ex25bDriv; #import "..\ex25c\debug\ex25c.tlb" rename_namespace("ClockDriv") using namespace ClockDriv; And of course you'll need to call AfxOleInit in your application class InitInstance member function.
The view class header contains embedded smart pointers as shown:
IEx25bAutoPtr m_auto; IBankPtr m_bank; IEx25cPtr m_clock; IAlarmPtr m_alarm;
Here is the code for the view class menu command handlers:
void CEx25eView::OnBankoleLoad() { if(m_bank.CreateInstance(__uuidof(Bank)) != S_OK) { AfxMessageBox("Bank component not found"); return; } } void CEx25eView::OnUpdateBankoleLoad(CCmdUI* pCmdUI) { pCmdUI->Enable(m_bank.GetInterfacePtr() == NULL); } void CEx25eView::OnBankoleTest() { try { m_bank->Deposit(20.0); m_bank->Withdrawal(15.0); TRACE("new balance = %f\n", m_bank->GetBalance()); } catch(_com_error& e) { AfxMessageBox(e.ErrorMessage()); } } void CEx25eView::OnUpdateBankoleTest(CCmdUI* pCmdUI) { pCmdUI->Enable(m_bank.GetInterfacePtr() != NULL); } void CEx25eView::OnBankoleUnload() { m_bank.Release(); } void CEx25eView::OnUpdateBankoleUnload(CCmdUI* pCmdUI) { pCmdUI->Enable(m_bank.GetInterfacePtr() != NULL); } void CEx25eView::OnClockoleCreatealarm() { CAlarmDialog dlg; try { if (dlg.DoModal() == IDOK) { COleDateTime dt(1995, 12, 23, dlg. m_nHours, dlg.m_nMinutes, dlg. m_nSeconds); LPDISPATCH pAlarm = m_clock->CreateAlarm(dt); m_alarm.Attach((IAlarm*) pAlarm); // releases prior object! m_clock->RefreshWin(); } } catch(_com_error& e) { AfxMessageBox(e.ErrorMessage()); } } void CEx25eView::OnUpdateClockoleCreatealarm(CCmdUI* pCmdUI) { pCmdUI->Enable(m_clock.GetInterfacePtr() != NULL); } void CEx25eView::OnClockoleLoad() { if(m_clock.CreateInstance(_ _uuidof(Document)) != S_OK) { AfxMessageBox("Clock component not found"); return; } try { m_clock->PutFigure(0, COleVariant("XII")); m_clock->PutFigure(1, COleVariant("III")); m_clock->PutFigure(2, COleVariant("VI")); m_clock->PutFigure(3, COleVariant("IX")); OnClockoleRefreshtime(); m_clock->ShowWin(); } catch(_com_error& e) { AfxMessageBox(e.ErrorMessage()); } } void CEx25eView::OnUpdateClockoleLoad(CCmdUI* pCmdUI) { pCmdUI->Enable(m_clock.GetInterfacePtr() == NULL); } void CEx25eView::OnClockoleRefreshtime() { COleDateTime now = COleDateTime::GetCurrentTime(); try { m_clock->PutTime(now); m_clock->RefreshWin(); } catch(_com_error& e) { AfxMessageBox(e.ErrorMessage()); } } void CEx25eView::OnUpdateClockoleRefreshtime(CCmdUI* pCmdUI) { pCmdUI->Enable(m_clock.GetInterfacePtr() != NULL); } void CEx25eView::OnClockoleUnload() { m_clock.Release(); } void CEx25eView::OnUpdateClockoleUnload(CCmdUI* pCmdUI) { pCmdUI->Enable(m_clock.GetInterfacePtr() != NULL); } void CEx25eView::OnDlloleGetdata() { try { m_auto->DisplayDialog(); COleVariant vaData = m_auto->GetTextData(); ASSERT(vaData.vt == VT_BSTR); CString strTextData = vaData.bstrVal; long lData = m_auto->GetLongData(); TRACE("CEx25dView::OnDlloleGetdata—long = %ld, text = %s\n", lData, strTextData); } catch(_com_error& e) { AfxMessageBox(e.ErrorMessage()); } } void CEx25eView::OnUpdateDlloleGetdata(CCmdUI* pCmdUI) { pCmdUI->Enable(m_auto.GetInterfacePtr() != NULL); } void CEx25eView::OnDlloleLoad() { if(m_auto.CreateInstance(__uuidof(Ex25bAuto)) != S_OK) { AfxMessageBox("Ex25bAuto component not found"); return; } } void CEx25eView::OnUpdateDlloleLoad(CCmdUI* pCmdUI) { pCmdUI->Enable(m_auto.GetInterfacePtr() == NULL); } void CEx25eView::OnDlloleUnload() { m_auto.Release(); } void CEx25eView::OnUpdateDlloleUnload(CCmdUI* pCmdUI) { pCmdUI->Enable(m_auto.GetInterfacePtr() != NULL); } Note the use of the try/catch blocks in the functions that manipulate the components. These are particularly necessary for processing errors that occur when a component program stops running. In the previous example, EX25D, the MFC COleDispatchDriver class took care of this detail.
EAN: 2147483647
Pages: 332