The EX09A Example
To illustrate how to take advantage of the new Internet Explorer 4 Common Controls, we'll build a dialog that demonstrates how to create and program each control type. The steps required to create the dialog are shown below.
- Run AppWizard to generate the EX09A project. Choose New from the Visual C++ File menu, and then select Microsoft AppWizard (exe) from the Projects page. Accept all the defaults but one: choose Single Document Interface (SDI). The options and the default class names are shown here.
- Create a new dialog resource with ID IDD_DIALOG1. Place the controls as shown in Figure 9-1.
- Use ClassWizard to create a new class, CDialog1, derived from CDialog. ClassWizard will automatically prompt you to create this class because it knows that the IDD_DIALOG1 resource exists without an associated C++ class. Go ahead and create a message handler for the WM_INITDIALOG message.
- Set the properties for the dialog's controls. To demonstrate the full range of controls, we will need to set a variety of properties on each of the IE4 common controls in the example. Here is a brief overview of each property you will need to set:
- The Short Date and Time Picker. To set up the first date and time picker control to use the short format, select the properties for IDC_DATETIMEPICKER1, as shown in the following figure.

- The Long Date and Time Picker. Now configure the second date and time picker control (IDC_DATETIMEPICKER2) to use the long format as shown below.

- The Short and NULL Date and Time Picker. This is the third date and time picker control, IDC_DATETIMEPICKER3. Configure this third date and time picker to use the short format and the styles shown here.

- The Time Picker. The fourth date and time picker control, IDC_DATETIMEPICKER4, is configured to let the user choose time. To configure this control, select Time from the Format combo box on the Styles tab as shown.

- The Month View. To configure the month view, you will need to set a variety of styles. First, from the Styles tab, choose Day States, as shown here.

If we leave the default styles, the month view does not look like a control on the dialog. There are no borders drawn at all. To make the control fit in with the other controls on the dialog, select Client Edge and Static Edge from the Extended Styles tab, as shown below.

- The IP Address.This control (IDC_IPADDRESS1) does not require any special properties.
- The First Extended Combo Box.Make sure that you enter some items, as shown here, and also make sure the list is tall enough to display several items.

- The Second Extended Combo Box.Enter three items: Tweety, Mack, and Jaws. Later in the example, we will use these items to show one of the ways to draw graphics in an extended combo box.
- Add the CDialog1 variables. Start ClassWizard and click on the Member Variables tab to view the Member Variables page. Enter the following member variables for each control listed.
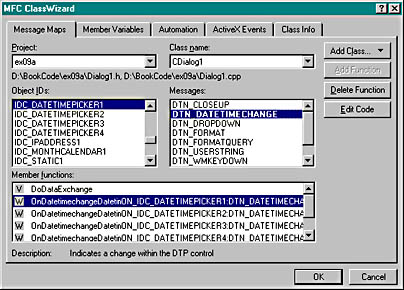
- Program the short date time picker. In this example, we don't mind if the first date time picker starts with the current date, so we don't have any OnInitDialog handling for this control. However, if we wanted to change the date, we would make a call to SetTime for the control in OnInitDialog. At runtime, when the user selects a new date in the first date and time picker, the companion static control should be automatically updated. To achieve this, we need to use ClassWizard to add a handler for the DTN_DATETIMECHANGE message. Start ClassWizard (CTRL-W) and choose IDC_DATETIMEPICKER1 from the Object IDs list and DTN_DATETIMECHANGE from the Messages list. Accept the default message name and click OK. Repeat this step for each of the other three IDC_DATETIMEPICKER IDs. Your ClassWizard should look like the illustration here.
- Program the long date time picker. Now we need to provide a similar handler for the second date time picker.
- Program the third date time picker. The third date time picker needs a similar handler, but since we set the Show None style in the dialog properties, it is possible for the user to specify a NULL date by checking the inline check box. Instead of blindly calling GetTime, we have to check the return value. If the return value of the GetTime call is nonzero, the user has selected a NULL date. If the return value is zero, a valid date has been selected. As in the previous two handlers, when a CTime object is returned, it is converted into a string and automatically displayed in the companion static control.
- Program the time picker. The time picker needs a similar handler, but this time the format displays hours/minutes/seconds instead of months/days/years:
- Program the Month Selector. You might think that the month selector handler is similar to the date time picker's handler, but they are actually somewhat different. First of all, the message you need to handle for detecting when the user has selected a new date is the MCN_SELCHANGE message. Select this message in the ClassWizard, as shown here.
- Program the IP control. First we need to make sure the control is initialized. In this example, we initialize the control to 0 by giving it a 0 DWORD value. If you do not initialize the control, each segment will be blank. To initialize the control, add this call to the CDialog1::OnInitDialog function:
- Add a handler for the first extended combo box. No special initialization is required for the extended combo box, but we do need to handle the CBN_SELCHANGE message. The following code shows the extended combo box handler. Can you spot the ways that this differs from a "normal" combo box control?
- Add Images to the Items in the second extended combo box. The first extended combo box does not need any special programming. It is used to demonstrate how to implement a simple extended combo box very similar to the older, nonextended combo box. The second combo box requires a good bit of programming. First we created six bitmaps and eight icons that we need to add to the resources for the project, as shown in the following illustration.
- Add Items to the Extended Combobox. The other technique available for putting images into an extended combo box is to add them dynamically, as shown in the code added to OnInitDialog below:
- Add a handler for the second extended combo box. The second extended combo box handler is essentially the same as the first:
- Connect the view and the dialog. Add code to the virtual OnDraw function in ex09aView.cpp. The following boldface code replaces the previous code:
- Use ClassWizard to add the OnLButtonDown member function to the CEx09aView class. Edit the AppWizard-generated code as follows:
- Compile and run the program. Now you can experiment with the various IE4 common controls to see how they work and how you can apply them in your own applications.

You can drag the controls from the control palette, shown in Chapter 6. Remember that IE4 Common Controls are at the bottom of the palette. The following table lists the control types and their IDs.
| Tab Sequence | Control Type | Child Window ID |
| 1 | Group Box | IDC_STATIC |
| 2 | Static | IDC_STATIC |
| 3 | Date Time Picker | IDC_DATETIMEPICKER1 |
| 4 | Static | IDC_STATIC1 |
| 5 | Static | IDC_STATIC |
| 6 | Date Time Picker | IDC_DATETIMEPICKER2 |
| 7 | Static | IDC_STATIC2 |
| 8 | Static | IDC_STATIC |
| 9 | Date Time Picker | IDC_DATETIMEPICKER3 |
| 10 | Static | IDC_STATIC3 |
| 11 | Static | IDC_STATIC |
| 12 | Date Time Picker | IDC_DATETIMEPICKER4 |
| 13 | Static | IDC_STATIC4 |
| 14 | Static | IDC_STATIC |
| 15 | Month Calendar | IDC_MONTHCALENDAR |
| 16 | Static | IDC_STATIC5 |
| 17 | Group Box | IDC_STATIC |
| 18 | Static | IDC_STATIC |
| 19 | IP Address | IDC_IPADDRESS1 |
| 20 | Static | IDC_STATIC6 |
| 21 | Group Box | IDC_STATIC |
| 22 | Static | IDC_STATIC |
| 23 | Extended Combo Box | IDC_COMBOBOXEX1 |
| 24 | Static | IDC_STATIC7 |
| 25 | Static | IDC_STATIC |
| 26 | Extended Combo Box | IDC_COMBOBOXEX2 |
| 27 | Static | IDC_STATIC8 |
| 28 | Pushbutton | IDOK |
| 29 | Pushbutton | IDCANCEL |
The following figure shows each control and its appropriate tab order.
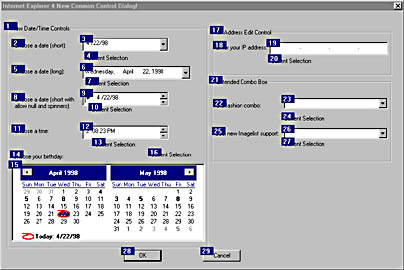
Until we set some properties, your dialog will not look exactly like the one in Figure 9-1.

| Control ID | Data Member | Type |
| IDC_DATETIMEPICKER1 | m_MonthCal1 | CDateTimeCtrl |
| IDC_DATETIMEPICKER2 | m_MonthCal2 | CDateTimeCtrl |
| IDC_DATETIMEPICKER3 | m_MonthCal3 | CDateTimeCtrl |
| IDC_DATETIMEPICKER4 | m_MonthCal4 | CDateTimeCtrl |
| vIDC_IPADDRESS1 | m_ptrIPCtrl | CIPAddressCtrl |
| IDC_MONTHCALENDAR1 | m_MonthCal5 | CMonthCalCtrl |
| IDC_STATIC1 | m_strDate1 | CString |
| IDC_STATIC2 | m_strDate2 | CString |
| IDC_STATIC3 | m_strDate3 | CString |
| IDC_STATIC4 | m_strDate4 | CString |
| IDC_STATIC5 | m_strDate5 | CString |
| IDC_STATIC6 | m_strIPValue | CString |
| IDC_STATIC7 | m_strComboEx1 | CString |
| IDC_STATIC8 | m_strComboEx2 | CString |
Next add the following code to the handler for Datetimepicker1 created by ClassWizard:
void CDialog1::OnDatetimechangeDatetimepicker1(NMHDR* pNMHDR, LRESULT* pResult) { CTime ct; m_MonthCal1.GetTime(ct); m_strDate1.Format(_T("%02d/%02d/%2d"), ct.GetMonth(),ct.GetDay(),ct.GetYear()); UpdateData(FALSE); *pResult = 0; } This code uses the m_MonthCal1 data member that maps to the first date time picker to retrieve the time into the CTime object variable ct. It then calls the CString::Format member function to set the companion static string. Finally the call to UpdateData(FALSE) triggers MFC's DDX and causes the static to be automatically updated to m_strDate1.
void CDialog1::OnDatetimechangeDatetimepicker2(NMHDR* pNMHDR, LRESULT* pResult) { CTime ct; m_MonthCal2.GetTime(ct); m_strDate2.Format(_T("%02d/%02d/%2d"), ct.GetMonth(),ct.GetDay(),ct.GetYear()); UpdateData(FALSE); *pResult = 0; } void CDialog1::OnDatetimechangeDatetimepicker3(NMHDR* pNMHDR, LRESULT* pResult) { //NOTE: this one can be null! CTime ct; int nRetVal = m_MonthCal3.GetTime(ct); if (nRetVal) //If not zero, it's null; and if it is, // do the right thing. { m_strDate3 = "NO DATE SPECIFIED!!"; } else { m_strDate3.Format(_T("%02d/%02d/%2d"),ct.GetMonth(), ct.GetDay(),ct.GetYear()); } UpdateData(FALSE); *pResult = 0; }
void CDialog1::OnDatetimechangeDatetimepicker4(NMHDR* pNMHDR, LRESULT* pResult) { CTime ct; m_MonthCal4.GetTime(ct); m_strDate4.Format(_T("%02d:%02d:%2d"), ct.GetHour(),ct.GetMinute(),ct.GetSecond()); UpdateData(FALSE); *pResult = 0; } 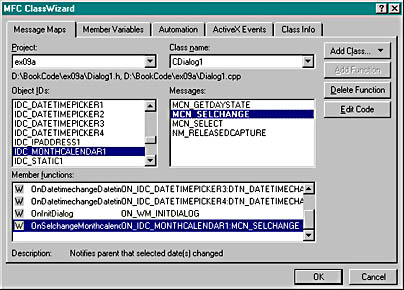
In addition to the different message handler, this control uses GetCurSel as the date time picker instead of GetTime. The code below shows the MCN_SELCHANGE handler for the month calendar control.
void CDialog1::OnSelchangeMonthcalendar1(NMHDR* pNMHDR, LRESULT* pResult) { CTime ct; m_MonthCal5.GetCurSel(ct); m_strDate5.Format(_T("%02d/%02d/%2d"), ct.GetMonth(),ct.GetDay(),ct.GetYear()); UpdateData(FALSE); *pResult = 0; } m_ptrIPCtrl.SetAddress(0L);
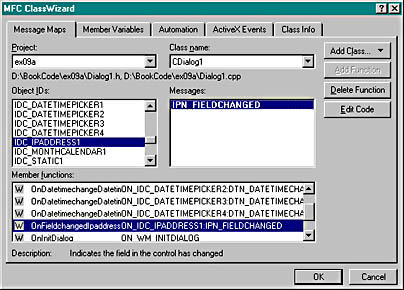
Now we need to add a handler to update the companion static control whenever the IP address control changes. First we need to add a handler for the IPN_FIELDCHANGED notification message using ClassWizard, as shown here.
Next we need to implement the handler as follows:
void CDialog1::OnFieldchangedIpaddress1(NMHDR* pNMHDR, LRESULT* pResult) { DWORD dwIPAddress; m_ptrIPCtrl.GetAddress(dwIPAddress); m_strIPValue.Format("%d.%d.%d.%d %x.%x.%x.%x", HIBYTE(HIWORD(dwIPAddress)), LOBYTE(HIWORD(dwIPAddress)), HIBYTE(LOWORD(dwIPAddress)), LOBYTE(LOWORD(dwIPAddress)), HIBYTE(HIWORD(dwIPAddress)), LOBYTE(HIWORD(dwIPAddress)), HIBYTE(LOWORD(dwIPAddress)), LOBYTE(LOWORD(dwIPAddress))); UpdateData(FALSE); *pResult = 0; } The first call to CIPAddressCtrl::GetAddress retrieves the current IP address into the local dwIPAddress DWORD variable. Next we make a fairly complex call to CString::Format to deconstruct the DWORD into the various fields. This call uses the LOWORD macro to first get to the bottom word of the DWORD and the HIBYTE/LOBYTE macros to further deconstruct the fields in order from field 0 to field 3.
void CDialog1::OnSelchangeComboboxex1() { COMBOBOXEXITEM cbi; CString str ("dummy_string"); CComboBoxEx * pCombo = (CComboBoxEx *)GetDlgItem(IDC_COMBOBOXEX1); int nSel = pCombo->GetCurSel(); cbi.iItem = nSel; cbi.pszText = (LPTSTR)(LPCTSTR)str; cbi.mask = CBEIF_TEXT; cbi.cchTextMax = str.GetLength(); pCombo->GetItem(&cbi); SetDlgItemText(IDC_STATIC7,str); return; } The first thing you probably noticed is the use of the COMBOBOXEXITEM structure for the extended combo box instead of the plain integers used for items in an older combo box. Once the handler retrieves the item, it extracts the string and calls SetDlgItemText to update the companion static control.

Of course, you are free to grab these images from the companion CD instead of recreating them all by hand, or you can choose to use any bitmaps and icons.
There are two ways to add our graphics to an extended combo box. The first method is to attach images to existing combo box items. (Remember that we used the dialog editor to add the Tweety, Mack, and Jaws items to the combo box.) The second method is to add new items and specify their corresponding images at the time of addition.
Before we start adding graphics to the extended combo box, let's create a public CImageList data member in the CDialog1 class named m_imageList. Be sure you add the data member to the header file (Dialog1.h) for the class.
Now we can add some of the bitmap images to the image list and then "attach" the images to the three items already in the extended combo box. Add the following code to your CDialog1's OnInitDialog method to achieve this:
//Initialize the IDC_COMBOBOXEX2 CComboBoxEx* pCombo = (CComboBoxEx*) GetDlgItem(IDC_COMBOBOXEX2); //First let's add images to the items there. //We have six images in bitmaps to match to our strings: //CImageList * pImageList = new CImageList(); m_imageList.Create(32,16,ILC_MASK,12,4); CBitmap bitmap; bitmap.LoadBitmap(IDB_BMBIRD); m_imageList.Add(&bitmap, (COLORREF)0xFFFFFF); bitmap.DeleteObject(); bitmap.LoadBitmap(IDB_BMBIRDSELECTED); m_imageList.Add(&bitmap, (COLORREF)0xFFFFFF); bitmap.DeleteObject(); bitmap.LoadBitmap(IDB_BMDOG); m_imageList.Add(&bitmap, (COLORREF)0xFFFFFF); bitmap.DeleteObject(); bitmap.LoadBitmap(IDB_BMDOGSELECTED); m_imageList.Add(&bitmap, (COLORREF)0xFFFFFF); bitmap.DeleteObject(); bitmap.LoadBitmap(IDB_BMFISH); m_imageList.Add(&bitmap, (COLORREF)0xFFFFFF); bitmap.DeleteObject(); bitmap.LoadBitmap(IDB_BMFISHSELECTED); m_imageList.Add(&bitmap, (COLORREF)0xFFFFFF); bitmap.DeleteObject(); //Set the imagelist pCombo->SetImageList(&m_imageList); //Now attach the images to the items in the list. COMBOBOXEXITEM cbi; cbi.mask = CBEIF_IMAGE|CBEIF_SELECTEDIMAGE|CBEIF_INDENT; CString strTemp; int nBitmapCount = 0; for (int nCount = 0;nCount < 3;nCount++) { cbi.iItem = nCount; cbi.pszText = (LPTSTR)(LPCTSTR)strTemp; cbi.cchTextMax = 256; pCombo->GetItem(&cbi); cbi.iImage = nBitmapCount++; cbi.iSelectedImage = nBitmapCount++; cbi.iIndent = (nCount & 0x03); pCombo->SetItem(&cbi); } First the extended combo box initialization code creates a pointer to the control using GetDlgItem. Next it calls Create to create memory for the images to be added and to initialize the image list. The next series of calls loads each bitmap, adds them to the image list, and then deletes the resource allocated in the load.
CComboBoxEx::SetImageList is called to associate the m_imageList with the extended combo box. Next a COMBOBOXEXITEM structure is initialized with a mask, and then the for loop iterates from 0 through 2, setting the selected and unselected images with each pass through the loop. The variable nBitmapCount increments through the image list to ensure that the correct image ID is put into the COMBOBOXEXITEM structure. The for loop makes a call to CComboBoxEx::GetItem to retrieve the COMBOBOXEXITEM structure for each item in the extended combo box. Then the loop sets up the images for the list item and finally calls CComboBoxEx::SetItem to put the modified COMBOBOXEXITEM structure back into the extended combo box and complete the association of images with the existing items in the list.
HICON hIcon[8]; int n; //Now let's insert some color icons hIcon[0] = AfxGetApp()->LoadIcon(IDI_WHITE); hIcon[1] = AfxGetApp()->LoadIcon(IDI_BLACK); hIcon[2] = AfxGetApp()->LoadIcon(IDI_RED); hIcon[3] = AfxGetApp()->LoadIcon(IDI_BLUE); hIcon[4] = AfxGetApp()->LoadIcon(IDI_YELLOW); hIcon[5] = AfxGetApp()->LoadIcon(IDI_CYAN); hIcon[6] = AfxGetApp()->LoadIcon(IDI_PURPLE); hIcon[7] = AfxGetApp()->LoadIcon(IDI_GREEN); for (n = 0; n < 8; n++) { m_imageList.Add(hIcon[n]); } static char* color[] = {"white", "black", "red", "blue", "yellow", "cyan", "purple", "green"}; cbi.mask = CBEIF_IMAGE|CBEIF_TEXT|CBEIF_OVERLAY| CBEIF_SELECTEDIMAGE; for (n = 0; n < 8; n++) { cbi.iItem = n; cbi.pszText = color[n]; cbi.iImage = n+6; //6 is the offset into the image list from cbi.iSelectedImage = n+6; // the first six items we added... cbi.iOverlay = n+6; int nItem = pCombo->InsertItem(&cbi); ASSERT(nItem == n); } The addition of the icons above is similar to the EX06B list control example in Chapter 6. The for loop fills out the COMBOBOXEXITEM structure and then calls CComboBoxEx::InsertItem with each item to add it to the list.
void CDialog1::OnSelchangeComboboxex2() { COMBOBOXEXITEM cbi; CString str ("dummy_string"); CComboBoxEx * pCombo = (CComboBoxEx *)GetDlgItem(IDC_COMBOBOXEX2); int nSel = pCombo->GetCurSel(); cbi.iItem = nSel; cbi.pszText = (LPTSTR)(LPCTSTR)str; cbi.mask = CBEIF_TEXT; cbi.cchTextMax = str.GetLength(); pCombo->GetItem(&cbi); SetDlgItemText(IDC_STATIC8,str); return; } void CEx09aView::OnDraw(CDC* pDC) { pDC->TextOut(0, 0, "Press the left mouse button here."); } void CEx09aView::OnLButtonDown(UINT nFlags, CPoint point) { CDialog1 dlg; dlg.DoModal(); } Add a statement to include Dialog1.h in file ex09aView.cpp.
EAN: 2147483647
Pages: 331