| A use-case model describes a system's functional requirements in terms of actors and use cases. An actor represents a type of user of the system, or another system that will interact with the system. A use case describes how each actor will interact with the system. Here are 10 steps that are quite usefula "to-do" list to get the use-case model right: - Step 1. Identify actors.
- Step 2. Identify use cases.
- Step 3. Do 1 and 2 again, and see if you need more actors for newly identified use cases, and vice versa.
- Step 4. Write a paragraph describing each actor and a couple of paragraphs about each use case.
- Step 5. Identify key "items" the system handles, and put them in a glossary or domain model. A domain model is a partial business model, showing only important concepts and how they relate to each other (see Figure 15.3).
- Step 6. Verify that you have steps in one or more use cases that create, maintain, and delete each of the "items" your system handles.
- Step 7. Identify the most essential or critical (architecturally significant) use cases (usually about 20 to 30 percent).
- Step 8. Describe the most essential or critical use cases in more detail.
- Step 9. Update the glossary or domain object model, and do lifecycle analysis of important concepts.
- Step 10. Structure your use-case model.
The next section, Describe Requirements "Mile-Wide, Inch-Deep," details steps 17; the section Detail Actors and Use Cases details step 8; and the section Fine-Tune Your Model details steps 9 and 10. Describe Requirements "Mile-Wide, Inch-Deep" During Inception you need to provide a good understanding of the scope of the system, without going into too much detail. This is what we call a "mile-wide, inch-deep" understanding of the system (something we also talked about in Chapter 6). This is done in parallel with, or slightly after, eliciting stakeholder requests and documenting a Vision. So how do you produce this mile-wide, inch-deep description? For small projects, you get your team, your customer, and maybe other stakeholders together for a brainstorming meeting of a few hours. For larger projects, you may instead do a two-day workshop that includes all key stakeholders: project manager, architect, lead developer, customer, and a couple of analysts. During this session go through steps 17 as follows : - Step 1. Analyze stakeholder requests and features to identify as many actors (remember, actors represent both users and external systems with which the system interacts ) as you can. Make sure that the actors represent roles, not titles or individual people. Any single person can typically play several roles, and many individuals may have the same role. Write a one- sentence description of actors as you find them. Do not spend too much time on this step; you will revisit this step many times.
- Step 2. For each actor, capture interactions with and usage of the system in the form of use cases. A use case is a service, or a sequence of actions, that has a measurable value to the actor. It should be meaningful by itself. Write a one-sentence description of use cases as you find them.
- Step 3. For each of the use cases, determine whether it requires interaction with other users or systems. This can be done by verbally walking through what happens when you execute the use case. In this way, you can find additional actors. Continue to go back and forth between finding actors and use cases until you feel the model has stabilized. You will most likely identify 80 percent of the actors and use cases in the first 20 percent of the time you spend. Therefore, you may want to cut the discovery period short when the rate of discovery slows down. You will revisit this model later.
Your results will probably look similar to Figure 15.4. - Step 4. Write a paragraph describing each actor and a couple of paragraphs about each use case . This can be done as a break-out session, where each person in the workshop is given two hours to describe, let's say, one actor and two to three use cases. Reassemble the group and review all descriptions. At this point you typically observe an interesting phenomenon : Although everyone agrees on the use-case names , they have their own interpretation of what the use case entails; now that there are actual detailed descriptions, the different interpretations are clear. As a result, you can usually come up with a few more use cases to cover all the functionality needed.
- Step 5. Create a Glossary containing the key "items" the application deals with. For example, for an insurance application define things such as claims, different types of policies, and so on. Also add common terminology that is used in the domain and with which the team or stakeholders may not be familiar. This glossary should help the participants to agree on a common terminology, as this is often a cause of miscommunication and misunderstanding. For many systems, it can be quite useful to graphically depict how one concept relates to other concepts. This can be done by modeling important concepts in a domain model (see Figure 15.3). A domain model allows you to capture a richer set of information about a concept such as how it relates to other concepts, allowing you to answer questions such as, "What type of policies exist, and how are they related to each other?", "Can a policy owner have any number of policies?", and "Must a claim be associated with a policy?" You can also use a domain model to give everybody an understanding of what key information is typically captured for a policy. Especially for complex systems, some formalism around essential concepts greatly hastens definition of requirements. Note that it is sometimes useful to do this step before step 1.
- Step 6. Review the glossary or domain model and make sure there are use cases describing how each of the key "items" is created, maintained , and deleted. Do you have a use case that describes how to set up a policy? How to make changes to a policy? How to cancel a policy? You get the point. This is a great way of discovering holes in your use-case model.
- Step 7. At this stage, you need to identify the most essential or critical use cases (up to 20 percent of the total). For some systems, you may have one or two use cases that capture the essence of the system, and most of the remaining use cases are there just to support them. If this is the case, you would identify a smaller percentage of use cases to be essential or critical. This activity is typically led by the architect, but analysts also need to participate (see the section Objective 2: Identify Key System Functionality, in Chapter 6, for more details on this).
Figure 15.4. System Overview: Actors and Use Cases. During a brainstorming meeting or use-case workshop, capture (on a whiteboard) the user groups and systems (actors) that will interact with your system, and the services (use cases) your system will provide to those actors. 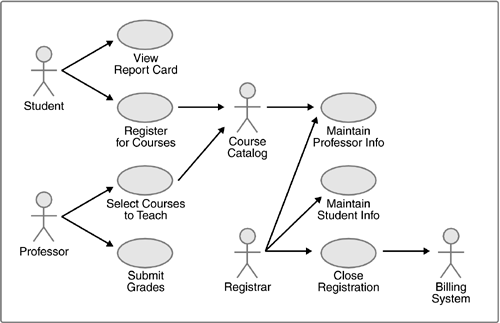 Detail Actors and Use Cases - Step 8. Perform this step during Inception for the most essential and critical use cases. Most of this activity is, however, performed during Elaboration, where you finalize the use cases described in Inception, as well as detail almost all other use cases. You may also detail and finalize a smaller set of use cases first in Construction (see the section Describe the Remaining Use Cases and Other Requirements, in Chapter 8, for more information).
It is essential to understand that a use case contains many scenarios. As an example, the use case Transfer Balance may allow you to transfer a balance from a Checking, Savings, or Broker Account to a Checking, Savings, or Broker Account. So there are nine different transfer combinations. Each one of these nine transfers can have any number of outcomes , including Successful or Insufficient Funds. Also, there may be a series of error conditions, such as Connection to Server Not Available, and alternative flows of events, such as Receiving Account in Other Bank ( potentially allowing the user to launch a Wire Transfer use case).
It usually takes just a few hours to produce a good draft of the most essential and typical use-case scenarios. For most systems, such a draft is one to two pages long. It generally takes considerably longer to complete the use case by detailing all scenarios within the use case. Detailed use cases are typically two to six pages long, but they can be much longer for systems with complex sequencing, such as telecom systems, or they can be shorter when there is limited sequencing and few business rules to be applied, such as viewing, but not updating, a limited set of information. For smaller projects, where you have the same person doing analysis and design of the use case, or projects building applications where maintenance is not considered a major issue, you may consider not documenting all possible scenarios to save time.
Guidelines for Detailing Use Cases Here are some guidelines that you may find useful when detailing a use case: -
Identify the steps in the flow of events (see Figure 15.5) for the most common scenario of the use case, referred to as the basic flow of events or the "Happy Day" scenariothis is a scenario where everything goes as expected. In the earlier example, that could be Transfer Balance from a Checking to a Savings Account when there are sufficient funds. Figure 15.5. Structuring of Flows of Events. The typical structure of a flow of events: The straight arrow represents the basic flow of events, and the curves represent alternative paths relative to "normal." Some alternative paths return to the basic flow of events, while others end the use case. A scenario is a combination of main and alternate flows from start to finish through a use case. 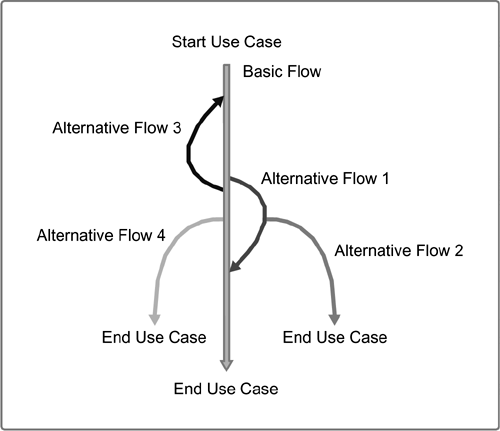 -
Describe each of the steps for that scenario. -
For each of these steps, identify all the things that could go wrong, or all exceptions from the Happy Day scenario. Document these alternative flows of events as If XX, then YY, structured as sub-bullets under their respective steps. -
Continue to describe each alternative flow of events in detail. If the alternative flow of events becomes longer than a paragraph, place it in a separate section toward the end of the use-case description, and reference it from the step where it previously was described. This restructuring makes it easier to distinguish the Happy Day scenario, since the use-case description would otherwise be chopped into too many long parallel flows. -
If you have a lot of business rules, define these business rules outside the use case, as you do for the glossary. If you are using Rational tools, you can, for example, create a requirements type called Business Rule. Within your use-case description, reference in each section the business rules that should be applied. This way of handling business rules is especially good if the same business rules are referenced from many different use cases. -
Add pre- and postconditions; that is, clarify how the use case starts and ends. A precondition is the state of the system that is required before the use case can be started. A postcondition is the state the system can be in after the use case has ended. [4] [4] See Bittner 2003 and Cockburn 2001. It should be noted that for many systems, use-case descriptions should be complemented with a user-interface prototype (see the section Develop User-Interface Prototypes, below). Another important warning is now due: Always keep "the Spirit of the RUP" in mind, especially "Stay focused on executable software" (see Chapter 2). It is easy to become too focused on perfecting the requirements, and we have seen many projects go under because the focus has turned to academic discussions on how to document requirements, rather than on documenting the requirements well enough to enable successful implementation and testing of the system. As an analyst, you should also work closely with the developer designing and implemeting the use case (it may even be the same person taking on both roles). Work hand-in-hand with this person to understand whether the requirements can be optimized. We discuss this in the section Describe the Remaining Use Cases and Other Requirements, in Chapter 8. |