The Abstract Windowing Toolkit
The AWT is a set of Java classes that allow you to develop user interfaces in a Windows environment. If you use the AWT to develop your interfaces, your application can work on any machine that supports Java, such as UNIX workstations, Windows NT computers, or Macintosh computers. You can use the versatile AWT to develop complete applications, as well as simple pop-ups that are triggered from an applet in an Internet browser.
Through the AWT you can set up your interface to accept input from either a keyboard or a pointing device such as a mouse. You can set up text input fields, menus, buttons, scroll bars, and more. The AWT has three basic parts: components, containers, and layout managers.
| Note | This chapter focuses on developing a simple user interface; it does not cover all aspects of the AWT. |
Components are simply items, such as buttons, input fields, labels, and menus, that can be used in a user interface. Containers are special components that contain other components. Layout managers are objects that control the arrangement of components in a container
Setting Up the Sample Programs
In this chapter you will be using small pieces of Java code to learn about various aspects of the AWT. The easiest way for you to set up these examples and test them is through applets. Applets are discussed in detail in Chapter 10, 'Java Beans, ActiveX, Applets, and the Internet;' all you need to know for now is that an applet allows you to run a piece of Java within a Web browser. To enter and run the examples on the next several pages, you need to set up a small HTML file, which you can create with any standard text editor (like Windows Notepad). First create a new directory on your computer and then create the following file (call it awt_test.html). As you work through this chapter, make sure that the Class file (generated by your Java compiler) is located in the same directory as your HTML file.
<!-Test HTML page for AWT functions -> <html> <head> <title>Test Page for AWT Applets</title> </head> <body> <applet code="AwtTest.class"> Java not supported with this browser </applet> </body> </html>
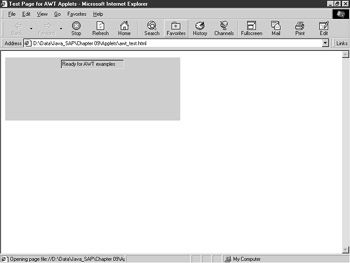
To test this file before you get into the AWT examples, type in the following Java applet, compile it, bring up a browser, and point it toward the awt_test.html page. Your results should look like those in Figure 9.1. If you have any problems setting up this applet, refer to either Chapter 5, 'A Simple Material Report Example,' which walks you screen by screen through the process, or Chapter 10, 'Java Beans, ActiveX, Applets, and the Internet,' which discusses applets in more detail.
import java.awt.*; import java.applet.*; public class AwtTest extends Applet { TextField text; public void init() { text = new TextField(); text.setEditable(false); text.setText("Ready for AWT examples"); add(text); } }
Basic AWT Components
AWT components consist of objects like buttons, check boxes, text fields, and menu items.
Buttons
Buttons are simple components that generate events when clicked; they are created through the Button class. A few common methods are used for the Button class.
-
setEnabled(Boolean). Calling this method enables the button if the argument is true or disables it if the argument is set to false.
-
setlabel(String). Sets the text on the button.
-
getlabel(). Retrieves the text that is on the button.
-
addActionListener(ActionListener). This method registers the button so that if it is clicked, the ActionListener specified is called. The ActionListener is usually ActionPerformed(), as shown in the next example.
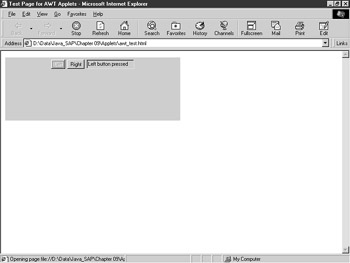
The following Java applet demonstrates the use of buttons by creating a screen with two buttons. Initially, one of the buttons is active; if the user clicks on this button, it becomes disabled and activates the other button (see Figure 9.2).
| Note | The 'Handling Events' section later in this chapter describes how the ActionListener and other interfaces work. Concentrate on the button declaration and method calls in this example. |
import java.awt.event.*; import java.awt.*; import java.applet.*; // Extend the Applet class & implement the Actionlistener public class AwtTest extends Applet implements ActionListener { // Declare 2 Button Class References Button b1,b2; // Declare reference to TextField Class TextField text; // Setup the Applet Init method to display buttons public void init() {// Point the references to New objects b1 = new Button(); b2 = new Button(); text = new TextField(); // Set up the initial values b1.setEnabled(false); b1.setLabel("Left"); b1.addActionListener(this); b2.setEnabled(true); b2.setLabel("Right"); b2.addActionListener(this); text.setEditable(false); text.setText("Click Right Button"); // Add the components to the Applet Container add(b1); add(b2); add(text); } // Define the Action Event which will be called each time // a user clicks one of the buttons public void actionPerformed(ActionEvent event) { Object target = event.getSource(); if (target == b1) { b1.setEnabled(false); b2.setEnabled(true); text.setText("Left button pressed"); } if (target == b2) { b1.setEnabled(true); b2.setEnabled(false); text.setText("Right button pressed"); } } }
Check Boxes
Check boxes usually allow the user to turn options on and off. Though the user can trigger code by toggling the check box, having them do so should not be the norm. The goal here is to put the check box on the screen and read the value from it when the user presses a button.
Check boxes can also be grouped together so that only one check box in the group can be marked at any one time. This approach basically gives you a group of radio buttons.
The following methods are used most often with the Checkbox class:
-
setLabel(string). Sets up the text that will be positioned beside the check box.
-
setState(boolean). Deselects the check box if the Boolean expression false is passed in; selects the check box if the expression true is passed in.

Check boxes can be grouped together by passing a reference from the class CheckboxGroup to the constructor of the Checkbox class. In the following example, four check boxes are defined: two that are grouped and two that are not grouped. The check boxes are labeled 1 through 4, and the text box on the screen shows the sum of the labels for the marked check boxes. A working example is shown in Figure 9.3.
import java.awt.event.*; import java.awt.*; import java.applet.*; public class AwtTest extends Applet implements ActionListener { // Declare 4 Checkbox Class References and a CheckboxGroup Reference Checkbox chk1, chk2, chk3, chk4; CheckboxGroup chkgrp; Button b1;// Declare reference to TextField Class TextField text; // Setup the Applet Init method to display checkboxes public void init() { // Point the references to New objects chkgrp = new CheckboxGroup(); chk1 = new Checkbox(); chk1.setLabel("1"); chk2 = new Checkbox("2"); // Label set through Constructor chk3 = new Checkbox("3",chkgrp,false); chk4 = new Checkbox("4",chkgrp,true); text = new TextField(); b1 = new Button("Result"); // Set up the initial values text.setEditable(false); text.setText("4"); b1.addActionListener(this); // Add the components to the Applet Container add(chk1); add(chk2); add(chk3); add(chk4); add(b1); add(text); } // Define the Action Event which will be called each time // a user clicks one of the buttons public void actionPerformed(ActionEvent event) { int result; Object target = event.getSource(); if (target == b1) { result = 0; if (chk1.getState() == true) result += 1; if (chk2.getState() == true) result += 2; if (chk3.getState() == true) result += 3; if (chk4.getState() == true) result += 4; text.setText(String.valueOf(result)); } } }
Labels and Text Fields
Nearly all Java applications need to place text on the screen and allow the users to type in input. The most common classes used for this purpose are Label, TextField, and TextArea. Labels place static text on the window, TextFields create single line input fields, and TextAreas create multiple line text input boxes.
The Label class has only one commonly used method (other than the align- ment method, which is covered a little later in this chapter). That method, Label.SetText(String), sets the text that you want to display.
TextField and TextArea share many methods because they are both subclasses of TextComponent.
-
setText(String). Inserts the value of String into the input field.
-
setEditable(Boolean). Makes the field noneditable if false is passed in; opens the field for user input if true is passed in.
-
getText(). Returns the current string in the input field.
The following methods are specific to the TextArea class:
-
appendText(String). Appends text to the current text in the TextArea field.
-
getRows(). Returns the number of rows currently used in the TextArea field.
-
getCols(). Returns the number of columns currently declared in the TextArea field.
-
replaceText(String). Replaces the current contents of the TextArea field with the value in String.
-
insertText(String, position). Inserts the String at the specified position in the TextArea field.
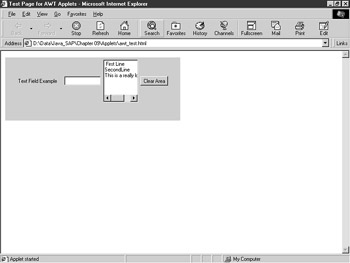
The following example has all three text classes, along with a few buttons to control the entry of text; an example is shown in Figure 9.4.
| Note | Take note of how the constructors are used for the TextField and TextArea classes in this example. Previous examples used empty parentheses ( b1 = new Button(); ), but this example begins to use parameters. The number and type of parameters determine which constructor is called. For example, the TextField constructor can be called in the following ways: |
| Note | The examples in this book use the most common forms of the constructors; you can refer to the online help in your Java compiler to see and get information about less common, more specific constructors. |
import java.awt.event.*; import java.awt.*; import java.applet.*; public class AwtTest extends Applet implements ActionListener { // Declare References to Class Objects TextField txt; TextArea txta; Label lab1; Button b1; // This is the initialization routine for the Applet public void init() { // Setup the Object's initial values b1 = new Button("Clear Area"); b1.addActionListener(this); txt = new TextField(); txt.setColumns(10); txt.addActionListener(this); lab1 = new Label("Text Field Example"); txta = new TextArea(6,10); add(lab1); add(txt); add(txta); add(b1); } // This method will handle the events from the text box // and the button public void actionPerformed(ActionEvent event) { Object target = event.getSource(); // If the button is pressed clear the text area if (target == b1) { txta.setText(" "); } // If the user presses enter in the textfield move the // contents to the text area plus a newline character if (target == txt) { txta.append(txt.getText() + "\n"); txt.setText(""); } } }
Choice and List Classes
The Choice class is somewhat like a text field, except that it offers the user a limited number of choices of field entries. The Choice class is similar to the F4 functionality in SAP and Select elements in HTML. The difference between the Choice class and List class is that the Choice class is displayed on one line; to see the possible selections, a user must click on a down arrow. In the List class, all choices are shown on multiple lines. If there are more choices than the size of the object, a vertical scroll bar is used for navigation.
The most commonly used methods for the Choice class are as follows:
-
addItem(String). Adds the string to the choice.
-
getSelectedItem(). Returns the string selected by the user.
-
getSelectedIndex(). Returns an integer that points to the row the user has selected.
-
countItems(). Returns the number of items in the choice.
-
select(String or Integer). Selects the choice specified by String or row.
List boxes have many of the same methods as the Choice class, but also allow you to have multiple selections and to manipulate the list by deleting items and determining which items to show.
-
delItem(Integer). Deletes the indicated row.
-
getSelectedIndexes(). Returns an array containing the indexes of the selected items.
-
setsMultipleSelections(Boolean). Determines whether the user can select multiple items.
-
makeVisible(Integer). Forces the indicated row to be visible.
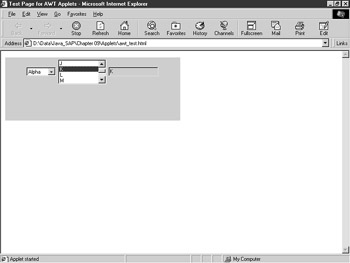
The following example demonstrates these two classes (see Figure 9.5).
// Example for Choice and List Classes import java.awt.event.*; import java.awt.*; import java.applet.*; public class AwtTest extends Applet implements ItemListener { // Declare Class References Choice ch1; List list; TextField text; // Initialization Routine for Applet public void init() { // Instantiate the class references ch1 = new Choice(); list = new List(); text = new TextField(15); // Set up the initial values for the objects ch1.add("Numeric"); ch1.add("Alpha"); ch1.addItemListener(this); list.addItemListener(this); text.setEditable(false); ch1.select("Numeric"); for(int i = 1; i < 10; ++i) list.addItem(String.valueOf(i)); // Add the items to the Applet Container add(ch1); add(list); add(text); } public void itemStateChanged(ItemEvent event) { Object target = event.getSource(); if (target == list) { text.setText(list.getSelectedItem()); } if (target == ch1) { list.removeAll(); if (ch1.getSelectedItem() == "Numeric") { for(int i = 1; i < 10; ++i) list.addItem(String.valueOf(i)); } else { for(int i = 65; i< 91; ++i) list.addItem(String.valueOf((char)i)); } } } }
This example completes the basic components that allow you to make simple interfaces for your users. We'll defer discussion of one more component, the Menu class, until you know a bit more about containers.
Basic AWT Containers
A container is simply an object that can hold components of the AWT. Containers are objects themselves, and thus containers can hold other containers. An applet is a good example of a container, as it usually contains other objects, such as text fields and radio buttons. The two basic types of containers are Panel and Window, both of which are subclasses of the Container class. Because they are subclasses of Container, they share methods that are defined to the Container class. The most often used Container methods follow.
-
add(). Adds a component to a container.
-
remove(). Removes a component from a container.
-
dispose(). Removes all components from a container.
Also remember that if a container is deleted, all of the components within that container are deleted as well. This is an important point, especially when you start to group containers within one another on more complex windows.
Panel
A panel is a general-purpose container; the Applet class is a subclass of the Panel class. The Constructor method for a panel can be called with no arguments or with a layout manager as the argument (layout managers are covered in the 'Basic AWT Layout' section later in this chapter).
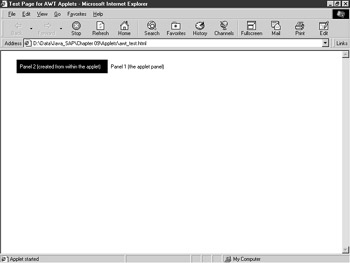
A simple example of multiple panels follows (see Figure 9.6).
// Example for AWT import java.awt.*; import java.applet.*; public class AwtTest extends Applet { // Declare Class References Panel p1; Label l1,l2; // Initialization Routine for Applet public void init() { // Instantiate the class references p1 = new Panel(); l1 = new Label("Panel 1 (the applet panel)"); l2 = new Label("Panel 2 (created from within the applet)"); this.setBackground(Color.white); // background for applet p1.setBackground(Color.black); p1.setForeground(Color.white); // Add the panels to the Applet Object add(p1); add(l1); p1.add(l2); // Add 2nd label to panel } }
Window
The Window class can be broken down into two more subclasses, Dialog and Frame. The Frame class allows you to build a window with most of the features of a standard window that are available in your operating system. These features include window titles, menu bars, and minimize and close functions. Dialogs are like frames except that they are more limited in function and are dependent on other windows.
Frame
The Frame class allows you to build windows that are independent of the calling program. Because Frame is a subclass of Window, which is a subclass of Container, which is a subclass of Component, you can use many of the functions that you have already seen, such as the add() method.
Frames can be created by using either Frame() or Frame(String), where string is the title of the frame. When you initially create a frame, it is invisible and you need to call a method to make the frame appear or to hide it again later. The most commonly used methods for the Frame class are as follows:
-
add(). Adds components to the frame.
-
pack(). Resizes the frame to the smallest size that allows all the components to be visible. In another method, called resize(), the arguments are in pixels, which means that the screen's appearance is different on different machines.
-
show(). Makes the frame visible.
-
hide(). Hides a currently visible frame.
-
dispose(). Destroys the frame and sets it up for garbage collection.
The following is a simple example of a frame, called by an applet with a few buttons on it, as shown in Figure 9.7.
// Example for AWT import java.awt.event.*; import java.awt.*; import java.applet.*; public class AwtTest extends Applet implements ActionListener { // Declare Class References Frame win1; Button b1,b2; // Buttons on Applet // Initialization Routine for Applet public void init() { // Instantiate the class references b1 = new Button("Show Frame1"); b2 = new Button("Hide Frame1"); // Initialize some of the stuff for the objects b1.addActionListener(this); b2.addActionListener(this); // Add the objects to the applet add(b1); add(b2); win1 = new FrameExample("Test Frame"); }// Setup the code that is executed when an Action is performed public void actionPerformed(ActionEvent event) { Object target = event.getSource(); if (target == b1 && !win1.isShowing()) { win1.setVisible(true); b1.setEnabled(false); b2.setEnabled(true); } if (target == b2 && win1.isShowing()) { win1.setVisible(false); b1.setEnabled(true); b2.setEnabled(false); } } } import java.awt.event.*; import java.awt.*; public class FrameExample extends Frame implements ActionListener { // Object Declaration Button b1; WindowListener wl; // Constructor for FrameExample FrameExample(String title) { super(title); // This calls the superclass's constructor b1 = new Button("Resize"); b1.addActionListener(this); wl = new WindowAdapter() // This Class is discussed in the Event { // Section of this chapter public void windowClosing(WindowEvent e) { dispose(); } }; addWindowListener(wl); add(b1); setSize(100,100); } // Analysis of Actions public void actionPerformed(ActionEvent event) { Object target = event.getSource(); // If the button is pressed clear the text area if (target == b1) pack(); } }
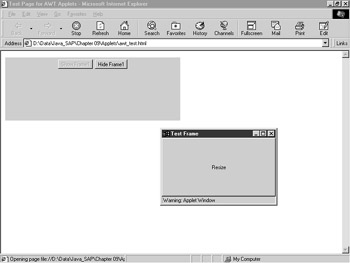
| Note | If you close your browser window after you start the frame, you will see that the frame remains open even after the browser is gone. The ability of frames to stand alone is the fundamental difference between frames and dialog windows. |
Dialog Windows
Through the AWT you can also create dialog windows. Like pop-up dialogs in SAP, a dialog window is called up by another window, and if the source window is destroyed, the dialog window is destroyed as well. If you decide to minimize the parent window, then the child window is minimized as well. You usually use dialog windows to tell users about events or to prompt users to enter a value before the main window performs an action. With Java you don't need to worry about the code that handles this parent/child relationship between these windows because the AWT takes care of it automatically.
The capability to create dialog windows also allows you to access the FileDialog class, which contains some neat dialogs for selecting files. Many times, though, the system that is executing the Java code prohibits the use of the FileDialog class because it can be a security issue. Another problem with the Dialog class is that no mechanism exists to trigger an applet to start within a dialog window (however, an applet can use the dialogs).
Using dialog windows in your programs is very similar to using frames. The main difference is in the way the constructors are built. The examples in Figures 9.7 and 9.8 use the same Java code, except that in Figure 9.8 the dialog window replaces the frame. You will notice in the following dialog window example that the dialog is called from within an applet. This process is not as simple as it sounds because you must pass a Frame object to the constructor of the dialog to indicate the dialog's parent window. Because applets are a subclass of the Frame class, you can use the method getParent() to get the Frame object of the applet. You can then cast this object as a type Frame when you make the call to the constructor.
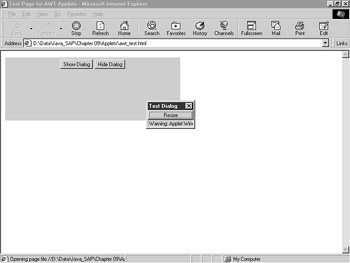
// Example for AWT import java.awt.event.*; import java.awt.*; import java.applet.*; public class AwtTest extends Applet implements ActionListener { // Declare Class References Dialog win1; Button b1,b2; // Buttons on Applet Object appletframe; // Initialization Routine for Applet public void init() { // Instantiate the class references b1 = new Button("Show Dialog"); b2 = new Button("Hide Dialog");// Initialize some of the stuff for the objects b1.addActionListener(this); b2.addActionListener(this); // Get the Frame of the applet appletframe = getParent(); while(!(appletframe instanceof Frame)) appletframe=((Component)appletframe).getParent(); // Add the objects to the applet add(b1); add(b2); win1 = new DialogExample((Frame)appletframe, "Test Dialog", true); } // Setup the code that is executed when an Action is performed public void actionPerformed(ActionEvent event) { Object target = event.getSource(); if (target == b1 && !win1.isShowing()) { win1.setVisible(true); b1.setEnabled(false); b2.setEnabled(true); } if (target == b2 && win1.isShowing()) { win1.setVisible(false); b1.setEnabled(true); b2.setEnabled(false); } } } import java.awt.event.*; import java.awt.*; public class DialogExample extends Dialog implements ActionListener { // Object Declaration Button b1; // Constructor for FrameExample DialogExample(Frame parent,String title,boolean modal) { super(parent, title, modal); // This calls the superclass's constructor b1 = new Button("Resize"); b1.addActionListener(this); add(b1); setSize(100,100); } // Analysis of Actions public void actionPerformed(ActionEvent event) { Object target = event.getSource(); // If the button is pressed set the size of the Dialog if (target == b1) pack(); } } The FileDialog class allows you to program platform-independent code to handle opening and saving files. As mentioned before, this class is often prohibited because it allows the applet to write files to the local system, which can cause a security problem. If your application allows you to use the FileDialog class, it works just like a regular dialog with a few extra methods for setting paths or file name filters. Because many browsers do not allow you to access the FileDialog class, an example is set up as a stand-alone application in Chapter 10.
Menu Items
Menu items are the last of the commonly used components covered in this chapter. Menus are a combination of objects from different classes and are used most often in frames (rather than in dialogs). A standard menu comprises the following classes:
-
MenuItem. An object on a menu.
-
CheckboxMenuItem. A menu object that can have a check mark beside it.
-
Menu. A collection of menu items.
-
MenuBar. A collection of menus.
Because menus are related to windows, you cannot have a menu in an applet. However, if the applet calls up a window, then menus can be implemented there. The following example shows how to set up a simple menu with a few options. Figure 9.9 shows this example in action.
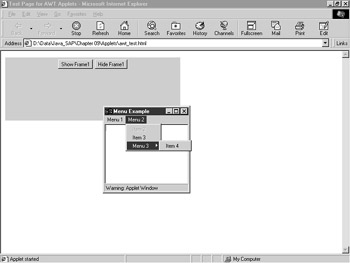
// Example for AWT import java.awt.event.*; import java.awt.*; import java.applet.*; public class Jsap0911 extends Applet implements ActionListener { // Declare Class References Frame win1; Button b1,b2; // Buttons on Applet // Initialization Routine for Applet public void init() { // Instantiate the class references b1 = new Button("Show Frame1"); b2 = new Button("Hide Frame1");// Initialize some of the stuff for the objects b1.addActionListener(this); b2.addActionListener(this); // Add the objects to the applet add(b1); add(b2); win1 = new MenuExample("Menu Example"); } // Setup the code that is executed when an Action is performed public void actionPerformed(ActionEvent event) { Object target = event.getSource(); if (target == b1 && !win1.isShowing()) win1.setVisible(true); if (target == b2 && win1.isShowing()) win1.setVisible(false); } } import java.awt.event.*; import java.awt.*; public class MenuExample extends Frame implements ActionListener { // Object Declaration TextField txt1; WindowListener wl; MenuBar mb; Menu menu1, menu2, menu3; MenuItem item1, item2, item3; CheckboxMenuItem item4; // Constructor for FrameExample MenuExample(String title) { super(title); // This calls the superclass's constructor txt1 = new TextField(20); wl = new WindowAdapter() // This Class is discussed in the Event { // Section of this chapter public void windowClosing(WindowEvent e) { dispose(); } }; addWindowListener(wl); add(txt1); // Build up our simple Window Example mb = new MenuBar(); setMenuBar(mb); // Ties menu to this frame // Menu 1 menu1 = new Menu("Menu 1"); mb.add(menu1); item1 = new MenuItem("Item 1"); item1.addActionListener(this); menu1.add(item1); // Menu 2 menu2 = new Menu("Menu 2"); mb.add(menu2); item2 = new MenuItem("Item 2"); item2.setEnabled(false); menu2.add(item2); item3 = new MenuItem("Item 3"); item3.addActionListener(this); menu2.add(item3); // Menu 3 (a sub menu under menu 2) menu3 = new Menu("Menu 3"); item4 = new CheckboxMenuItem("Item 4"); item4.addActionListener(this); menu3.add(item4); menu3.addActionListener(this); menu2.add(menu3); // Set the initial size of the Apple setSize(200,200); } // Analysis of Actions public void actionPerformed(ActionEvent event) { if(event.getSource() instanceof CheckboxMenuItem) { CheckboxMenuItem citem = (CheckboxMenuItem)event.getSource(); txt1.setText(citem.getLabel() + ":" + citem.getState()); } else if(event.getSource() instanceof MenuItem) { MenuItem item = (MenuItem)event.getSource(); txt1.setText(item.getLabel()); } } }
Basic AWT Layout
So far we have explored building user interfaces by looking at containers-and the components inside them-without really considering the placement of the components on the screen. The layout manager controls the position and size of components within a container. All Java containers have a layout manager, implemented through the LayoutManager interface.
| Note | Another way to position items within a container is to use absolute positioning. This method is not commonly used because it can become platform dependent; most screens can be built by using one of the standard layout managers. |
Java has five standard layout managers; they are described in the sections that follow.
BorderLayout
BorderLayout is the default layout manager of all Window objects. BorderLayout contains five areas to hold components: north, south, east, west, and center. An example of a BorderLayout (see Figure 9.10), along with the sample code, follows.
import java.awt.*; import java.applet.*; public class Applet1 extends Applet { public void init() { setLayout(new BorderLayout()); add("North",new Button("NORTH")); add("South",new Button("SOUTH")); add("East",new Button("EAST")); add("West",new Button("WEST")); add("Center", new Button("CENTER")); } }
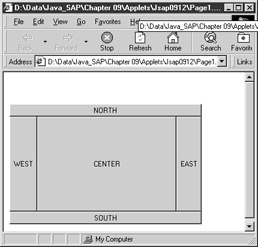
By default there is no gap between components. The outside edge of the border is just large enough to hold its components, and the center of the window takes the rest of the space. You can set both horizontal and vertical gaps between components through the BorderLayout constructor.
CardLayout
The CardLayout layout manager allows you to stack components on top of one another. You can then select the component to display by using one of the following methods: first(), next(), previous(), last(), or show().
FlowLayout
The FlowLayout layout manager is the default manager for panels. The FlowLayout manager works just like sentences in a book. The containers are added in a single row from left to right at their preferred size (if the LEFT alignment is used), as seen in Figure 9.11. When the row is filled, the layout manager creates a new row underneath the current row and continues.

import java.awt.*; import java.applet.*; public class Applet1 extends Applet { public void init() {, setLayout(new FlowLayout(FlowLayout.LEFT)); add(new Button("First")); add(new Button("Second")); add(new Button("Third")); add(new Button("Fourth")); add(new Button("Fifth")); add(new Button("Six")); add(new Button("Seventh")); add(new Button("Eigth")); add(new Button("Ninth")); add(new Button("Tenth")); } } The alignment of components on each row is determined through the constructor of the FlowLayout manager (LEFT, RIGHT, CENTER), as are the horizontal and vertical gaps that determine the space between the components.
GridLayout
With the GridLayout constructor, you specify the number of rows and columns you want, along with optional horizontal and vertical component gaps. The layout manager creates the grid with equal-size cells. If the window is resized, then the manager resizes the cells to get the maximum possible constant cell size. The components are filled from right to left and from top to bottom, as shown in Figure 9.12.
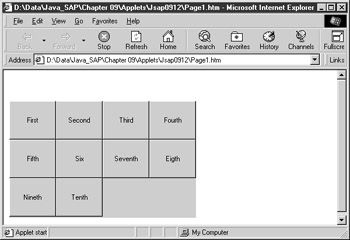
import java.awt.*; import java.applet.*; public class Applet1 extends Applet { public void init() { setLayout(new GridLayout(3,4)); add(new Button("First")); add(new Button("Second")); add(new Button("Third")); add(new Button("Fourth")); add(new Button("Fifth")); add(new Button("Six")); add(new Button("Seventh")); add(new Button("Eigth")); add(new Button("Ninth")); add(new Button("Tenth")); } }
GridBagLayout
The GridBagLayout layout manager is both the most flexible and the most complicated of the layout managers. Like the GridLayout manager, the GridBagLayout places components in rows and columns; however, the size and number of components per row or column can be controlled at the component level.
Because the GridBagLayout method is so complex, it is not discussed in this introductory-level book. If you need more flexibility than the preceding four layout managers can provide, you can try the form generator that comes with most Java compilers.
Common Layout Manager Methods
Every layout manager, whether provided by the AWT or custom written, must have the following five methods defined:
-
addLayoutComponents(String, Component). Called by the container add() method.
-
removeLayoutComponent(Component). Called by the remove() and removeAll() container methods.
-
preferredLayoutSize(Container). Called by the container preferredSize() method.
-
minimumLayoutSize(Container). Called by the container minimumSize() method.
-
layoutContainer(Container). Called the first time a container is drawn and each time that its size changes.
Handling Events
The AWT also provides a common way to handle events. This approach enables you to write platform-dependent event code, which means that if the code is executed on different operating systems, it will work in the same fashion. Event handling is one area in Java that has changed a great deal between versions 1 and 2. Most of the old event-handling methods, such as action(), have been replaced with a concept called event listening. With event listening, you call a method when you want to intercept an event for an object.
Many examples in this chapter created buttons. To find out whether someone has pressed the button, call addActionListener() and pass to it the object to which you want to listen. When the button is pressed, the AWT event handler calls the processAction() method in your code. To gain access to the addActionListener() method, you need to implement the ActionListener interface.
For window events such as WINDOWS_DESTROY, you can set up an event scheme similar to the ActionListener interface mentioned earlier. The interface to use is the WindowListener; however, if you implement this interface, then you have to code all the event processing for WINDOW_CLOSE, WINDOW_ICONIZE, and so on. The menu example earlier in this chapter shows one workaround. The WindowAdapter class is an empty class that allows you to write single functions, for example, a function to handle the WINDOW_CLOSE event.
Other listeners that are available include
-
ComponentListener. Used for processing events related to keystrokes, mouse movement, focus, and other related component events.
-
AdjustmentListener. Used for events pertaining to adjustable objects (such as toolbars).
-
ItemListener. Used for item-specific events, such as check boxes or radio buttons.
| Team-Fly |