Tracking Projects
Many corporate and government environments require employees to keep track of their time. For example, when consulting, I track my time in 15-minute intervals. I once had a job where the employer required accountability down to every 6-minute interval. With today's operating systems, multitasking becomes a blessing and a problem. The good news is that you can do many things at once. The bad news is: tracking billable time on projects can get very confusing when you're multitasking (and double-billing clients is a definite no-no). If the accounting people require you to track your work, then Ubuntu is definitely what you want.
Tracking Time on Projects
There are a variety of packages that enable you to track your time on projects. Some examples include gnotime, gtimer, gtimelog, wmwork, and worklog. Each of these packages allows you to create a project, start and stop a work-time clock, and easily switch between projects. They also allow you set the accumulation interval (from one minute to hourly) and display total time spent summaries.
My personal preference is the Gnotime Time Tracker (sudo apt-get install gnotime). After installing it, you can run the Gnotime Time Tracker from Applications ![]() Office
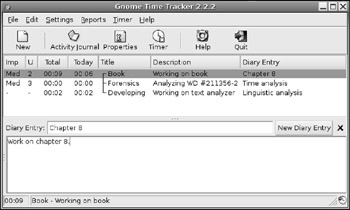
Office ![]() GnoTime Tracking Tool. Besides being able to add projects and diary entries, it allows you to specify billable rates on a per-project basis. You can also mark projects with a priority and urgency. Figure 8-7 shows the main window for gnotime. Simply double-click any task to start the clock. Diary entries can be added to help track what work was being done.
GnoTime Tracking Tool. Besides being able to add projects and diary entries, it allows you to specify billable rates on a per-project basis. You can also mark projects with a priority and urgency. Figure 8-7 shows the main window for gnotime. Simply double-click any task to start the clock. Diary entries can be added to help track what work was being done.

Figure 8-7: The Gnotime Time Tracker
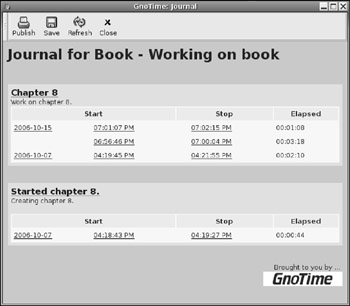
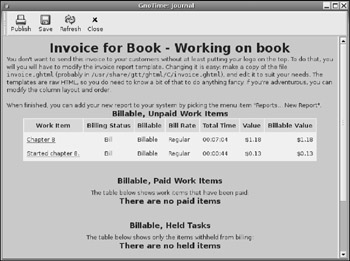
Gnotime can generate a variety of reports including a journal of time spent (see Figure 8-8) and a billing list (see Figure 8-9). Each report includes clickable items with menus so you can add more diaries, annotations, adjust times, change rates, and so on. Reports can be saved as HTML or exported to a web server, FTP site, or e-mailed.

Figure 8-8: The work journal

Figure 8-9: Invoice report showing billable hours. (Wow! $1.18 in just 7 minutes!)
Gnotime isn't perfect. It cannot merge times from multiple people or export to a spreadsheet. However, it is more than enough for tracking the work from a single individual. For group tracking, consider a collaborative project tracking system such as gforge.
Tracking CPU Usage
In some cases, projects need to be tracked by the resources they consume. The two most common billable resources are CPU time and disk space. Unfortunately, there are no nice GUI applications for tracking a project's CPU consumption. Instead, this is done using the time command. This keeps track of the real elapsed time, time spent in user-space, and system time (time spent in the kernel). For example, time bash monitors the command bash (a shell) and every process created by bash. When the shell finally exists, a run-time summary is displayed:
$ time bash # run some commands $ exit real 1m12.428s user 0m0.292s sys 0m0.588s
The example summary shows that the shell was running for a little more than a minute, but most of the time was spent idling-0.588 seconds were spent in the kernel and 0.292 seconds were spent in user-space. If you need to know how long a process was running, preface the command with time. When the process exists, you will know how much time was spent.
| Warning | The time command has trouble monitoring spawned processes. If the program being timed kicks off a CPU intensive process, then time will only see the total duration, not the kernel or user-space times. Also, if a process is separated from its parent (for example, scheduled to run using at) then time will not measure the spawned application. |
Tracking Disk Usage and Quotas
Disk space is much easier to compute. The df command (discussed in Chapter 7) shows you the current disk usage, but this is usually inadequate for billing. Another way to track disk usage is to install the quota package. Enabling quotas is not the easiest system, but the command line tools allow you to specify how much disk space a user can have on a specific file system.
| Note | When using df to determine disk space, be aware that this is only a snapshot. There may have been a time between snapshots when the disk space exceeded the current allotment. |
Although quotas may seem unnecessary for the average home user, they can be very useful for project tracking. Quotas enable you to track disk use, bill by the megabyte, and identify when a project dramatically increases in size. Quotas can also stop runaway processes from filling your hard drive. For example, the default installation for Ubuntu places all files in one partition. If you are running a mail server then you might want to enable quotas for the e-mail system. This prevents a massive e-mail (or flood of small e-mails) from filling your disk.
Understanding Your Limits
Under Ubuntu, the quota system enables you to specify limits for files, links, and disk space per user. There are soft limits and hard limits, and an allotted grace period. These limits can be set for users or groups. This way, a group can share files within a given quota.
-
Hard limits-A hard limit specifies the maximum allocation for a user or group. For example, if you are allotted 10,000 files, then you cannot create any new files if you are over your quota. The only way to get under your quota is to either delete files, or have the administrator increase your limit.
-
Soft limits-Soft limits are used to provide a warning to users. If they go over their soft limit quota, then the grace time kicks in. The grace time says how long they have to remove files and get under their quota. If the grace time is set to seven days, then users have seven days to get under their quota. After the grace period, the soft limit is treated as a hard limit and the user is blocked from creating or updating new files. Soft limits are really useful since sometimes you might go a little over your quota for a short duration.
-
Disk limits-Soft and hard limits can be set based on disk space. For example, a user may be allocated a 100 MB soft limit at 110 MB hard limit. Small systems may have limits set in the megabyte range, while large systems may use gigabyte quotas.
-
File limits. This limit allows you to specify how many files a user (or group) can have. Files are anything that consumes an inode-this includes real files, device files, and links to other files. Small systems, such as local e-mail servers, may be limited to a few hundred or a few thousand files. In contrast, large file repositories may be allowed hundreds of thousands of files, or have no limit at all.
| Note | The file system uses inodes to store meta-data information about files. This includes the actual file name (since it is not found inside the file contents), permissions, timestamps, and directory information. |
Enabling Quotas
-
Install the quota package.
sudo apt-get install quota
-
Quotas are set on a per-file-system basis. Edit /etc/fstab and add the mount options usrquota and grpquota to your file system. In my case, I have added user quotas to my Ubuntu file system (/dev/hda1), and both user and group quota to second hard drive (/dev/hdb4). My /etc/fstab file looks like:
# /etc/fstab: static file system information. # device mount fs options dump pass proc /proc proc defaults 0 0 /dev/hda1 / ext3 defaults,errors=remount-o,usrquota 0 1 /dev/hda5 none swap sw 0 0 /dev/hdc /media/cdrom0 udf,iso9660 user,noauto 0 0 /dev/hdb4 /mnt/disk ext3 defaults,usrquota,grpquota 0 0
Tip Don't enable quotas on read-only devices such as CD-ROM drives. Since a user has no way to add or remove files, quota information provides no value. Similarly, removable devices such as floppy disks and USB thumb drivers usually should not have quotas enabled.
-
Since the partitions are already mounted, you will need to remount each of the quota- enabled file systems in order to load the new mount flags. Since the changes are in /etc/fstab, you won't need to do this after a reboot. Since I added quotas to / and /mnt/disk, I can remount using:
$ sudo mount -o remount / $ sudo mount -o remount /mnt/disk $ mount | grep quota # check results /dev/hda1 on / type ext3 (rw,errors=remount-ro,usrquota) /dev/hdb4 on /mnt/disk type ext3 (rw,usrquota,grpquota)
-
Before quotas can be enabled, you need to check for existing problems (even through there shouldn't be any problems). This is done using the quotacheck command. The parameters -augmv means all file systems, all user and group quotas, and don't remount the partitions. For large disks, this check might take a few minutes. If you don't have user quotas, then you do not need -u, and -g is only used when group quotas are enabled. Specifying the -g without the grpquota mount option will generate a warning, but won't cause problems.
$ sudo quotacheck -augmv quotacheck: Scanning /dev/hdb4 [/mnt/disk] quotacheck: Cannot stat old user quota file: No such file or directory quotacheck: Cannot stat old group quota file: No such file or directory quotacheck: Cannot stat old user quota file: No such file or directory quotacheck: Cannot stat old group quota file: No such file or directory done quotacheck: Checked 10254 directories and 228748 files quotacheck: Old file not found. quotacheck: Old file not found.
The first time you run quotacheck -augmv, you will see a bunch of warnings about files not existing. This is because the system has not been checked before. After it is checked, the quota version 2 files /mnt/disk/aquota.user and /mnt/disk/ aquota.group (or quota.user and quota.group if you are using the older quota version 1 system) will be created and these errors should not appear again.
Note Even if you are not enabling both user and group quotas on a file system, you should create both files. Otherwise some quota commands may generate warnings.
-
Now quotas can be turned on.
sudo quotaon -augv
| Tip | Running sudo /etc/init.d/quota start will perform the quota check (Step 4) and turn on quotas (step #5). |
Editing Quotas
After quotas are enabled you can edit them using edquota. Using edquota -u, you can edit the quota for any particular user. Similarly, edquota -g edits group quotas.
sudo edquota -u bill sudo edquota -g users
The edquota command opens an editor that allows you to specify the soft and hard limits for disk space (blocks) and files (inodes). Each partition where quotas are enabled is listed. The current values are also displayed. For example, my quota settings look like:
Filesystem blocks soft hard inodes soft hard /dev/hda1 68866148 0 0 247947 0 0 /dev/hdb4 31153944 0 0 238603 0 0
This says that I am currently using about 65 GB on /dev/hda1, and using 247,947 inodes. On /dev/hdb4 I am using about 30 GB and 238,603 inodes. This also says that I have no quota limits. Changing and saving the soft and hard values will immediately enable quotas. If I am over quota, then the soft and hard limits are immediately enforced.
The grace times default to seven days, but can be edited using sudo edquota -t. This brings up an editor that displays the current settings per device and allows you to change the values.
Grace period before enforcing soft limits for users: Time units may be: days, hours, minutes, or seconds Filesystem Block grace period Inode grace period /dev/hda1 7days 7days /dev/hdb4 7days 7days
| Tip | Don't worry about maintaining the correct column spacing when editing with edquota. The system only checks the number of columns separated by spaces, not the actual number of spaces. Saving changes and then running edquota again will reformat the columns. |
Reporting Quotas
After enabling quotas, you can generate periodic reports using the repquota command. These can either be in the raw system format or in a human-readable form (-s).
$ sudo repquota -a *** Report for user quotas on device /dev/hda1 Block grace time: 7days; Inode grace time: 7days Block limits File limits User used soft hard grace used soft hard grace ---------------------------------------------------------------------- root -- 3953944 0 0 189921 0 0 nealk -- 68866148 0 0 247947 0 0 postfix -- 56 0 0 41 0 0 test -- 28 0 0 8 0 0 *** Report for user quotas on device /dev/hdb4 Block grace time: 7days; Inode grace time: 7days Block limits File limits User used soft hard grace used soft hard grace ---------------------------------------------------------------------- root -- 36628 0 0 192 0 0 nealk -- 31153944 41153944 51153944 238603 59153944 61153944 postfix -- 4 0 0 1 0 0 test -- 32472 0 0 207 0 0 $ sudo repquota -as *** Report for user quotas on device /dev/hda1 Block grace time: 7days; Inode grace time: 7days Block limits File limits User used soft hard grace used soft hard grace ---------------------------------------------------------------------- root -- 3862M 0 0 190k 0 0 nealk -- 67253M 0 0 248k 0 0 postfix -- 56 0 0 41 0 0 test -- 28 0 0 8 0 0 *** Report for user quotas on device /dev/hdb4 Block grace time: 7days; Inode grace time: 7days Block limits File limits User used soft hard grace used soft hard grace ---------------------------------------------------------------------- root -- 36628 0 0 192 0 0 nealk -- 30424M 40190M 49956M 239k 59154k 61154k postfix -- 4 0 0 1 0 0 test -- 32472 0 0 207 0 0
You can also generate quota e-mails using warnquota. By default, e-mails are sent to each user when they are over quota, and root also receives a copy of each e-mail. You can change the e-mail sender's information by editing /etc/warnquota.conf.
When I need to track projects by disk space, I usually create a user account just for the project and enable a cron job to generate a nightly (or hourly) report for the project's user (sudo repquota -a | grep projectusername).
EAN: 2147483647
Pages: 124