| The GWIA is not installed, by default, when you create your GroupWise system. It is not required for users to be able to send messages to each other. Of course, because it is required for users to send Internet email, a GroupWise system without a GWIA is a little bit like having a Harley that you use only to walk your dog. That's an interesting picture! This section walks through the process of installing the GWIA so that users can send email to their biker friends in Sturgis, South Dakota, or anywhere else in the world. First, though, let's lay down some prerequisites for the server that will run the GWIA: The GWIA server should have access to the Internet, unless the GWIA will relay to another SMTP host. The GWIA must have a way to resolve Internet domain names to Internet addresses. The server that houses the GWIA needs to be configured to point at a DNS server. On a NetWare server that means there is a RESOLV.CFG file in the SYS:ETC directory. The RESOLV.CFG would looking something like this: domain wwwidgets.com nameserver 137.65.55.200 nameserver 137.65.55.201
The GWIA should be configured as an Internet host, accessible from the Internet. On a NetWare server, this means that the SYS:ETC\HOSTS file has a listing of the server's IP address and its fully qualified Internet domain name. The Internet domain mentioned in the Internet domain name should match the Internet domain mentioned in the RESOLV.CFG file mentioned earlier. For example: 137.65.55.211 SMTP.WWWIDGETS.COM
The GWIA should be running on a server with plenty of horsepower; it's good to have plenty of disk space, but not like a post office. The GWIA keeps messages in a holding queue only for a short time. Your DNS administrator will want to make three DNS records: an A record, an MX record, and a PTR record for the server that is running the GWIA. An A record is an Address record pointing to the server running the GWIA. This helps establish the server on the Internet as a member of the Internet domain that the server is a member of. In our example, the Internet domain is wwwidgets.com. An MX record indicates to other SMTP hosts which host in the wwwidgets.com Internet domain to try to send SMTP messages through. So, for example, if the Internet domain name is WWWIDGETS.COM and the aforementioned server had a name of SMTP.WWWIDGETS.COM, the MX record would point to SMTP.WWWIDGETS.COM as being the Internet host that has the capacity to receive SMTP messages from the Internet for the Internet domain WWWIDGETS.COM. A PTR or Reverse Address Lookup record translates the public IP address of the server back into the server name; for example, 134.45.67.89 will be translated to SMTP.WWWIDGETS.COM. This way, a receiving SMTP server can check the validity of your server credentials, and some servers might refuse an SMTP session from your server if this PTR record does not exist or is not configured properly. The GWIA also supports this feature when you check the option Reject Mail If Sender's Identity Cannot Be Verified, as described later in this chapter.
Following are the steps to install a GWIA on the NetWare platform: 1. | First, locate the GWIA installation program.
It is found in the GWIA directory, under the INTERNET directory at the root of your GroupWise 7 Software Distribution Directory (SDD) or on the GroupWise 7 Administration CD.
| 2. | Run INSTALL.EXE under the SDD\INTERNET\GWIA directory.
The License Agreement screen comes up, followed by the welcome screen, which explains what this installation program is going to do.
| 3. | Click Next.
Next comes the prompt for the software platform screen. These instructions will be for installing the GWIA on the NetWare/NLM platform.
| 4. | After making the platform selection, click Next.
The installation needs the paths for the NLMs and the NetWare load script (it's referring to an *.NCF file) that the GWIA will use. This will generally be the system directory on the SYS volume of the server where the GroupWise domain that owns this GWIA resides. However, if you are using Novell Clustering Services, you might want to install this software to a different path of your choosing, on a clustered volume. You can also update the Autoexec.ncf file, or cluster-enable the GWIA install.
| 5. | After making the code location selection, click Next.
| 6. | At the Server Information screen, indicate the IP address or DNS address for the GWIA. When installing the Linux GWIA, you need to fill in both the IP address and the DNS address fields. Also, indicate the Message Transfer Port for the GWIA. This is the port that the GWIA listens on for messages coming in from a GroupWise MTA within the GroupWise system. For those familiar with how the GWIA worked in the past, this is a difference with the queue-based method of the past. This new GroupWise 7 feature is discussed more fully in Chapter 16, "Internet Addressing."
| 7. | After specifying the Server Information, click Next.
| 8. | The GWIA, like all GroupWise agents, can be monitored from a Web browser. In the next installation step, you will be prompted for the port that the GWIA should listen to for Web-browser monitoring requests, as well as the username and password to use. We recommend skipping this step (or not checking the option to enable the Web Console) and entering this information from ConsoleOne instead.
At this point, the installation asks whether the GWIA is going to send directly to the Internet or whether it is going to use a relay host (see Figure 10.1). Relay hosts are commonly used on large, heterogeneous systems in which Internet access must be tightly controlled at the firewall.
Figure 10.1. Choosing between direct connection to the Internet and connection via a relay host 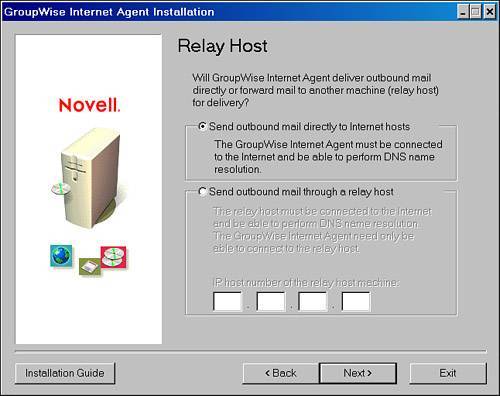
| 9. | If a relay host is needed, provide the installation program with the IP address of the relay host machine, and click Next.
When you click Next, the install wizard will check for Internet connectivity either to the Internet or to the relay server you specified. If the server where you are installing the GWIA agents does not have connectivity, you will receive a warning about this. You can continue the install by selecting the option I Will Fix This Problem Later. Just remember to come back and fix the problem.
You might also be prompted about no DNS name resolution if the server is not properly configured to talk to a DNS Server to resolve Internet names. Once again, you can continue the install by selecting the option to fix this problem later.
| 10. | In the next window, you need to indicate which GroupWise domain to connect the GWIA to.
You should have made this decision well in advance of this step, because in step 4 you selected the server to which you are installing the software. The GWIA will be most efficient if it runs on the same server on which the GroupWise domain resides. This server should also be running the GroupWise MTA for that domain. The installation also prompts for a name of the subdirectory for the GWIA. The default is GWIA. Because that name is pretty intuitive, it's a good default.
| 11. | In yet another case of intuitive naming, the installation asks for the name of the object that will represent the GWIA in the GroupWise system and in eDirectory (see Figure 10.2). This object will appear as a child object of the domain selected in an earlier step. You can name it GWIA or some other name that works for you, such as SMTP.
Figure 10.2. Naming the GWIA object 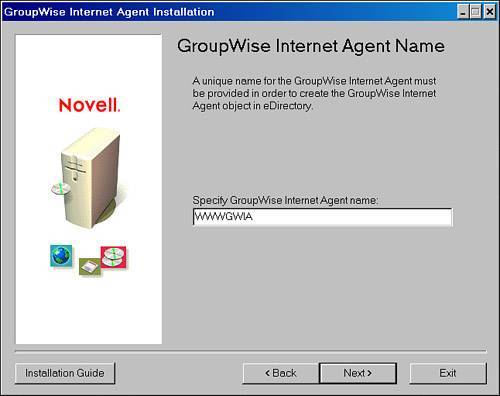
| 12. | After clicking Next, you are prompted for the Internet domain name that the GWIA should listen asfor example, wwwidgets.com. The value you enter here is added to the Foreign ID field on the GroupWise property page of the GWIA. If your GWIA will listen for several Internet domain names, just enter the most popular one in this field, and later you can add the others. Figure 10.3 shows this installation screen.
Figure 10.3. Here, you enter the host portion of your Internet domain name 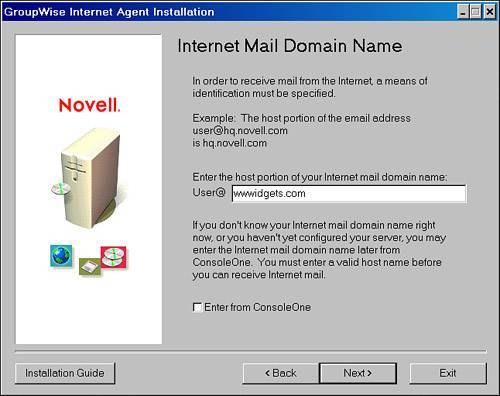
When you click Next, the install routine will check for DNS entries for this domain name. If none is found, you will be warned about the problem. Once again, you can continue the installation by choosing to fix the problem later.
| 13. | The Linux-based GWIA install requires some additional information in order to install the GWIA. Specifically, you are asked for LDAP authentication so that the GWIA can be put into the Novell eDirectory tree. The directions are clear enough in the wizard, but installing the GWIA successfully may be tricky without a few tips. Here they are:
The IP address you specify for the LDAP server must be running the LDAP Agent for eDirectory. On a NetWare server this is the module called NLDAP.NLM. If you are pointing to a Linux server running eDirectory, most likely LDAP is running automatically as a result of eDirectory being loaded. It is best to indicate an IP address to a server that hosts a replica of the partition that houses the object for the GroupWise domain that will own the new GWIA. The LDAP settings for a particular eDirectory server are kept in the two objects called LDAP Group - servername and LDAP Server - servername. Authenticating to the LDAP server when you create the gateway can be done securely; however, in most environments the effort to do this is not worth it. It is generally easiest to allow for clear text password authentication via LDAP, simply so that you can install the new GWIA gateway object. On the LDAP Server object make sure that SSL/TLS is not required for authentication. On the LDAP Group object allow for Clear Text Password. To reload NLDAP on a NetWare server, do the following: UNLOAD NLDAP LOAD NLDAP
To reload NLDAP on a Linux server, do the following: /etc/rc.d/ndsd restart
| 14. | With the Linux-based GWIA install, when you specify the eDirectory location of the domain that will own the gateway object, there is a browse button for browsing the eDirectory tree. We've found that in some environments browsing for the domain will cause the installation software to quit. If this happens to you, just enter the eDirectory object location by typing it in; for example, cn=ITS,ou=CORPOU,o=WWW.
| 15. | Armed with all the information provided during the installation, the wizard is now ready to actually install something. If you reach this point and decide you want to change something, you can use the Back button as many times as you want. When you are ready, click Install.
|
When the installation is done, you have the option to launch the GWIA. However, consider waiting on launching the GWIA until you have it completely configured. It might not be able to correctly send Internet email, but it is up and running. If, during the installation, problems came up that you decided to fix later, now might be a good time to unload the GWIA so that it does not begin generating undeliverable messages. |