Bringing the User Back
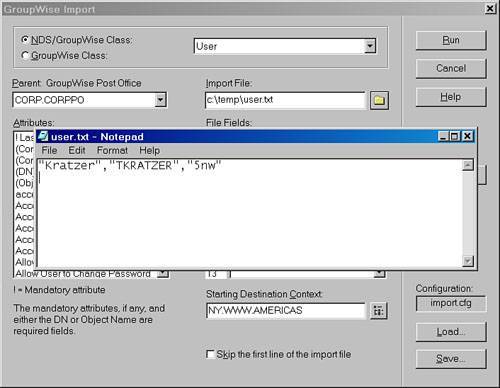
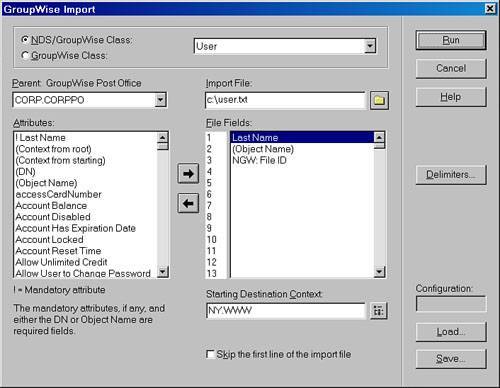
| When bringing a user back from deletion, you must restore the user's GroupWise directory object. It's possible that you have already re-created the user so that the user has an account in the meantime. That's a common thing to do. However, at this point, you cannot have a second account for the user before proceeding. The person can have an eDirectory/NDS account, though. If the user has items in the new mailbox, get rid of the mailbox. You can have the user forward the message items to you or someone else for safekeeping. Importing the User's ObjectThe process of importing a user is very precise. Follow these steps closely for a successful import of the user:
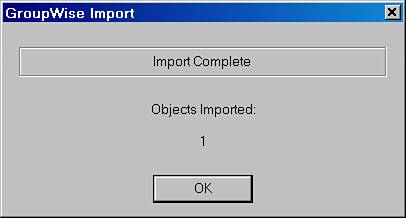
It's easy to see when your import is successful. Importing can be difficult for some customers. The important thing to remember is the syntax in the import file. Make sure that it is perfect, including just one carriage return at the end of the import file. Obtaining Access to the User's Message Store on the Backup Post OfficeYou have imported the user's object with the correct FID, so now you need to configure the post office so that you can access the message store at the post office you brought back from backup. Every GroupWise post office has two security locks, so to speak. Those security locks are the WPHOST.DB file and the password on the user's USERxxx.DB file. To access the post office and the user's mailbox you restored from backup, you need to reconfigure the security locks to your advantage. On the post office database/WPHOST.DB file, you must do the following:
Here are the step-by-step instructions for accessing a user's message store (mailbox). You do not want to affect your live system with the changes you are going to make, so first you will have to spoof your system a bit:
All the changes you made should not affect the live system because you are connected to WPDOMAIN.DB on the local hard drive. Now you need to build the WPHOST.DB file for the post office that TKRATZER is a member of. You will place this WPHOST.DB file in the post office directory that you brought from backup. To do so, follow these steps:
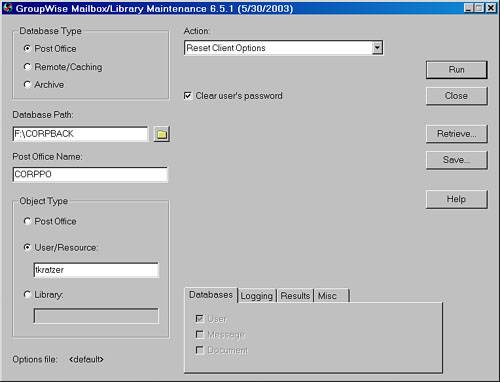
For this procedure you have been temporarily connected to the WPDOMAIN.DB file in the C:\GWDOM directory. It's important to make sure that you disconnect ConsoleOne from this WPDOMAIN.DB and connect to a WPDOMAIN.DB on your live system, which is on a server location. We suggest doing this right now. If you do not do this, the next time you load ConsoleOne it will remember that you were connected to the domain on the C: drive, and will attempt to connect here. You might not notice that you are not connected to a production database, and all your administration changes will be for naught. Now with the newly configured WPHOST.DB in place at the post office you brought from backup, you are just about ready to get in. You need to push Tay Kratzer's mailbox password of 123 down to the USERxxx.DB. Here's how to this:
Now the user's message store is ready for you to access it. Here's what you do. Use the following command line to access the post office in direct mode: GRPWISE.EXE /@U-USERID /PH-PATH TO POST OFFICE For example: GRPWISE.EXE /@U-TKRATZER /PH-F:\GWAVARE Exporting a User's MailboxThose of you familiar with the Archive feature might wonder why we refer to these next steps as exporting. It's because there's more to the procedure than just using the Archive feature. A user's mailbox doesn't contain only messages; it comprises the folder structure the user has created, as well as the user's address books, calendar items, and even trash items. Perhaps this is too sentimental a notion for you, but many users see their email as an office of sorts. People are rather sensitive about their mailbox. You won't always be able to restore shared address books, shared folders, rules, and personal preferences, but if you are restoring the mailbox for an accidentally deleted user, you should take care to restore everything you possibly can. Configuring the Archive DirectoryFirst, you need to specify an archive location in order to create an Archive mailbox. Before doing this, though, you need to take some precautions. We have had experience in the past with Windows caching data rather then writing it to the hard drive. When you are archiving so much data, it might be better to specify the archive path to a NetWare server. The NetWare client does a much better job than Windows does of handling data. It decreases the likelihood of corruption to the Archive mailbox when you're archiving a large bunch of data at one time. Here are the steps for specifying the archive directory:
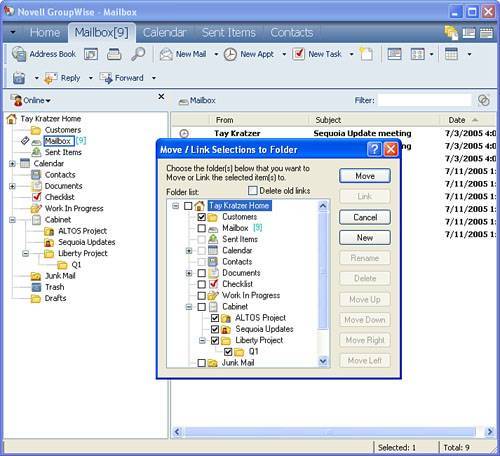
Configuring the Mailbox Folder Structure for ExportMany users have created an elaborate folder structure under their mailbox and cabinet. When you archive messages, the folders that have messages in them are automatically created in the Archive mailbox. When you eventually unarchive these items, the folder names are created again in the live mailbox. However, folders containing nothing at the time you performed the archive will be lost. Again, the idea is to try to duplicate the mailbox as closely as possible. Following are the steps for exporting the folder structure from a mailbox to the Archive mailbox:
Check in some of the folders and make sure that all of them have a copy of the message you linked to the folders. Exporting All Message ItemsEven Sent Items and Personal/Posted ItemsIt is time to export the real meat of the mailbox. The easiest way to determine whether you archive everything in the mailbox is to use the Find feature in the GroupWise mailbox. Select Tools, Find; make no additional selections from the Find dialog box; and then click OK. This way, you are telling GroupWise to find everything. If this user is tidy or if you have an aggressive email retention policy, perhaps you'll just find a few hundred items. However, many times you will find that there are thousands of items, maybe more. The problem with this is that the Find window will not display that many items. So you might need to alter your Find query to find only items in a certain period or of a certain type. When you choose Tools, Find, you can alter the scope of the query by using the Date Range section. You can also modify the results from the Find window by selecting Tools, Modify Find. We'll leave that to you. The idea is to get a maximum of about 4,500 items in the Find window, and then modify the Find window to get the next batch of items. Your goal is to eventually find, and then archive, all the message items in the user's mailbox. Here's an example of the steps for doing this; you might need to deviate from these steps to pare down the results:
This process of archiving the items from the Find query should find calendar items, be they group or personal calendar items, and all message items if they are sent or received. Ideally, this process will move all message items from the master mailbox to the Archive mailbox. When the process finishes, the mailbox should look like a ghost town, perhaps with a bunch of empty folders. Tip This process of using the Find feature and archiving messages archives all the user's Sent Items. Beginning with GroupWise 7, the Sent Items folder is no longer a find results folder. As a result, it is now created by default in the archive. So the user will see her sent items in the Sent Items folder by default. In earlier versions of the GroupWise client, this was not quite the case, and you had to create the Sent Items folder manually in the archive. Tip We've been using third-party tools from many vendors, and one of them, Advansys, has created a development framework called Formativ. In this development framework you can easily create some very interesting tools, and one of the tools we've made together with Advansys is an "Archive/Unarchive all" applet. This applet has been used to archive thousands of mailboxes, including an export of the user's address books, and unarchive them elsewhere. Although it's not a publicly available tool, you can check out Formativ at www.advansyscorp.com and send an email to inquire about this tool. Exporting the TrashIt's Quick!If you bring back the user's trash, the user is going to think you performed wonders, and it takes just a minute. The steps to perform this task are as listed here:
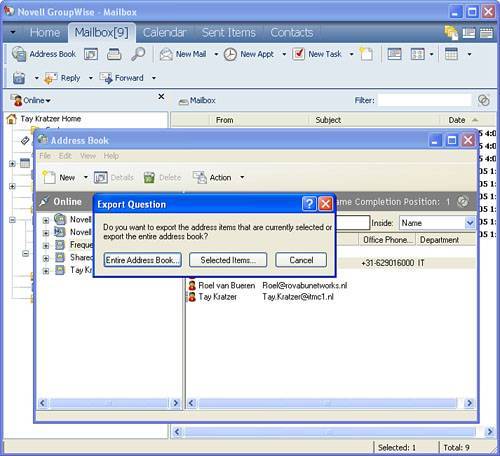
Note The section "Importing Mail/Folders and Trash Items," a little later in the chapter, describes how to move these trash items in the trash2 folder back to the trash bucket in the user's live mailbox. Exporting the Address BookEvery user has at least two address books and quite often more than that. These two address books are the Frequent Contacts address book and the address book containing the user's full name. The user you are working with might even have more. You can export the user's address books, and then import them (later) into the user's address book in the live mailbox. The following steps illustrate how to do this:
Now you've exported everything you possibly can. You might want to check the user's rules and proxy settings and make a note of them. You will have to manually re-create them in the live system. Next, you need to access the user's live mailbox and start the import operations. Importing a User's MailboxYou need to access the user's live mailbox, so you might need to reset TKRATZER's password in order to get in. When you get into TKRATZER's live master mailbox, the process you follow is nearly the opposite of the Export process. First, though, for the Find feature to work on the Archive mailbox, you must access the Archive mailbox and then exit GroupWise. GroupWise needs to rebuild the QuickFinder index on the Archive mailbox. Exiting GroupWise after GroupWise has discovered that it has new indexing to do causes the QuickFinder index for the Archive mailbox to be rebuilt. Importing Mail/Folders and Trash ItemsTo import mail, folders, and trash items, get into Tay Kratzer's live GroupWise mailbox, not the one on the backed-up post office, and perform the following steps:
Now all message items are in place, and the user's mailbox should look very much the same as it did before someone slipped on the banana peel that caused them to hit the Delete button and the OK button in succession. Importing the Address BooksImporting is the opposite of the exporting you performed. Inside the GroupWise Address book, you should see at least two personal address books. They are the Frequent Contacts address book and the address book with the user's name. If they are there, follow these steps:
Now you have imported all the data you can restore. Final Notes About the Import ProcessThe import process does not import the following less common attributes about a mailbox:
You can go back into the backup mailbox and gather this data. You can try to re-create it in the live mailbox. Additionally, earlier in the document you might have linked a message item to several folders, in order to re-create the folder structure. You don't want that item linked to all the folders, so take these steps:
After you've taken all of these steps, the mailbox should look and behave in much the same way as it did before. |
EAN: 2147483647
Pages: 320
- Chapter III Two Models of Online Patronage: Why Do Consumers Shop on the Internet?
- Chapter V Consumer Complaint Behavior in the Online Environment
- Chapter VI Web Site Quality and Usability in E-Commerce
- Chapter XIV Product Catalog and Shopping Cart Effective Design
- Chapter XV Customer Trust in Online Commerce