Windows Me Networking and the Internet
|
| < Day Day Up > |
|
Windows Me Networking and the Internet
Windows Me offers the Home Networking Wizard to set up local connections and the Internet Connection Wizard to help you establish a connection to the Internet. In previous versions of the Windows 9.x family, you had to manually configure your network card and install necessary protocols and clients through the Network applet in the Control Panel. This can all still be done the same way, but the Home Networking and Internet Connection Wizards will accomplish all of this for you, including setting up and installing necessary protocols for features like Internet Sharing. All of the protocols handled by Windows 9.x are supported in Windows Me (e.g., NetBEUI, TCP/IP, etc.) and are handled the same. For information on these protocols please refer to Chapter 11 on Windows 9.x.
First, we will take a look at the steps necessary to create an Internet connection in Windows Me.
Create an Internet Connection
Creating an Internet connection can be started in several ways. You can:
-
Go to Start > Programs > Accessories > Communication > Internet Connection Wizard.
-
Go to Start > Settings > Control Panel > Internet Options, then open the Internet Properties applet and choose the Connections tab and then the Setup button.
-
If you do not currently have an Internet connection setup, you can simply start an instance of Internet Explorer to start the Internet Connection Wizard.
-
From Internet Explorer, go to Tools > Internet Options, and then select the Connections tab, followed by the Connect button. You will start the Internet Connection Wizard, which will guide you through the process of starting a new Internet connection. From this applet, the first three options will be:
-
I want to sign up for a new Internet account (My telephone line is connected to my modem). This option dials you into Microsoft’s Referral Service using your modem, then gives you a list of recommended ISPs to set up a new account. You are led through several screens of data entry—everything from credit card information to address/zip code for local dial-up numbers. At the end, you will have an established Internet account.
-
I want to transfer my existing Internet account to this computer. (My telephone line is connected to my computer.) This option is for those who already have an existing service or who are signing up with a service not listed on Microsoft’s Referral Service page. To do this, you will need all of the information provided by the ISP for that particular account (e.g., dial-up phone numbers, user names, passwords, POP and SMTP information for your mail account, etc.).
-
I want to set up my Internet connection manually, or I want to connect through a Local Area Network (LAN). Both this and the previous option are identical in nature in terms of the steps you will have to complete. Should you choose one of these last two options, the process will continue on as follows.
-
You will be prompted to choose if you connect through a phone line and a modem; click Next.
-
The next screen will ask you to enter the telephone number for your ISP. (Make sure you uncheck the box for “Dial using the area code and country code” if it is not necessary in your area.)
Note Most ISPs do not require you to enter static or specific DNS or IP addresses. However, should your ISP require it, you can click on the Advanced tab to enter these numbers.
-
Click Next to continue.
-
Enter your username and password in the appropriate fields, and click Next.
-
Enter a name that you wish to associate with this particular connection. This should be something that you can easily identify; it does not necessarily have to be the name of the ISP.
-
Click Next to continue.
-
You are now prompted to set up an e-mail account. Click Yes and Next to continue.
-
Should Windows find an existing e-mail account, you are prompted to either edit that account or set up a new one. Choose “Create New Internet Account” and click Next to continue.
-
Enter your display name in the appropriate field (the name that will be attached to all outgoing e-mail that you send). Click Next to continue.
-
Enter the e-mail address for sending/receiving e-mail messages. Click Next to continue.
-
This screen will have you fill out your incoming mail server type (usually POP3), as well as enter your POP3 (IMAP or HTTP) server name and your SMTP server name. Click Next to continue.
-
You will be prompted for your user name and password. Enter these then click Next to finish to process.
-
Essentially, what you have done by using the ICW (Internet Connection Wizard) is avoid having to set your TCP/IP and dial-up networking settings manually (and installed Dial-Up Networking, had it not been installed previously). Should you need to edit the settings or set up a new dial-up connection, you can do so from the Dial-Up Networking folder located at Start > Settings > Dial-Up Networking (which is possible if your ISP requires you to change settings due to connection failure).
Dial-Up Networking
Dial-up networking is handled exactly in the same way as it is for the rest of the Windows 9.x family. Again, it can be found at Start > Settings > Dial-Up Networking. From there, you will have access to any previous connections or the ability to create a new one. If you are modifying an existing connection, right-click on it from the Dial-Up Networking folder, and click Properties. Dial-up networking handles standard modem connections, ISDN connections, and null-modem connections between serial ports. From the General tab, you can choose from the following:
-
General tab. You choose the phone number to dial, whether to use an area code and country code when dialing, or choose a different modem for the connection from the drop-down menu. (Click the Configure button to open the Properties for the selected modem, and edit them if necessary.)
-
Networking tab. TCP/IP, NetBEUI, and IPX/SPX Compatible protocols can be easily selected/deselected, and you can choose to specify an IP or DNS address (see Figure 14.7).

Figure 14.7: Windows Me dial-up networking connection properties Networking tab. -
Security tab. Modify your username and password. Check mark the box if you want your Internet connection to connect automatically and log on to network options.
-
Dialing tab. Select/Deselect the default Internet connection, retry settings (in case of a failed connection), and idle disconnect settings.
Note You can actually change the default Internet connection much more easily by going to Internet Explorer > Tools > Connections, and choosing which connection should be the default from there.
Creating a Peer-to-Peer Network
Creating a peer-to-peer Network in Windows Me is just as easy as setting up an Internet connection. To start, go to Start > Programs > Accessories > Communications > Home Networking Wizard. At the introductory screen, click Next.
-
Choose if your computer is currently connected to the Internet, and in what manner. Click Next to continue.
-
Depending how you answered in the previous step, you’ll be asked if you wish to share your connection with the Internet. If you do, then choose the Network Adapter to share (that is the NIC you have installed to connect your home network). Click Next to continue.
-
Enter a name that you wish to be associated with this computer on your network. You will also be choosing the workgroup name. (You can leave it at the default or change it as you feel necessary, but do realize that all computers must use the same workgroup name.) Click Next to continue.
-
Next will be the TCP/IP screen, and you will be prompted to choose whether to share certain folders and printers associated with this PC. Choose which items you would like to share and click Next to continue.
-
You will be prompted to create a setup disk. Should you have any other Windows 9.x machines on your network, choose YES. If the other computers are running Windows Me or Windows 2000/NT, you will not require the disk.
-
When you reach the Completing the Home Networking Wizard Screen, choose Finish, and the necessary files will be copied.
-
If you are prompted to restart your machine, do so. When you restart, you will be prompted for a username and password (just make them up if you don’t have them already), and your computer is now networked.
Note Use the disk created in this process to set up networking on Windows 95/98 machines. (Run it from the My Computer menu in that operating system.)
Note You can still manually install network drivers if you not wish to relinquish control to the Home Network Wizard, or if you find it necessary to use other protocols. Manual installation of network drivers starts with:
-
Go to Start > Settings > Control Panel, then double-click Network.
-
Review the list of components on the Configuration tab (see Figure 14.8). Should Client for Microsoft Networks not appear there:
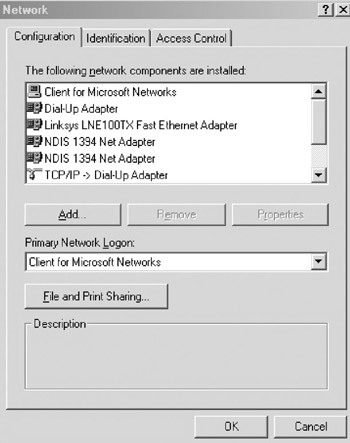
Figure 14.8: Windows Me Network Configuration tab.-
Click Add, followed by Client, and click Add again. A list of provided Microsoft Clients appears.
-
Choose Client for Microsoft Networks, and click OK.
Note You may be prompted to insert the Windows Me CD-ROM. Do so if necessary.
-
-
From here, choose your desired protocol (ATM, ATM LAN Emulation, IPX/SPX compatible, NetBEUI, PPP over ATM, or TCP/IP). Click the protocol to install, and click OK to continue.
-
Open the network logon drop-down list and choose the client for the network (e.g., Client for Microsoft Networks).
-
Click File and Print sharing to choose your file and print sharing permissions (make sure both boxes are checked to share both of them).
-
Click OK to finish. The system may require you to reboot; do so if necessary.
Connecting to a Windows NT/2000 Server
You can still connect to a Windows 2000/NT server using the Home Networking Wizard. However, you must take the following into consideration:
-
If the Windows NT Server is a domain server, you need to create a user account on the NT server for every Windows Me user who will need to access resources on the NT server.
-
If you are using Windows NT Workstation, make sure you have the same workgroup name entered as you do for each Windows Me station that will be in that workgroup.
-
If you are using Windows NT Server, you must set the Windows Me PC to log on to the Windows NT domain and enter the correct domain in the domain entry field at each station. To do this:
-
Go to the Control Panel > Network Properties, and choose Client for Microsoft Windows Networks.
-
Click the domain checkbox, and enter the name of your Windows NT domain.
-
Creating a FireWire Subnet
Users who have created an Ethernet or modem network and use a mobile device or laptop may want to consider setting up a subnet (or secondary network) using IEEE 1394 (FireWire) or wireless connection so that they can move about freely with the mobile device while having access to all resources. If you are using an external DSL or cable modem, you will require two Ethernet cards on your primary ICS (Internet Connection Sharing) machine where the Internet is shared from. Otherwise, you will need only one to connect to the rest of your network. Make sure that you have ICS set up on your primary ICS server before you begin. To create this subnet:
-
Go to Start > Settings > Control Panel > Internet Options.
-
Click on the Connections tab.
-
On the LAN (Local Area Network) tab, click Sharing.
-
Choose the device that connects you to the secondary network from the list.
Note If sharing is not an option, you have not enabled ICS on your system. Follow the steps in the Home Networking Wizard to set up this feature.
-
Click OK, and you will be prompted to restart your computer.
Cookies
A cookie is a message that is sent or ‘transmitted’ to a Web server from a Web browser. It is important to note that a cookie can also be referred to as a state object or persistent cookie. The cookie is used to provide the Web server with unique information that is used to identify where the request to the server is coming from. In other words, the cookie provides information about you. When you access pages on the Internet and enter your personal information into Web forms, that information along with other prepared information is combined into a file called a cookie. Most often, server-side scripts known as CGI (Common Gateway Interface) scripts are used to control what happens with the cookie. The next time you happen upon the same Web site, your Internet browser will automatically forward the locally stored cookie to that Web site’s server. If set up to do so, the server will provide you with a prepacked, customized page that targets you for specific advertisements. In other words, you will get ‘spammed.’
Many Web servers use trusted cookies as their only form of authentication. This widespread misuse of cookies has spawned a major security threat to both Web servers and users alike. If an attacker, or ‘cookie hijacker,’ is able to infiltrate a user’s session while the user is logged on to a server service, the attacker can steal the user’s cookie and use it to access such things as account information. A common practice that attackers use to grab cookies during an active session is to execute a fake JavaScript routine on an unprotected server.
Although many servers are open to this cookie authentication exploitation, most servers that provide important financial information and extremely sensitive data have more secure authentication mechanisms and devices in place.
There are several good ways to protect your system from the threats to security provided so nicely by the use of cookies. You can set up your Internet browser to alert you when a cookie is present, you can direct your browser to only download cookies from trusted sites, or you can disable cookies altogether. Depending on your operating system and Internet browser, this procedure will vary.
JavaScript
JavaScript is a programming script language that is supported by Internet browsers provided by Netscape and Microsoft. JavaScript is commonly used by Web developers to interact with Web pages, which are typically created using HTML or XML source codes. In simple terms, JavaScript allows developers to spruce up Web pages by adding features such as self-updating software packages, pop-up windows, link-to pages, and 3D interactive worlds to new or existing Internet Web pages. JavaScript is considered to be a portable, object-oriented, robust and secure scripting language.
The productive tools that we manufacture to design and create a better, more intuitive Internet experience all seem to come with a heavy price tag concerning security. Java, JavaScript, and Java applets (little programs sent with Web pages that do not require user interaction) are no exception. They all provide transportation mechanisms that can allow attackers to insert code to infiltrate and destroy your system. JavaScript, applets, and Java are programs that actually run on your system.
Hijackers and attackers often create scripts and applets, which are oftentimes able to circumvent network security parameters. They can be used to manipulate files on users’ computers.
Signed Applets
As mentioned earlier, applets are small programs that contain scripts that are sent with Web pages to users. Applets, such as Java applets, allow calculations, animations, and other functions to take place on a user’s system without a need for communication to take place with the applet-providing server.
Applets can contain malicious code that can easily destroy a system if allowed to run. A popular technique known as sandboxing is often used to quarantine applets that appear suspicious or malicious.
Signed applets are applets that contain a digital signature. They are a means of proving that an applet has come from a trusted location, author, or site. Signed applets receive permission to access local system resources. Plain applets only have access to the directories from which they originally run. Some books state that signed applets cannot be altered. This is simply not true. Anyone can create or forge a signed applet. This makes them very dangerous and provides a huge security vulnerability to local as well as networked systems.
| Note | It is important to note that most applets on the Web are unsigned applets. These applets can be assigned various security levels, which include untrusted, high, medium, and low levels of security. Please refer to Table 14.1 for the various levels of unsigned applet security.
|
ActiveX
ActiveX is a set of object-oriented programs, technologies, and tools that are Microsoft’s answer to Java technology, which by the way was created by Sun Microsystems. ActiveX is basically a combination, or ‘outgrowth’ of the Microsoft technologies known as OLE (Object Linking and Embedding) and COM (Component Object Model). When this technology is used in a networked environment that provides directory support and other service, the COM technology becomes DCOM (Distributed Component Object Model).
The goal of this technology is to create a self-sufficient program, known as a component or ActiveX control, which can be run anywhere your ActiveX network exists.
ActiveX’s controls, or ‘components,’ can be compared to Java applets, and can be reused by applications and other systems throughout your network.
ActiveX provides a power tool for developers and programmers. Unfortunately, ActiveX carries with it security risks, as JavaScript and applets do. But, the ActiveX security model is quite different from the security controls in place for Java and Java applets. As you may recall, Java applets are restricted based on a set of actions that are considered safe. The ActiveX security model does not limit an application package to a set of individual restrictive controls. Instead, its controls are based on digital signatures. These digital signatures are registered and certified with a trusted digital authority, such as VeriSign. When a person registers a software package or application with a trusted CA (Certificate Authority), they are agreeing that the package or ‘ActiveX Control’ is free of malicious code. From that point on, the risks involved with downloading the controls are totally the responsibility of the user.
In simple terms, the main weaknesses or problems associated with ActiveX controls are:
-
Once the user has accepted the certificate, responsibility for the control’s actions are placed completely on the user. If an uneducated user on your network happens to accept a certificate from an unknown or unofficial CA Authority, you may not have many systems left operable by the end of the day.
-
Users can change browser settings to allow unsigned ActiveX controls to be downloaded with a warning.
-
There is no good logging or audit trail available to track down what an ActiveX control has done to your system.
If you need help troubleshooting problems associated with active content such as JavaScript and ActiveX using Internet Explorer, Microsoft provides an excellent white paper on the subject. You will also be shown how to disable dangerous active content altogether in this white paper: http://support.microsoft.com/default.aspx?scid=KB;EN-US;Q154036
To access the ActiveX settings for Internet Explorer, navigate to Internet Explorer > Tools > Internet Options > Security Settings. Choose the network resource where you wish to edit ActiveX settings (e.g., Internet, Local Intranet, Trusted Sites, Restricted Sites), and Reset custom settings (see Figure 14.9). From here, you will be able to Disable/Enable/Prompt settings for:
-
Download signed ActiveX controls
-
Download unsigned ActiveX controls
-
Initialize and script ActiveX controls not marked as safe
-
Run ActiveX controls as plug-ins (this also has an option for Administrator approved)
-
Script ActiveX controls marked safe for scripting
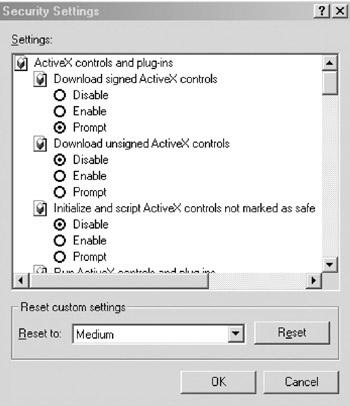
Figure 14.9: Windows Me Internet Explorer Security Settings window.
CGI
The Common Gateway Interface is a language-independent interface or standard that Internet Web servers use to pass a user’s request to an application program and forward a response back to the Web server, which in turn provides the results to the user. In English, when a user fills out an HTML form on a Web page, a CGI program is typically used to process the form’s data behind the scenes and get the information back to the server. This allows Web servers to dynamically serve and interact with the users. The actual method of passing data between a server and an application is called the CGI.
CGI programs run on Web servers and are considered to be server-side applications. JavaScript, applets, and ActiveX controls are run on individual systems and are considered client-side programs. A disadvantage with using CGI programs is that they start a new service on a Web server every time a CGI program runs. This can result in a major decrease in the performance of a Web server.
The use of CGI programs allows the vulnerabilities associated with HTTP to be exploited. Also, in order for CGI programs to work, they are written to run on most operating systems and have access to important server system files, as well as connected hosts.
Poorly executed CGI scripts and lack of or improper file system permissions can open the security hole doors and leave your system vulnerable to attack.
|
| < Day Day Up > |
|
EAN: 2147483647
Pages: 237