Java-based IDEs
|
| < Day Day Up > |
|
The discussion so far has focused on the commercial IDEs for Delphi and C++ languages. This section will provide details on some of the popular Java-based IDEs used in platform-independent development. Kylix 3 provided source code level platform independence for Delphi and C++ languages, and the Java platform (and the associated IDEs) enables the users to build applications with binary level platform independence. In the previous chapter, the readers were introduced to the Java technology fundamentals; therefore, it is assumed that they are aware of the type of binary level compatibility provided by Java platform. In terms of Java, binary-level compatibility does not mean compatibility at the native machine code executed by the operating system. Because different operating systems have different ways of interpreting the binary executable file formats, it is almost impossible to provide true machine code–level binary compatibility. Rather, modern technologies such as Java (and the latest Microsoft .NET platform) are capable of creating a virtual execution environment (typically known as virtual machine) to boost the concept of binary-level code compatibility across platforms. In simple terms, compiled Java programs are compatible across platforms within the context of Java Virtual Machine (JVM).
As mentioned previously, although Sun Microsystems built the Java technology, many popular vendors—such as IBM, Borland, Oracle Corp. and others—have supported the platform through their products, which include IDEs, component packages, application servers, and so on. Even though it is not possible to discuss every available Java IDE in this book, an attempt is made to introduce the readers to the Borland JBuilder8 IDE. As mentioned earlier, Oracle JDeveloper and IBM WebSphere Application Developer and its previous releases of IBM Visual Age for Java platforms are also very popular Java IDEs whose discussion is not within the scope of this book. Because the IDE and tool vendors are making continuous efforts to release newer editions of their products, there is always a possibility that newer versions of some of the products discussed here may be available in the market by the time this book is released. However, because these products have already become matured and stable, there may not be major differences from the appearance or look and feel of the IDEs; rather, there may be differences in terms of new functionality or enhancement of existing features and their support to external tools and so on.
Typically, these Java IDEs are productivity enhancement tools with features outlined here.
-
Development of a variety of Java classes such as applications, applets, Java beans, interfaces, serialized objects, servlets, Java Server Pages, and so on.
-
Development of J2EE applications, components, remote interfaces, remote objects, distributed objects, Java messaging applications, and so on.
-
Visual development of Java Swing and 2D applications using drag-and-drop features of the IDE.
-
Automatic generation of a lot of (reusable) code blocks and generation of property getter and setter methods for existing classes, thus reducing the developers’ time spent on mundane work.
-
Embedded code editor, project (or workspace) manager, compiler, debugger, and built-in runtime environment, which make the IDEs very powerful development platforms with all the supporting bells and whistles.
-
Establishing database connections effectively and visual development of applications showing data in complex data grids (known as tables in Java terminology).
-
Cross-platform development supporting Linux as a desktop frontend for the developers, while the code may be deployed on a variety of platforms, including Windows and Linux, and other clones of UNIX. In a way, Java IDEs have enhanced the power of Linux as an effective desktop environment.
-
Support to easily integrate with third-party (and open source) tools such as Jakarta Struts, Ant, and so on.
-
Powerful refactoring features to improve performance, readability, and maintainability of existing Java applications.
-
Advanced editor features, such as syntax highlighting, code templates, code formatting, and so on.
As each of these products has been developed by different vendors, certainly there will be some differences among them; however, a majority of the features are commonly available in most of these IDEs.
Although the discussion in this chapter is focused on JBuilder8, it also should be applicable to JBuilder9 (which was being released to the market at the time of completion of the book) and even JBuilder7 to a great extent. An example on SuSE Linux 8.2 using JBuilder8 will be demonstrated in this chapter, while the distributed and Enterprise Java applications in the later chapters will be demonstrated using Red Hat Linux 9.0. Although this approach helps in dividing the examples between the two versions of Linux discussed in this book, the examples may be tested in other versions and should be compatible to a maximum extent, within the limitations imposed by the incompatibilities for specific kernel versions.
Borland JBuilder8 IDE
JBuilder8 is a very mature edition of Java IDE from Borland Software Corporation. It provides a number of productivity features, such as visual designers, various configuration and setup wizards, and syntax checking while typing the code (without being an obstruction to the developer). The individual files in an application are grouped together as a project, and the source and compiled Java programs are kept separate. Although simple Java application development may not need a powerful IDE such as this, developing Enterprise applications will be very easy with a tool such as JBuilder8. This may be noticed from the examples built in Chapters 7 and 8, particularly as Enterprise Java applications demand interaction and integration between several files, including compiled Java classes, XML configuration files, and maintaining specific directory architecture for the packages. The Beans Express component of this tool enables rapid development of JavaBeans and the visual form designer enables rapid development of Java GUI applications. An important feature is that automatic code generation by the IDE does not prevent the manual changes to the code; rather, it enhances the entire development process. The Enterprise Edition of the product comes with a number of wizards to create almost any kind of file required in a Java application, whether it is an applet, an application, simple classes and interfaces, XML files, servlets, Java Server Pages, CORBA (Common Object Request Broker Architecture)-related files, Java (RMI) Remote Method Invocation applications, and so on. Even third-party and open source packages such as Jakarta Struts, Junit, and Cocoon are integrated within the IDE. The IDE is capable of configuring Enterprise applications for a variety of Enterprise application servers, including Borland Enterprise Server, IBM Web Sphere Application Server, Sybase Enterprise Application Server, iPlanet Application Server, open source Apache Tomcat Server for JSP support, and so on. As one would expect, developing database and desktop applications is very simple using this tool. In addition to all these features, the IDE automatically generates a large amount of skeleton code as required in the Enterprise applications; without a tool like this, one has to manually write all the skeleton code for every application and make sure that the files are integrated properly. In other words, the tool eliminates a lot of mundane work. Borland JBuilder8 is available in several editions, and the details of features and pricing may be checked with Borland Software Corporation.
A Multiple Document Interface (MDI) Application
Now we will see how simple it will be to develop a simple MDI (multiple document interface) application using JBuilder8. An MDI application contains a main window frame that acts as a container for one or more child windows. Each of the child windows is displayed as the user chooses menu options and provides the necessary user interface for the application. In the process of building this example, we will examine several Java 2 SDK classes that we have not discussed before.
From the JBuilder8 IDE, choose the File ® New menu option to invoke the object gallery, which is similar to the new items dialog in Kylix with a number of tabbed pages containing icons for invoking several dialogs. The majority of JBuilder8’s dialogs are invoked from the object gallery, and some of them are invoked by menu options from the main menu. We need to switch to the Projects page in the object gallery to create a new project. Figure 6.26 displays the object gallery with the Projects page.
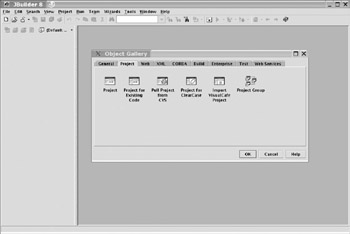
Figure 6.26: JBuilder8 Object Gallery Project page.
Double-click the Project icon to invoke the Project Wizard, which allows the users to specify project properties in three pages. Although the first page needs to be populated with the directory name and project name for the project, the default information populated in the following pages usually will be sufficient. From the first page, we can go forward using the Next button to fill in details in the remaining pages or click the Finish button to create the project. Figure 6.27 displays the first page of the Project Wizard.
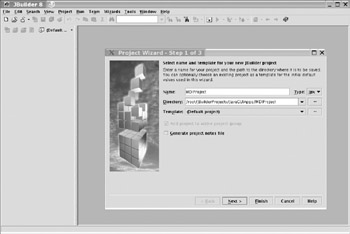
Figure 6.27: JBuilder8 Project Wizard.
It is always necessary to create a project file for every project that we create. JBuilder uses the project file name to create a separate subdirectory within the directory specified in the Project Wizard and also creates a project file in XML format. This file should not be modified manually, as it is maintained by the IDE every time we add new items to the project, remove items from the project, or change project properties, and so on. This file contains the .jpx file extension. In the current project, we named the project as MDIProject and therefore the project file is created with the name ‘MDIProject.jpx’, within the MDIProject subdirectory under the directory specified in the wizard. It may be noted that the project file name and the project subdirectory name may be specified to be different in the Wizard as required, but they are considered the same by default.
Once the project is created, next we have to create the main application file. The General page in the Object Gallery shows a number of icons for different files required in Java applications. These include icons for creating an application, class, interface, JavaBean, dialog, data module, and so on. Typically, a Java application may contain one or more class files; although all these files represent Java classes, there should be at least one class file with the main() function. It is this main() function that is executed by the JVM when the application is launched. A Java application file is created by choosing the Application icon from the object gallery and invoking the Application Wizard. Because the example is a standalone application, we need to create an application file. While the Java technology permits us to make any class executable by adding the main() function, JBuilder separates the class that implements the main() function from the class that provides the main window frame of the GUI application. A Java GUI application main window is a subclass of javax.swing.JFrame class. The application class object instantiates the main window class object when the main() function is executed by the JVM. If we did not use JBuilder or any other Java IDE, we could have made a single class derived from the JFrame class and included the main() function in itself. By separating the application class file from the main window frame class file, we are making the application modular. Figure 6.28 displays the General page of the Object Gallery, and Figures 6.29, 6.30, and 6.31 display the three pages of the Application Wizard sequentially.

Figure 6.28: JBuilder8 Object Gallery General page.
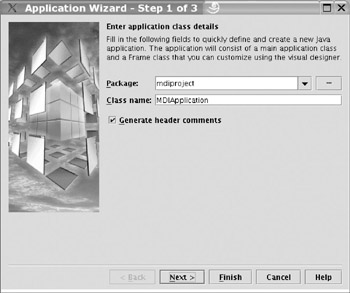
Figure 6.29: JBuilder8 Application Wizard, Page 1.
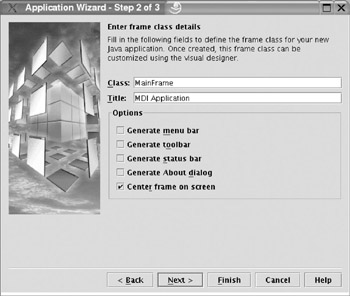
Figure 6.30: JBuilder8 Application Wizard, page 2.
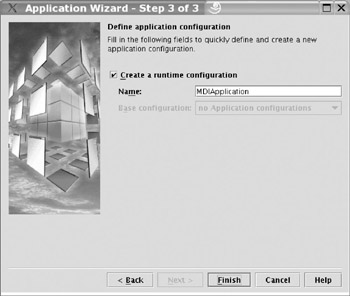
Figure 6.31: JBuilder8 Application Wizard, page 3.
In the first page of the Application Wizard, we specify the package name and the name of the main application class. The second page permits us to provide the main window class name, a title to the window, and other options to add an application menu, tool bar, status bar, and so on. By checking the appropriate boxes, we are making JBuilder create a large amount of code for us, which not only saves considerable time but also is helpful as a template code for more options to be added later to the window. The last page in the wizard displays an option to create a runtime configuration. A runtime configuration is required to run an application from the IDE itself, without leaving the IDE. Once this checkbox is checked, a runtime configuration for normal mode and debug mode is created, which will be used later to run the application in normal or debug mode. However, if this option is not checked at this time, we can create the configuration later through the Run page of the project properties dialog, which may be invoked through the Run ® Configurations IDE menu option, or through the Project ® Properties IDE menu option, or by selecting the Properties option from the pop-up menu displayed when the right mouse button is clicked after placing the cursor on the project name in the top left navigation window.
In this example, the application class file is named as ‘MDIApplication’ and the main window frame class is named as ‘MainFrame’. If we checked the option for creating an About dialog on the second page, the wizard creates an additional class derived from javax.swing.JDialog class. Once the wizard completes its task, all the three files are tightly integrated and the application should compile error free. The application can be executed by selecting the Run ® Run Project option from the IDE menu or pressing the F9 key. It should be noted at this point that we have not yet written a single line of code to create a simple GUI application. If the appropriate options were checked in the Application Wizard, we also could add a main menu, a toolbar, and a status bar very easily. However, we would like to add these features ourselves, so these options are not checked in the wizard. Let us now go through the code and note salient features. Listing 6.12 and Listing 6.13 display code for the application class and the main window frame class, respectively. These listings are available on the accompanying CD-ROM.
Listing 6.12: MDIApplication.java
package mdiproject; import javax.swing.UIManager; import java.awt.*; /** * <p>Title: </p> * <p>Description: </p> * <p>Copyright: Copyright (c) 2003</p> * <p>Company: </p> * @author not attributable * @version 1.0 */ public class MDIApplication { boolean packFrame = false; //Construct the application public MDIApplication() { MainFrame frame = new MainFrame(); //Validate frames that have preset sizes //Pack frames that have useful preferred size info, e.g. from their layout if (packFrame) { frame.pack(); } else { frame.validate(); } //Center the window Dimension screenSize = Toolkit.getDefaultToolkit().getScreenSize(); Dimension frameSize = frame.getSize(); if (frameSize.height > screenSize.height) { frameSize.height = screenSize.height; } if (frameSize.width > screenSize.width) { frameSize.width = screenSize.width; } frame.setLocation((screenSize.width - frameSize.width) / 2, (screenSize.height - frameSize.height) / 2); frame.setVisible(true); } //Main method public static void main(String[] args) { try { UIManager.setLookAndFeel(UIManager.getSystemLookAndFeelClassName()); } catch(Exception e) { e.printStackTrace(); } new MDIApplication(); } } Listing 6.13: MainFrame.java
package mdiproject; import java.awt.*; import java.awt.event.*; import javax.swing.*; /** * <p>Title: </p> * <p>Description: </p> * <p>Copyright: Copyright (c) 2003</p> * <p>Company: </p> * @author not attributable * @version 1.0 */ public class MainFrame extends JFrame { JPanel contentPane; BorderLayout borderLayout1 = new BorderLayout(); //Construct the frame public MainFrame() { enableEvents(AWTEvent.WINDOW_EVENT_MASK); try { jbInit(); } catch(Exception e) { e.printStackTrace(); } } //Component initialization private void jbInit() throws Exception { contentPane = (JPanel) this.getContentPane(); contentPane.setLayout(borderLayout1); this.setSize(new Dimension(400, 300)); this.setTitle("MDI Application"); } //Overridden so we can exit when window is closed protected void processWindowEvent(WindowEvent e) { super.processWindowEvent(e); if (e.getID() == WindowEvent.WINDOW_CLOSING) { System.exit(0); } } } The Java Swing framework is an extension of the Java AWT (Abstract Windowing Toolkit), which was introduced in the earlier versions of JDK for building GUI applications. Though AWT still exists within the Java framework and forms the foundation for the Swing library, it is recommended that new applications be built using the Swing library due to its enhanced features. The JFrame class represents an application’s main window and is typically the super class for the main window of a single document interface (SDI) type application or the parent window of an MDI application. There are other classes that are designed explicitly to provide other types of windows, such as the javax.swing.JDialog class to create a dialog style window, javax.swing.JDesktopPane class to act as the container of the main window frame to hold child windows within an MDI style application, javax.swing.JInternalPane class to provide the functionality of a child window in the MDI application, and so on. In the current example, we use the three main classes (or their subclasses)—the JFrame for the parent window, the JDesktopPane for the container of the parent window, and the JInternalFrame for the child window classes. The JBuilder IDE creates a subclass of JFrame with the name that we provided (MainFrame in this case), and all the object initiation functionality is coded within the jbInit() method, which is invoked from the constructor method within a try . . . catch block.
Now we can add more functionality to our programs, making them do the intended task, which is to work with simple text files. In the MainFrame class, we create a simple File menu with options to open an existing file in a child window, open a child window to create a new file, close the current file, and exit the application. The main menu bar of the application is an instance of javax.swing.JMenuBar class, which can hold one or more individual menus. Each of the individual menus in the menu bar is an object of javax.swing.JMenu class, and holds one or more menu items, which are instances of the javax.swing.JMenuItem class. In the example, we have one menu containing four menu items. The main frame has a default content pane (or container) that holds the components layout (to be displayed) on the frame. There are different layout manager objects that help in laying out components on the frame object, appropriate to the requirement.
As this is a typical Java GUI application, we need to implement the Java event model to capture the menu selections made by the user. The Java event model requires that an event listener object should capture the events, which is the MainFrame class in the example, and one or more components should register with the event listener object so that events generated by these components are captured by the listener. The components that generate the events are typically the GUI components such as buttons, checkboxes, menu items and so on. For the event listener class to listen to the events, it should implement the java.awt.event.ActionListener interface. This interface dictates that any class that performs the task of listening to events should implement a single method, known as actionPerformed(), which receives a reference to the java.awt.event.ActionEvent object. When the registered component generates an event, it creates an object of the appropriate event and passes its references to the event listener, which will execute the appropriate logic in its actionPerformed() method. Using this method, we can examine the source component that has generated the event and take action appropriately, as shown in the example code.
As we are building an MDI style application, we have to set a JDesktopPane object as the container for the main frame. The JDesktopPane object has necessary built-in functionality to manage child frames. Listing 6.14, which is available on the accompanying CD-ROM, may be examined to understand the concepts discussed so far.
Listing 6.14: MainFrame.java—Modified
package mdiproject; import java.io.*; import java.awt.*; import java.awt.event.*; import javax.swing.*; import java.util.*; import java.beans.*; import javax.swing.filechooser.*; /** * <p>Title: </p> * <p>Description: </p> * <p>Copyright: Copyright (c) 2003</p> * <p>Company: </p> * @author not attributable * @version 1.0 */ public class MainFrame extends JFrame implements ActionListener { JPanel contentPane; BorderLayout borderLayout1 = new BorderLayout(); JMenuBar mainMenu = new JMenuBar(); JMenu fileMenu; JMenuItem fileNew; JMenuItem fileOpen; JMenuItem fileClose; JMenuItem fileExit; JDesktopPane mainFrameDesktop = new JDesktopPane(); int xOffset = 20; int yOffset = 20; int nbrofChildrenCreated = 0; Vector childWindows = new Vector(); //Construct the frame public MainFrame() { enableEvents(AWTEvent.WINDOW_EVENT_MASK); try { jbInit(); } catch(Exception e) { e.printStackTrace(); } } //Component initialization private void jbInit() throws Exception { contentPane = (JPanel) this.getContentPane(); contentPane.setLayout(borderLayout1); this.setSize(new Dimension(700, 600)); this.setTitle("MDI Application"); this.setJMenuBar(mainMenu); mainMenu.setVisible(true); fileMenu = new JMenu("File"); mainMenu.add(fileMenu); fileNew = new JMenuItem("New"); fileMenu.add(fileNew); fileOpen = new JMenuItem("Open"); fileMenu.add(fileOpen); fileClose = new JMenuItem("Close"); fileMenu.add(fileClose); fileMenu.addSeparator(); fileExit = new JMenuItem("Exit"); fileMenu.add(fileExit); fileNew.addActionListener(this); fileOpen.addActionListener(this); fileClose.addActionListener(this); fileExit.addActionListener(this); this.setContentPane(mainFrameDesktop); } //Overridden so we can exit when window is closed protected void processWindowEvent(WindowEvent e) { super.processWindowEvent(e); if (e.getID() == WindowEvent.WINDOW_CLOSING) { System.exit(0); } } // public void actionPerformed(ActionEvent e) { if (e.getSource() == fileNew) { this.createNewWindow(); } if (e.getSource() == fileOpen) { this.openTextFile(); } if (e.getSource() == fileClose) { this.closeCurrentFile(); } if (e.getSource() == fileExit) { System.exit(0); } } public void createNewWindow() { ChildFrame childFrame = new ChildFrame("New Child Window", false); mainFrameDesktop.add(childFrame); childFrame.setLocation(nbrofChildrenCreated*xOffset, nbrofChildrenCreated*yOffset); childWindows.add(childFrame); nbrofChildrenCreated++; try { childFrame.setSelected(true); } catch (PropertyVetoException e) { } } public void openTextFile() { JFileChooser fileChooser = new JFileChooser(); fileChooser.setFileSelectionMode(JFileChooser.FILES_AND_DIRECTORIES); int selectedValue = fileChooser.showOpenDialog(this); if (selectedValue == JFileChooser.APPROVE_OPTION) { ChildFrame childFrame = new ChildFrame(fileChooser.getSelectedFile().getPath(), true); mainFrameDesktop.add(childFrame); childFrame.setLocation(nbrofChildrenCreated*xOffset, nbrofChildrenCreated*yOffset); childWindows.add(childFrame); nbrofChildrenCreated++; try { childFrame.setSelected(true); } catch (PropertyVetoException e) { } } } public void closeCurrentFile() { for (int i=0; i < childWindows.size(); i++) { ChildFrame childWin = (ChildFrame)childWindows.get(i); if (childWin == null) continue; try { if (childWin.isSelected()) { if (childWin.buffReader != null) childWin.buffReader.close(); childWin.dispose(); childWindows.remove(i); break; } } catch (IOException ex) { System.out.println(ex.getMessage()); } } } } Now we need to create a class that provides the necessary framework for a child frame. As mentioned earlier, this class should be derived from the javax.swing.JInternalFrame class. There are a couple of noteworthy components used in this class: the text area object to hold the contents of the file and the scroll pane object to provide data scrolling functionality to the text area; these are instances of javax.swing.JTextArea and javax.swing.JScrollPane classes, respectively. A text area is a data entry component where the user can enter one or more lines of text. Every time the user chooses to create a new file, an object of the child frame is created with an empty text area object to hold the contents typed by the user. Every time the user chooses to open an existing text file, a ‘File Open’ dialog is displayed so that the user can choose the file and navigate to a specific directory, if necessary. The ‘File Open’ dialog in Java is an object of javax.swing.JFileChooser class. In the child frame class, we implemented the necessary functionality to make sure that the user chooses a text file only (as opposed to a binary file such as an image file or an executable program). However, the program limits the functionality to opening a few types of text files only, whereas it can be modified to open any kind of file and process its contents. Listing 6.15 shows the child frame class source code. This listing is available on the accompanying CD-ROM.
Listing 6.15: ChildFrame.java
package mdiproject; import java.awt.*; import java.awt.event.*; import javax.swing.*; import java.io.*; import javax.swing.JInternalFrame; /** * <p>Title: </p> * <p>Description: </p> * <p>Copyright: Copyright (c) 2003</p> * <p>Company: </p> * @author not attributable * @version 1.0 */ public class ChildFrame extends JInternalFrame { // public ChildFrame() { // super("New Child Frame", true, true, true, true); // setVisible(true); // setSize(400, 300); // } JTextArea textArea = new JTextArea(); JScrollPane scrollPane = new JScrollPane(textArea); BufferedReader buffReader = null; public ChildFrame(String fileName, boolean fileExists) { super(fileName, true, true, true, true); setVisible(true); setSize(500, 400); this.getContentPane().add(scrollPane); if (!isValidTextFile(new File(fileName))) return; try { buffReader = new BufferedReader(new FileReader(fileName)); while (buffReader.ready()) { String nextLine = buffReader.readLine(); textArea.append(nextLine+"\n"); } } catch (IOException ex) { System.out.println(ex.getMessage()); } } private boolean isValidTextFile(File pathname) { boolean validTextFile = false; if (pathname.isDirectory()) validTextFile = false; // From the filename, extract the file extension. Typically Linux filenames // can have more than one '.' embedded in the path; therefore, extract the // substring that is after the last index position of '.' in the filename. String fileName = pathname.getName(); int extIndex = fileName.lastIndexOf('.'); String fileExt = ""; if (extIndex > 0) { fileExt = fileName.substring(extIndex + 1); fileExt = fileExt.toUpperCase(); } if ((fileExt == null) || (fileExt.equals(""))) validTextFile = false; if ((fileExt.equals("TXT")) || (fileExt.equals("TEXT")) || (fileExt.equals("JAVA")) || (fileExt.equals("HTML")) || (fileExt.equals("HTM")) || (fileExt.equals("XML"))) { validTextFile = true; } return validTextFile; } } When the program is compiled and executed, we can see a simple text editor application that can open existing text files, create new text files, or close the currently selected file. The program may be further extended to make it a fully functional text editor, or even a programmers’ IDE. Figure 6.32 shows the program in action, where the source code files of this example are opened in the editor.
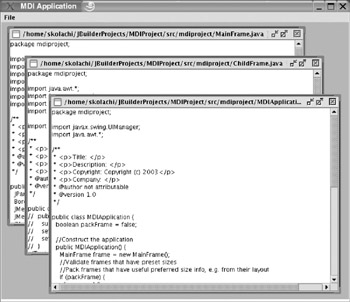
Figure 6.32: MDI Application in action.
Multiprocess and Multi-threaded Applications
A process in Linux is a program in execution, occupying some system memory and demanding other resources such as CPU time. A process is also known as the execution context of a program. When the program is sitting on the disk, it is static and hence does not perform the task for which it is created. However, when the program is loaded into memory and the CPU starts executing the instructions in the program, then it becomes a process and therefore has a state that changes dynamically as the execution progresses. If multiple instances of the same program are in execution concurrently in different address spaces, then there are two execution contexts of the same program. The memory used by the process may keep varying throughout the lifetime of the process, as it is being allocated and deallocated by respective system calls. When a program is invoked for execution by the user, or by another program or a shell script, the shell starts a new process. In fact, the shell itself is a process waiting in an infinite loop to accept and execute user commands. Each time we type a command, the shell creates a new process and executes the command in the new process address space. Because Linux is a powerful multitasking operating system, it permits us to develop multitasking applications in two ways—through multiprocess and multi-threaded applications. A multiprocess application is one that can create child processes to perform subtasks. Once the child process is created, the parent process does not execute much control on the behavior of the child process, except that it might wait for the child process to complete or it might kill the child process in emergency conditions such as if the child process falls in an infinite loop or hangs. Although the parent and child processes run in their own address spaces, the kernel maintains the special relationship between these processes as long as they live. The upside of this approach is that the parent process that initiates the child process is inherently safe, as the child process runs in its own address space and is handled by the kernel as an independent process. On the other side, multiple threads spawned by a process execute concurrently within the same address space of the process, and each thread may be considered as a stream of instructions in execution. This approach provides better control of the relationships between the threads of an application. The downside of this approach is that an inefficiently designed multi-threaded application might crash the whole application or might influence the performance of the application. However, the concept of pthreads as implemented in the latest kernel design uses a mechanism to spawn independent lightweight processes to execute multiple threads within a single process. In this section, we are going to discuss the features of multiprocess and multi-threaded applications and how they are supported in the Linux platform and vendor tools such as Kylix and JBuilder.
Every process created is assigned a new (and unique) process id by the kernel. It is the way that the kernel keeps track of the processes running in the system. The state of the process and the resources being used by it are tracked by the kernel through the process descriptor structure and other associated data structures. The process id (also known as PID) is a 32-bit unsigned integer value and is unique for every process at any point of time. The PID of the process—along with the state, PPID (current parent process id), and other details—is stored within the process descriptor data structure. The state of the process is updated every time the process attains a new state and is indicative of the current state of the process, such as whether it is running, suspended, resumed, stopped, and so on. When the system is system is booted, the kernel creates two processes, with PID 0 and 1. These are the system idle process and the init process, respectively. As discussed in Chapter 2, Linux for Windows Programmers, the init process is responsible to bring system services configured at the particular run level, and it is the predecessor and ancestor of all the processes (other than the system idle process). The ps command is used to display the status of all the currently active processes. This command has several options to extract process list matching specific criteria. Most commonly used options are –e (to list all the processes) and –f option, to indicate that full listing should be displayed; when used together, this makes up the command as shown below.
$ ps –ef
Listing 6.16 displays a typical output of the ps –ef command. For the sake of simplicity, some processes in the listing are removed because their names are wrapping around multiple lines.
Listing 6.16: Output of ps Command
UID PID PPID C STIME TTY TIME CMD root 1 0 0 18:30 ? 00:00:05 init root 2 1 0 18:30 ? 00:00:00 [keventd] root 3 1 0 18:30 ? 00:00:00 [ksoftirqd_CPU0] root 4 1 0 18:30 ? 00:00:00 [kswapd] root 5 1 0 18:30 ? 00:00:00 [bdflush] root 6 1 0 18:30 ? 00:00:00 [kupdated] root 7 1 0 18:30 ? 00:00:00 [kinoded] root 9 1 0 18:30 ? 00:00:00 [mdrecoveryd] root 953 1 0 18:30 ? 00:00:00 /sbin/klogd -c 1 -2 root 1036 1 0 18:30 ? 00:00:00 /sbin/resmgrd bin 1407 1 0 18:30 ? 00:00:00 [portmap] root 1538 1 0 18:30 ? 00:00:00 /usr/sbin/cupsd root 1835 1 0 18:30 ? 00:00:00 [khubd] root 1856 1 0 18:30 ? 00:00:00 [master] postfix 1882 1856 0 18:30 ? 00:00:00 [pickup] postfix 1883 1856 0 18:30 ? 00:00:00 [qmgr] at 1978 1 0 18:30 ? 00:00:00 [atd] root 2007 1 0 18:30 ? 00:00:00 /usr/sbin/cron root 2109 1 0 18:30 ? 00:00:00 /usr/sbin/nscd root 2110 2109 0 18:30 ? 00:00:00 /usr/sbin/nscd root 2111 2110 0 18:30 ? 00:00:00 /usr/sbin/nscd root 2112 2110 0 18:30 ? 00:00:00 /usr/sbin/nscd root 2113 2110 0 18:30 ? 00:00:00 /usr/sbin/nscd root 2114 2110 0 18:30 ? 00:00:00 /usr/sbin/nscd root 2115 2110 0 18:30 ? 00:00:00 /usr/sbin/nscd root 2140 1 0 18:30 ? 00:00:00 /usr/sbin/xinetd root 2590 1 0 18:30 ? 00:00:00 /opt/kde3/bin/kdm root 2615 1 0 18:30 tty2 00:00:00 /sbin/mingetty tty2 root 2616 1 0 18:30 tty3 00:00:00 /sbin/mingetty tty3 root 2617 1 0 18:30 tty4 00:00:00 /sbin/mingetty tty4 root 2618 1 0 18:30 tty5 00:00:00 /sbin/mingetty tty5 root 2619 1 0 18:30 tty6 00:00:00 /sbin/mingetty tty6 skolachi 2728 1 0 19:08 ? 00:00:00 kdeinit: klauncher skolachi 2731 1 0 19:08 ? 00:00:00 kdeinit: kded skolachi 2744 1 0 19:08 ? 00:00:00 kdeinit: knotify skolachi 2745 2688 0 19:08 ? 00:00:00 kwrapper ksmserver skolachi 2747 1 0 19:08 ? 00:00:00 kdeinit: ksmserver
The ps –u <user id> command may be used to list all the processes owned by the specific user id. The –u option may be combined with the –f option to get a full listing of all the processes owned by user. However, when combined with the –e option, the –u option will have no effect, as –e option takes precedence and displays all the active processes.
Ideally, one CPU can run a single process. In computer systems containing multiple processors, the kernel is able to run as many processes in parallel as there are CPUs. However, the practical situation is that many processes is expected (or initiated) to run simultaneously, although the number of processors is limited. Typically, the majority of the developers’ systems have only one CPU. Therefore, on a single CPU system, the kernel cannot run more than one process at a time; however, it creates an illusion of running multiple processes at the same time. Normally, a process keeps running until it must wait for other system resources such as I/O devices. Because I/O devices run slower compared with the CPU speed, the process wait time is longer than the process running time; there may be exceptions to this rule in case of applications involving larger computations and hence longer CPU times. The kernel utilizes the waiting time of a process to put another waiting process into running mode. Because the process execution times are typically in milliseconds, users do not notice this switching of processes by the kernel. Thus, there is an illusion created that several processes are running parallel. Also, because Linux is a preemptive multitasking operating system, the kernel is in control of deciding which process should get more time of execution in comparison to the other waiting processes; this is achieved by relative priority of the competing processes. As mentioned here, if a process is consuming longer CPU times than usual, then the programmer must control this tendency by periodically relinquishing the CPU resource to other processes by way of implementing inherent waiting cycles. This type of control is performed through multi-threaded applications.
Traditional UNIX kernels create a child process through the fork() system call. When the fork() system call is executed, the kernel creates a new process, duplicates the process descriptor from the parent, and assigns it to the child process. The fork() system call returns a PID value of 0 to the child process while the PID of the child process is returned to the parent process; this is the basic difference between the newly created process and the one that executed the fork() system call. At this time, the child process looks exactly like the parent process. However, an exec system call must be performed on the child process (with PID 0). Then the child process turns out to be different from the parent process, as it creates its own data structures based on the program being executed. The program being executed and the list of arguments are passed to the child process as null-terminated character arrays. The Linux kernel performs slightly different procedures to improve the performance of process creation. These include the lightweight processes and the clone() and vfork() system call. The __clone() function in Linux may be used to execute a specific function in a separate process and is created to invoke the clone() system call internally and then execute the function specific to the child process. This is typically the mechanism used by multi-threaded processes in Linux.
While a majority of older Enterprise UNIX applications implemented the fork() and exec() style multiprocesses, the addition of pthreads library to UNIX as well as Linux has made it possible to design complex multi-threaded applications. In particular, the lightweight process-based design of multiple threads makes the multi-threaded applications more robust and efficient. Enterprise tools such as Kylix and JBuilder are capable of supporting multi-threaded applications, as we are going to discuss in this section. These tools hide the internal design from the developer and provide a sophisticated approach to building multi-threaded applications, in a way that is very similar to the Microsoft Windows operating system. In fact, a Windows-based multi-threaded application developed using the CLX component library has the source-code level compatibility when moved to Linux, while the Java-based multi-threaded application has the byte-code level compatibility, and the individual JVM on each of the operating systems handles the internal threading techniques as supported by the respective operating system.
Before we look into the examples of multi-threaded applications, let us identify the scenarios that are in favor of multiple-threads as against those that are not recommended. In a typical situation, a background process should be running continuously, receiving data either from another process or from an external source, while a foreground process should be utilizing this data, as in the case of a financial application that continuously receives stock market data, say on a subscription basis, and a GUI (or Web-based) application displays this information for those who are interested in it. One way of implementing this kind of business scenario is to store the data in a local database (or on disk files); the foreground process can read from the data store. This may be done by two distinct processes, which are not necessarily multiple threads in an application. However, in most cases, it may not be necessary to save the data; in such a situation, implementing a background and a foreground thread within the same application might be a better alternative. Processes that need to access slow devices—such as printers, scanners, video cameras, and so on—should be set to run in separate threads of their own. In circumstances where fewer resources may have to be shared across processes, multiple threads within a single application process would function more efficiently than distinct multiple processes because the threading model implements lightweight processes and because the communication (or interaction) between multiple threads within a single process is more efficient than interprocess communication. Multi-threaded applications (and also multiprocess applications) certainly give a higher level of performance on computers running with multiple processors. Having said all this, it should not be misinterpreted that multi-threaded applications always improve performance. There are many circumstances that do not demand multiple threads to be running, and if multiple threads are implemented in such situations, the application might become a performance bottleneck for itself as well as for other processes. Typically, when multiple threads are set to run in an application, it is the responsibility of the programmer to ensure that these threads do not compete with each other in a race that could lead to a deadlock condition and the program might hang (which means the program does nothing because neither thread can enter into the run state). On the other hand, the multiple threads of the application might try to access the same (common) data segment in memory or might attempt to update the database data in an inconsistent way. For example, one thread might insert rows into a table while the other thread might delete or update the same rows before the first thread could even complete its run, leaving the database in an inconsistent state. This kind of situations are handled programmatically by dictating that certain critical sections of the application are accessed and executed by only one thread at a time; a second thread can enter the critical sections of the program only after the previously running thread exits that point. This is known as thread synchronization. Therefore, it is not always a pleasure (in fact, it is usually not a pleasure) to write multi-threaded applications; rather, it is need that drives multi-threaded development.
|
| < Day Day Up > |
|
EAN: 2147483647
Pages: 86
- Challenging the Unpredictable: Changeable Order Management Systems
- The Second Wave ERP Market: An Australian Viewpoint
- Intrinsic and Contextual Data Quality: The Effect of Media and Personal Involvement
- Healthcare Information: From Administrative to Practice Databases
- A Hybrid Clustering Technique to Improve Patient Data Quality