Customizing the Boot Sequence
|
|
Most Windows operating systems automatically configure the default boot sequence. However, there are many users who may need to modify this. For example, if you have a multi-boot system, you may need to change the default operating system. Sometimes you may need to increase the default interval when the boot menu is displayed, add custom logo files, and so forth. We'll discuss all the methods of customizing the boot sequence. These methods aren't complicated, and any system administrator, support specialist, or advanced user should know them.
A detailed description of all the processes that take place when Windows NT/2000/XP is booting is provided in Chapter 6; you'll also find the role of the system registry in the boot process there.
To customize the boot sequence of Windows NT/2000/XP, you only need to edit a single INI file: Boot.ini. This file resides in the root directory of the system partition. This file is required for Windows NT/2000/XP to boot; because of this, it has the Hidden, System, and Read-only attributes set.
 | Starting with Windows 2000, the developers included some protective measures that were meant to protect beginners from themselves. One of these new devices is known as "super-hidden" files. By default, Windows Explorer doesn't display files that have both Hidden and System attributes. These files are considered protected operating system files, and shouldn't be modified or even seen by ordinary users. The default list of these files includes all the files required for starting the operating system, including the Boot.ini file. |
However, you can always use a command line. To view all the files independently from their attributes, use the following command: dir /a.
To be able to view these files using Windows Explorer, log in to the local system as an Administrator (otherwise you won't get the results you need). Start the Folder Options applet in Control Panel or select the Folder Options command from the Tools menu in Windows Explorer or My Computer. The dialog shown in Fig. 4.1 will open. Go to the View tab, and then go the Advanced Settings field. Set the Show hidden files and folders option and clear the Hide protected operating system files (Recommended) checkbox.
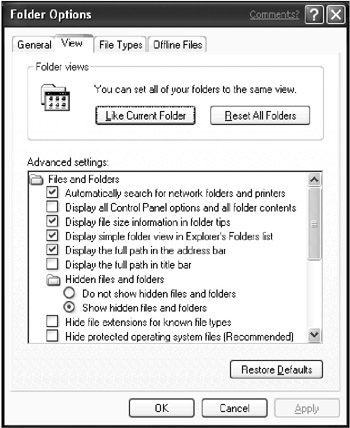
Fig. 4.1: The View tab of the Folder Options window
The Simplest Method of Editing the Boot.ini File
If you have enough experience using the Boot.ini file format, you can edit it manually using any text editor. For an advanced user, this won't be difficult. However, for a beginner, the easiest method of editing this file is to use the System applet from the Control Panel. This option allows you to specify the time interval for which the boot loader will display the boot menu, thus allowing you to select the operating system (for multi-boot systems). This option also allows you to specify the default operating system that will be loaded when this interval expires and you don't select an option from the boot menu. To configure these options in Windows NT 4.0, start the System applet from Control Panel, go to the Startup/Shutdown tab, and set the options you need using the System Startup option group.
 | Starting with Windows 2000, this functionality has undergone significant changes, and Windows XP introduces further enhancements. Let us consider these new features in more detail (Windows XP enhancements will be specially emphasized). |
To specify the boot parameters, open the Control Panel window and double-click the System icon. The System Properties window will open. Go to the Advanced tab (Fig. 4.2) and click the Startup and Recovery button.
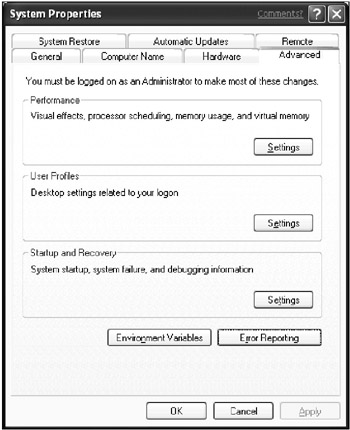
Fig. 4.2: The Advanced tab of the System Properties window (Windows XP)
 | A careful look at the Advanced tab of the System Properties window reveals one of the Windows XP enhancements—the so-called Error Reporting Options, introduced by Microsoft in order to encourage users to help developers improve future versions of the operating system. Any time an error occurs, Windows XP displays a dialog prompting the user to produce an error report and send it to Microsoft. This option is enabled by default, but if you want to customize its settings or totally disable the feature, click the Error Reporting button in the Advanced tab of the System Properties window. The Error Reporting window will open (Fig. 4.3), where you can disable the reporting feature altogether or customize its options by choosing the programs that you want to include or exclude from error reporting. To customize the program list, select the Programs option (Fig. 4.3), and then click the Choose Programs button to open the Choose Programs window (Fig. 4.4). In this window, you can change the default reporting mode by setting one of the radio buttons in the Default reporting mode option group. If you set the second option, Do not report errors in any programs, you'll be able to edit the lists of programs included or excluded from error reporting. |
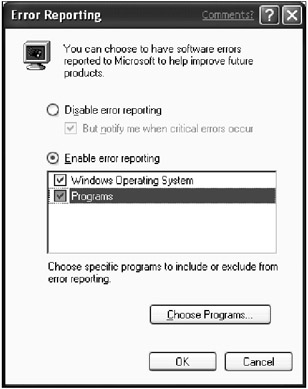
Fig. 4.3: Windows XP provides new error reporting options
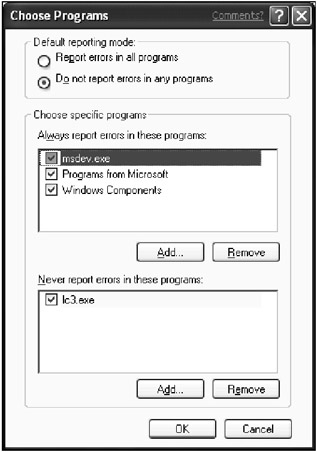
Fig. 4.4: The Choose Programs window
To set the boot and system behavior parameters, click the Startup and Recovery button at the Advanced tab of the System Properties window. The Startup and Recovery window will open (Fig. 4.5).
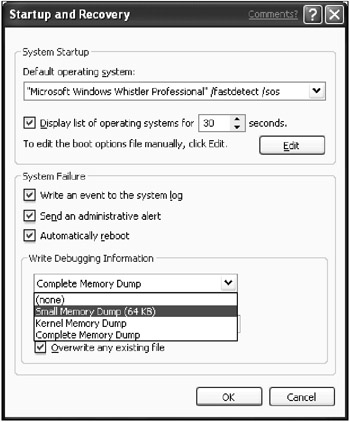
Fig. 4.5: The Startup and Recovery window
At the top of this window is the System startup option group that allows you to specify the default operating system and set the time interval when the system will display the boot menu.
 | In Windows 2000, the System startup options are the same as those in Windows NT 4.0, but Windows XP provides a very convenient enhancement—now the System startup group provides the option of manually editing the Boot.ini file. To do so, simply click the Edit button (Fig. 4.5). |
The most interesting option group is System Failure, which allows you to specify system behavior in case a STOP error occurs (these errors are also known as kernel errors or "blue screens"). Let's look at these options in more detail.
If you need to identify a problem and find out what caused it, you shouldn't overlook the system log. Because of this, I recommend that you set the Write an event to the system log checkbox. If this option is enabled, the system will register an event in the system log any time a STOP error occurs. An example illustrating what this record looks like is shown below:
Event ID: 1001 Source: Save Dump Description: The computer has rebooted from a bugcheck. The bugcheck was : 0xc000021a (0xe1270188, 0x00000001, 0x00000000, 0x00000000). Microsoft Windows NT (v15.1381). A dump was saved in: C:\WINNT\MEMORY.DMP.
If you set the Send an administrative alert checkbox, the system will send an administrative alert to the network administrator's workstation any time a STOP error occurs.
Finally, if you need to get the computer up and running as soon as possible, you can configure it to reboot automatically whenever a STOP error occurs. To enable this option, set the Automatically reboot checkbox.
| Note | The following tip explains how to edit the Windows NT/2000/XP registry to make the system reboot automatically when a STOP error occurs. Open the system registry using Regedit.exe, expand the HKEY_LOCAL_MACHINE\SYSTEM\CurrentControlSet\Control\CrashControl\ key, and set the Autoreboot value to 1. Theoretically, this tip is correct, but there's a much easier way to accomplish it. Just set the Automatically reboot checkbox in the Startup and Recovery window. |
If STOP errors persist, you need to find out what's causing them. The best way to do this is to analyze the memory dump. To instruct the system to create a memory dump when a STOP error occurs, use the Write Debugging Information option. To specify the name of a file in which to store the debugging information, fill in the Dump File field. If you need to overwrite the contents of this file when the memory dump is created, set the Overwrite any existing file checkbox. Note that these options haven't changed since the release of Windows NT 4.0.
Starting with Windows 2000, Microsoft included an extended function for saving the memory dump. If you're an experienced Windows NT user, you'll remember that Windows NT 4.0 dumps the entire contents of the physical memory. The size of the memory dump file generated by this system is slightly larger than the amount of physical memory that's present on the computer. Since STOP errors initiate in the system kernel, it's the kernel data (for example, the state of a system at the time of a crash, including what applications were active, what device drivers were loaded, and what code was being executed) that's of interest to the support specialists analyzing the dump. User-mode data isn't useful for determining the cause of a crash. It just contributes to the size of a crash dump file.
Because of this, starting with Windows 2000, the developers included a new option in the Startup and Recovery window. This option provides you with some control over the size of the crash dump. The first combobox from the Write Debugging Information option group allows you to select the mode used for saving the crash dump. Besides the capability of saving the complete dump (this option is similar to the one existing in Windows NT 4.0), Windows 2000 provides a Kernel Memory Dump option that allows you to exclude application (user-mode) data. Only kernel information will be stored in the crash dump. All Windows 2000-compatible crash analysis tools, including Dumpexam and WinDbg, will interpret this file correctly. This option allows you to save disk space (the amount will be different for each system; it also depends on the type of crash). For example, my own experience has shown that on computers having 128 MB RAM, a complete crash dump will consume about 128 MB (actually a little more); while a kernel dump will only consume about 40 MB.
 | Windows XP enhances this functionality even further by providing an additional option—namely, the Small Memory Dump, which allows you to limit the dump to 64 KB (see Fig. 4.5). |
Editing the Boot.ini File Manually
As was already mentioned, Windows XP provides a very convenient way of editing the Boot.ini file. However, if you are working with Windows NT/2000, and still want to use a text editor to open the Boot.ini file for editing, clear the Read-Only attribute. This is necessary to save your changes.
To do this, run the following command from the command line:
attrib -r boot.ini
Boot.ini File Format
The Boot.ini file is automatically created by the Setup program when installing the operating system. This file is located in the root directory of the system partition, and is needed by the boot loader to display the boot menu (the screen that allows the user to select the operating system).
A typical example of the Boot.ini file is shown below:
[Boot Loader] Timeout=5 Default=multi (0) disk (0) rdisk (0) partition (2) \WINXP [Operating Systems] multi (0) disk (0) rdisk (0) partition (2) \WINXP="Microsoft Windows XP Professional" /fastdetect multi (0) disk (0) rdisk (0) partition(3) \WINNT="Microsoft Windows 2000 Professional" /fastdetect /noguiboot multi (0) disk (0) rdisk (0) partition (7) XPRC1="Microsoft Windows XP Professional" /fastdetect multi (0) disk (0) rdisk (0) partition (9) \WINDOWS="Microsoft Windows 2002 Server (Tchek)" /fastdetect multi (0) disk (0) rdisk (0) partition (8) \WINDOWS="Microsoft Windows XP Home Edition (RC2 Tchek)" /fastdetect multi (0) disk (0) rdisk (0) partition (1) \WINDOWS="Microsoft Windows Whistler Professional" /fastdetect /sos C: \CMDCONS\ BOOTSECT.DAT="Microsoft Windows Recovery Console" /cmdcons C:\="Microsoft Windows" C: \="Microsoft Windows"
The Boot.ini file contains two sections: [boot loader] and [operating systems]. Both of these sections are described below.
The [boot loader] Section
The parameters contained in this section are described in Table 4.1.
| Parameter | Description |
|---|---|
| | |
| Timeout | The number of seconds the boot loader provides for the user to select an operating system from the boot menu displayed on the screen. If the time interval expires and the user doesn't choose an operating system, NTLDR will start loading the default operating system. If this value is set to 0, the boot loader starts loading the default operating system immediately without displaying the boot loader screen, which prevents the user from making a choice. If this value is set to -1, the boot loader will wait until the user selects an operating system. Note that you must edit the Boot.ini file to set this value since the System option in the Control Panel interprets it as invalid |
| Default | The path to the default operating system |
 | The startup menu does not appear if Windows XP is the only system installed on your computer. In this case, Ntldr ignores the time-out value and starts Windows XP immediately. |
The [operating systems] Section
This section contains the list of available operating systems. Each record contained in this section specifies the path to the boot partition of the operating system, the string displayed in the boot loader screen, and optional parameters.
The Boot.ini file supports the capability of loading multiple Windows NT/2000/XP installations, as well as starting other operating systems, including Windows 9x, MS-DOS, OS/2, LINUX, and UNIX.
The entries contained in the [operating systems] section of the Boot.ini file support several optional switches described in Table 4.2. Note that these switches aren't case-sensitive. Switches that are introduced with Windows 2000 (Win2K) are marked with an asterisk (*).
| Switch | Description |
|---|---|
| | |
| /BASEVIDEO | This switch causes Windows NT/2000 to load using a standard VGA driver. If you've installed a new video driver that isn't working correctly, this switch will allow you to start the computer so you can change the video driver |
| /BAUDRATE | This switch enables kernel-mode debugging (it also sets the /DEBUG parameter) and specifies the baud rate to be used for this purpose. If you don't set the baud rate, a default value will be used. If a modem is attached, the default baud rate is 9,600 (for a null-modem cable, the default baud rate is 19,200) |
| /BOOTLOG* | If this switch is specified, Windows 2000 will write the boot process log into the %SystemRoot%\NTBTLOG.TXT file. This log will enable you to find out which drivers were loaded successfully, and which weren't |
| /CRASHDEBUG | If you include this switch, the kernel debugger is loaded when the system boots, but remains inactive unless a crash occurs. This allows the specified COM port (or COM1 by default) to be available for other uses while the system is running. This switch is especially useful if your system is subject to random STOP errors |
| /DEBUG | Enables kernel-mode debugging. The debugger is loaded when the system boots, and can be activated at any time by a host debugger that's connected to the computer. This mode is recommended when STOP errors are persistent and reproducible |
| /DEBUGPORT=comx | Enables kernel-mode debugging and specifies an override for the default serial port (COM1) that the remote debugger's connected to. For example: /DEBUGPORT=COM2 |
| /FASTDETECT* | This switch is new to Windows 2000. When you dual boot NT 4.0 and Windows 2000, the Windows 2000 version of NTDETECT.COM is used during the boot process. In Windows 2000, detection of parallel and serial devices is performed by plug-and-play device drivers. Windows NT 4.0, however, expects NTDETECT to perform the detection. Specifying FASTDETECT causes NTDETECT to skip parallel and serial device enumeration for a boot into Windows 2000; whereas omitting the switch has NTDETECT perform enumeration for a boot into Windows NT 4.0. Windows 2000 Setup program automatically recognizes dual-boot configurations and sets this switch for BOOT.INI lines that specify a Windows 2000 boot |
| /MAXMEM | This option will limit Windows NT/2000 to using only the amount of memory you specify. The number is interpreted as MB. For example: /MAXMEM=16 would limit NT to using 16MB of the system's memory. This option is useful if you suspect that a memory chip is bad |
| /NODEBUG | Prevents kernel-mode debugging from being initialized. Overrides the specification of any of the three debug-related switches, /DEBUG,/DEBUGPORT, and /BAUDRATE |
| /NOGUIBOOT* | This switch is new to Windows 2000. When this option is specified, the VGA video driver that's responsible for presenting bitmapped graphics during Win2K's boot process isn't initialized. The driver is used to display boot progress information, as well as to print the Blue Screen crash screen. Disabling it will disable Win2K's ability to do those things as well |
| /NOSERIALMICE=[COMx, Y, Z,…] | Disables serial mouse detection of the specified COM port(s). Use this switch if you have a component other than a mouse attached to a serial port during the startup sequence. If you use /NOSERIALMICE without specifying a COM port, serial mouse detection is disabled on all COM ports |
| /SAFEBOOT* | This option is new to Windows 2000. You should never have to specify this option manually, since NTLDR does it for you when you use the F8 menu to perform a safe boot. Following the colon in the option, you need to specify one of three additional switches: MINIMAL, NETWORK, or DSREPAIR. The MINIMAL and NETWORK flags correspond to a safe boot with no network and a safe boot with network support |
| /SOS | This switch causes Windows NT/2000/XP to print information about what drivers are being loaded as the system boots. It's useful when Windows NT/2000/XP won't start and you suspect that a device driver is missing |
The list of Boot.ini switches shown above shouldn't be considered a complete list since it only includes the most frequently used switches. The most complete and up-to-date list of Boot.ini switches can be downloaded from http://www.sysinternals.com/bootini.htm.
|
|
EAN: 2147483647
Pages: 144