Managing Registry Security
|
|
To manage registry security, Windows XP Registry Editor provides the Permissions command. Using this command, you can edit registry key permissions and set the rules of auditing registry key access.
 | It should be noted that in Windows NT/2000 these capabilities were only available in Regedt32.exe. As you remember, Regedt32.exe had a special Security menu, which allowed you to specify registry key permissions and establish auditing rules. In Windows XP this functionality was delegated to Regedit.exe. Notice that registry key permissions can be set independently from the file system type on the disk partition containing Windows XP files. |
This chapter provides only a brief overview of these functions and general instructions on performing operations needed to protect the registry.
More detailed information on these topics will be provided in Chapter 9, which is dedicated to registry protection.
As in previous Windows NT/2000 versions, Windows XP provides the following capabilities for protecting the system and managing security:
-
All access to system resources can be controlled
-
All operations that access system objects can be registered in the security log
-
A password is required for accessing the system, and all access operations can be logged
Setting Registry Key Permissions
The Permissions command opens the Permissions for the <Keyname> window intended for viewing and setting registry key permissions. The capability of setting registry key permissions doesn't depend on the file system used to format the partition that contains Windows XP files.
| Note | Changing registry key permissions can lead to serious consequences. For example, if you set the No Access permission for the key required for configuring network settings using the Control Panel applet, this applet won't work. Full Control permissions to the registry should be assigned to the members of the Administrators group and the operating system itself. This setting provides the system administrator with the capability of restoring the registry key after rebooting the system. |
Since setting registry key permissions can lead to serious consequences, reserve this measure for the keys added in order to optimize software, or other types of customizing the system.
| Note | If you change permissions for the registry key, I recommend that you also audit the key access (or at least audit the failed attempts of accessing this key). A brief overview of registry auditing will be provided later in this chapter. |
The Permissions command follows the principles used by the Explorer commands to set file and folder permissions on NTFS partitions. To set registry key permissions, proceed as follows:
-
Before modifying registry key permissions, backup the registry keys you're going to modify.
-
Select the key for which you're going to set permissions, and then select the Permissions command.
-
The Permissions for <Keyname> window allowing you to specify registry key permissions (Fig. 3.20) will open. Windows XP provides lots of enhancements, including security enhancements. However, the main types of access permissions and basic principles of setting these permissions are similar to the ones found in previous versions of Windows NT/2000. Select the name of the user or group from the list at the top of this window, and then set the required access level by selecting the option you need from the Permissions for <Username> list provided below. Brief descriptions of the available access types (Read, Full Control, and Special Permissions) are listed in Table 3.3. To set permissions for a selected registry key, proceed as follows:
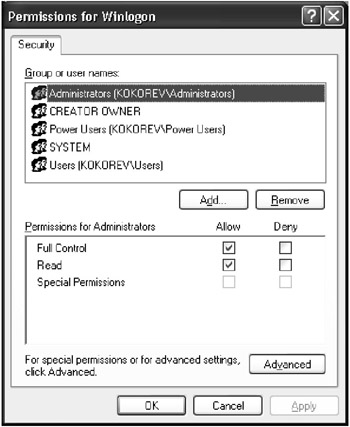
Fig. 3.20: The Permissions for <Keyname> window allows you to specify registry key permissions-
From the list at the top of this window, select the user or group for which you need to set registry key permissions. If the user or group needs the capability of reading, but not modifying, the key, set the Allow checkbox next to the Read option.
-
If the user or group needs the capability of opening the selected registry key for editing ownership, set the Allow checkbox next to the Full Control option.
-
To assign the user or group a special combination of permissions (special permissions), click the Advanced button.
-
| Permission type | Description |
|---|---|
| | |
| Read | Users who have permission to access this key can view its contents, but can't save any changes |
| Full Control | Users who have permission to access this key can open the key to edit its contents, save the changes, and modify access levels for the key |
| Special Permissions | Users who have permission to access this key have individual combinations of access rights for the selected key. A detailed description of all these types and their combinations will be provided later in this chapter |
-
Set the system audit for registry access (more detailed information on this topic will be provided later in this chapter). Audit the system carefully over a period of time to make sure that new access rights have no negative influence on the applications installed in your system.
Specifying Advanced Security Settings
To set special access types for a Windows 2000/XP registry key, click the Advanced button in the registry key permissions dialog (see Fig. 3.20). The Advanced Security Settings for <Keyname> window will open (Fig. 3.21).
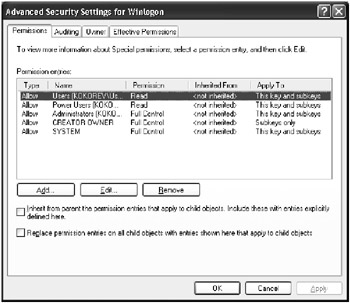
Fig. 3.21: The Permissions tab of the Advanced Security Settings for <Keyname> window
If you're setting permissions for the registry subkey and want this subkey to inherit permissions from its parent key, set the Inherit from parent the permission entries that apply to the child objects … checkbox.
If you're setting permissions for the parent key and want all its subkeys to inherit permission to the selected key, set the Replace permission entries on all child objects… checkbox.
Double-click the name of the user or group for which you need to set special access (or select the name and click the Edit button). The dialog shown in Fig. 3.22 will appear. In the Permissions list, set Allow or Deny checkboxes next to the type of access that you need to allow or deny for the selected user or group. The list of special access options is provided in Table 3.4. Note that the list doesn't differ from the similar list in Windows NT 4.0 and Windows 2000.
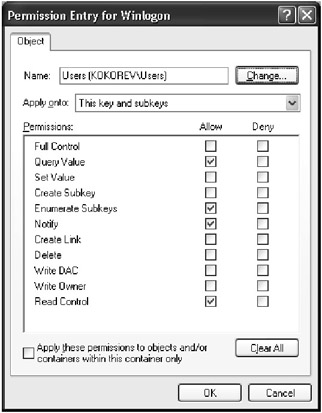
Fig. 3.22: The Permission Entry window
| Checkbox | Description |
|---|---|
| | |
| Query Value | Allows the user to read values within the selected registry key |
| Set Value | Allows the user to set values within the selected registry key |
| Create Subkey | Allows the user to create subkeys within the selected registry key |
| Enumerate Subkeys | Allows the user to identify the subkeys within the selected registry key |
| Notify | Allows the user to audit this key |
| Creat Link | Allows the user to create symbolic links in the selected registry key |
| Delete | Allows the user to delete the selected registry key |
| Write DAC | Allows the user to access the key and create or modify its Access Control List (ACL) |
| Write Owner | Allows the user to take ownership of this registry key |
| Read Control | Allows the user to view the security parameters set for the selected registry key |
Taking Registry Key Ownership
As a system administrator, you may take ownership for any registry key and restrict access to this key. Anyone who logged in to the local system as a member of the Administrators group may take ownership of any registry key. However, if you have owner rights without full control access type, you won't be able to return this key to its initial owner at a later time, and the appropriate message will appear in the security log.
To take ownership of the Windows XP registry key, proceed as follows:
-
Select the registry key for which you have to take ownership.
-
Select the Permissions command from the Edit menu.
-
Click the Advanced button. The Advanced Security Settings for <Keyname> window will open. Go to the Owner tab (Fig. 3.23).
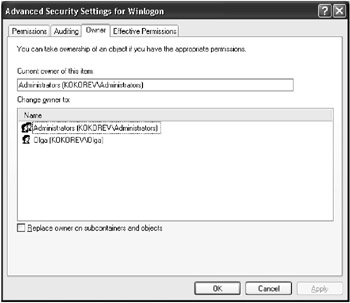
Fig. 3.23: The Owner tab of the Advanced Security Settings for <Keyname>window -
Select the new owner from the Change owner to list and click OK.
| Note | If you need to change the owner for all nested objects of this key as well, set the Replace owner on subcontainers and objects checkbox You can change the registry key owner only if you log in as an Administrator (or a member of the Administrators group) or if the previous owner has explicitly assigned you owner rights for this key. |
Registry Auditing
Auditing is the process used by Windows NT/2000/XP for detecting and logging security-related events. For example, any attempt to create or delete system objects, or any attempt at accessing these objects are security-related events. Note that in object-oriented operating systems, anything is considered an object, including files, folders, and registry keys. All security-related events are registered in the security log file. Auditing isn't activated in the system by default. So if you need to audit security-related events, you'll need to activate the audit. After the system audit has been activated, the operating system starts logging security-related events. You can view information registered in the security log using Event Viewer. When establishing auditing, you can specify the types of events to be registered in the security log, and the operating system will create a record each time the specified event type occurs in the system. The record written to the security log contains an event description, the name of the user who performed the action corresponding to the event, and the event date/time information. You can audit successful and failed attempts, and the security log will display both the names of the users who performed successful attempts and the names of the users whose attempts failed.
Detailed information on this topic and tips on auditing registry access are provided in Chapter 9, which is dedicated to registry protection.
Note that in Windows NT 4.0 Workstation, you activate the audit using the User Manager utility. In Windows NT 4.0 Server, the same operation is done using the User Manager for Domains utility. In Windows 2000 and Windows XP, this task is accomplished using the Group Policy Editor in the MMC console window. Having activated the system audit, log in to the system several times as different users and administrators, and observe the various types of security-related events for a period of time.
To establish registry auditing, proceed as follows:
-
Activate the audit and set the audit policy for each event that requires auditing
-
Specify users and groups whose access to the specified registry keys should be audited
-
Use the Event Viewer for viewing the audit results in the Security log
To perform any of the actions mentioned above, you need to log in to the local system as a member of the Administrators group. The audit policy is specified individually for each computer. Before you can set the registry auditing policy, you need to activate the audit in the system. Regedit.exe will display an error message (Fig. 3.24) if you attempt to set registry auditing without activating the audit in the system.
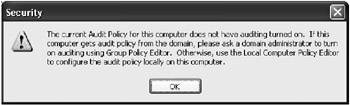
Fig. 3.24: Error message displayed if you attempt to set registry auditing without first activating the audit in the system
Activating System Auditing
To activate system auditing in Windows 2000 and Windows XP, proceed as follows:
-
From Control Panel, start the Administrative Tools applet and select Local Security Policy.
-
The MMC console window will open. Expand the console tree in the left pane and select the Audit Policy option (Fig. 3.25). The right pane of the window will display the list of event types that can be audited.
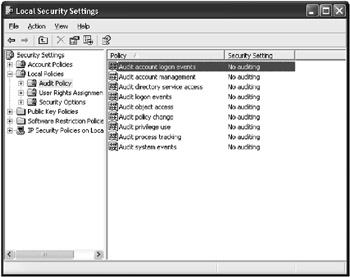
Fig. 3.25: System auditing in Windows 2000/XP is activated using the Local Security Policy MMC snap-in -
Double-click one of the list items in the right pane. A new window will open (Fig. 3.26) where you need to set the audit options. Notice that, similar to the previous versions of Windows NT/2000, Windows XP allows you to audit both successful and failed attempts. Set auditing options for the Audit object access event type
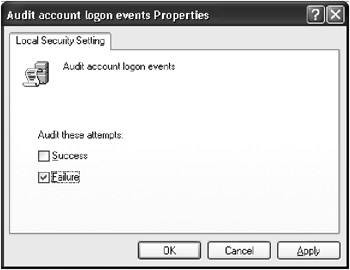
Fig. 3.26: Like Windows NT/2000, Windows XP allows you to audit both successful and failed attempts
Having activated the system audit, you now need to set the audit for the registry keys. I recommend that you audit the following registry keys:
-
Registry keys accessed and modified by users and application programs
-
Registry keys needed by the custom applications you have to test
Auditing the Registry
To set the auditing options for the Windows 2000/XP registry, proceed as follows:
-
Select the key that you need to audit
-
Select the Permissions command from the Edit menu, and then click the Advanced button. The Advanced Security Settings for <Keyname> window will open Go to the Auditing tab (Fig. 3.27).
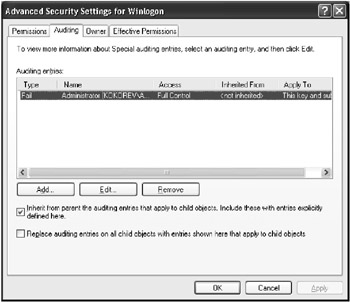
Fig. 3.27: The Auditing tab of the Advanced Security Settings for <Keyname>window -
If you are setting the auditing options for this key for the first time, the Auditing Entries list will be blank Click the Add button below this list, select the users and groups whose activity you need to audit, and add them to the list.
-
To audit the activity of a certain user or group, select the name of this user/group from the Auditing Entries list, and click the Edit button. The dialog shown in Fig. 3.28 will appear. In the Access list, set the Successful and/or Failed checkboxes for the access types that require auditing.
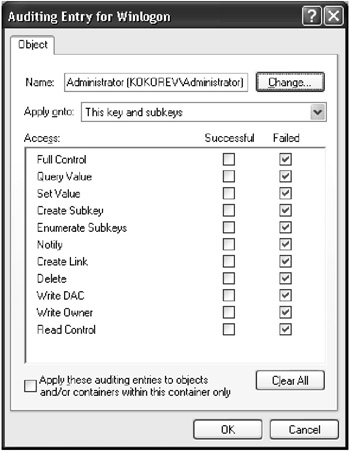
Fig. 3.28: The Auditing Entry for <Keyname> window
The auditing options available to you are described in Table 3.5. Note that the set of options hasn't changed from those in Windows NT/2000.
| Auditing option | Description |
|---|---|
| | |
| Query Value | Accessing the key with the right to query the value |
| Set Value | Opening the key with the right to set the value |
| Create Subkey | Opening the key with the right to create subkeys |
| Enumerate Subkeys | Opening the key with the right to enumerate its subkeys. This option controls events which open the keys and attempts to get a list of the subkeys contained within the key being opened |
| Notify | Accessing the key with the right to notify |
| Create Link | Opening the key with the right of creating symbolic links within this key |
| Delete | Deleting the key |
| Write DAC | Attempts to modify the list of users who have access to this key |
| Read Control | Reading owner-related information on this key |
| Note | To set the registry key auditing, you need to log in to the local system as an Administrator or a member of the Administrators group. If the local computer is connected to the network, then network security policy may prevent you from auditing the registry keys. |
To view the auditing results, select the Programs | Administrative Tools | Computer Management commands from the Start menu. Expand the console tree in the left pane of the MMC window by selecting the System Tools | Event Viewer | Security Log options. The right pane will display a list of security-related events. Viewing this list is similar to viewing the security log in Windows NT 4.0.
Options included in other menus, such as Window and Help, are standard for most Windows applications.
|
|
EAN: 2147483647
Pages: 144